A reliable woodworking glue-up starts before the glue is open: dry-fit the assembly, plan where each clamp will go, and prepare cauls and cleanup supplies. During clamping, tighten gradually and evenly—use only enough pressure to close a well-fitting joint, while checking that the boards stay aligned and the panel stays flat.
What to prepare before a glue-up
Glue makes parts slippery and puts the assembly on a clock. A complete dry run lets you find fit, access, and sequencing problems while you can still correct them without rushing. WoodworkingWeb recommends dry-fitting and planning the clamping sequence before applying adhesive (WoodworkingWeb’s clamping and glue-up guide).
- Assemble the parts without glue and confirm that the joints close properly.
- Check that clamps can reach their positions without colliding with one another or obstructing the work.
- Make sure you can bring the assembly square, and decide the order in which you will tighten the clamps.
- Set out any cauls, protective pads, painter’s tape, and cleanup supplies you will need.
For difficult-to-reach inside corners, apply painter’s tape before assembly so glue squeeze-out does not end up where it is hard to remove. Lee Valley also recommends planning ahead for slippery wet glue and protecting areas where cleanup will be difficult (Lee Valley’s gluing strategies and techniques).
How to clamp without shifting or distorting the assembly
- Apply adhesive according to its maker’s current instructions, then bring the parts together in the sequence you rehearsed during the dry fit.
- Bring clamps into contact and tighten them gradually in sequence rather than fully tightening one clamp at a time. Check the joint line, alignment, and squareness as you go.
- For a panel, alternate clamps above and below the boards. This balances the clamps’ bending force and helps limit bowing.
- Stop tightening once the joints are closed and a small, continuous line of squeeze-out is visible. If a joint needs substantial force to close, release pressure and inspect the fit rather than cranking harder.
A thin, even line of squeeze-out is a useful visual check that adhesive has reached the joint; it is not a reason to keep tightening. Excessive force can bow or distort the assembly and push out too much glue. WOOD Magazine and WoodworkingWeb both advise using controlled pressure rather than treating more force as a fix for a poor fit (WOOD Magazine’s glue-up guidance; WoodworkingWeb).
Free tools Windows power users keep installed
One-click scans. No signup required.
#1 Best Overall

- The 4-Way Panel Clamp:With parallelogram couplers, our 2 pack panel clamps are very convenient to use. It clamps in two directions at once, making it easier to achieve flat panels and flush joints.
- Easy to Use: With parallelogram-action couplers and fix pins, it is easy to adjust the width and thickness you need and continuous apply pressure from all sides. (Tips: Although the operation process is simple, please follow the instructions or video instructions to use it to bring a better experience. )
- Durable Quality: These clamps are made by steel pipe with a durable powder-coat finish and copper thread bushing to ensure that the retaining pins are durable and strong,making it a reliable and precision tool. The special surface treatment allows the glue spilled during the panel splicing process to be easily removed by hand or knife, and is not easy to damage the surface of the panel fixture.
- Versatile Adjustable: Our panel clamps are designed to accommodate panels up to 24'' wide and thicknesses ranging from 1/4" to 3", making it perfect for panel clamp woodworking projects of various sizes and dimensions.
- Ideal Projects: Perfect for medium panel clamp woodworking projects such as cutting boards, table tops, wide door panels, cabinet tops, and thick bench tops. This tool is designed to meet your various needs.
Keeping panel boards flush with cauls
Clamps close joints; cauls help control the faces of boards across a panel so neighboring pieces remain flush. Place cauls across the panel where they can hold alignment, and cover their contact faces with tape to keep squeeze-out from gluing them to the work. Fine Woodworking describes cauls as a way to protect the work from clamp jaws while controlling alignment (Fine Woodworking’s guide to clamping cauls).
Cauls can be made from scrap wood, so buying specialized equipment is not a requirement. For wider panels, splines, biscuits, or dowels can also help align boards, but these add preparation and are not essential for every glue-up.
Rank #2

- The 4-Way Panel Clamp:With parallelogram couplers, our 2 pack panel clamps are very convenient to use. It clamps in two directions at once, making it easier to achieve flat panels and flush joints.
- Versatile Adjustable: Our panel clamps are designed to accommodate panels up to 36” wide and thicknesses ranging from 1/4" to 3", making it perfect for panel clamp woodworking projects of various sizes and dimensions.
- Easy to Use: With parallelogram-action couplers and fix pins, it is easy to adjust the width and thickness you need and continuous apply pressure from all sides. (Tips: Although the operation process is simple, please follow the instructions or video instructions to use it to bring a better experience. )
- Durable Quality: These clamps are made by heavy-duty steel pipe with a durable powder-coat finish and copper thread bushing to ensure smooth operation, making it a reliable and precision tool. Special surface treatment allows glue used in the panel assembly process to be easily removed.
- Ideal Projects: Perfect for medium panel clamp woodworking projects such as cutting boards, table tops, wide door panels, cabinet tops, and thick bench tops. This tool is designed to meet your various needs.
Managing squeeze-out and moving the work
Protect hard-to-clean areas before applying glue, and keep cleanup tools within reach. Avoid dragging wet adhesive into corners or onto surfaces that will be difficult to access. If glue squeezes out, follow the adhesive maker’s cleanup directions rather than assuming that one cleanup method suits every product.
WOOD Magazine recommends leaving a clamped assembly on a flat table or bench for 30 minutes before moving it. Treat that as the magazine’s handling recommendation, not a universal clamp or cure schedule: timing depends on the adhesive. Check the current label or technical data sheet for the glue you are using before releasing clamps or moving the work.
Quick Recap
Best Value

- The 4-Way Panel Clamp:With parallelogram couplers, our 2 pack panel clamps are very convenient to use. It clamps in two directions at once, making it easier to achieve flat panels and flush joints
- Versatile Adjustable: Our panel clamps are designed to accommodate panels up to 48” wide and thicknesses ranging from 1/4" to 3", making it perfect for panel clamp woodworking projects of various sizes and dimensions
- Easy to Use: With parallelogram-action couplers and fix pins, it is easy to adjust the width and thickness you need and continuous apply pressure from all sides. (Tips: Although the operation process is simple, please follow the instructions or video instructions to use it to bring a better experience)
- Durable Quality: These clamps are made by steel pipe with a durable powder-coat finish and copper thread bushing to ensure that the retaining pins are durable and strong,making it a reliable and precision tool. The special surface treatment allows the glue spilled during the panel splicing process to be easily removed by hand or knife, and is not easy to damage the surface of the panel fixture.
- Ideal Projects: Perfect for larger panel glue‑ups such as dining tabletops, king‑size headboards, wide entry doors, conference room desks, and large cabinet gables. This 48” capacity gives you the extra span needed for serious woodworking projects
Rank #4

- The Mini Panel Clamps:With parallelogram Couplers, this set is very convenient to use. It clamps in two directions at once, making it easier to achieve Flat panels and flush joints.The 4-way pressure system can eliminates gaps and warping in woodworking projects.
- Versatile Adjustable:These panel clamps are designed to accommodate panels up to 16” wide and thicknesses ranging from 1/4" to 2-1/4", making it perfect for panel clamp small woodworking projects of various sizes and dimensions.
- Easy to Use: With parallelogram-action couplers and fix pins, it is easy to adjust the width and thickness you need and continuous apply pressure from all sides.
- Durable Quality: These clamps are made by steel pipe with a durable powder-coat finish and copper thread bushing to ensure that the retaining pins are durable and strong,making it a reliable and precision tool. The special surface treatment allows the glue spilled during the panel splicing process to be easily removed by hand or knife, and is not easy to damage the surface of the panel fixture.
- Ideal for Precision Projects: Perfect for small panel clamp woodworking projects such as cutting boards, table tops, cabinet tops, and small bench . This tool is designed to meet your various needs.
Rank #3
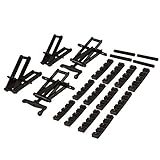
- Clamping panels can certainly be a challenge. Especially when we try to use everyday pipe clamps or bar clamps. While these types of clamps work fairly well on certain glue up projects, the one thing they don’t do at all is apply pressure from the top and bottom of the panels during glue up. In fact, with all the pressure being applied on both sides, bar and pipe clamps will almost certainly bow, buckle or rack your panel glue up project.
- Let’s make racked panel glue ups a thing of the past! The uniquely designed 4 way pressure solves this age old issue by applying pressure to all four sides of your panel glue up. With a simple turn of the rotating clamp handle, all four sides of the clamp will draw inward at the same time. This provides equal pressure on to your panel and prevents bowing, buckling, or racked panels.
- Build any length clamp with the durable plastic bars with 4 notches for maximum adjustability to handle a variety of stock widths. Clamp can be used for boards up to 6 inches in thickness by simply adjusting the clamp width capacity with the appropriate number of notches. Turn the handle clockwise to tighten the clamp and turn the handle counter clockwise to release pressure. The 4 way pressure clamp is equipped with side pressure pads to prevent damaging your stock.
- Now you can confidently glue up wide boards, shelving, table tops, and more up to 6” thick. To setup the clamps simply attach the clamp to any length 2 x 2’s (2” x 4” ripped in half) with the the wood screws that are provided, apply wood glue to your project, set the clamps on to your panel boards and turn handle to tighten the clamp on all four sides. We recommend that you place a 4 way pressure clamp every 12” to 18” for best results.
- This clamp package comes with two full 4 way pressure clamp assemblies. Includes: 2 each rotating handle assemblies, 2 each tailstock assemblies, 4 each side pressure pads and 12 each 4 notch bars. Together, this setup will allow you to create two 4 way pressure clamps. More than one clamp is generally recommended for any project over 12” in length. Wood is required for setting up the clamp. Wood is NOT included.
Product prices and availability are accurate as of the date/time indicated and are subject to change. Any price and availability information displayed on Amazon at the time of purchase will apply.




