Crashes, No Sound, or Screen Glitches?
Random freezes, missing sound and display glitches usually trace back to one bad driver. Find and replace yours safely.Free scan · under a minuteWindows Errors? Fix Them Before They Spread
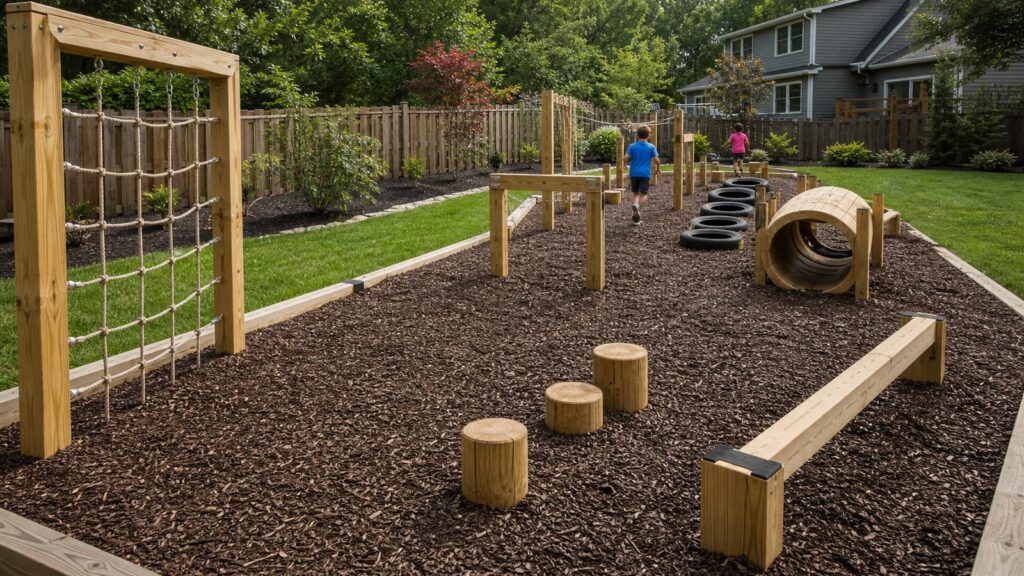
Repair common Windows errors and clear accumulated junk for a smoother, more stable PC - no reinstall needed.Free scan · no reinstallA DIY obstacle course can be as simple as cones, chalk, buckets, and pool noodles for a Saturday afternoon, or as serious as a permanent backyard fitness loop with posts, cargo nets, monkey bars, and protective surfacing. The right version depends on who will use it, how much space you have, and whether you are building temporary play equipment or a structural outdoor installation.
For most homeowners in 2026, a realistic budget starts around $25 to $150 for a temporary kid course, $250 to $900 for a basic backyard course with low wood elements, and $900 to $3,500 or more for a permanent family course. Custom professional backyard fitness or ninja-style installations commonly run $3,000 to $15,000 or more once grading, structural frames, drainage, and impact surfacing are included.
On our job sites, we think about obstacle courses the same way we think about decks, stairs, fences, and play structures: start with the ground, clearances, drainage, anchors, fasteners, and inspection plan. The fun parts matter, but the course only works if the structure and landing areas are disciplined.
As an Amazon Associate I earn from qualifying purchases.
Start With the Users, Not the Obstacles
The safest backyard obstacle course is designed around the people using it. A course for children under 12 should stay low, soft, creative, and forgiving. Think crawling, balancing, stepping, weaving, tossing, and short jumps. A course for teens or adults can include more strength work, such as a traverse wall, cargo net, balance beam, tire run, or monkey bars, but only when those elements are load-rated, properly anchored, and surrounded by appropriate surfacing.
A common mistake is starting with the most exciting feature: a high platform, tall wall, overhead rings, or homemade rope swing. That reverses the process. First decide the user group, maximum fall height, circulation path, and safe zones. Then choose obstacles that fit those limits.
For young kids, keep most elements under 24 inches high, and treat anything with climbing or jumping as a fall zone. For mixed family use, separate low-speed balance and crawling features from faster running lanes. For adult fitness, build fewer obstacles but make them stronger, better anchored, and easier to inspect.
#1 Best Overall

- BECOME A REAL NINJA - Our ninja training course are specially designed for kids over 4 years old. Upper Line can be installed more than 11 obstacles, and Ground Line can be used as a training line to improve strength and balance. Get your kids OUTSIDE and Overcome obstacles course of different difficulty in the most fun ways. Warriors never afraid of difficulties!
- MOST COMPLETE OBSTACLES FOR KIDS TO CONQUER -Our kit has an exciting assortment of the most complete and fun obstacles. Kids LOVE it, and even forget about electronics (sometimes)! 6 Stairs rope ladder and Double Line Design make it much easier for little ones to climb to the obstacles line or swing on it, and keep your kid balance and safe.
- ADJUSTABLE OBSTACLES DISTANCE -No Fixed Obstacles, No Fixed Distance, you could move the obstacles apart to whatever distance you want. Enjoy Endless Possibilities by Easily Customizing your obstacles in ANY ORDER and ANY DISTANCE apart to create an easier or harder challenge! User friendly design with quick setup and takedown.
- GREAT ALTERNATIVE TO THE PLAYGROUND -Whether or not you want to get a swing set or jungle gym when all of the playgrounds closed, but don't have enough flat space in your yard and they're expensive? Choose our Dripex ninja obstacles course, all you need is two mature trees or pillars that can withstand a maximum distance of 39-42ft and a maximum weight of 400lbs.
- PERFECT FOR ALL AGES & LEVELS -Whether you're a beginner slacklining for fun or a pro-athlet e looking to improve strength and balance, our ninja obstacles course is the perfect backyard challenge for ninjas of all levels. From Kids to Adults, and Beginners to Advanced. You could install it on your backyard, playground, home gym, basement, pool, fitness class, camping trip, beach park, etc. No More Worries about Your Kids' Health!
Choose a Course Type: Temporary, Semi-Permanent, or Structural
There are three practical categories of DIY obstacle courses. They are not just style choices. They affect cost, materials, permits, and safety expectations.
Free tools Windows power users keep installed
One-click scans. No signup required.
| Course Type | Best For | Typical 2026 Cost | Build Time | Examples |
|---|---|---|---|---|
| Temporary | Young kids, parties, indoor/outdoor play | $25-$150 | 1-3 hours | Cones, painter’s tape, hula hoops, pool noodles, buckets, chalk, tunnels |
| Semi-permanent | Families who want a changeable backyard setup | $250-$900 | 1-2 weekends | Low balance beam, stepping stumps, rope step-throughs, tire run, mulch zone |
| Structural | Older kids, teens, adults, fitness training | $900-$3,500+ DIY materials | 2-5 weekends | Posts, concrete footings, traverse wall, cargo net, monkey bars, platforms |
| Professional custom build | Permanent backyard fitness or complex terrain | $3,000-$15,000+ | Varies by scope | Engineered frames, drainage, premium surfacing, custom obstacles |
If you want a low-risk starting point, build temporary first. Watch how your kids or guests actually move through the course. You will learn quickly where they bunch up, where they sprint too fast, which obstacles get ignored, and where falls are likely. That information is more valuable than a sketch made before anyone uses the space.
Plan the Layout Before Buying Materials
Start with the path. A good course has a clear start, clear finish, no crossing traffic, and at least one bypass route for younger users or anyone who gets tired. For a backyard layout, a loop is usually better than a straight line because it uses space efficiently and keeps supervision easier.
Use a tape measure, marking paint, flags, or garden stakes before digging. Photograph the marked layout from several angles. Those photos help with HOA questions, permit conversations, future repairs, and remembering where buried irrigation or drainage lines may be.
Small Yard Template: 10 by 20 Feet
A 10 by 20 foot space is best for a temporary or low-height course. Use a cone zigzag, chalk start line, hula hoop jumps, crawl tunnel, bucket toss, and a short balance line made from a 2×4 laid flat or secured close to grade. Keep the path one-way and avoid obstacles that require hard running.
Quick wins for a faster PC:
Scan for outdated or missing drivers - takes under a minuteDriver Scan →Repair Windows errors before they cause bigger problemsFix Now →Budget: $25 to $150 if you use cones, pool noodles, chalk, buckets, jump ropes, and cardboard. Build time: about 1 to 2 hours.
Family Yard Template: 20 by 30 Feet
A 20 by 30 foot course can handle a more complete family layout. Use a low balance beam, stepping stumps, rope step-throughs, a tire run, crawl tunnel, and a tossing station. Keep elevated elements grouped together so the protective surfacing is not scattered all over the yard.
Budget: $250 to $900 for pressure-treated lumber, screws or bolts, stakes, rope, simple anchors, landscape fabric, and wood chips or mulch. Build time: one to two weekends.
Fitness Loop Template: 30 by 50 Feet
A 30 by 50 foot space can support a permanent fitness loop for teens and adults. Consider a traverse wall, balance beam, cargo net, tire run, low platform jump, and monkey bars only if the frame is properly designed and anchored. Leave room between stations so users do not collide, and place bypass paths around difficult obstacles.
Recommended Free Tools
Budget: $900 to $3,500 or more for 4×4 or 6×6 posts, concrete, rated fasteners, climbing holds, cargo net, monkey bars, surfacing, drainage materials, stain or sealer, and possible tool rental. Build time: two to five weekends for a careful DIY build.
Use Real Safety Clearances
The Consumer Product Safety Commission’s home playground guidance recommends placing equipment on level ground at least 6 feet from structures or obstacles. Use that 6 foot clear zone as a planning baseline around elevated play elements. Keep courses away from fences, sheds, patios, HVAC units, fire pits, retaining walls, rocks, trees, and driveways.
Swings need more space than most homeowners expect. CPSC guidance calls for clearance in front of and behind swings equal to twice the height of the swing beam. If the beam is 8 feet high, that means 16 feet in front and 16 feet behind. For that reason, we do not like adding swings to a tight obstacle course. They create directional fall and collision zones that are hard to manage in a compact yard.
Also watch for entrapment and snag points. Avoid gaps where a child’s head, neck, or torso could get caught. Cap bolts, orient hardware so clothing cannot snag, and avoid open S-hooks. Round or ease every wood edge that users touch. A router with a roundover bit is a small step that makes a large difference on handrails, beams, platforms, and balance elements.
Pick Obstacles That Match the Risk Level
The best DIY obstacles are not always the tallest or hardest. The best ones create movement variety without creating unnecessary fall height.
Safer Obstacles for Young Kids
For kids under 12, good choices include cone zigzags, rope step-throughs, crawl tunnels, hula hoop jumps, chalk stations, bucket tosses, low balance beams, stepping stumps, and pool noodle arches. Keep the course playful and changeable. A 6 year old does not need a tall climbing wall to get fitness value from balance, crawling, jumping, and coordination.
Rank #2

- NINJA WARRIOR OBSTACLE COURSE FOR KIDS OUTSIDE - Turn any two trees into a backyard ninja course. Two 55ft slacklines carry 10 adjustable obstacles, so kids climb, swing and balance their way across instead of sitting in front of a screen. Builds real grip strength, coordination and confidence while it just feels like playing.
- 10 OBSTACLES IN ONE BOX, NOT A STARTER SET - Includes 2x 55ft slacklines with high-grade ratchets, 2x monkey bars, 2x gymnastic rings, monkey fist, seat swing, ninja wheel, rope ladder, 12in x 12in climbing cargo net, 2x tree protectors, 17x buckle straps and a carry bag. Arrives gift-boxed, ready to give.
- RATED TO 450LB AND BACKED FOR 5 YEARS - The full line is rated to 450 lb total, so several kids can play at once. Two-inch wide, 4mm thick polyester webbing, nylon, wood and metal construction with stainless steel fasteners, anti-rust coated hardware and reinforced buckles that hold tension instead of slipping. Covered by a 5-year manufacturer warranty.
- SETS UP IN UNDER 30 MINUTES, NO TOOLS - Three steps: wrap the tree protectors, feed the ratchet, clip on the obstacles. No drilling, no hardware, no posts to sink. Needs two solid trees 15-45ft apart; the wider span lets you loop the line properly around each trunk, and the protectors mean the bark takes none of the load. Packs back into the carry bag for the park or the campsite.
- GROWS WITH THEM, AGES 5 AND UP - Slide the obstacles anywhere along the line and set the spacing to match the child, so a five-year-old and a twelve-year-old get a different course from the same kit. A birthday and Christmas gift that gets used all summer. Adult supervision recommended.
Good Family Obstacles
For a family course, use a low traverse wall, short cargo net, tire run, balance beam, low platform jump, and stepping posts. Keep jump platforms low and place them over maintained protective surfacing. If you install climbing holds, use rated holds with through-bolts or manufacturer-approved fasteners, not random screws.
Advanced Obstacles for Teens and Adults
Adults can use monkey bars, taller traverse walls, cargo nets, and strength stations, but the construction standard needs to rise with the difficulty. Posts should be ground-contact rated, set plumb, braced where needed, and anchored according to the load and soil conditions. Overhead elements should use rated hardware, not improvised pipe, rope, or tree limbs.
What’s actually slowing this PC down?
Pick the symptom - the matching free tool is one click away.
Avoid high-risk DIY elements unless they are engineered: tall warped walls, high platforms, zip lines, trampolines built into the route, homemade rope swings from limbs, and overhead rings on untested frames. These can look simple online and still fail under real dynamic loads.
Build From the Ground Up: Drainage, Surfacing, and Fall Zones
Grass and dirt are not protective surfacing under climbing or jumping elements. CPSC guidance recommends loose-fill protective surfacing under and around elevated play equipment, not grass, dirt, asphalt, concrete, carpet, or thin mats.
Before adding surfacing, solve drainage. A low backyard corner that holds water will turn mulch into a mess and can expose concrete footings over time. We like a slightly crowned or well-drained base, with water moving away from posts and landing zones. In wet areas, that may mean regrading, adding compacted stone under fabric, or installing a simple drain line before the course goes in.
For home equipment under 4 feet high, CPSC says at least 6 inches of protective surfacing is the minimum. In practice, loose fill moves and compacts. A 12 inch loose-fill installation may compact to about 9 inches over time. That is why top-offs should be part of the annual budget, not an afterthought.
The Tool Desk
Outbyte Driver Updater FREEFix the driver behind crashes, sound loss and screen glitchesFind Drivers →Outbyte PC Repair FREEClear out junk files and repair common Windows errorsFree Scan →| Surface | Relative Cost | Pros | Watchouts |
|---|---|---|---|
| engineered wood fiber or playground wood chips | Low to moderate | Often the most economical safety surface; natural look; works well for larger zones | Compacts, migrates, decomposes, and needs periodic top-offs |
| Pea gravel | Often economical | Drains well and is widely available | Poor accessibility, not ideal for toddlers, and can scatter into lawn areas |
| Loose rubber mulch | Higher upfront | Longer lasting than organic mulch; less decomposition | Often about $2.50-$3.00 per sq ft in consumer cost guides; quality and certification vary |
| Poured rubber or turf with pad | Premium | Clean look, stable surface, better accessibility when installed correctly | Much higher installed cost; usually a professional scope |
Keep fall obstacles and run obstacles separate. Landings need soft, maintained surfacing. Sprint lanes need clear, trip-free footing. Mixing the two usually creates divots, kicked-out mulch, and awkward transitions.
Materials That Hold Up Outside
For permanent or semi-permanent wood elements, use pressure-treated lumber rated for the exposure. Posts and any wood near soil or mulch should be ground-contact treated. A typical 2x4x8 pressure-treated board at large US retailers runs roughly $4.50 to $8 in 2026. A 4×4 pressure-treated post commonly runs about $10 to $25 or more depending on length, grade, treatment level, and region.
Use exterior-rated structural screws, galvanized or stainless hardware where appropriate, and rated connectors. Do not use drywall screws. They are brittle, not designed for outdoor structural loads, and can corrode quickly. For ropes, nets, and holds, buy products intended for outdoor play or fitness use and check stated load ratings.
Cut ends are a weak point in treated lumber because fresh cuts reduce the treatment protection at that surface. Seal cut ends with an appropriate end-cut preservative. This is especially important at posts, beam ends, notches, and any member close to wet mulch.
Do these 3 things before closing this tab:
1Scan for outdated or missing drivers - takes under a minute2Repair Windows errors before they cause bigger problems3Fix the driver behind crashes, sound loss and screen glitchesFor posts, the right footing depends on height, loads, soil, frost depth, and local requirements. A small low balance beam may only need secure blocking or short anchored supports. Monkey bars, cargo nets, and platforms are different. Those loads move, swing, and rack the frame. When in doubt, reduce the height or bring in a builder.
Permits, HOA Rules, and Property Constraints
Permit rules vary by city and county, but the trigger usually changes when the course becomes structural. Temporary cones and tunnels typically do not need a building permit. Posts, platforms, footings, overhead elements, retaining walls, electrical lighting, and tall accessory structures can change the conversation.
Some jurisdictions exempt small play structures or minor accessory items, while others care about height, roofed area, setbacks, easements, excavation, or whether concrete footings are used. Some local zoning or accessory-structure fees may be around $75 to $200, while full building permits may be based on project valuation. The bigger cost risk is not the permit fee. It is rebuilding a course because it violates setbacks, HOA rules, drainage easements, utility clearances, or height limits.
Rank #3
- 【Great Value Set】Hapfan ninja obstacle course consists of 65 ft slackline and 11 accessories. The most pupular accessories are included in this kit, like saucer swing, 360° rotation ninja twister swing, trapeze bar swing, unique climbing net ladder. They could be used alone on your tree branch, swing set or climbing dome
- 【Sturdy and Durable Playset】With the strong strap, several kids can play together. The whole set can hold up to 880 lbs. The max weight capacity of each obstalcle is 250lbs. Rest assured, our play set has undergone rigorous safety testing to guarantee your child's well-being
- 【Newly Designed Buckle】To ensure a quicker setup and enhanced safety without any fraying of the slackline, Hapfan has meticulously designed a new buckle. This innovative buckle not only saves time during assembly but also provides added security during playtime
- 【Portable Climbing Toys】Hapfan ninja rope course features easy setup and lightweight for portability. You can easily bring it to your backyard or enjoy it on family trips. A great gift choice for families with children
- 【Easy Installation】For your convenience, we provide detailed instructions and assembly videos to guide you through the setup process effortlessly. If you have any questions, simply click Hapfan for help
Before digging, call 811 for utility marking. Also check sprinkler lines, low-voltage lighting, drainage pipe, septic areas, and irrigation valve boxes. If you are in an HOA, submit a simple site plan with dimensions, height, materials, colors, and a photo of the marked layout. That small amount of preparation can save a lot of friction later.
Step-by-Step Build Sequence
For a semi-permanent or permanent backyard course, use this order.
- Measure the yard. Mark fences, trees, patios, utilities, slopes, wet spots, doors, gates, and mowing access.
- Choose the user group. Decide whether the course is for young kids, mixed family use, or teen/adult fitness.
- Mark the route. Use flags or paint to create a one-way loop with a start, finish, and bypass lane.
- Confirm clear zones. Use 6 feet as a baseline around elevated elements, with larger zones for swings or directional movement.
- Resolve drainage. Regrade or add drainage before posts and surfacing go in.
- Build low elements first. Install balance, stepping, crawling, and agility stations before advanced climbing elements.
- Install structural elements carefully. Set posts plumb, use appropriate concrete or anchors, and allow concrete to cure before loading.
- Add protective surfacing. Install the right depth for fall zones and contain loose fill with edging that does not create a trip hazard.
- Round, cap, and inspect. Ease sharp edges, cap bolts, remove snags, and test each station under controlled conditions.
- Document the course. Keep photos, measurements, product information, and inspection notes.
Concrete cure time matters. Even when concrete feels hard the next day, it has not reached full strength. For loaded posts and overhead elements, follow the concrete manufacturer’s cure guidance and avoid early use.
Sample Material List for a Family Backyard Course
For a 20 by 30 foot family course with a low balance beam, stepping stumps, crawl tunnel, rope step-through, tire run, and small traverse wall, a reasonable starter list might include:
- Six to ten pressure-treated 2x4x8 boards
- Four to six ground-contact 4×4 posts for any framed elements
- Exterior-rated structural screws and galvanized bolts
- Landscape fabric for surfacing zones
- Playground wood chips, engineered wood fiber, or rubber mulch for fall areas
- Outdoor-rated rope or webbing
- Rated climbing holds for any traverse wall
- Edging, stakes, and drainage stone where needed
- End-cut preservative for treated lumber cuts
- exterior stain or sealer after the lumber has dried enough for coating
That kind of course often lands in the $250 to $900 range depending on how much surfacing you need and how many items you already own. Surfacing is usually the cost driver. A few boards are inexpensive. A properly sized landing zone with enough depth is where the budget becomes real.
When to DIY and When to Hire a Pro
DIY is a good fit when the course is temporary, low-height, modular, and easy to inspect. Cones, tunnels, low beams, stepping elements, chalk paths, and rope step-throughs are well within reach for a careful homeowner. A semi-permanent course can also be a good DIY project if you are comfortable measuring, cutting, fastening, leveling, and managing drainage.
Hire a contractor when the course includes elevated platforms, overhead bars, large posts, concrete footings, retaining walls, major grading, electrical lighting, or complex drainage. Also bring in help if the yard has steep slopes, poor soil, water problems, or tight setbacks. The cost of professional labor can add hundreds to several thousand dollars, but it can prevent structural movement, drainage failures, and unsafe hardware choices.
For adult fitness or ninja-style equipment, we recommend being especially conservative. Dynamic bodyweight loads are different from static loads. A 180 pound adult swinging, dropping, or changing direction can place far more stress on a frame than the scale number suggests.
Monthly Safety Inspection Checklist
A backyard course is not a build-it-and-forget-it project. Weather, UV exposure, freeze-thaw cycles, heavy rain, and repeated use all change the structure over time. Inspect monthly during active seasons and do a deeper check after winter, heavy rain, or high winds.
- Loose bolts, screws, brackets, or connectors
- Splinters, cracks, sharp edges, and raised fasteners
- Rot or softness at post bases and wood near mulch
- Wobble in posts, beams, platforms, or balance elements
- Surfacing displacement under jumps, landings, and exits
- Compacted mulch that needs top-off
- Rope, net, and webbing wear from UV exposure or abrasion
- Rust on hardware, chains, bars, or connectors
- Exposed concrete around posts
- Standing water, puddles, erosion, or drainage washouts
- Trip hazards at edging, transitions, roots, tires, or borders
- Snag points from hooks, bolts, gaps, or rough hardware
If something moves unexpectedly, take that obstacle out of service until it is repaired. Do not wait for the weekend if kids use the yard every day. A temporary rope or caution tape barrier is not overkill when a structural item is questionable.
Practical Design Tips From the Field
Modularity is your friend. Kids grow, adults progress, and everyone gets bored with the same path. Use movable cones, bolt-on climbing holds, removable ropes, and stations that can be rearranged without rebuilding the entire course.
Rank #4

- 𝗪𝗔𝗥𝗡𝗜𝗡𝗚 - Please check and make sure the accessories are assembled correctly before each use. Make sure all parts are in good condition before each use. Although waterproof certified, it is not designed for permanent outdoor exposure. UV rays accelerate plastic aging; internal corrosion may occur if rainwater infiltrates metal joints
- 𝗕𝗘𝗖𝗢𝗠𝗘 𝗔 𝗥𝗘𝗔𝗟 𝗡𝗜𝗡𝗝𝗔 - Our ninja training courses are specially designed for kids over 4 years old. Ninja Line can be installed with more than 8 obstacles, and can also be used as a training line ONLY to improve strength and balance. Get your kids OUTSIDE and Overcome obstacles course of different difficulty in the most fun ways. Warriors are never afraid of difficulties
- 𝟭𝟬𝟬% 𝗪𝗲𝗮𝘁𝗵𝗲𝗿𝗽𝗿𝗼𝗼𝗳 𝗗𝗲𝘀𝗶𝗴𝗻 - Triple-layer coating on plastic accessories (rope ladder, gymnastic rings, monkey bar holds) withstands rain and humidity. Usage Tip: Wipe dry after use in damp conditions.
- 𝗣𝗘𝗥𝗙𝗘𝗖𝗧 𝗙𝗢𝗥 𝗔𝗟𝗟 𝗔𝗚𝗘𝗦 & 𝗟𝗘𝗩𝗘𝗟𝗦 - Whether you're a beginner slacklining for fun or a pro athlete looking to improve strength and balance, our ninja obstacles course is the perfect backyard challenge for ninjas of all levels. From Kids to Adults, and Beginners to Advanced. You could install it in your backyard, playground, home gym, basement, pool, fitness class, camping trip, beach park, etc. No More Worries about Your Kids' Health
- 𝗣𝗥𝗘𝗠𝗜𝗨𝗠 𝗤𝗨𝗔𝗟𝗜𝗧𝗬 - Dripex Monkey Line Obstacle Course is made of very durable slackline webbing and ratchet webbing, which can hold up to 400lbs. Our kit sets include two 50ft slacklines and 8.3ft ratchet lines, 2 monkey bar holds, 2 triangular gymnastics rings, 2 climbing ropes with knots,1 free carry bag, 1 arm trainer strap(4ft), 1 climbing ladder, 11 carabiners, 11 M-Shaped Buckles, and 4 tree protectors. Our products have been tested by SGS, and you will feel completely relieved when using them
Keep mowing and maintenance in mind. If the course makes the yard impossible to maintain, it will decline quickly. Leave access for a mower or design the course as a defined mulched zone with clean edges.
Do not overload the course with obstacles. Six well-spaced stations are better than twelve crowded ones. Crowding creates collisions, unclear movement, and landing zones that overlap in bad ways.
What’s actually slowing this PC down?
Pick the symptom - the matching free tool is one click away.
Finally, build for supervision. A course for younger kids should be visible from the patio, kitchen window, or main outdoor seating area. Avoid blind corners behind sheds, fences, or tall landscaping.
Bottom Line
A good DIY obstacle course is part playground, part fitness station, and part construction project. The winning formula is simple: keep young kids low, give older users stronger and better anchored elements, use real fall zones and protective surfacing, drain the site before covering it, and inspect the course on a schedule.
If your plan is cones, chalk, tunnels, and pool noodles, you can be running the course this afternoon for under $150. If your plan includes posts, platforms, cargo nets, monkey bars, or concrete, slow down and treat it like a real build. That is how you get a backyard obstacle course that is fun on day one and still solid after the first season of hard use.
Frequently Asked Questions
How much does it cost to build a DIY backyard obstacle course in 2026?
A temporary kid course usually costs $25 to $150. A basic backyard course with low wood elements often costs $250 to $900. A permanent family course with posts, concrete, climbing holds, cargo net, monkey bars, surfacing, and drainage commonly runs $900 to $3,500 or more in DIY materials.
Quick wins for a faster PC:
Repair Windows errors before they cause bigger problemsFix Now →Scan for outdated or missing drivers - takes under a minuteDriver Scan →Clear out junk files and repair common Windows errorsFree Scan →Do I need a permit to build a backyard obstacle course?
Temporary cones, tunnels, and low movable items typically do not need a permit. Posts, footings, platforms, overhead elements, retaining walls, electrical lighting, or tall structures may trigger local building, zoning, setback, or HOA requirements. Check with your city or county before digging or setting permanent posts.
What is the safest ground surface under a backyard obstacle course?
For elevated play or jumping areas, use protective playground surfacing such as engineered wood fiber, playground wood chips, rubber mulch, or a professionally installed impact surface. Grass, bare dirt, asphalt, concrete, carpet, and thin mats are not appropriate fall surfaces under climbing or jumping elements.
How much space do I need for a backyard obstacle course?
A 10 by 20 foot area can work for a temporary kid course. A 20 by 30 foot area is better for a family course with low obstacles. A 30 by 50 foot area can support a permanent fitness loop. Use at least a 6 foot clear zone as a planning baseline around elevated elements.
How deep should playground mulch or rubber mulch be?
For home equipment under 4 feet high, CPSC guidance says at least 6 inches of protective surfacing is the minimum. Loose fill compacts and moves, so many homeowners install deeper material and budget for top-offs. A 12 inch loose-fill layer may compact to about 9 inches over time.
Do these 3 things before closing this tab:
1Fix the driver behind crashes, sound loss and screen glitches2Repair Windows errors before they cause bigger problems3Scan for outdated or missing drivers - takes under a minuteWhen should I hire a contractor instead of building it myself?
Hire a pro when the course includes elevated platforms, overhead bars, monkey bars, large posts, concrete footings, complex drainage, retaining walls, electrical lighting, steep slopes, or adult fitness loads. These details require more than basic carpentry because movement, anchoring, soil, and fall protection all matter.
Quick Recap
Product prices and availability are accurate as of the date/time indicated and are subject to change. Any price and availability information displayed on Amazon at the time of purchase will apply.

