Recommended Free Tools
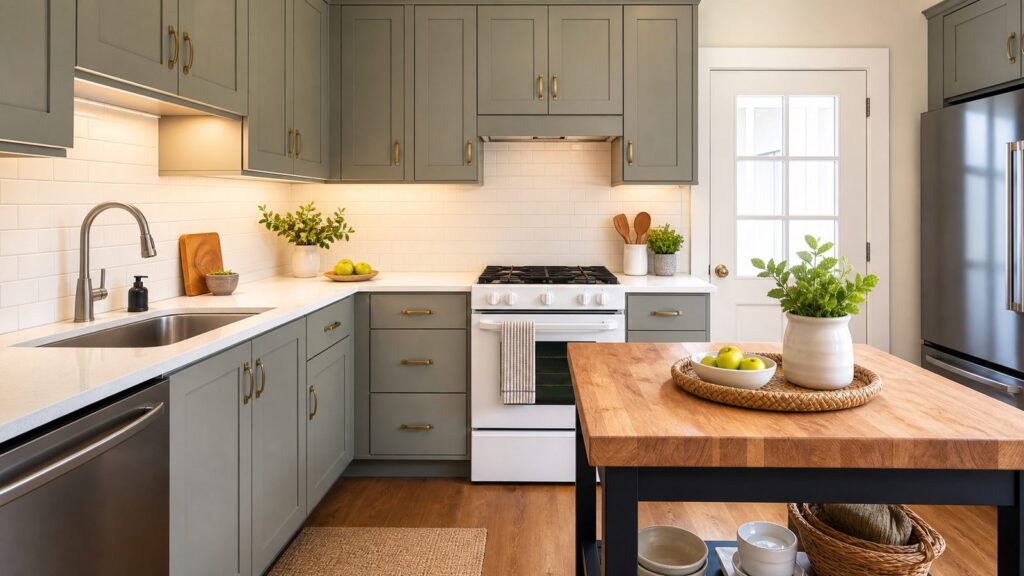
A budget kitchen remodel works best when it respects one rule: keep the existing footprint whenever you can. On our job sites, the expensive surprises usually start when a homeowner moves plumbing, gas, exterior venting, walls, or major electrical runs. Paint, lighting, cabinet improvements, storage, backsplash, faucet upgrades, and small appliance changes can make a kitchen feel completely different without turning the project into a full gut remodel.
In 2026, a typical professional kitchen remodel lands around $26,900 nationally, with common ranges near $14,600 to $41,600. Major remodels with new cabinets, appliances, flooring, and layout work often run $45,000 to $80,000, while large structural or upscale kitchens can exceed $150,000. Houzz reports a 2026 median spend of $20,000 for minor kitchen remodels and $55,000 for major remodels. The latest JLC/Zonda Cost vs. Value data shows a minor midrange kitchen remodel at $28,458 with a 112.9% cost recouped, while major midrange and upscale projects recoup far less.
As an Amazon Associate I earn from qualifying purchases.
That does not mean every homeowner should avoid a bigger project. It means the smartest budget remodel starts with what is visible, touched daily, and structurally sound enough to keep.
Start With a Budget Kitchen Inspection
Before buying tile or cabinet paint, spend an hour checking the kitchen the way a contractor would. Look under the sink and dishwasher for swollen cabinet bottoms, staining, active leaks, soft drywall, or a musty smell. Check whether cabinet boxes are square, securely fastened, and worth painting or refacing. Confirm appliance widths before ordering replacements: common dishwashers are 24 inches wide, ranges are often 30 inches, and refrigerators vary enough that a half-inch can cause problems.
#1 Best Overall

- ⭐【Unique Advantages】- In order to avoid drilling directly with an electric drill will cause the jig to shake, we provide an "Automatic Center Punch". Use jig finded the location, you just need to use the "hole punch" to directly punch the small holes, and then use the electric drill to punch the big holes on have already been punched small holes. It is a very ingenious way.
- ⭐【Metric + Imperial Scale】- Contains metric + imperial double sizes. Super high-definition tick board marks made of ABS, and the ruler is made from stainless steel. Ensure the jig’s premium durability, high corrosion resistance, high strength.
- ⭐【Detachable & Portable】- Cabinet hardware installation template quick-release '' drill guide'' sliders can be split into small parts by taking a small Space to easily carry. The storage bag we present will solve all your troubles of carrying.
- ⭐【Time Saver Quick Drilling】- Cabinet hardware template tool a full day of measuring and re-measuring. Set it up once and use it repeatedly with no further measurements, A good accessory, and helper for woodwork or DIY. The installation efficiency is greatly improved.
- ⭐【Jig Widely Application】- Cabinet hardware jig is ideal for installing pulls or handles and knobs on DRAWERS, CABINETS, DOOR and so on. Works on any cabinet door stile and rails including shaker doors & recessed drawer fronts. The product size is 16 inches, please confirm your cabinet/door size before purchasing
Open a few outlets and switches only if you know how to work safely around electrical components. Kitchen receptacles should be GFCI protected where required, and older kitchens may not have enough circuits for today’s appliance loads. If the home was built before 1978, assume lead-safe renovation rules may apply when disturbing painted surfaces. If you find suspicious flooring, adhesive, ceiling texture, or pipe insulation in an older home, do not sand or demo first and ask questions later. Testing is cheaper than cleanup.
Also check the range ventilation path. A ducted hood needs a proper route outdoors, not into an attic or wall cavity. The 2021 IRC addresses kitchen exhaust systems, and local rules can be more specific. In many cities, electrical, plumbing, structural changes, exterior vent penetrations, and gas work can trigger permits. Cosmetic work usually does not, but scope matters.
The Budget Ladder: What Your Money Can Realistically Buy
The table below is a practical planning guide. Labor rates and material pricing vary by market, but these ranges are useful for setting expectations before calling a contractor or loading a cart at the home center.
| Budget tier | Best uses | Typical timeframe | Risk level |
|---|---|---|---|
| Under $250 | Cabinet pulls, caulk, grout refresh, switch plates, shelf liners, runner, cleaning supplies | Half day to weekend | Low, mostly DIY |
| $250-$1,200 | Wall paint, faucet, peel-and-stick backsplash, lighting trims, organizers, small fixtures | Weekend to 1 week | Low to moderate |
| $3,000-$10,000 | Tile backsplash, cabinet painting, sink, select appliances, LVP flooring, butcher-block counters | 1 to 3 weeks | Moderate, trade help likely |
| $15,000-$35,000+ | Contractor-led budget remodel that keeps layout but updates multiple systems and finishes | 3 to 8 weeks | Higher, permits likely if trades are involved |
The cheapest remodel is not always the best value. If the kitchen has unsafe wiring, leaks, poor ventilation, failing cabinets, or damaged subflooring, fix those before cosmetics. Fresh paint over a water-damaged sink base is money spent twice.
38 Budget Kitchen Remodeling Ideas
1. Deep clean, declutter, and stage before spending
Cost: $25-$150. DIY or pro: DIY-safe. Permit risk: none. Empty the counters, clean the cabinet faces, degrease around the range, remove duplicate gadgets, and add only what earns its space. This is the cheapest way to see what the kitchen actually needs.
2. Paint the walls
Cost: $75-$300 DIY for most kitchens. DIY or pro: DIY-safe. Permit risk: none, unless lead-safe rules apply in a pre-1978 home. Use washable satin or eggshell paint. A warm white, soft green-gray, muted blue, or clean neutral can make old cabinets look more intentional.
3. Paint the cabinets
Cost: Homewyse 2026 estimates about $5.40-$10.79 per square foot; professional cabinet painting often runs into the low thousands. DIY or pro: DIY-with-care or hire a painter. Permit risk: low, but lead-safe precautions may apply. Remove doors and drawers, label hinges, degrease, sand lightly, use bonding primer, and allow full cure before heavy use.
4. Replace cabinet hardware
Cost: $2-$12 per pull, more for premium finishes. DIY or pro: DIY-safe. Permit risk: none. Match existing hole spacing if you want a fast install. If drilling new holes, use a cabinet hardware jig so every pull lines up.
5. Add soft-close hinges
Cost: $3-$10 per hinge. DIY or pro: DIY-with-care. Permit risk: none. This is a daily touch-point upgrade. Verify overlay type, hinge cup size, and face-frame versus frameless cabinet construction before ordering.
6. Add soft-close drawer slides
Cost: $20-$60 per drawer for hardware, plus labor if hired. DIY or pro: handyman/pro for older cabinets. Permit risk: none. Good slides make inexpensive cabinets feel better, but crooked boxes can make installation fussy.
7. Reface cabinet boxes
Cost: commonly several thousand dollars, often less than full cabinet replacement. DIY or pro: pro recommended. Permit risk: low. Reface only if cabinet boxes are dry, square, and solid. Refacing bad boxes is like putting new tires on a failing frame.
8. Replace only cabinet doors and drawer fronts
Cost: often $50-$250 per door depending on size and finish. DIY or pro: DIY-with-care or cabinet pro. Permit risk: none. This works well when layout and boxes are good but the style is dated.
9. Remove one upper cabinet and add open shelves
Cost: $75-$400. DIY or pro: DIY-with-care. Permit risk: low. Use wall studs or rated anchors. Keep open shelving for daily dishes, not clutter.
10. Install pullout base cabinet organizers
Cost: $40-$250 each. DIY or pro: DIY-safe for simple kits. Permit risk: none. Pullouts can rescue deep base cabinets without replacing them.
Rank #2

- ⭐【King&Charles Unique Kit】- In order to avoid drilling directly with an electric drill will cause the jig to shake, we provide an "Automatic Center Punch". Use jig finded the location, you just need to use the "hole punch" to directly punch the small holes, and then use the electric drill to punch the big holes on have already been punched small holes. It is a very ingenious way by King&Charles. Perfect suit, Only need to buy once, In one step.
- ⭐【Punch & 3 Point Wood Bits 】- Set extra include metal punch + 3 sizes of Point Wood bits。AUTOMATIC PUNCH is constructed from heavy-duty metal to resist against corrosion. Pro-WOODWORKING BITS is 3mm/4mm/5mm can meeting different installation requirements. Bits top with pointed tip ,keep won't jitter when drilling.
- ⭐【Cabinet Hardware Jig】- Contains metric + imperial double Scale sizes. Super high-definition tick board marks made of ABS, and the ruler is made from stainless steel. Ensure the jig’s premium durability, high corrosion resistance, high strength.
- ⭐【Detachable & Portable】- Cabinet hardware installation template quick-release '' drill guide'' sliders can be split into small parts by taking a small Space to easily carry. The storage bag we present will solve all your troubles of carrying.
- ⭐【Good Hepler】- Set it up once and use it repeatedly with no further measurements, A good accessory set, and helper for woodwork or DIY. The installation efficiency is greatly improved. This is a complete set, and only one set is needed to meet the installation requirements
11. Add drawer dividers
Cost: $15-$100 per drawer. DIY or pro: DIY-safe. Permit risk: none. Use adjustable bamboo, maple, or metal inserts for utensils, knives, wraps, and cooking tools.
Outdated Drivers Are Slowing You Down
One free scan finds every outdated or missing driver and matches the right update for your exact hardware.Free scan · exact hardware matchPC Slower Than It Used to Be?
A free scan shows the junk files, broken settings and background clutter dragging Windows down - then fixes them in one click.Free scan · Windows 10 & 1112. Add pantry pullouts
Cost: $100-$600 per cabinet. DIY or pro: DIY-with-care. Permit risk: none. Measure clear interior width, door swing, hinge intrusion, and shelf depth before ordering.
13. Replace the faucet
Cost: commonly $150-$600 installed, depending on faucet and plumbing condition. DIY or pro: DIY-with-care or licensed plumber. Permit risk: low for replacement. A quality pull-down faucet is one of the best budget upgrades because it is used every day.
14. Replace the sink
Cost: often $300-$1,200+ installed. DIY or pro: plumber or countertop pro. Permit risk: low to moderate. Drop-in swaps are easier than undermount changes. Confirm cabinet width, drain alignment, and countertop cutout.
15. Install a peel-and-stick backsplash
Cost: $100-$400 for many kitchens. DIY or pro: DIY-safe. Permit risk: none. Use it where heat and water exposure are modest. Clean and degrease the wall first.
The Tool Desk
Outbyte Driver Updater FREEFix the driver behind crashes, sound loss and screen glitchesFind Drivers →Outbyte PC Repair FREEClear out junk files and repair common Windows errorsFree Scan →16. Install a simple tile backsplash
Cost: often $800-$2,500 installed, depending on tile, layout, and outlets. DIY or pro: DIY-with-care or tile pro. Permit risk: low unless electrical changes are needed. Straight-set subway tile costs less to install than herringbone, diagonal layouts, handmade tile, or heavy-cut patterns.
17. Use beadboard or panel backsplash
Cost: $150-$800. DIY or pro: DIY-with-care. Permit risk: low. Choose moisture-resistant panels and a cleanable finish. Keep combustible clearances in mind behind cooking surfaces.
18. Add under-cabinet lighting
Cost: plug-in LED kits can be $50-$250; hardwired systems are often several hundred to more than $1,000 installed. DIY or pro: DIY for plug-in, licensed electrician for hardwired. Permit risk: moderate for new wiring. Warm, dimmable task light can make old counters and backsplash look better immediately.
19. Swap the ceiling fixture
Cost: $100-$700 depending on fixture and labor. DIY or pro: electrician recommended unless it is a straightforward replacement and you are qualified. Permit risk: low to moderate. Choose enough lumens for task work, not just a pretty shade.
What’s actually slowing this PC down?
Pick the symptom - the matching free tool is one click away.
20. Upgrade recessed light trims
Cost: $15-$60 per trim. DIY or pro: DIY-safe if compatible. Permit risk: low. LED retrofit trims can modernize yellowed cans and improve light quality.
21. Add dimmers
Cost: $25-$150 per switch installed DIY, more with an electrician. DIY or pro: licensed electrician if wiring is unfamiliar. Permit risk: moderate. Match dimmers to LED fixtures to avoid flicker.
22. Replace outlets and switch plates
Cost: $20-$200 for plates; more for device replacement. DIY or pro: plates are DIY-safe, devices should be handled by someone qualified. Permit risk: low to moderate. In kitchens, GFCI protection and proper spacing matter.
23. Add a runner
Cost: $60-$400. DIY or pro: DIY-safe. Permit risk: none. Use a washable, low-profile runner with a non-slip pad, especially near the sink.
Quick wins for a faster PC:
Scan for outdated or missing drivers - takes under a minuteDriver Scan →Repair Windows errors before they cause bigger problemsFix Now →Rank #3

- Extra-Large Hardware Capacity: The Kreg Cabinet Hardware Jig Pro accommodates pulls from 1-3/4" to 12" center-to-center, with a reversible design for precise placement on both doors and drawers
- Professional-Grade Accuracy: Kreg’s precision-engineered guides deliver accurate results, giving DIYers and pros the confidence to create ideally positioned hardware and holes
- Consistent, Repeatable Results: Built-in stops and intuitive adjustment features eliminate the guesswork, helping to make every installation or hole uniform from project to project
- Engineered for Versatility: Offers adaptable, user-friendly design—ideal for cabinets, furniture, or creative builds—making it easy to tackle any woodworking task
- Premium Kreg Tools: We offer products that help woodworkers close the gap between idea and outcome
24. Refresh grout
Cost: $20-$150 DIY. DIY or pro: DIY-with-care. Permit risk: none. Cleaning, sealing, or recoloring grout can make tile floors and backsplashes look newer without replacement.
25. Recaulk counters and sink edges
Cost: $10-$50 DIY. DIY or pro: DIY-safe. Permit risk: none. Remove failed caulk fully, clean the joint, let it dry, and use kitchen/bath silicone where water is present.
26. Repaint trim
Cost: $40-$200 DIY. DIY or pro: DIY-safe. Permit risk: possible lead-safe concern in older homes. Fresh trim paint sharpens the whole room.
27. Add crown molding or light rail to cabinets
Cost: $200-$1,200 depending on trim and labor. DIY or pro: handyman/pro for clean miters. Permit risk: none. This is especially useful when existing cabinets stop short of the ceiling.
Free tools Windows power users keep installed
One-click scans. No signup required.
28. Add a butcher-block island or cart
Cost: $250-$1,500. DIY or pro: DIY-safe for freestanding carts, pro for built-ins. Permit risk: low unless electrical is added. Leave practical walkways: 36 inches is a workable minimum, while 42 inches or more is better near busy zones.
29. Replace laminate countertops
Cost: often $1,500-$4,500 for many modest kitchens. DIY or pro: pro recommended. Permit risk: low. Modern laminate is not the old stereotype. It can be a smart budget surface when layout stays the same.
30. Install butcher-block counters
Cost: often $1,000-$4,000 depending on wood, layout, and finish. DIY or pro: DIY-with-care or pro. Permit risk: low. Seal correctly and be honest about maintenance near sinks.
31. Add an appliance garage
Cost: $150-$1,000. DIY or pro: cabinet pro for built-ins. Permit risk: low unless outlets are modified. This keeps coffee makers, toasters, and mixers accessible without crowding the counter.
32. Add or replace a range hood
Cost: $300-$2,500+ depending on ducting and electrical. DIY or pro: contractor, HVAC, and electrician as needed. Permit risk: moderate to high. Recirculating hoods are easier but less effective. Ducted hoods perform better, but exterior routing and makeup-air requirements can change the project.
33. Replace one tired appliance
Cost: $500-$2,500 for many single appliance swaps, plus delivery and installation. DIY or pro: appliance installer, plumber, electrician, or gas fitter depending on appliance. Permit risk: low to high. Replacing a dishwasher is not the same risk as changing a gas range.
34. Install LVP flooring
Cost: often $3-$10 per square foot installed, depending on product and prep. DIY or pro: DIY-with-care or flooring pro. Permit risk: low. Kitchens need stable, water-resistant flooring. Subfloor prep and transitions matter more than the sample board.
35. Paint or stencil an existing floor
Cost: $100-$500 DIY. DIY or pro: DIY-with-care. Permit risk: possible lead/asbestos risk if sanding old materials. This is best for low-risk floors that are structurally sound but ugly.
Do these 3 things before closing this tab:
1Fix the driver behind crashes, sound loss and screen glitches2Clear out junk files and repair common Windows errors3Scan for outdated or missing drivers - takes under a minute36. Add a floating breakfast bar
Cost: $300-$1,500. DIY or pro: handyman/pro. Permit risk: low unless electrical is added. Use proper blocking and brackets. Do not guess on wall support.
Rank #4

- HIGH PRECISION MEASUREMENT & MARKING: Cabinet Hardware Jig adopts high-precision laser cutting technology, with clear and wear-resistant scale lines that won't fade easily. The foam-lined storage box safeguards the cabinet handle jig from scratches during storage, while keeping components neatly organized for quick access during woodworking projects.
- DURABLE ALUMINUM ALLOY CONSTRUCTION: Made of high quality thickened aluminum alloy, the cabinet handle jig is sturdy and against deformation The surface of cabinet hardware jig tool is treated with anodization to enhance wear resistance, ensuring long-term use even in harsh construction environments. Lightweight design makes cabinet door jig easy to carry and operate without causing fatigue during long working hours.
- ADJUSTABLE SLIDER: An intuitive template design is adopted, and the cabinet pull jig can be fixed on the surface of the board to achieve wobble-free drilling. The freely adjustable slider can adapt to various size marking needs and handle positioning tasks with ease. Say goodbye to the deviation troubles of traditional tape measures, cabinet handle template making drilling precise and neat, and the construction effect is professional and beautiful.
- MULTI-SCENE APPLICATION: Ideal for woodworking, kitchen, drawers, doors, and custom cabinets, and other construction scenarios. cabinet hole drilling template very suitable for professional carpenters, construction workers, as well as home DIY enthusiasts. The whole operation can be completed by one person, which greatly reduces the labor cost and construction time. cabinet jig can meet your needs and improve work efficiency significantly.
- EASY TO USE & AFTER-SALES: All components of the cabinet installation tool are standardized, no complicated operation required. Simply clean the ruler surface of cabinet pull template, adjust the slider to the desired size, and start marking. We provide a 24-hour customer service. If you have any questions about the product, please to contact us, and we will solve it for you immediately.
37. Improve trash and recycling storage
Cost: $80-$500. DIY or pro: DIY-safe. Permit risk: none. A pullout trash cabinet improves function more than many decorative purchases.
38. Add a wall-mounted pot rail or simple window treatment
Cost: $40-$300. DIY or pro: DIY-safe. Permit risk: none. A pot rail frees cabinet space; a washable shade softens the room without taking counter space.
Best Value Combinations by Budget
If the kitchen is functional but dated, do not scatter money randomly. Bundle upgrades that support each other visually and practically.
Under $500: deep clean, cabinet hardware, recaulking, grout refresh, switch plates, washable runner, and one small storage fix. This is a good pre-sale or rental refresh budget.
Under $1,500: wall paint, new faucet, cabinet hardware, LED recessed trims, plug-in under-cabinet lighting, drawer dividers, and pantry pullouts. This tier can make a kitchen feel cleaner and easier to use without hiring multiple trades.
$3,000-$10,000: cabinet painting, simple tile backsplash, faucet and sink, selected lighting, a few organizers, and possibly LVP flooring or new laminate counters. This is where scope discipline matters. Pick two or three high-impact surfaces instead of lightly touching everything.
$15,000-$35,000+: a contractor-led budget remodel can include cabinet refacing or new fronts, countertops, backsplash, flooring, lighting, plumbing fixtures, and limited appliance replacement while preserving the layout. This is still not a full custom kitchen in most markets, but it can be a strong value when the existing footprint works.
The Tool Desk
Outbyte Driver Updater FREEFix the driver behind crashes, sound loss and screen glitchesFind Drivers →Outbyte PC Repair FREERepair Windows errors before they cause bigger problemsFix Now →When to DIY and When to Hire a Pro
Good DIY work saves money. Bad DIY work creates repair work. We usually divide budget kitchen work into five levels.
DIY-safe: cleaning, organizing, cabinet pulls using existing holes, drawer dividers, runners, shelf liners, switch plates, and simple decor. These projects have low cost and low consequence.
DIY-with-care: painting walls, painting cabinets, installing peel-and-stick backsplash, refreshing grout, recaulking, simple open shelves, butcher-block carts, and some pullout organizers. Measure twice, read product specs, and do not skip prep.
Handyman or finish pro: trim, crown molding, cabinet door replacement, some shelving, floating breakfast bars, and appliance garages. These jobs look simple until the walls are out of square.
Licensed electrician or plumber: hardwired lighting, new dimmers where wiring is uncertain, outlet replacement, sink and faucet work involving questionable shutoffs, dishwasher connections, disposals, and any gas-related appliance work.
Contractor-only: layout changes, wall removal, structural work, exterior vent routing, major flooring/subfloor correction, panel upgrades, and projects involving multiple trades and inspections.
Best Value

- 🇺🇸【All Aluminum Alloy】- The most accurate and durable drilling can only be achieved by using the highest grade materials and aerospace precision. Every part of the cabinet hardware jig is made of forged aircraft-grade aluminum alloy. All aluminum alloy and no plastic. All the parts of the jig are precisely processed many times. Ensure the jig’s premium durability, high corrosion resistance, high strength, Won't Fade.
- 🇺🇸【Unique Advantages】- In order to avoid drilling directly with an electric drill will cause the jig to shake, we provide an "Automatic Center Punch". Use jig finded the location, you just need to use the "hole punch" to directly punch the small holes, and then use the electric drill to punch the big holes on have already been punched small holes. It is a very ingenious way.
- 🇺🇸【Detachable & Portable】- Cabinet hardware installation template quick-release '' drill guide'' sliders can be split into small parts by taking a small Space to easily carry. The storage bag we present will solve all your troubles of carrying.
- 🇺🇸【Good Helper】- Contains metric + imperial double sizes. Cabinet hardware template tool a full day of measuring and re-measuring. Set it up once and use it repeatedly with no further measurements, A good accessory, and a helper for woodwork or DIY.
- 🇺🇸【Jig Widely Application】- Cabinet hardware jig is ideal for installing pulls or handles on DRAWERS, CABINETS, DOOR and so on. Works on any cabinet door stile and rails including shaker doors & recessed drawer fronts. We offer 24-hour after-sales customer service, Feel free to contact us if you have any questions.
One more electrical note matters in newer kitchens: island and peninsula receptacle rules changed under the NEC. Depending on the adopted code in your local jurisdiction, adding or modifying island power may not be as simple as copying an older kitchen. Ask before cutting stone or cabinets.
Projects That Look Cheap but Can Get Expensive
Some ideas sound budget-friendly until hidden scope appears. Moving a sink can require plumbing, cabinet modification, countertop replacement, wall repair, and inspections. Moving a range can involve electrical or gas work, ventilation, clearances, and flooring patches. Replacing floors can reveal uneven subflooring, water damage, asbestos concerns, or height conflicts at adjoining rooms.
Windows Errors? Fix Them Before They Spread
Repair common Windows errors and clear accumulated junk for a smoother, more stable PC - no reinstall needed.Free scan · no reinstallOutdated Drivers Are Slowing You Down
One free scan finds every outdated or missing driver and matches the right update for your exact hardware.Free scan · exact hardware matchBacksplash tile is another example. A basic straight-set backsplash is manageable. Add handmade tile, many outlets, inside corners, a pot filler, open shelves, and a decorative range feature, and labor climbs quickly. The same is true for countertops: a simple laminate swap is one thing; adding an undermount sink, waterfall edge, new overhang support, and appliance changes is a different project.
The best budget remodels are honest about what must stay. If cabinets remain, protect them. If appliances remain, design around their actual dimensions. If the flooring stays, choose colors and finishes that make it look intentional instead of pretending it is new.
A Practical Sequence for a Budget Kitchen Remodel
Sequence keeps small projects from damaging each other. Start with inspection and measurements. Then handle repairs: leaks, electrical concerns, ventilation problems, loose cabinets, bad caulk, and soft flooring. After that, do messy prep such as sanding, patching, priming, and cabinet painting. Install lighting before backsplash when wiring is involved. Install counters before final backsplash. Paint walls before final hardware if possible. Finish with hardware, organizers, rugs, window treatments, and final caulk touch-ups.
For a weekend refresh, plan one to two days. For cabinet painting, plan a week or more because cure time matters. For a partial update with trades, expect one to three weeks depending on scheduling. A contractor-led budget remodel often takes three to eight weeks once materials are ready, and longer if cabinets, counters, or inspections are delayed.
Do these 3 things before closing this tab:
1Clear out junk files and repair common Windows errors2Scan for outdated or missing drivers - takes under a minute3Repair Windows errors before they cause bigger problemsThe goal is not to make a cheap kitchen. The goal is to make a durable, cleaner, better-functioning kitchen without paying for scope you do not need. Keep the layout. Spend on the surfaces you see, the parts you touch, and the systems that keep the room safe. That is where a budget kitchen remodel earns its keep.
Frequently Asked Questions
What is the cheapest way to remodel a kitchen?
The cheapest meaningful approach is to keep the layout and update visible surfaces: clean and declutter, paint walls, replace cabinet hardware, refresh caulk and grout, improve lighting, and add organizers. Many kitchens can look noticeably better for under $1,200 if the cabinet boxes, plumbing, and flooring are sound.
How much does a budget kitchen remodel cost in 2026?
A DIY refresh can run under $500, while a stronger cosmetic update often lands between $250 and $1,200. Partial updates commonly run $3,000 to $10,000. A contractor-led budget remodel that keeps the layout often starts around $15,000 and can reach $35,000 or more depending on materials and trades.
Is painting kitchen cabinets worth it?
Yes, if the cabinet boxes are solid, dry, and square. Cabinet painting can deliver a major visual change for much less than replacement, but prep is everything: degreasing, labeling, sanding, bonding primer, careful application, and proper cure time.
Quick wins for a faster PC:
Scan for outdated or missing drivers - takes under a minuteDriver Scan →Repair Windows errors before they cause bigger problemsFix Now →Fix the driver behind crashes, sound loss and screen glitchesFind Drivers →What kitchen upgrades should not be DIY?
Hire licensed trades for hardwired lighting, uncertain outlet work, plumbing changes, gas appliance work, exterior range hood venting, structural changes, and any project that requires permits or inspections. DIY mistakes in these areas can create safety and insurance problems.
Do budget kitchen remodels need permits?
Cosmetic work usually does not require a permit, but rules vary by city. Electrical changes, plumbing changes, gas work, structural work, new exterior venting, and some layout changes commonly require permits. Always check local requirements before opening walls or moving fixtures.
Quick Recap
Product prices and availability are accurate as of the date/time indicated and are subject to change. Any price and availability information displayed on Amazon at the time of purchase will apply.

