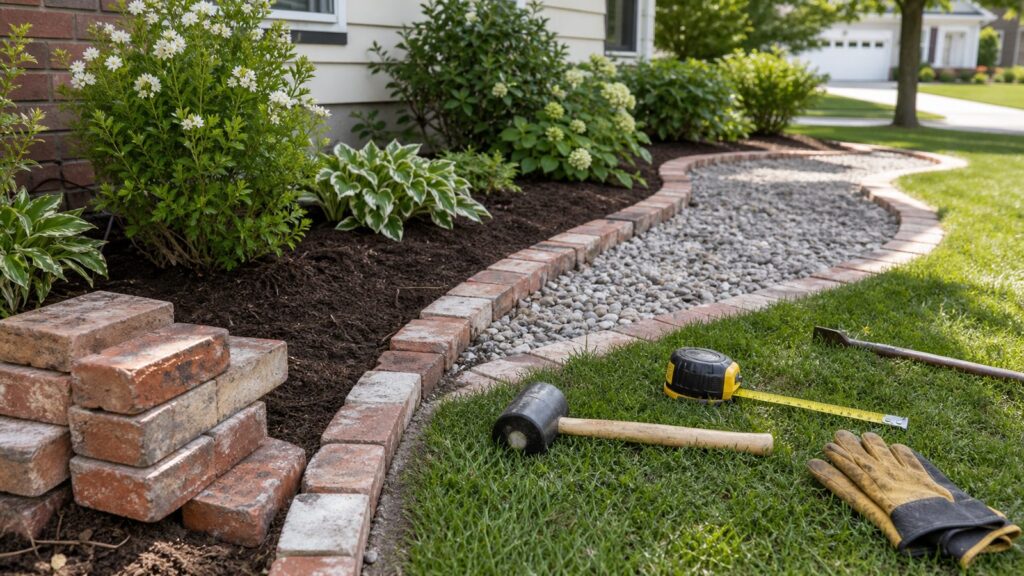
A good garden border does more than make a bed look finished. It keeps grass from creeping into planting areas, holds mulch or gravel where it belongs, creates a clean mower or trimmer line, and gives the yard a deliberate shape. The budget mistake we see most often is choosing the cheapest material without thinking about soil movement, mowing, drainage, and how the edge will look after one full season.
For a typical 60-linear-foot garden bed, a homeowner can build a useful border for as little as $0 to $40 with a spade-cut trench if tools are already in the garage. A mulch strip may run about $25 to $90. No-dig plastic or composite edging often lands around $22 to $80 for basic materials. Reclaimed brick can be nearly free if you already have it, while new brick or pavers may push the same 60-foot run toward $150 to $390 before base material. A narrow gravel strip usually falls around $70 to $220 using bagged stone, and less per foot on larger bulk orders.
As an Amazon Associate I earn from qualifying purchases.
Those DIY numbers are low compared with professional installed benchmarks. In 2026, national installed landscape edging commonly starts around $3.61 to $9.38 per linear foot, while poured or decorative landscape curbing can sit around $25.71 to $30.60 per linear foot in national cost models. Professional landscape curbing projects average about $1,455 nationally, with a common range of roughly $784 to $2,161. That does not make pro work overpriced; it reflects excavation, base prep, layout, labor, equipment, and cleanup. But it does show why a carefully planned DIY border can be a strong weekend project.
What’s actually slowing this PC down?
Pick the symptom - the matching free tool is one click away.
Below are five budget-friendly garden border ideas we would actually recommend to a homeowner, along with the cost math, installation notes, and the places where it is smarter to call a contractor.
#1 Best Overall

- 𝐅𝐥𝐞𝐱𝐢𝐛𝐥𝐞 & 𝐄𝐚𝐬𝐲 𝐭𝐨 𝐈𝐧𝐬𝐭𝐚𝐥𝐥: Each panel measures 40" (L) × 5" (H), including 3" underground stakes for strong anchoring, leaving 2" visible above ground for a clean, low-profile border. The hammer-in design makes installation fast and effortless—perfect for creating neat, professional-looking edges without digging.
- 𝐃𝐮𝐫𝐚𝐛𝐥𝐞 𝐆𝐚𝐥𝐯𝐚𝐧𝐢𝐳𝐞𝐝 𝐒𝐭𝐞𝐞𝐥 𝐂𝐨𝐧𝐬𝐭𝐫𝐮𝐜𝐭𝐢𝐨𝐧: Made from high-quality galvanized steel, this 33ft landscape edging (10-pack) is built to withstand outdoor conditions, providing long-lasting durability and rust resistance for your garden, yard, or flower beds.
- 𝐒𝐞𝐜𝐮𝐫𝐞 & 𝐒𝐭𝐚𝐛𝐥𝐞 𝐃𝐞𝐬𝐢𝐠𝐧: Comes with 11 stakes, ensuring strong anchoring in soil and stability against shifting over time. Ideal for maintaining defined garden edges and pathways.
- 𝐒𝐥𝐞𝐞𝐤 𝐁𝐥𝐚𝐜𝐤 𝐅𝐢𝐧𝐢𝐬𝐡 𝐟𝐨𝐫 𝐌𝐨𝐝𝐞𝐫𝐧 𝐀𝐩𝐩𝐞𝐚𝐥: The powder-coated black steel adds a stylish, modern touch to your outdoor landscaping while blending seamlessly with various garden styles.
- 𝐕𝐞𝐫𝐬𝐚𝐭𝐢𝐥𝐞 𝐆𝐚𝐫𝐝𝐞𝐧 𝐁𝐨𝐫𝐝𝐞𝐫 𝐒𝐨𝐥𝐮𝐭𝐢𝐨𝐧: Perfect for creating crisp, clean separations between lawns, flower beds, pathways, and patios. Easily cut or bend to fit curves, corners, and custom garden designs.
Start With Layout, Drainage, and Utility Checks
Before buying edging, walk the yard with a tape measure, marking paint, and a garden hose. Use the hose to lay out curves, then look at the line from the street, kitchen window, patio, and main walkway. On our job sites, we do not judge a border only from where it is installed. We judge it from where people will actually see it.
Measure the full run in linear feet and add 10 percent for waste, cuts, damaged pieces, and layout changes. A 54-foot bed should be priced as about 60 linear feet. If the border wraps a tree, driveway, walkway, patio, or utility area, take extra time with layout. A cheap border in the wrong place can block drainage or become a nuisance every time you mow.
Call 811 before digging. Even shallow edging work can cross low-voltage lighting, irrigation lines, invisible fence wire, internet cable, or utilities near the home. Hand tools do not make digging risk-free. If your edge will go deeper than a few inches, or if you are near utility meters, service lines, or irrigation valves, locate first and dig carefully.
Do these 3 things before closing this tab:
1Repair Windows errors before they cause bigger problems2Scan for outdated or missing drivers - takes under a minute3Clear out junk files and repair common Windows errorsKeep grade in mind near the house. Finished grade should slope away from the foundation, not trap water against it. As a working rule, maintain positive drainage away from the structure and avoid piling mulch, stone, or soil against siding, foundation vents, stucco weep screeds, or wood trim. A border that looks neat but holds water at the foundation is not a good project.
Also understand the difference between edging and retaining. A garden border holds mulch, gravel, or the edge of a planting bed. A retaining wall holds back soil. Once a border is resisting a slope, supporting a raised grade, or sitting near a property line, driveway, sidewalk, or drainage path, local rules may apply. Some cities regulate retaining walls and fences by height, location, and surcharge conditions. Check your local building department before building anything that retains soil or changes drainage.
2026 DIY Garden Border Cost Comparison
The table below gives a practical starting point for a 60-linear-foot project. Local prices vary by region, store, delivery fee, and soil conditions, but these ranges are realistic enough for planning.
| Border idea | Typical DIY material cost | 60-ft rough budget | Best use | Maintenance level |
|---|---|---|---|---|
| Spade-cut trench edge | $0-$0.75 per linear foot if tools are owned | $0-$40, or $25-$70 to buy a manual edger | Clean bed lines on the lowest budget | High: re-cut 1-3 times per growing season |
| Mulch border strip | $0.50-$2.50 per linear foot | $25-$90 | Plant beds where soil health matters | Medium: refresh mulch annually or seasonally |
| Gravel or river-rock strip | $1.50-$5.00 per linear foot using bagged stone | $70-$220 | Drainage-prone edges, fire-wise zones, pest-resistant strips | Medium: contain and rake back into place |
| Reclaimed brick or paver edge | $0-$1.50 per linear foot salvaged; $2.50-$6.50 new | $0-$390 plus $20-$60 base/sand | Traditional curb appeal and durable bed separation | Low to medium: reset shifted units as needed |
| No-dig plastic or composite edging | $1-$5 per linear foot | $22-$300 depending on kit quality | Fast curves, rental-friendly upgrades, simple beds | Medium: inspect stakes and heaving |
| Natural stone, log, or wood edge | $0-$3 per foot with on-site material; $3-$21.50 purchased stone | $0-$1,290 depending on source | Cottage, rustic, wooded, or informal landscapes | Medium to high depending on material |
Retail examples explain the spread. Bagged shredded mulch may be around $3.33 for 2 cubic feet or $3.97 for 1.5 cubic feet. A 0.5-cubic-foot pea gravel bag may be around $5.97 and cover roughly 2 square feet at a shallow landscape depth. Some no-dig plastic edging kits list around $21.98 for 10 feet, while composite kits may run around $49.98 for 20 feet. For larger projects, bulk mulch or bulk stone can lower the material cost per foot, but delivery charges may erase that savings on small jobs.
The Tool Desk
Outbyte PC Repair FREEClear out junk files and repair common Windows errorsFree Scan →Outbyte Driver Updater FREEFix the driver behind crashes, sound loss and screen glitchesFind Drivers →Use this simple calculator before you shop: linear feet x material cost per foot + base or fabric + stakes + 10 percent waste + tool purchase or rental. For brick, pavers, and stone, include crushed base and leveling sand. For gravel, include fabric and edging on both sides if the strip borders lawn and planting soil.
Idea 1: Spade-Cut Trench Edge
The cheapest garden border is a clean trench cut between lawn and bed. It costs almost nothing if you already own a half-moon edger, flat spade, or sharp square shovel. If not, expect about $25 to $70 for a manual edger. For a 60-foot bed, the out-of-pocket cost can stay between $0 and $40, plus your time.
This is the right choice when the bed line is still evolving, the budget is tight, or you want a classic look without visible edging material. It works especially well around foundation beds, island beds, and long lawn curves where a hard edge would feel too busy.
How to Build It
Mark the edge with a hose or marking paint. Cut straight down 3 to 5 inches along the lawn side, then cut a shallow angled slice from the bed side to remove a small wedge of soil. The finished profile should look like a narrow V or vertical trench, with the lawn side crisp and the bed side slightly lower. Remove loose grass roots and shake soil back into the bed.
Quick wins for a faster PC:
Repair Windows errors before they cause bigger problemsFix Now →Fix the driver behind crashes, sound loss and screen glitchesFind Drivers →Clear out junk files and repair common Windows errorsFree Scan →For mower-friendly maintenance, keep the lawn surface flat beside the trench. Do not create a deep ditch that catches mower wheels. A clean 3-inch-deep edge is usually enough to visually separate the bed and slow grass creep.
Rank #2

- 𝐀𝐛𝐨𝐮𝐭 𝐭𝐡𝐞 𝐄𝐝𝐠𝐢𝐧𝐠: Enhance your garden with our 6-pack landscape edging set, providing 20 ft of total coverage when connected. Each panel measures 40" L x 8" H, creating clean, defined borders while helping keep grass and weeds out for a neat, well-maintained look.
- 𝐃𝐮𝐫𝐚𝐛𝐥𝐞 𝐆𝐚𝐥𝐯𝐚𝐧𝐢𝐳𝐞𝐝 𝐒𝐭𝐞𝐞𝐥 𝐌𝐚𝐭𝐞𝐫𝐢𝐚𝐥: Crafted from rust-resistant galvanized steel, this lawn edging is built to withstand harsh weather conditions. Its durable construction ensures long-lasting performance and maintains its aesthetic appeal, making it an ideal choice for outdoor use and low-maintenance landscaping
- 𝐅𝐥𝐞𝐱𝐢𝐛𝐥𝐞 & 𝐁𝐞𝐧𝐝𝐚𝐛𝐥𝐞 𝐃𝐞𝐬𝐢𝐠𝐧: Our steel garden edging is highly flexible, allowing you to easily shape it to follow the curves of your lawn, flower beds, or landscaping features. Its sturdy build ensures it retains its form over time, providing a reliable solution for your garden design needs.
- 𝐐𝐮𝐢𝐜𝐤 & 𝐄𝐚𝐬𝐲 𝐈𝐧𝐬𝐭𝐚𝐥𝐥𝐚𝐭𝐢𝐨𝐧: Featuring a front-and-back interlocking system, this edging offers hassle-free assembly. The 4-inch sharp teeth easily penetrate the soil for a secure fit, creating a stable garden border. Simply position the edging and tap it into place—no need for complicated tools or steps.
- 𝐕𝐞𝐫𝐬𝐚𝐭𝐢𝐥𝐞 𝐋𝐚𝐧𝐝𝐬𝐜𝐚𝐩𝐢𝐧𝐠 𝐔𝐬𝐞: Perfect for more than just garden borders, this 8-inch landscape edging kit is versatile enough for outlining pathways, separating zones, or building raised garden beds. Elevate your garden design effortlessly with this adaptable garden border kit.
Where It Fails
A spade-cut edge is not set-and-forget. Fast-growing turf can blur the line in a few weeks, and many yards need re-cutting 1 to 3 times per growing season. It also does not hold loose gravel well, and it can erode on slopes or in sandy soil. If you want a border that physically contains material, use one of the hard-edge options below.
Idea 2: Mulch Border Strip
A mulch border is one of the best low-cost upgrades for planting beds because it improves appearance and helps the soil. For a 6- to 12-inch-wide strip, plan on about $0.50 to $2.50 per linear foot depending on depth, bagged versus bulk mulch, and whether you add fabric or edging. A 60-foot run commonly lands around $25 to $90.
Use mulch where plant health matters most. It moderates soil temperature, reduces weed pressure, and makes beds look finished without introducing a hard trip edge. It is also forgiving around curves and tree rings.
Recommended Free Tools
Material and Depth
For most beds, 2 to 3 inches of mulch is enough. More is not better. Mulch piled 5 or 6 inches deep can hold moisture against stems, trunks, siding, or foundation vents. Keep mulch pulled back from tree trunks, shrub crowns, wood siding, and weep areas. Around trees, avoid the volcano shape. Build a wide, shallow ring instead.
Bagged mulch is convenient for small borders. Bulk mulch is usually cheaper per cubic yard on larger jobs, but delivery cost matters. A 2-cubic-foot bag at roughly $3.33 is easy to price: divide the bed area by the coverage at your target depth, then add 10 percent. For a narrow 60-foot strip that is 1 foot wide and 2 inches deep, you need roughly 10 cubic feet before waste, or about five 2-cubic-foot bags.
Installation Notes
Cut a clean trench edge first, remove weeds, and rake the soil smooth. If grass pressure is heavy, use a narrow physical edging strip between lawn and mulch. Landscape fabric can help under decorative mulch in some borders, but we use it selectively. In planting beds that will be amended, divided, or replanted often, fabric can become a maintenance headache. For a simple perimeter strip, it can be useful if it is pinned flat and covered completely.
Refresh mulch thinly. A light top-up looks better and performs better than burying last year’s mulch under another heavy layer.
Idea 3: Gravel or River-Rock Strip
A gravel or river-rock border costs more than mulch but can solve problems mulch does not. Expect about $1.50 to $5.00 per linear foot for narrow DIY borders using bagged product. A 60-foot project often runs $70 to $220 with bagged pea gravel or decorative rock, and less per foot on larger bulk deliveries.
Use gravel where washout is an issue, where pests are a concern, near fire-wise defensible-space areas, or along narrow strips where mulch gets kicked into the lawn. It also works well beside modern patios, concrete walks, and utility zones where a crisp, mineral surface looks intentional.
Containment Matters
Loose stone migrates unless it is contained. If gravel touches lawn on one side and soil on the other, use edging on both sides. That can be no-dig edging, metal edging, brick, or a compact trench edge. Without containment, the mower will eventually throw stones, and the bed will look messy.
For a narrow border, excavate 2 to 3 inches, remove roots and clods, compact the soil lightly, install landscape fabric, pin it every few feet, and add stone to a finished depth of about 1.5 to 2 inches. Do not overfill. Stone above the edging line spills out and creates a trip or mowing hazard.
Pea Gravel Versus River Rock
Pea gravel is small, affordable, and easy to shovel, but it moves under foot traffic. River rock is larger and more decorative, but it costs more and is harder to rake smooth. For a mower edge, smaller stone contained below the mowing line is usually easier to live with. Near downspouts or splash zones, larger stone resists washout better.
Rank #3

- Long-Lasting Galvanized Steel: Made from high-quality galvanized steel with a rust-resistant coating, this metal landscape edging built to resist fading, cracking, and rusting. It withstands all weather conditions, providing long-term durability for any outdoor environment.
- Flexible & Bendable: This yard edging is both flexible and durable. It can be easily bent to suit any shape—whether your garden is square, round, or irregular—without causing any damage, offering a tailored fit for your landscape design.
- Easy Installation: Installing this metal is a breeze! Simply interlock the pieces at the edges for a quick and easy setup that saves you time and effort. (Note: We recommend wearing gloves during installation.
- Versatile for Multiple Applications: Ideal for creating garden fences, defining borders along roadsides, or separating various outdoor zones. This galvanized steel garden edging not only adds a neat structure to your outdoor space but also serves as a decorative element to enhance your landscape’s aesthetic appeal.
- What You’ll Receive: Each set includes 5 metal flowerbed edging borders, 1 pair of installation glove, and 1 instruction manual. The extended spiked design ensures easy installation by helping the barrier penetrate the ground with less effort. Spend more time enjoying your garden and less time maintaining it!
Keep gravel below siding and away from foundation vents. Stone does not decay like mulch, but it can still trap debris and redirect water if the grade is wrong.
Idea 4: Recycled Brick or Paver Edge
Brick and pavers give a garden bed a more permanent look without committing to poured concrete. If you have leftover or salvaged brick, material cost can be $0 to $1.50 per linear foot. New brick or paver materials often run about $2.50 to $6.50 per linear foot before labor. Add $20 to $60 for paver sand or crushed base on a small project.
This is one of the best choices when you want budget curb appeal and a border that can be repaired instead of replaced. A dry-set brick edge can be lifted, re-leveled, and reset after frost movement or root pressure. That is a major advantage over rigid mortar in many residential beds.
Free tools Windows power users keep installed
One-click scans. No signup required.
Best Patterns
For a low border, set bricks flat in a soldier course or running bond. For stronger separation, set them on edge, partially buried. Small units handle curves better than long timbers or large rectangular pavers. Reused materials can look professional if the size, color, and pattern repeat consistently. Random leftovers only look intentional when the layout is disciplined.
Installation Notes
Excavate a consistent trench 5 to 7 inches deep depending on the brick thickness and how high you want the finished edge. Add 2 to 3 inches of compacted crushed base for better stability, then a thin layer of screeded sand. Use a string line for straight runs and a hose for curves. Set each unit tight, tap it level with a rubber mallet, and backfill both sides so the edge resists movement.
For mower-friendly brick edging, keep the top flush or just slightly proud of grade. If the edge sits too high beside turf, mower wheels scalp the lawn or leave a strip that must be trimmed by hand. Near walkways, avoid uneven raised bricks that can become trip hazards.
Freeze-Thaw Advice
In freeze-thaw climates, prioritize drainage and compacted base over mortar. Rigid mortared edges crack when the base moves. Dry-set brick or stone is easier to reset after winter heave. If the soil is clay-heavy, spend extra time on base prep and avoid trapping water under the units.
Idea 5: No-Dig Plastic or Composite Edging
No-dig edging is popular because it is fast, flexible, and easy to install with basic tools. DIY material costs typically run about $1 to $5 per linear foot depending on kit quality, stake count, height, thickness, and UV resistance. Retail examples include 10-foot decorative no-dig kits around $21.98 and 20-foot composite edging around $49.98.
This is a practical choice for curved beds, rental properties, starter landscapes, and projects where the homeowner wants a visible edge without excavation. It is not always the longest-lasting option, but good layout and proper staking make a big difference.
Installation Notes
Cut the bed line first so the edging follows a clean shape. Place the edging on compacted soil, stake it at the manufacturer’s spacing, and add extra stakes at curves, ends, and transitions. If the kit includes too few stakes, buy more. Under-staked plastic edging is the reason many installations look wavy after a season.
Keep the top of the edging flush or slightly proud of grade. Too low, and mulch spills over it. Too high, and it becomes a trimmer scar, trip edge, or visual distraction. For tight curves, warm the edging in the sun before installation so it bends without kinking.
Outdated Drivers Are Slowing You Down
One free scan finds every outdated or missing driver and matches the right update for your exact hardware.Free scan · exact hardware matchWindows Errors? Fix Them Before They Spread
Repair common Windows errors and clear accumulated junk for a smoother, more stable PC - no reinstall needed.Free scan · no reinstallLifecycle Cost
Thin plastic is cheap upfront but may need re-staking or replacement sooner than brick, stone, steel, or concrete. Composite edging usually costs more but handles UV exposure and movement better. If you expect to live with the border for 10 years, compare replacement cost, not just checkout price.
Rank #4

- Rust-Resistant Galvanized Steel: Crafted from durable galvanized steel, our lawn edging is built to withstand various weather conditions and resist rust, ensuring long-lasting performance. This material maintains its aesthetic appeal over time, offering a reliable and low-maintenance solution for outdoor spaces.
- Seamless Connection Design: Our steel edging features a seamless connection that eliminates gaps, resulting in uniform lines and a polished look. Perfect for enhancing the visual appeal of flowerbeds, pathways, and paver edges, it adds a sophisticated touch to any garden.
- Easy Installation: Installing our 6-pack metal landscape edging kit is simple and straightforward. Use a rubber mallet to secure the connectors, creating a sturdy and stable border. No special tools or advanced skills are needed, making it ideal for DIY enthusiasts and professionals alike.
- Versatile Landscaping Applications: This 6-inch landscape edging kit is versatile enough for various landscaping tasks. Ideal for outlining pathways, defining different garden zones, or constructing raised beds, it easily adapts to your outdoor design needs.
- Flexible & Bendable: Our steel garden edging is flexible and bendable, allowing you to effortlessly shape it to fit the curves of your lawn, flower beds, or other landscaping features. Its robust construction ensures it maintains its form over time, providing a dependable solution for all your garden design projects.
Metal edging deserves a mention here. Basic steel or aluminum edging often costs about $5 to $11 per linear foot for materials, so it is not the cheapest option. But it gives a clean line, handles curves, and usually lasts longer than thin plastic. Use capped or rolled-top metal near foot traffic, and avoid sharp exposed edges.
Independent reader supportYour contribution helps us test, update, and keep practical guides available for everyone.Bonus Option: Natural Stone, Log, or Wood Edging
Natural materials can be budget-friendly if you already have them on site or can source them locally. Fieldstone may cost $0 to $3 per linear foot if using on-site stone where allowed. Purchased stone can range from about $3 to $21.50 per linear foot depending on type, thickness, and local availability. Wood edging often falls around $2.50 to $7 per linear foot for materials.
Stone is durable and attractive, but heavy. Use it where the informal look fits the house and landscape. Set stones into a shallow trench, burying roughly one-third of their height so they do not roll or shift. For a cleaner mowing line, choose stones with a reasonably flat top and consistent thickness.
Logs and landscape timbers can work in rustic gardens, but soil contact shortens their life. Wood can rot, attract insects, or shift as it dries. Avoid placing untreated wood against the house, and do not use questionable reclaimed lumber where chemicals may leach into edible garden areas. For curves, wood is usually awkward unless you use short segments.
How to Choose the Right Border for Your Yard
For the lowest cost, choose a spade-cut trench. For plant health, choose mulch. For washout resistance or a fire-wise strip, choose gravel contained by edging. For long-term curb appeal, choose brick or pavers. For fast curves, choose no-dig plastic or composite. For a natural landscape, choose fieldstone or carefully selected wood.
Skill level matters. A trench or mulch strip can be done in 2 to 4 hours for a 60-foot bed. No-dig edging often takes half a day. Brick, pavers, and stone may take a full weekend because excavation, base prep, leveling, and backfill are slower than they look. If the bed has roots, clay, buried irrigation, or grade changes, add time.
Climate matters too. In freeze-thaw regions, flexible and resettable systems are safer than rigid mortar. In hot sun, thin plastic can warp or become brittle faster. In high-rain areas, gravel and stone need drainage fabric and proper containment. In dry regions, keep combustible mulch away from structures and follow local defensible-space guidance where it applies.
The Tool Desk
Outbyte PC Repair FREEClear out junk files and repair common Windows errorsFree Scan →Outbyte Driver Updater FREEFix the driver behind crashes, sound loss and screen glitchesFind Drivers →Mowing should influence every decision. Leave a flat strip of turf beside the edge for mower wheels. Avoid tall, uneven borders along lawn unless you are willing to string-trim every time. On our projects, a border that makes maintenance harder is usually the wrong border, even if it photographs well on day one.
When to DIY and When to Hire a Pro
DIY is a good fit when the border is decorative, shallow, away from utilities, away from drainage structures, and not retaining soil. A homeowner with basic tools can handle trench edging, mulch strips, most no-dig edging, simple gravel borders, and dry-set brick on relatively flat ground.
Hire a pro when the border touches drainage, borders a driveway or public walkway, sits near utilities, requires saw cutting, involves poured concrete, uses large stone, or holds back soil. Also get help when the project changes the grade near the house. Water management is not cosmetic. A few hundred dollars saved on edging can become a much larger repair if water is directed toward the foundation.
Poured or decorative concrete curbing is usually not budget DIY territory. Contractor sources in 2026 commonly cite about $12 to $20 per linear foot for typical residential concrete curbing and $20 to $40 per foot for stamped or colored work. National models can show curbing around $25.71 to $30.60 per foot. That price can be justified for a polished, durable result, but it belongs in a different budget category than the five DIY options above.
Permits are usually not required for a shallow decorative garden edge, but rules change when height, retaining function, property lines, easements, fences, drainage, or public right-of-way are involved. If your border is more than a simple edge, call the local building department before you build.
Best Value

- Do it once, do it Right! Edge Right is the ultimate hammer-in edging. Instead of cheap plastics it's comprised of heavy duty 16-gauge COR-TEN steel.
- Worried about damage from your weed eater? Don't be! Edge Right can take unlimited abuse.
- Edge Right develops a rust patina over time to give a handsome modern look. (It can be sealed too!)
- Uses COR-TEN steel in order to be more malleable for use on curves in your landscape.
- The COR-TEN weathering steel can last well over 100 years.
A Simple Shopping List for a 60-Foot Border
For a spade-cut edge, you need a half-moon edger or flat spade, marking paint or a hose, gloves, and a rake. Budget $0 to $70 depending on whether you own the tool.
For a mulch strip, plan for mulch, a spade or edger, rake, gloves, and optional landscape fabric or pins. At 1 foot wide and 2 inches deep, a 60-foot strip needs roughly 10 cubic feet before waste. Add 10 percent and round up.
For a gravel strip, buy stone, landscape fabric, fabric pins, edging for containment, a hand tamper, and a rake. At 1 foot wide and 2 inches deep, 60 linear feet requires roughly 10 cubic feet of stone before waste. Bagged 0.5-cubic-foot pea gravel adds up quickly, so compare bulk pricing if the project is larger than one small bed.
Do these 3 things before closing this tab:
1Fix the driver behind crashes, sound loss and screen glitches2Repair Windows errors before they cause bigger problems3Scan for outdated or missing drivers - takes under a minuteFor brick or pavers, buy the units, crushed base, leveling sand, stakes, string line, a torpedo level, rubber mallet, hand tamper, and a masonry blade if cuts are needed. Add 10 percent extra units for cuts and breakage.
For no-dig edging, buy the edging kit, extra stakes, a mallet, marking paint, and a utility knife or saw approved for the material. Extra stakes are cheap compared with reworking a wavy edge later.
Final Recommendation
If you want the best result for the least money, start with the bed line. A clean shape makes inexpensive materials look deliberate. For a true shoestring project, use a spade-cut trench and maintain it through the season. For most homeowners, the best balance is either a mulch strip with a crisp cut edge or a dry-set brick/paver border built on a compacted base. Those options look finished, solve real maintenance problems, and can be repaired without tearing out the whole run.
Spend money where it affects performance: base prep, containment, stakes, drainage, and mower clearance. Save money on finishes only after those basics are handled. That is how a budget garden border still looks like part of the landscape instead of a temporary add-on.
Free tools Windows power users keep installed
One-click scans. No signup required.
Frequently Asked Questions
What is the cheapest way to edge a garden bed?
A spade-cut trench is usually the cheapest option. If you already own a spade or half-moon edger, the material cost can be $0. Expect to re-cut the edge 1 to 3 times per growing season.
How much does DIY landscape edging cost per foot in 2026?
Basic DIY options range from about $0 to $0.75 per linear foot for a trench edge, $0.50 to $2.50 for mulch, $1 to $5 for no-dig plastic or composite edging, and $2.50 to $6.50 for new brick materials.
Do I need to call 811 before installing garden edging?
Yes, call 811 before digging, especially if the edge goes deeper than a few inches or sits near meters, irrigation, lighting, utility routes, or service lines. Shallow landscape work can still hit buried lines.
How deep should a garden border trench be?
For a simple spade-cut edge, 3 to 5 inches is usually enough. For brick or paver edging, excavate deeper, often 5 to 7 inches, so there is room for compacted base, leveling sand, and the edging unit.
Recommended Free Tools
Is gravel or mulch better for a garden border?
Mulch is better for plant health and soil improvement. Gravel is better where washout, pests, or fire-wise defensible space are concerns. Gravel needs containment on both sides so it does not migrate into lawn or beds.
When does a garden border become a retaining wall?
If the border is holding back soil, supporting a raised grade, changing drainage, or sitting near a driveway, walkway, property line, or slope, treat it as more than decorative edging and check local rules before building.
Quick Recap
Product prices and availability are accurate as of the date/time indicated and are subject to change. Any price and availability information displayed on Amazon at the time of purchase will apply.

