Quick wins for a faster PC:
Clear out junk files and repair common Windows errorsFree Scan →Scan for outdated or missing drivers - takes under a minuteDriver Scan →The best venting over-range microwave is the one that can move cooking exhaust outdoors through a short, properly sized duct, while fitting your cabinets, clearances, electrical supply, and cooking habits. A 400 CFM label on the box does not guarantee better performance if the duct is pinched, too long, full of elbows, blocked by a damper, or never converted from recirculating mode.
On our kitchen remodels, we treat an over-the-range microwave as both an appliance and a small ventilation system. The microwave has to cook food, but the vent has to capture steam, grease, odors, smoke, and, with gas cooking, combustion byproducts. Those are construction details, not just appliance features.
For most US homes in 2026, expect the appliance itself to run roughly $199 to $1,339 at common retail, with broader listings from about $100 to $2,000. A straightforward replacement often lands around $300 to $800 including a midrange microwave and labor. A first-time exterior-vented installation can commonly reach $600 to $1,500 or more once ductwork, cabinet work, electrical changes, or wall and roof penetrations are involved.
If you want the short answer: choose exterior venting when practical, verify the duct path before buying, aim for 300 to 400 CFM with a clean duct run, and consider a dedicated range hood instead if you cook heavily on gas, use cast iron often, wok cook, griddle, or generate a lot of smoke.
Recommended Free Tools
#1 Best Overall

- Space-Saving Over-the-Range Design: Maximize kitchen space with this 30-inch microwave that mounts above your stove. This microwave hood vent combo combines cooking and ventilation in one appliance. Measures: 16.12" H x 29.87" W x 15.56" D
- Trusted GE Performance: From quick breakfasts to late-night snacks, this GE over-the-range microwave delivers the reliable performance, user-friendly controls, and everyday convenience that have made GE a trusted name in kitchens for generations
- Powerful 2-Speed Ventilation: Keep small spaces clear of cooking odors, steam and smoke with a 300-CFM ventilation system and 2-speed fan
- Charcoal Filter: Enjoy cooking and cleaner air, too. The replaceable charcoal filter removes fumes and odors that are released from foods during cooking
- Simple One-Touch Controls: One-touch express cooking settings and 4 convenience cook settings provide easy operation for busy lifestyles, while the digital display and electronic keypad provide precise control of cook time and power settings
What “Best Venting” Really Means
Most over-the-range microwaves are about 30 inches wide and are designed to replace the space above a standard 30-inch range. Common capacities run from about 1.1 to 2.1 cubic feet, with cooking power usually around 900 to 1,100 watts. Vent ratings commonly fall around 300 to 400 CFM, with some low-profile and premium models advertising 400 CFM.
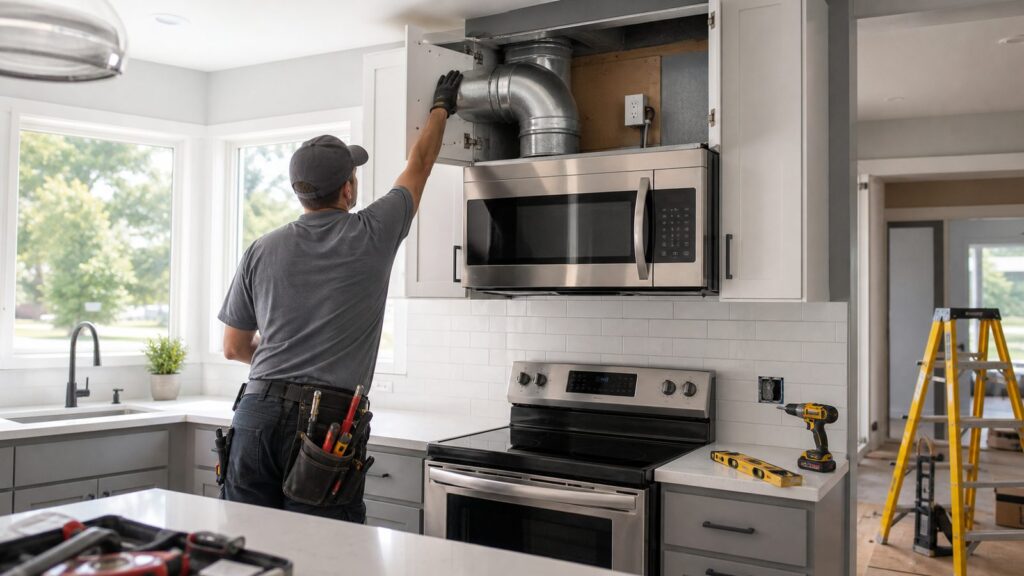
Those numbers matter, but they do not tell the whole story. Ventilation performance depends on four pieces working together: the blower inside the microwave, the duct path through the cabinet or wall, the exterior termination cap, and the installer’s setup of the damper and blower orientation.
We have seen good microwaves perform poorly because the unit was left in recirculating mode, the top knockout was never opened, the wall cap damper was stuck, or the duct took a long route through an upper cabinet before turning again into an attic. In those cases, the homeowner did not buy the wrong brand. The system was not built correctly.
Exterior Venting vs Recirculating Mode
Over-the-range microwaves are commonly installed in one of three configurations: recirculating, rear-vented through an exterior wall, or top-vented through a cabinet and then out a wall or roof. The best-performing option is exterior venting.
Free tools Windows power users keep installed
One-click scans. No signup required.
Exterior-ducted venting
Exterior venting sends air outdoors. It is the better choice for smoke, moisture, grease, odors, and combustion byproducts. If the range backs up to an exterior wall, a rear vent can be the cleanest approach. If the range is on an interior wall, the duct may need to rise through the upper cabinet and travel to an exterior wall or roof cap.
A short, straight duct to an exterior wall usually beats a long roof route with several elbows. In real kitchens, duct geometry can matter more than moving from a 300 CFM unit to a 400 CFM unit.
Recirculating venting
Recirculating mode pulls air through grease and charcoal filters, then returns it to the kitchen. It can help with some grease and odor, but it does not remove moisture from the house and does not exhaust combustion byproducts outdoors. This mode is often used in apartments, condos, masonry buildings, or finished homes where a new duct path is not practical.
Many over-the-range microwaves ship ready for recirculation or are factory configured that way. For exterior venting, the installer often has to rotate the blower, remove a knockout, attach the damper, and align the duct. Missing that step is one of the most common reasons a “vented” microwave does not actually vent outdoors.
The Buying Checklist We Use Before Choosing a Model
Before looking at finishes, smart features, or sale prices, verify the construction conditions. A microwave that fits the opening and vents properly is better than a fancier model that fights the house.
1. Exterior-vent compatibility
Confirm that the microwave can be configured for the vent direction you need: rear, top, or recirculating. Read the manufacturer’s installation manual before purchase, not after delivery. The manual is the final authority for duct size, maximum equivalent duct length, clearances, mounting hardware, damper setup, and blower conversion.
Rank #2

- Large Capacity: 13.9"D x 29.9"W x 16.4"H. Featuring a spacious interior, this 1.7 cubic feet microwave oven includes a 12.4-inch turntable and will serve as your top sous chef for any meal or cooking adventure.
- 10 Cooking Levels: With a 1000-watt output, this over-the-range microwave oven has 6 quick menus for your daily meals, including settings for Popcorn,Potato, Beverage, Melt/Soften, Reheat, and Defrost.
- Speedy Cooking: For quick action, press numbers 1, 2, or 3 for using the 100% power level at 1-3 minutes.
- Multi-stage Cooking: Save time by cooking with 90% microwave power for 10 minutes and then cooking with 50% power for 20 minutes in one time setting.
- 300 CFM Vent Fan with Light: With a 2-speed strong suction, the powerful vent on this stainless steel microwave helps to remove fumes and odors while an integrated light offers focused lighting while cooking.
2. Cabinet opening width
Most over-the-range microwaves are made for a 30-inch-wide cabinet opening. A 36-inch range or nonstandard cabinet layout may require a trim solution, cabinet work, or a different ventilation plan. Measure the actual opening, not just the range width.
3. Cabinet depth and upper-cabinet space
Check cabinet depth, interior cabinet height, shelf placement, and whether the duct and outlet can fit without crowding. A top-vented microwave usually needs space inside the upper cabinet for the duct transition. A poorly planned transition can steal storage space or force a restrictive duct bend.
Do these 3 things before closing this tab:
1Clear out junk files and repair common Windows errors2Fix the driver behind crashes, sound loss and screen glitches3Repair Windows errors before they cause bigger problems4. Cooktop clearance
Measure from the cooking surface to the bottom of the upper cabinet and to the expected bottom of the microwave. Low-profile models can help when the cabinet is too low or when the homeowner wants more room over taller pots. Standard OTR units offer more microwave cavity height, but they can make the cooktop feel cramped if the cabinet layout is already tight.
5. Backsplash height and wall conditions
Tile, stone, uneven plaster, old range-hood holes, and thick backsplashes can affect the mounting plate and rear duct alignment. If the microwave is replacing an old hood, the existing duct may not line up with the new template.
6. Outlet location
Most OTR microwaves plug into a grounded 120V receptacle located in the upper cabinet. If there is no properly placed outlet, budget for electrical work. Do not assume an old hood’s hardwired connection will be suitable for the new microwave.
7. Existing duct orientation
Look inside the upper cabinet and behind the old unit if possible. Determine whether the existing duct exits up, back, or not at all. Also check duct size, cap condition, and whether the duct terminates outdoors. Cooking exhaust should not be dumped into an attic, crawl space, wall cavity, or soffit unless the listed appliance and local code allow a recirculating setup.
The Tool Desk
Outbyte PC Repair FREERepair Windows errors before they cause bigger problemsFix Now →Outbyte Driver Updater FREEScan for outdated or missing drivers - takes under a minuteDriver Scan →CFM: 300 vs 400 Is Not the Whole Decision
CFM stands for cubic feet per minute. It describes how much air the fan is rated to move under test conditions. Many over-the-range microwaves advertise around 300 to 400 CFM. In a clean, short duct run, 400 CFM can be useful. In a restricted duct, the extra rating may mostly become noise.
For light cooking, boiling, reheating, and moderate electric range use, a properly installed 300 CFM OTR microwave can be acceptable. For more frequent frying, sauteing, searing, or gas cooking, 400 CFM is a better target if the duct path can support it.
The capture area is the bigger limitation. An over-the-range microwave is usually shallower than a dedicated range hood and sits higher above the burners than ideal. Smoke rising from the front burners can roll past the microwave before the fan catches it. That is why a dedicated hood often outperforms an OTR microwave even when the CFM number looks similar.
When a Dedicated Range Hood Is the Better Recommendation
An over-the-range microwave is popular because it saves space. It combines cooking, lighting, and ventilation in one cabinet bay. That does not make it the right answer for every kitchen.
Rank #3

- Large Capacity: 13.2"D x 29.9"W x 16.4"H. Featuring a spacious interior, this 1.7 cubic feet microwave oven includes a 12.4-inch turntable and will serve as your top sous chef for any meal or cooking adventure.
- 10 Cooking Levels: With a 1000-watt output, this over-the-range microwave oven has 6 quick menus for your daily meals, including settings for Popcorn, Beverage, Melt/Soften, Reheat, and Defrost.
- Speedy Cooking: For quick action, press numbers 1, 2, or 3 for using the 100% power level at 1-3 minutes.
- Multi-stage Cooking: Save time by cooking with 90% microwave power for 10 minutes and then cooking with 50% power for 20 minutes in one time setting.
- 300 CFM Vent Fan with Light: With a 2-speed strong suction, the powerful vent on this stainless steel microwave helps to remove fumes and odors while an integrated light offers focused lighting while cooking.
We generally steer homeowners toward a dedicated range hood when the home has a gas range, a pro-style range, frequent high-heat cooking, wok cooking, regular griddle use, heavy cast-iron searing, or a household that complains about lingering odors. A hood has a wider capture area, better blower options, more flexible mounting height, and usually better grease management.
If the kitchen is small and storage is limited, an OTR microwave may still be the practical compromise. In that case, choose the best ducted installation you can build, keep the duct route short, and maintain the filters. But if you are already remodeling cabinets, moving electrical, opening walls, and spending real money, compare the OTR plan against a proper hood and a countertop, drawer, or built-in microwave elsewhere.
2026 Cost Guide for Vented Over-Range Microwaves
Costs vary because the appliance is only part of the job. A same-size replacement on an existing bracket and duct is very different from cutting a new wall penetration, modifying cabinets, adding a receptacle, and patching tile.
| Project Scope | Typical 2026 Cost | What Is Usually Included |
|---|---|---|
| Appliance only | About $199 to $1,339 commonly; broad market range about $100 to $2,000 | OTR microwave unit, mounting kit, filters, basic factory hardware |
| Standard replacement labor | About $100 to $300 | Remove old unit, hang new unit, connect to existing outlet and existing vent setup |
| Basic installed project | About $300 to $800 | Midrange microwave plus straightforward labor with minimal changes |
| Add ductwork or convert to exterior venting | About $150 to $600 added | Wall or roof duct route, exterior cap, transitions, sealing, labor |
| Cabinet modification | Often about $400 to $500 added | Adjust cabinet, trim, face frame, shelves, or opening height |
| First-time exterior-vented install | Commonly $600 to $1,500+ | Appliance, labor, ducting, possible electrical, wall or roof penetration, finish repair |
A like-for-like replacement may take two to three hours when the existing bracket, outlet, and duct are usable. A first-time vented installation can take most of a day, and longer if electrical, cabinet, tile, roof, or drywall work is involved.
Roof penetrations, brick or stucco walls, long duct runs, upper-floor kitchens, difficult attic access, custom cabinetry, crown molding, and backsplash patching all raise the price. If makeup air is triggered by local code or by the total exhaust capacity in the home, that becomes a separate design and cost conversation.
Installation Details That Make or Break Performance
Blower orientation
The blower has to face the correct direction. For recirculation, it pushes air through the front grille. For rear venting, it pushes out the back. For top venting, it pushes upward into the duct. This is not a cosmetic step. If the blower is left in the wrong position, air can dump into the cabinet, leak around the chassis, or come out the front instead of leaving the house.
Duct size and equivalent length
Use the duct size and maximum equivalent length listed in the manufacturer’s manual. Equivalent length accounts for straight duct plus elbows, transitions, and caps. A 90-degree elbow can add a meaningful amount of resistance. Multiple elbows can turn a high-CFM microwave into a loud, weak exhaust fan.
Damper conflicts
The microwave damper and exterior cap damper must open freely. If a damper is installed backward, jammed against framing, blocked by a screw, or fighting another damper, airflow drops quickly. During final testing, we check airflow at the exterior cap and listen for damper chatter.
What’s actually slowing this PC down?
Pick the symptom - the matching free tool is one click away.
Cabinet support
An OTR microwave is heavy enough that the mounting plate and upper bolts matter. The rear bracket should be secured into studs or proper structural backing, not just drywall. The upper cabinet bottom must be sound enough to carry the load through the mounting bolts. Old particleboard cabinets, water-damaged cabinet bottoms, and previous oversized holes need attention before the new unit goes up.
Sealing and leakage
Where the duct passes through the cabinet, wall, or roof, gaps should be sealed with appropriate materials. Leaks inside the cabinet can leave grease residue and odor where homeowners store dishes or dry goods. Leaks into wall cavities are worse.
Rank #4

- Pre-programmed auto menus for popcorn, potato, vegetable, pizza, snack, bacon, frozen dinner, rice, and frozen breakfast..Rated Voltage : 120V - 60Hz
- 1000 Watts with ten power settings, clock and kitchen timer, 30 seconds express cooking and child lock.
- Cooktop LED lighting that offers a clear and bright vision for your meals on cooktop.
- Two-speed, 400-CFM venting fan system.
- Turntable On/Off function allows you to cook large dishes.
Safety, Code, and Permit Notes
Range exhaust rules vary by jurisdiction, but the baseline principle is simple: if the appliance is being used as domestic cooking exhaust and is ducted, the duct should terminate outdoors. It should not terminate in an attic, crawl space, garage, wall cavity, or other concealed interior space. Recirculating installation is different because the appliance is listed and configured to filter and return air to the room.
ENERGY STAR guidance for certified homes uses kitchen ventilation of at least 100 CFM intermittent or 5 air changes per hour continuous, with direct exhaust outdoors. Your local building department may enforce different requirements, but this is useful context for what a well-planned kitchen ventilation system is trying to accomplish.
Permits are local. A simple like-for-like appliance replacement is often handled as a normal appliance swap. New electrical circuits, new exterior wall or roof penetrations, structural changes, cabinet alterations, multifamily buildings, condo associations, and HOA-controlled exteriors can trigger review. When we are cutting a new hole through a wall or roof, we want the flashing, fire blocking, electrical, and exterior termination handled correctly the first time.
When to DIY vs When to Hire a Pro
A capable DIYer may handle it when
A DIY installation can make sense when you are replacing a same-size microwave, the old unit was properly installed, the existing outlet is in the upper cabinet, the duct already terminates outdoors, the new model uses the same general vent orientation, and two adults can safely lift and hold the unit. Even then, read the installation manual completely before starting. Templates, bracket height, top bolt locations, and blower setup vary by model.
Basic tools usually include a drill, stud finder, level, tape measure, screwdriver, socket or nut driver, pencil, protective blanket for the range, and possibly metal snips or foil HVAC tape for minor duct alignment. Plan for two to four hours if conditions are clean.
Hire a pro when
Bring in a qualified installer, contractor, electrician, or HVAC-minded remodeler if you need a new duct route, a roof or exterior wall penetration, cabinet modification, electrical relocation, backsplash cutting, structural backing, masonry work, or troubleshooting of poor airflow. Also hire help if the range is gas and clearances are tight, because the consequences of poor ventilation are higher.
PC Slower Than It Used to Be?
A free scan shows the junk files, broken settings and background clutter dragging Windows down - then fixes them in one click.Free scan · Windows 10 & 11Outdated Drivers Are Slowing You Down
One free scan finds every outdated or missing driver and matches the right update for your exact hardware.Free scan · exact hardware matchOTR microwaves are awkward to lift and easy to drop. They also sit over glass cooktops, tile, gas lines, and finished cabinetry. Saving $150 in labor is not much of a win if the unit dents a range, cracks tile, or leaves the vent dumping into an upper cabinet.
Independent reader supportYour contribution helps us test, update, and keep practical guides available for everyone.Features Worth Paying For
After the ducting and fit are settled, then compare appliance features. A good venting over-range microwave should have a fan rating appropriate for your cooking, easy-to-clean grease filters, charcoal filter access if recirculating, bright cooktop lighting, a usable control layout, and enough cooking wattage for everyday use.
For many kitchens, the sweet spot is a 30-inch exterior-vent-capable model with 1.7 to 2.1 cubic feet of capacity, 1,000 watts of cooking power, 300 to 400 CFM ventilation, dishwasher-safe grease filters, LED cooktop lighting, and a finish that matches the appliance package. Low-profile models are worth considering when cabinet height is limited or when the cooktop feels crowded under a standard microwave.
Do not overpay for features that do not match the household. Sensor cooking, convection modes, Wi-Fi controls, and premium finishes can be useful, but they do not fix a weak duct path. If the budget is limited, spend first on proper exterior venting, correct installation, and a reliable midrange unit.
Best Value

- One-touch-cook with 18 Auto Menus, and you can make popcorn, pizza, defrost, soften cream cheese, rice, potato, and so on. Feel free to create delicious dishes efficiently and easily.
- 1.7 cu.ft capacity with 12.4 inch turntable can easily hold your big rotisserie chicken and 12 inches pizza.
- 10-level power settings satisfy your different heating needs. (With 1000W outcome power)
- CFM 300 strong suction power with adjustable fan speeds, effectively removes the unpleasant fumes and odor.
- Bright cooktop light to serve your cooking with a clear view.
Common Mistakes to Avoid
The most common mistake is buying by CFM alone. A restricted duct, long run, undersized transition, or stuck exterior cap can make a 400 CFM unit perform worse than a 300 CFM unit on a short smooth duct.
The second mistake is assuming “vented” means vented outdoors. Many over-the-range microwaves can be installed three ways. If the blower is not rotated and the duct path is not connected, the unit may simply recirculate air back into the kitchen.
Other problems include leaving knockouts in place, misaligning the damper, venting into an attic, using poor cabinet backing, ignoring cooktop clearance, placing the outlet where it blocks the duct, and failing to clean filters. Grease filters should be cleaned regularly, and charcoal filters in recirculating setups need replacement. A clogged filter makes the fan louder and less effective.
Our Practical Recommendation
For most homeowners looking for the best venting over-range microwave, we would start with the house, not the appliance aisle. Confirm whether an exterior vent is practical. Measure the opening, cabinet depth, cooktop clearance, upper cabinet space, outlet location, and duct orientation. Then choose a 30-inch model that supports your vent path, offers 300 to 400 CFM, has 900 to 1,100 watts of cooking power, and gives you filter access you will actually maintain.
If the range backs to an exterior wall, a rear-vented OTR microwave can be a clean, cost-effective solution. If the duct route is long, full of turns, or headed through a difficult roof area, compare the cost against a dedicated range hood. If you are in a condo or cannot alter the exterior, choose a recirculating model with accessible charcoal filters and be realistic about its limits.
The best result is not the most expensive microwave. It is the most coherent system: correct fit, correct blower setup, short duct path, outdoor termination, solid cabinet support, proper electrical supply, and a homeowner who will use the fan because it works without excessive noise.
Frequently Asked Questions
Do over-the-range microwaves actually vent outside?
Many can, but not all are installed that way. Most over-the-range microwaves can be configured for rear venting, top venting, or recirculation. For outside venting, the blower must be oriented correctly and connected to ductwork that terminates outdoors.
Is 300 CFM or 400 CFM better for an over-the-range microwave?
All else equal, 400 CFM gives more ventilation capacity. In real homes, duct design matters just as much. A 300 CFM unit on a short, smooth exterior duct can outperform a 400 CFM unit connected to a long, restricted duct with several elbows.
Can an over-the-range microwave replace a range hood?
It can replace a basic hood in light to moderate cooking situations, especially where space is limited. For gas ranges, frequent frying, cast-iron searing, wok cooking, or griddle use, a dedicated range hood usually performs better because it has more capture area and better fan options.
How much does it cost to install a vented over-the-range microwave in 2026?
A straightforward replacement often costs about $300 to $800 including a midrange appliance and labor. A first-time exterior-vented installation commonly reaches $600 to $1,500 or more if ductwork, electrical, cabinet, wall, roof, or finish repairs are needed.
Do I need a permit to vent a microwave through a wall or roof?
It depends on local rules. A like-for-like replacement often does not trigger much review, but new electrical work, new exterior penetrations, roof venting, structural changes, multifamily buildings, condos, or HOA-controlled exteriors may require approval.
When is a low-profile over-the-range microwave worth it?
A low-profile model is worth considering when the cabinet above the range is low, cooktop clearance is tight, or taller pots feel cramped under a standard microwave. You give up some microwave cavity height, but you can gain a more usable cooking area.
Quick Recap
Product prices and availability are accurate as of the date/time indicated and are subject to change. Any price and availability information displayed on Amazon at the time of purchase will apply.