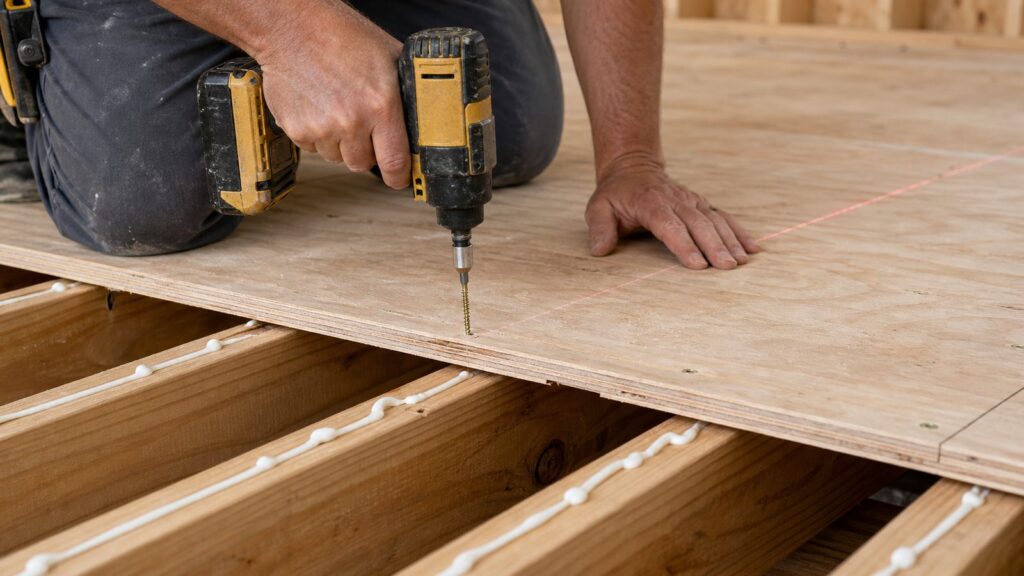
For a standard plywood subfloor fastened to wood joists, our default job-site specification is simple: use a code-accepted #8 or #9 x 2 in. star-drive construction or subfloor screw for 23/32 in. or 3/4 in. plywood. Use coarse threads, a flat or bugle-style countersinking head, and enough length to get about 1 in. of bite into the joist without overdriving the head through the plywood face.
That one sentence covers the most common installation, but it does not cover every floor. A structural subfloor fastened to joists is different from a thin plywood underlayment installed over an existing subfloor. A dry second-floor bedroom is different from a treated-lumber porch transition or a damp crawlspace. A full new subfloor is different from a squeak repair where you are adding screws beside old nails.
As an Amazon Associate I earn from qualifying purchases.
On our job sites, we care about three outcomes: the panel stays tight to the framing, the finished floor stays flat, and the floor does not start talking back six months later. The screw matters, but so do the framing, adhesive, panel spacing, drive depth, and fastening pattern.
The Best Screw for Most Plywood Subfloors
For new 3/4 in. plywood or OSB subfloor over wood joists, use a #8 or #9 x 2 in. construction screw, subfloor screw, or structural wood screw with a star-drive head and coarse wood threads. That is the best all-around answer for most residential work in the United States.
#1 Best Overall

- Package Includes: 1000 pcs #8×1-1/2 in subfloor to Wood collated screws, packed in 20 high-quality plastic strips (50 screws per strip) and delivered in a durable, portable storage bucket
- Anti-Rust Yellow Zinc Finish: Features a premium yellow zinc coating that provides superior corrosion resistance against rain, snow, and chemicals. Ideal for long-term durability in both indoor and outdoor decking projects
- Professional Square Drive: Designed with a precision square flat head for increased torque and "No Stripping" performance. The reinforced neck and sharp point allow for rapid, secure installation into wood studs without pre-drilling
- High-Efficiency Feeding: Specifically engineered for use with Auto-Feed Drivers. The tough, flexible collated strips ensure smooth, jam-free operation and consistent drive depth, significantly speeding up your workflow
- Versatile Material Compatibility: Perfect for fastening subfloors, decks, wood-to-wood structures, and composite boards. The coarse thread design ensures maximum holding power for professional construction and woodworking
The 2 in. length works well because the panel is usually 23/32 in. or 3/4 in. thick, leaving roughly 1 1/4 in. of screw below the panel before accounting for the countersunk head. In real framing, that gives strong joist engagement without using an unnecessarily long screw. If the assembly is thicker, if the manufacturer calls for it, or if a crew is using a collated subfloor system, #9 x 2 1/2 in. screws are also common.
The screw should have a head that seats flush without tearing up the panel. A flat, bugle, or purpose-made countersinking head is preferred. The drive should be star or Torx style. Phillips screws can work, but they cam out more often, especially when the installer is driving hundreds of screws into dense framing. Star drive saves time and reduces stripped heads.
Use coarse threads for wood joists. Fine-thread screws are not the right default for plywood-to-wood framing. They are usually meant for different materials and do not grab framing lumber the way a coarse wood thread does.
What’s actually slowing this PC down?
Pick the symptom - the matching free tool is one click away.
Do not use drywall screws. They are cheap and easy to find, but they are brittle, not intended for structural wood-to-wood subfloor fastening, and commonly snap at the head or shank. A subfloor is not the place to save a few dollars on the wrong fastener.
Quick Decision Table
The right screw depends on what you are fastening and what is below it. This table is how we would narrow it down before buying fasteners.
| Project condition | Practical screw choice | Typical length | Notes from the field |
|---|---|---|---|
| New 23/32 in. or 3/4 in. plywood subfloor to wood joists | #8 or #9 star-drive construction/subfloor screw | 2 in. | Best default for most residential floors. Use adhesive on joists and fasten while the panel is seated. |
| Thicker assembly or production framing | #9 collated subfloor screw | 2 1/2 in. | Often used with auto-feed screw guns. Higher fastener cost, lower labor fatigue on large jobs. |
| Squeak repair through existing plywood into joists | #8 or #9 star-drive construction screw | 1 5/8 in. to 2 in. | Locate joists accurately. Check for plumbing, electrical, and HVAC below before driving screws. |
| Plywood underlayment over existing subfloor | Underlayment-approved screw or ring-shank fastener per flooring instructions | Often 1 in. to 1 1/4 in. | Do not blindly use 2 in. screws. Avoid protruding below the subfloor or hitting hidden systems. |
| Treated lumber, damp crawlspace, wet area, or exterior-adjacent floor | Coated, hot-dip galvanized, stainless, or treated-lumber-compatible screw | Based on assembly thickness | Interior zinc screws are not enough for corrosive or wet-service conditions. |
| Tile prep over wood framing | Follow tile underlayment, backer board, membrane, and panel manufacturer specs | Varies | Tile assemblies are unforgiving. Deflection, panel grade, spacing, and fastening schedule all matter. |
Screw Size, Length, and Drive: What Actually Matters
Gauge: #8 vs #9
For plywood subflooring, #8 and #9 are the common practical sizes. A #8 screw is widely available, economical, and sufficient for many residential subfloor installations when used at the correct spacing. A #9 screw gives a little more shank and head strength and is common in purpose-made subfloor screws, especially collated systems.
We do not choose gauge in isolation. We look at panel thickness, joist material, spacing, fastening schedule, and whether the screw is specifically rated or marketed for construction, framing, decking, or subfloor use. A premium #8 structural wood screw may outperform a generic screw that only looks similar.
Quick wins for a faster PC:
Repair Windows errors before they cause bigger problemsFix Now →Fix the driver behind crashes, sound loss and screen glitchesFind Drivers →Clear out junk files and repair common Windows errorsFree Scan →Length: Why 2 Inches Is the Default for 3/4 Inch Plywood
For 3/4 in. plywood to joists, 2 in. screws are the practical default because they provide meaningful penetration into the joist without being excessive. You want the screw to pull the panel tight and hold it there. Too short, and the screw barely bites. Too long, and you spend more money, drive more slowly, increase the chance of hitting something below, and gain little benefit in a normal floor.
For thinner repair layers or underlayment, 2 in. may be too long. For 1/4 in. or 3/8 in. plywood underlayment over an existing subfloor, the fastener length is usually selected so it secures the underlayment without protruding below the structural subfloor. That is a different problem than fastening the structural panel to joists.
Drive: Star Beats Phillips
Star-drive screws are worth it. When a crew is fastening a full room, the difference is obvious after the first few sheets. Star drive reduces cam-out, strips fewer heads, and lets the installer set the screw flush with better control. On a 300 sq. ft. room, you may drive 500 to 700 screws depending on the fastening pattern. Saving even a few seconds per screw adds up.
Head Style: Flush, Not Crushed
The head should finish flush or just slightly below the plywood surface. Proud heads telegraph through thin flooring and interfere with underlayment, backer board, or resilient flooring. Deeply overdriven heads crush the face plies and reduce holding power. We set the clutch or depth stop, run a test row, check the heads by hand, and adjust before fastening the whole sheet.
Do these 3 things before closing this tab:
1Fix the driver behind crashes, sound loss and screen glitches2Repair Windows errors before they cause bigger problems3Scan for outdated or missing drivers - takes under a minuteSubfloor Screws vs Deck Screws vs Drywall Screws
Construction screws, subfloor screws, structural wood screws, and some deck screws can all be appropriate if the product is suitable for wood-to-wood fastening and the environment. The label matters. The coating matters. The head and thread design matter.
Deck screws are often acceptable for plywood subfloor work when they are coarse-thread, wood-compatible, corrosion-appropriate, and strong enough for the application. Many deck screws have good coatings and star drives, which makes them useful in remodel situations. The downside is that not every deck screw is a structural fastener, and some are designed around exterior decking rather than subfloor clamping performance.
Purpose-made subfloor screws are better when the project is large or squeak control is a priority. They are designed to pull panels tight, sit cleanly, and perform in repetitive installation. Collated subfloor screws paired with an auto-feed screw gun are especially useful for production crews.
Drywall screws are the wrong choice. They are not designed for subfloor movement, structural wood fastening, or long-term shear and withdrawal demands in a floor system. We do not use them for subfloor installation, even for small repairs.
Outdated Drivers Are Slowing You Down
One free scan finds every outdated or missing driver and matches the right update for your exact hardware.Free scan · exact hardware matchWindows Errors? Fix Them Before They Spread
Repair common Windows errors and clear accumulated junk for a smoother, more stable PC - no reinstall needed.Free scan · no reinstallSpacing: How Many Screws Per Sheet?
A common baseline fastening pattern for wood structural panel subflooring is 6 in. on supported panel edges and 12 in. in the field. That aligns with the traditional code-style nail schedule used for structural wood panels, but screw substitutions should be accepted by the local code official, engineer, plans, or manufacturer instructions. Do not assume every screw automatically replaces every nail in every assembly.
In practice, many experienced crews tighten the field spacing. For squeak control, remodels, or floors that will receive sensitive finishes, 6 in. on edges and 8 in. in the field is common. Some crews go 6 in. on every joist line when they are correcting a noisy floor, though that increases screw count and labor.
Rank #2

- Anti-corrosion coating: four layers of high-performance coating makes the screws less prone to rust in outdoor construction, and the flat head wood screws are made of high-quality heat-treated steel.
- Serrated Threads: Serrated threads on the head minimize plate separation, increase strength and ensure secure fastening.
- Plummer head: Star drive wood screws make installation easier and come with a plummer head.
- Dampening Knurled Shoulder: For faster, more secure installation. There are six non-slip bars under the head.
- Type 19 Slot: Extra sharp wood screw tip eliminates the need for pre-drilling, even on hardwoods. Keeps wood from cracking.
For one 4 ft. x 8 ft. sheet over joists spaced 16 in. on center, expect about 45 to 55 screws using a 6 in. edge and 12 in. field pattern. With a tighter 6 in. edge and 8 in. field pattern, expect about 60 to 75 screws per sheet, depending on blocking, sheet orientation, and whether all panel edges are supported.
Before fastening, snap every joist line on the panel. This is one of the simplest ways to improve the job. It raises the hit rate, makes inspection easier, and reduces wasted fasteners. Missing the joist gives you a screw that looks installed but does almost nothing.
Recommended Free Tools
Glue and Screw: The Right Way to Build a Quiet Floor
For new subfloor work, use construction adhesive and screws together. Adhesive helps reduce movement between the panel and joist, which is one of the main causes of squeaks. It does not replace required fasteners. It works with them.
Apply the adhesive immediately before the panel goes down. If the bead skins over before the plywood is placed, you lose bond quality. On warm, dry, windy days, that can happen faster than people expect. We run adhesive, place the sheet, seat it, and fasten it before moving too far ahead.
Start fastening from one edge or corner and work across the panel. That helps avoid trapping a bow, crown, or hump in the plywood. If the framing has a high joist, damaged blocking, or a crown issue, fix that first. Screws cannot make a weak or uneven floor system behave like good framing.
Use the adhesive pattern specified by the adhesive manufacturer or the project documents. As a rough planning number, one tube may cover 1 to 3 panels depending on bead size, joist spacing, blocking, waste, and weather. On a full-room project, adhesive is a small cost compared with the labor of fixing squeaks later.
Panel Gaps, Layout, and Joist Bearing
Fasteners cannot overcome bad panel layout. Plywood panels need room to expand. APA guidance commonly calls for 1/8 in. spacing at panel ends and edges unless the panel edge profile or manufacturer instructions say otherwise. Tongue-and-groove panels should be lightly closed without forcing the joint tight. Underlayment panels may have different small-gap requirements, such as 1/32 in., so do not apply structural subfloor spacing rules blindly to every plywood layer.
Panel ends need proper bearing. If a panel edge does not land on a joist, blocking, or an approved support condition, fastening it harder will not make it right. Stagger panel joints. Avoid creating long continuous seams across the floor. Check that cuts around plumbing, vents, stair openings, and walls do not leave unsupported slivers.
We also check the framing before covering it. Loose joists, cut joists, missing blocking, oversized holes, bad notches, and bounce need to be corrected before the subfloor is installed. A screw can clamp plywood to a joist. It cannot repair an underbuilt span or a joist damaged by a careless plumbing cut.
Cost in 2026: What Screws Add to the Floor
Fastener cost is real, but it is rarely the place to cut corners. In 2026, commodity #8 x 2 in. construction or deck screws commonly run about $28 to $33 for a 5 lb. box. When those boxes contain roughly 555 to 625 screws, the cost lands around $0.048 to $0.060 per screw.
Small boxes cost more per screw. A 1 lb. box of #8 x 2 in. construction screws may be around $10.98 at national retail pricing, which is fine for a squeak repair or closet patch but inefficient for a full room. Premium multipurpose screws cost more. A 650-pack of #8 x 2 1/2 in. premium screws listed around $55.08 works out to about $0.085 per screw.
Using those numbers, one 4 ft. x 8 ft. sheet often takes about $2.50 to $4.50 in commodity screws at normal fastening patterns. With premium screws and tighter spacing, the fastener cost can move closer to $5 to $7 per sheet. Adhesive adds more, often roughly one tube per 1 to 3 panels.
| Fastener type | Typical 2026 retail range | Approx. per-screw cost | Best use |
|---|---|---|---|
| #8 x 2 in. commodity construction/deck screw, 5 lb. box | $28-$33 | $0.048-$0.060 | Most room-size subfloor installs and repairs |
| #8 x 2 in. small 1 lb. box | About $10.98 | Higher than bulk | Small repairs, squeaks, patches |
| Premium #8 x 2 1/2 in. multipurpose screw, 650-pack | About $55.08 | About $0.085 | Higher-end remodels, thicker assemblies, premium drive performance |
| #9 x 2 1/2 in. collated subfloor screws, 750-pack | Varies by retailer and region | Higher upfront | Production crews using auto-feed screw guns |
The bigger cost drivers are length, coating, brand, package size, loose versus collated packaging, treated-lumber compatibility, and whether labor savings from an auto-feed system matter. For one bathroom patch, loose screws are fine. For a whole house, collated screws can pay for themselves in speed and reduced fatigue.
Structural Subfloor vs Plywood Underlayment
This is where many bad recommendations start. A structural plywood subfloor is part of the floor system. It spans across joists and helps carry load. Plywood underlayment is usually a thinner layer installed over an existing subfloor to create a smooth surface for finished flooring.
Free tools Windows power users keep installed
One-click scans. No signup required.
Because the jobs are different, the fastening approach is different. Structural subfloor fasteners need to connect the panel to framing. Underlayment fasteners often need to hold a thin panel flat without penetrating too far or creating bumps that telegraph through flooring.
For underlayment, follow the flooring manufacturer, underlayment manufacturer, and adhesive requirements. Vinyl, resilient flooring, hardwood, tile, and carpet can each have different tolerances. Some finish floors require specific underlayment grade, fastener spacing, patching compound, sanding, or moisture limits. A screw schedule that is excellent for a structural subfloor may be wrong for a thin underlayment layer.
Also pay attention to hidden utilities. When installing underlayment over an existing floor, long screws can hit plumbing, electrical wiring, radiant heat, HVAC lines, or other systems below. That risk is much lower when fastening new subfloor to exposed joists because you can see what is underneath.
Rank #3

- Package Includes: 1000 pcs #8×2 in subfloor to wood collated screws, organized in 20 high-strength plastic strips (50 screws per strip) and packed in a durable, portable storage bucket
- Anti-Rust Yellow Zinc Finish: The premium yellow zinc coating provides superior protection against rain, snow, and chemicals, ensuring long-term durability for both interior subfloors and outdoor decking
- Professional Square Drive: Features a precision square flat head to prevent stripping and a reinforced neck for high-torque stability. The sharp point and coarse thread allow for rapid installation without pre-drilling
- High-Efficiency Performance: Engineered for use with Auto-Feed Drivers, the flexible collated strips provide smooth, jam-free feeding and consistent drive depth to speed up your project workflow
- Wide Material Compatibility: Ideal for fastening subfloors, outdoor decks, and wood-to-wood structures. These screws provide maximum holding power in composite boards, wood studs, and plastics
Special Conditions: Treated Lumber, Moisture, Tile, and Squeaks
Treated Lumber and Damp Areas
If the floor framing includes pressure-treated lumber, or the area is damp, exterior-adjacent, over a crawlspace, or exposed to wet service, use corrosion-compatible fasteners. Interior zinc screws are not the right default. Use screws rated for the treated lumber chemistry and exposure, such as approved coated, hot-dip galvanized, or stainless options where required.
The Tool Desk
Outbyte PC Repair FREERepair Windows errors before they cause bigger problemsFix Now →Outbyte Driver Updater FREEScan for outdated or missing drivers - takes under a minuteDriver Scan →Corrosion failures are slow and expensive. The floor may look fine on installation day and still be wrong. Check the fastener box, the lumber treatment requirements, and the project specifications.
Tile Floors
Tile is unforgiving. Before thinking about screw brand, confirm the floor structure is stiff enough for the tile assembly. Joist span, joist spacing, subfloor thickness, panel grade, underlayment, backer board or membrane, fastener spacing, and movement joints all matter.
When tile prep is involved, follow the tile substrate manufacturer’s instructions. Cement board screws are not the same as subfloor screws. Membrane systems have their own requirements. Do not assume that adding more subfloor screws will fix joist deflection or an undersized floor.
Squeak Repairs
For squeaks, first locate the joists accurately. Then add screws beside existing nails into the joists, pulling the panel tight. A #8 or #9 construction screw, often 1 5/8 in. to 2 in. depending on the existing floor thickness, is a common repair choice.
Work carefully. If the ceiling below is open, inspect for plumbing, wiring, ducts, and radiant heat before driving screws. If the ceiling is closed, use a stud finder, layout clues, floor registers, basement access, or small pilot checks where appropriate. Randomly driving long screws into a finished floor can create a much larger repair.
Installation Steps Our Crews Follow
First, inspect the framing. We look for loose joists, crowns, damaged members, missing blocking, bad notches, plumbing cuts, and bounce. If the frame is wrong, we fix the frame before fastening panels.
Second, dry-fit the plywood. Ends should land properly, seams should be staggered, and edges should have required expansion gaps. For most structural panels, plan for 1/8 in. spacing unless the panel profile or manufacturer instructions say otherwise.
Third, snap joist lines on the panel. This takes a few minutes and saves far more time than it costs. It also gives the finished installation a clean, inspectable pattern.
What’s actually slowing this PC down?
Pick the symptom - the matching free tool is one click away.
Fourth, apply construction adhesive to the joists immediately before laying the panel. Do not spread adhesive too far ahead. Place the sheet before the adhesive skins over.
Fifth, fasten from one edge or corner across the panel. Set the drill clutch or depth control so the heads finish flush. Check the first row before committing to the whole sheet.
Sixth, use the selected fastening schedule. A baseline pattern is 6 in. on supported edges and 12 in. in the field. For tighter work, 6 in. edges and 8 in. field is a common upgrade. Keep screws back from panel edges enough to avoid splitting or breakout, while still catching framing cleanly.
Finally, walk the floor. Listen for movement, check proud fasteners, confirm gaps, and correct misses before the finished floor hides the work.
Code, Permits, and Manufacturer Requirements
Residential codes commonly list fastening schedules for wood structural panel subflooring, often in nail terms. Screws may be accepted when they meet the applicable code, manufacturer, engineered design, or local building department requirements. This is especially important for permitted work, engineered floors, multifamily projects, additions, and structural repairs.
For ordinary like-for-like interior repairs, a permit may not be required in many jurisdictions. For structural floor replacement, joist repair, water-damage reconstruction, bathroom relocation, stair work, additions, or work tied to plumbing and electrical changes, permits and inspections may apply. Local rules control.
Manufacturer instructions also matter. Panel manufacturers, adhesive manufacturers, flooring manufacturers, and fastener manufacturers all publish requirements that may be more specific than a generic rule of thumb. If those instructions conflict, stop and resolve the conflict before installing. That may mean calling the manufacturer, asking the inspector, or having an engineer specify the assembly.
When to DIY vs When to Hire a Pro
A capable homeowner can handle a small squeak repair, a closet patch, or a straightforward plywood replacement if the framing is sound, utilities are known, and the finished flooring plan is simple. Expect a small repair to take 1 to 3 hours once the area is exposed. A full room can easily take a full day for a DIY installer when layout, cutting, adhesive, fastening, and cleanup are included.
Rank #4

- HIGH-PERFORMANCE SUBFLOOR FASTENING: Strong-Drive WSV Subfloor Screws measure at #9 x 1-3/4 in. while featuring a self-tapping point and optimized thread design for fast driving and strong connections. The design reduces splitting while delivering excellent holding power without pre-drilling.
- CORROSION-RESISTANT COATING: A yellow zinc corrosion-resistant coating helps protect against rust in interior applications. Ideal for subfloor installations where durability and long-term performance are critical in high-humidity or moisture-prone environments.
- FAST & EASY INSTALLATION: The sharp point and aggressive threads drive quickly into wood, reducing installation time and torque. Designed to minimize cam-out and splitting, these screws provide smooth, efficient fastening in plywood and OSB subflooring.
- STRONG GRIP & FLUSH FINISH: The advanced thread geometry provides superior grip and resistance to pull-out. The flat head seats flush for a clean finish, helping eliminate floor squeaks and ensure a tight, secure subfloor connection.
- SIMPSON STRONG-TIE RELIABILITY: At Simpson Strong-Tie, our mission is to provide solutions that help people design and build safer, stronger structures. As a pioneer in the building industry, we have an unmatched passion for problem solving through skillful engineering and thoughtful innovation.
Hire a pro when the floor has bounce, water damage, rot, termite damage, cut joists, sagging, uneven framing, tile failure, or unknown utilities below. Also hire a pro when the project involves bathrooms, kitchens, structural repairs, stairs, load-bearing walls, or expensive finish flooring. The cost of a bad subfloor shows up later as cracked tile, squeaks, ridges, gaps, or doors and cabinets that do not behave correctly.
For larger projects, a professional crew also brings the right tools: screw guns with depth control, collated fastening systems, moisture meters, lasers, framing repair equipment, and the experience to know when the subfloor is not the real problem.
Common Mistakes to Avoid
The most common mistake is using drywall screws because they are cheap. The second is using the right type of screw in the wrong length. A 1 1/4 in. screw may be too short for structural subfloor to joists, while a 2 in. screw may be too long for thin underlayment over an existing floor.
Another frequent mistake is missing the joists. If you do not snap lines, you will miss more often than you think, especially in older houses where joist spacing is inconsistent. A screw that misses the joist is mostly cosmetic.
Windows Errors? Fix Them Before They Spread
Repair common Windows errors and clear accumulated junk for a smoother, more stable PC - no reinstall needed.Free scan · no reinstallCrashes, No Sound, or Screen Glitches?
Random freezes, missing sound and display glitches usually trace back to one bad driver. Find and replace yours safely.Free scan · under a minuteOverdriving is also common. Once the head crushes through the face ply, holding power drops. This is worse with soft panels, high-torque impact drivers, and installers working too fast without a depth stop.
Skipping adhesive on new work is another problem. More screws after the fact do not fully replace a good glue-and-screw installation. The adhesive belongs between the panel and joist from the start.
Finally, do not butt panels tight. Wood panels move with moisture. Tight seams can create ridges, squeaks, or buckling after humidity changes. Leave the required gaps and keep the panel layout clean.
Bottom Line
For most plywood subfloor installations over wood joists, choose #8 or #9 x 2 in. star-drive construction or subfloor screws, use coarse threads, set the heads flush, and fasten at about 6 in. on supported edges and 12 in. in the field unless the plans or manufacturer call for something different. For tighter work, 6 in. edges and 8 in. field is a practical upgrade.
Quick wins for a faster PC:
Scan for outdated or missing drivers - takes under a minuteDriver Scan →Clear out junk files and repair common Windows errorsFree Scan →Fix the driver behind crashes, sound loss and screen glitchesFind Drivers →Use adhesive and screws together on new work, leave proper panel gaps, snap joist lines, and fix framing problems before covering them. Avoid drywall screws. Use corrosion-compatible fasteners in treated lumber or damp locations. Treat underlayment as its own assembly, not just a thinner subfloor.
The best screw is not just the one that drives easily. It is the one that matches the floor assembly, holds the panel tight, and keeps the finished floor quiet, flat, and serviceable for years.
Frequently Asked Questions
What size screws should I use for 3/4 inch plywood subfloor?
For most 3/4 inch plywood subfloors over wood joists, use #8 or #9 x 2 inch star-drive construction or subfloor screws. That length usually gives about 1 inch or more of useful bite into the joist while keeping the head flush with the plywood.
Are deck screws OK for plywood subfloor?
Deck screws can be acceptable if they are coarse-thread, wood-compatible, corrosion-appropriate, and suitable for the application. Purpose-made subfloor or structural construction screws are still the cleaner choice for new subfloor work, especially where squeak control matters.
Free tools Windows power users keep installed
One-click scans. No signup required.
How far apart should subfloor screws be spaced?
A common baseline is 6 inches on supported panel edges and 12 inches in the field. Many pros use a tighter pattern, such as 6 inches on edges and 8 inches in the field, especially for remodels or squeak-prone floors.
How many screws do I need for one 4×8 sheet of plywood subfloor?
For a 4 ft. x 8 ft. sheet over 16 inch on-center joists, plan on about 45 to 55 screws with a 6 inch edge and 12 inch field pattern. A tighter 6 inch edge and 8 inch field pattern usually takes about 60 to 75 screws per sheet.
Can I use drywall screws for subfloor?
No. Drywall screws are brittle and are not intended for structural wood-to-wood subfloor fastening. They can snap, strip, or loosen, which can lead to squeaks and poor panel holding.
What is the difference between fastening subfloor and plywood underlayment?
A structural subfloor is fastened to joists and helps carry floor loads. Plywood underlayment is usually a thinner layer installed over an existing subfloor to support the finish flooring. Underlayment often needs shorter fasteners and must follow the flooring or underlayment manufacturer’s instructions.
Quick Recap
Product prices and availability are accurate as of the date/time indicated and are subject to change. Any price and availability information displayed on Amazon at the time of purchase will apply.

