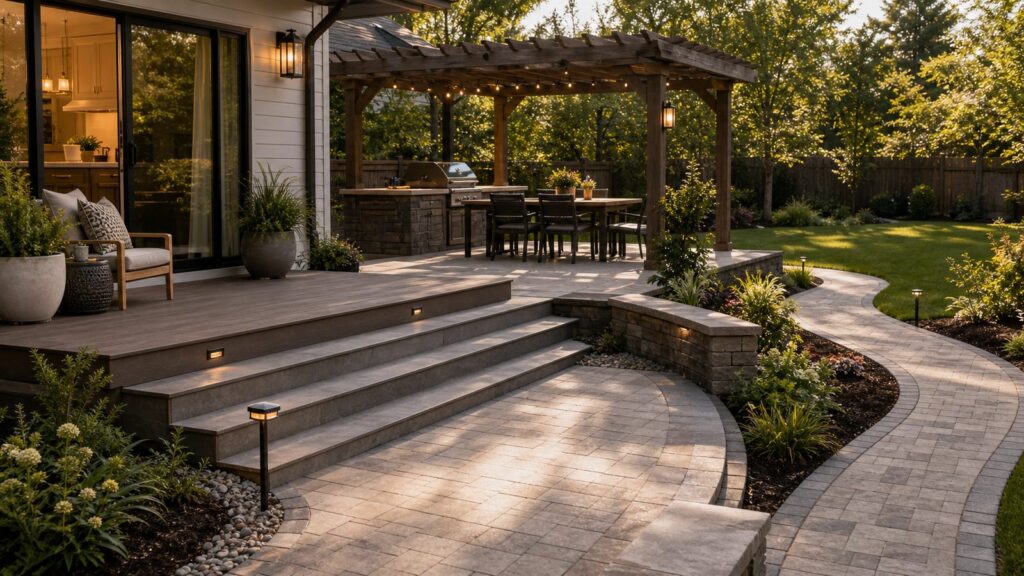
A seamless backyard is not a yard where every surface matches. It is a yard where the house, patio, lawn, grill area, pool, garden, storage route, and evening seating all connect without awkward steps, muddy shortcuts, glare, puddles, or dead corners.
That connection happens through transitional zones. A transitional zone is the in-between space that moves you from one use to another: the door landing outside the kitchen, the first deck platform, the walkway from the patio to the pool, the gravel band that collects runoff, the seat wall that handles a grade change, the pergola edge that turns full sun into usable shade, or the planting buffer between a dining area and a fence.
As an Amazon Associate I earn from qualifying purchases.
On our job sites, the best outdoor spaces usually do three things well. First, they make circulation obvious. Second, they repeat enough visual cues from the house and hardscape to feel intentional. Third, they solve environmental problems like drainage, heat, wind, privacy, and night visibility. When one of those layers is missing, the backyard may look finished in photos but feel inconvenient in daily use.
For 2026 planning, transitional work can be modest or substantial. A simple concrete patio, path, planting edge, or low-voltage lighting upgrade may land in the low thousands. A full backyard package with a deck, covered structure, outdoor kitchen, retaining walls, drainage, utilities, lighting, and planting can easily reach $50,000 to $100,000 or more. The difference is not just finish level. It is scope, grading, access, code requirements, and how many systems have to work together.
#1 Best Overall

- 【Landscape Edging Kit】 -- Includes 3 rolls of landscaping edging (33ft each) and 150 spikes, offering flexible layout options for various landscaping length needs,instead of having to take out long and heavy edging and cut it
- 【Easy Installation】 -- MIXC Garden edging using flexible material bends smoothly into curves for uneven terrain,pre-drilled holes and included spikes enable quick solo setup;Direct installation, no ground excavation required
- 【Durable & Long-Lasting】 -- Made of high-density polyethylene (HDPE), MIXC lawn edging resists UV damage, extreme temperatures, and pressure, ensuring 3-5 years of reliable use without cracking or breaking.
- 【Superior Functionality】 -- Garden border 100ft effectively helps control grass and weed spread, with a L-dual-layer design (soil barrier + root blocker) that prevents soil erosion and root intrusion, ideal for slopes or rainy climates.
- 【Versatile Applications】 -- Perfect for home gardens, farms, slopes, cafes, parks, and more, it works as garden dividers, sidewalk edging, erosion control on slopes, safety barriers for garden areas, and acid soil management,suitable for relatively soft land,too hard ground is not conducive to nailing.
Start at the Back Door, Not the Fence Line
The most common mistake is designing the backyard from the prettiest destination inward. Homeowners pick a fire pit, kitchen, pool edge, or pergola first, then try to connect it back to the house. We prefer to start at the main door and work outward because every backyard trip begins with a threshold.
A good sequence looks like this: interior room, exterior door, code-compliant landing, first outdoor surface, primary destination, secondary destination, service route, and garden edges. If the door is off the kitchen, the first destination may be a dining patio or grill station. If the door is from a family room, the first destination may be a lounge deck. If the door exits near a pool, the transition needs to handle wet feet, towels, storage, and slip resistance.
The landing matters. A door should not open directly onto a narrow step, loose gravel, or a sloped paver surface. The first few feet outside the house need to feel stable and generous enough for someone carrying a tray, guiding a child, or opening the door while another person passes. For many residential projects, we look for a landing that is at least as wide as the door and deep enough to stand comfortably without stepping backward. Local code, door swing, elevation, and stair conditions can change the exact requirement, so this is one of the first details to confirm during design.
Windows Errors? Fix Them Before They Spread
Repair common Windows errors and clear accumulated junk for a smoother, more stable PC - no reinstall needed.Free scan · no reinstallOutdated Drivers Are Slowing You Down
One free scan finds every outdated or missing driver and matches the right update for your exact hardware.Free scan · exact hardware matchFrom that first landing, the main route should be easy to read. A comfortable backyard circulation path is often 4 feet wide or more. That width lets two people pass, gives room for a grill lid or chair movement near the path, and feels much better than a 30-inch squeeze path through furniture. Side-yard and garden paths can be narrower when allowed by local code and actual use, but the main outdoor living route should not feel like an afterthought.
Use Three Layers of Transition
Most strong backyard designs use three kinds of transitions at the same time: physical, visual, and environmental. When all three are planned together, the yard feels smooth even when materials, elevations, and uses change.
Physical transitions
Physical transitions are the things your body notices: steps, slopes, landings, surfaces, railings, walls, paths, and edges. A deck that drops to a patio, a patio that meets lawn, and a walkway that turns toward a pool are all physical transitions.
These details should be deliberate. A single surprise step in the middle of a patio is a trip hazard and a design failure. If grade changes are necessary, we usually make them read as a feature: broad platform steps, a pair of symmetrical treads, a low seat wall, raised planters, or a terraced planting bed. Wider steps feel more natural outdoors than tight interior-style stairs, especially when guests are carrying plates or moving in low light.
Quick wins for a faster PC:
Clear out junk files and repair common Windows errorsFree Scan →Fix the driver behind crashes, sound loss and screen glitchesFind Drivers →Visual transitions
Visual transitions make separate areas feel related. That does not mean the deck, patio, walls, and walkways all need to be the same color. In fact, exact matching often fails because wood, concrete, pavers, stone, and siding weather differently.
A reliable rule is one dominant hardscape material, one secondary transition material, and one accent. For example, a backyard might use large-format concrete pavers as the dominant surface, composite decking as the secondary material, and a dark metal edge or natural stone wall as the accent. Repeating those three choices across the yard creates continuity without making the space flat.
Interior cues can help too. We often align an exterior path with a door or window, run deck boards in a direction that visually extends an interior floor, repeat a trim color on a pergola, or pick a stone tone that relates to the home’s foundation or fireplace. The key is to use exterior-rated materials that can handle water, UV exposure, freeze-thaw movement where applicable, and routine cleaning.
Environmental transitions
Environmental transitions solve comfort problems. A west-facing patio may need a shade structure, fan, tree canopy, or privacy screen before it becomes usable at 5 p.m. A windy yard may need fencing, planting buffers, or a partially enclosed outdoor room. A shaded corner may need mildew-resistant materials and better airflow. A pool zone needs cool, slip-resistant surfaces and a route that keeps wet traffic away from interior flooring.
The Tool Desk
Outbyte Driver Updater FREEFix the driver behind crashes, sound loss and screen glitchesFind Drivers →Outbyte PC Repair FREEClear out junk files and repair common Windows errorsFree Scan →This is where construction experience matters. A backyard can be drawn beautifully and still fail because the hottest seating area has no shade, the grill smoke blows into the dining table, or the lowest paver field collects runoff. Seamless design is not only visual. It is practical.
Backyard Transition Costs in 2026
Costs vary widely by region, access, soil, slope, demolition, utility work, finish level, and permit requirements. Still, current 2026 planning numbers are useful when deciding where to invest. The table below reflects common U.S. installed ranges and national benchmarks for the kinds of elements that create backyard transitions.
| Transition Element | Typical 2026 Cost Range | What Drives the Price |
|---|---|---|
| Basic patio or outdoor room foundation | $3,000-$11,185 | Size, demolition, base prep, drainage, finish, access, and layout complexity |
| Poured concrete patio | $15-$25 per sq. ft.; about $2,250-$5,000 for 150-200 sq. ft. before upgrades | Thickness, reinforcement, color, stamping, excavation, drainage correction, and site access |
| Paver patio or walkway | $20-$35 per sq. ft. | Base depth, soil conditions, edge restraints, cuts, pattern complexity, and drainage |
| Wood deck addition | $18,263 national benchmark | Common 16×20 ft. benchmark, framing, footings, railing, stairs, height, and lumber market |
| Composite deck addition | $25,096 national benchmark | Decking brand, hidden fasteners, railing, fascia, stairs, framing, and elevation |
| Pergola | $1,463-$7,994 marketplace range; $9,000-$32,000 for many larger custom builds | Kit vs. custom, cedar or metal, roof detail, footings, lighting, fans, size, and attachment |
| Patio cover | $12,000-$35,000 for many 20×20 ft. professional installs | Open pergola vs. insulated roof, gutters, electrical, slab work, tie-in, and engineering |
| Outdoor kitchen | $5,000-$50,000 nationally; many custom setups around $13,000-$17,000 before premium upgrades | Appliances, plumbing, gas, electric, counters, masonry, roof coverage, and seating |
| Seat wall or retaining wall | Often $50-$150 per linear foot for simpler regional examples | Height, engineering, drainage pipe, footing, waterproofing, surcharge loads, and soil |
| Landscape design | $2,200-$6,180 per project or $50-$150 per hour | Site plan detail, revisions, planting plan, drainage coordination, and construction documents |
| Whole-backyard transformation | $30,000-$100,000+; luxury or high-cost metro projects can exceed $150,000-$300,000 | Hardscape, structures, utilities, grading, walls, lighting, planting, pool work, and access |
Decks are worth a closer look because they are often the first transition out of the house. Zonda’s latest national Cost vs. Value benchmark lists a wood deck addition at $18,263 with $17,323 in resale value, and a composite deck addition at $25,096 with $22,199 in resale value. Those numbers do not mean every deck will cost exactly that amount, but they are useful because they reflect a common 16×20-foot, 320-square-foot project size used in national remodeling data.
Rank #2

- No Digging: These landscape edgings are simple to install. Just hammer these spikes into the ground to reinforce the shape to prevent warping. It's easy to create a beautiful garden by yourself without hiring a professional.
- Flexible and Durable: This plastic landscape edging border made of polyethylene (PE) is very strong and flexible. It bends easily into curves without breaking. Each bundle is tied with straps for easy transportation and portability.
- Easy to Trim & Long Life: This plastic lawn edging is easier to trim to any length to separate garden flower bed areas than metal garden edging! It won't rust and will keep the garden looking good for a long time.
- Suitable for: This garden edging border is suitable for loose ground and provides a good separation between grass and garden. It can be used to improve the appearance of landscape edges and create clean gardens and pathways. Ideal for landscape edging, patio gardens and lawns.
- More Spikes: Ours kit includes 2 pack 33 ft edging for landscape and 100 pcs landscape stakes (We provide 5 stakes per 1 meter and others provide 3 stakes per meter). You can buy as many as you need depending on the size of your garden.
For smaller scopes, some homeowners see simpler deck projects in the $3,920-$10,540 range, but that usually means less complexity. Elevated decks, composite materials, premium railings, wide stairs, drainage systems below the deck, and difficult access can move the cost well beyond the average.
Make Grade Changes Feel Designed
Backyards are rarely as flat as they look during the first walkthrough. There may be a few inches from the door threshold to the patio, a slope away from the house, a low area near the fence, or a steep change between the lawn and pool. These changes determine whether the finished yard feels smooth or patched together.
We try to avoid isolated, unexpected elevation changes in travel paths. One random 7-inch step between a patio and walkway is easy to miss, especially at night. A better solution is to use broad platform steps, a short run of two or three steps with lighting, a low retaining wall that doubles as seating, or a terrace that makes the grade change visible.
Outdoor steps should be planned with local code in mind. Stair dimensions, landings, handrails, guards, lighting, and slip resistance can all become code issues depending on height, layout, and jurisdiction. The International Residential Code includes detailed requirements for stair geometry and walking surfaces, and local amendments may be stricter. If a deck, stair, retaining wall, or covered structure is involved, assume the details need review before construction.
For sloped yards, the cleanest transition is often not one large retaining wall. Terraced planting, seat walls, and split-level patios can be more comfortable and more attractive. They also give water a place to move if drainage is designed correctly. A 16-inch to 20-inch seat wall can define a room and manage a small grade change. Taller retaining walls may require engineering, geogrid, drainage stone, pipe, waterproofing, and inspections.
Recommended Free Tools
Drainage Should Be Part of the Design
Drainage is one of the clearest differences between a cosmetic backyard makeover and a well-built outdoor living space. Water does not care how good the pavers look. If the slope, base, drains, and discharge points are wrong, the patio will settle, stain, heave, or send water toward the house.
Good transitional zones use drainage as part of the design language. Permeable pavers, gravel bands, planted swales, rain gardens, channel drains, and slight grade breaks can look intentional while solving runoff. EPA guidance identifies permeable pavement systems, including pervious concrete, interlocking pavers, and grid pavers, as ways to reduce runoff by allowing stormwater to move through the surface into stone and soil layers.
That does not mean every patio should be permeable. Soil type, groundwater, freeze-thaw conditions, roof runoff, municipal stormwater rules, and maintenance expectations all matter. In some yards, a properly pitched concrete slab with a channel drain is the right answer. In others, a permeable paver field with an open-graded stone base gives better performance and a softer visual transition to planting beds.
As a basic construction sequence, grading and drainage come before finish surfaces. We want to know where roof water goes, where patio water goes, where downspouts discharge, and where water exits the property before pavers, decking, turf, or planting are installed. Retrofitting drainage after the hardscape is finished is always more expensive than planning it into the base work.
Do these 3 things before closing this tab:
1Scan for outdated or missing drivers - takes under a minute2Clear out junk files and repair common Windows errors3Fix the driver behind crashes, sound loss and screen glitchesChoose Materials That Change Without Clashing
A seamless backyard does not need one continuous patio slab. In fact, changing material can make the space easier to use. The goal is to make each change explain itself.
Concrete works well for clean, modern patios, utility zones, and outdoor kitchen pads. Pavers are useful for walkways, flexible patios, pool approaches, and places where repair access matters. Decking works well where the house floor is elevated above grade or where a warmer surface is desired near the living area. Gravel can be effective in side yards, garden paths, fire pit edges, and drainage bands, but it should be contained with proper edging and used carefully near pools or doors.
Surface texture matters as much as color. Around pools, choose cool, slip-resistant surfaces. In shaded or damp areas, avoid materials that become slick or support mildew easily. For grill zones, consider stain resistance, heat exposure, and cleaning. For dining areas, avoid surfaces so uneven that chairs rock and table legs wobble.
We also look at transitions between fixed and flexible materials. A paver walkway meeting a concrete slab needs edge control and a clean joint. A deck stair landing onto pavers needs a stable base and a predictable final elevation. Turf against pavers needs an edge that can handle mowing and settlement. These small details determine whether the yard still looks intentional five years later.
Free tools Windows power users keep installed
One-click scans. No signup required.
Lighting Connects the Yard After Dark
Backyards are often designed in daylight and used after dinner. Lighting should be part of the transition plan, not a few fixtures added at the end.
Rank #3

- 𝐅𝐥𝐞𝐱𝐢𝐛𝐥𝐞 & 𝐄𝐚𝐬𝐲 𝐭𝐨 𝐈𝐧𝐬𝐭𝐚𝐥𝐥: Each panel measures 40" (L) × 5" (H), including 3" underground stakes for strong anchoring, leaving 2" visible above ground for a clean, low-profile border. The hammer-in design makes installation fast and effortless—perfect for creating neat, professional-looking edges without digging.
- 𝐃𝐮𝐫𝐚𝐛𝐥𝐞 𝐆𝐚𝐥𝐯𝐚𝐧𝐢𝐳𝐞𝐝 𝐒𝐭𝐞𝐞𝐥 𝐂𝐨𝐧𝐬𝐭𝐫𝐮𝐜𝐭𝐢𝐨𝐧: Made from high-quality galvanized steel, this 33ft landscape edging (10-pack) is built to withstand outdoor conditions, providing long-lasting durability and rust resistance for your garden, yard, or flower beds.
- 𝐒𝐞𝐜𝐮𝐫𝐞 & 𝐒𝐭𝐚𝐛𝐥𝐞 𝐃𝐞𝐬𝐢𝐠𝐧: Comes with 11 stakes, ensuring strong anchoring in soil and stability against shifting over time. Ideal for maintaining defined garden edges and pathways.
- 𝐒𝐥𝐞𝐞𝐤 𝐁𝐥𝐚𝐜𝐤 𝐅𝐢𝐧𝐢𝐬𝐡 𝐟𝐨𝐫 𝐌𝐨𝐝𝐞𝐫𝐧 𝐀𝐩𝐩𝐞𝐚𝐥: The powder-coated black steel adds a stylish, modern touch to your outdoor landscaping while blending seamlessly with various garden styles.
- 𝐕𝐞𝐫𝐬𝐚𝐭𝐢𝐥𝐞 𝐆𝐚𝐫𝐝𝐞𝐧 𝐁𝐨𝐫𝐝𝐞𝐫 𝐒𝐨𝐥𝐮𝐭𝐢𝐨𝐧: Perfect for creating crisp, clean separations between lawns, flower beds, pathways, and patios. Easily cut or bend to fit curves, corners, and custom garden designs.
Layered lighting works best. Use path lights for movement, step lights for elevation changes, downlights for dining, task lighting at the grill, and low-glare accent lighting for walls, trees, or planting. The goal is not to flood the yard. The goal is to make movement safe and destinations comfortable.
Step and wall lights need to be planned before masonry, stair risers, or deck fascia are finished. Conduit, transformers, switch locations, smart controls, and fixture aiming all affect the final result. If an outdoor kitchen, pergola fan, patio heater, or audio system is part of the plan, electrical rough-in should happen before final hardscape installation whenever possible.
For homeowners budgeting in phases, we often recommend installing sleeves or conduit during the first hardscape phase even if all fixtures are not installed right away. It is much cheaper to pull wire through planned conduit later than to cut through a new patio.
Plan Each Destination and the Space Between Them
A backyard is not just a patio size. It is furniture clearance, door swings, grill clearance, walking routes, storage, drainage, and views. Before construction, we like to mark the layout full size with paint, tape, flags, or temporary furniture. Homeowners should physically walk from the door to the grill, from the grill to the table, from the table to the lawn, and from the pool to the house.
Dining areas need enough space for chairs to pull out without blocking the main route. A 6-person outdoor table often needs a patio zone closer to 10×12 feet or larger once chair movement and circulation are included. Lounge areas need space for deep seating, side tables, and a route around the furniture. Grill zones need room for the grill lid, hot work area, landing space, and safe separation from siding, railings, and traffic.
Service routes are easy to forget. A well-designed backyard still needs access to hose bibs, cleanouts, irrigation valves, pool equipment, AC units, trash paths, gates, and storage. If the only path to the side yard runs through the dining table, the design will be frustrating in daily use.
Transition-Zone Checklist by Yard Type
Flat yard
Flat yards need definition. Use a patio field, low planting beds, edging, shade structures, and lighting to create a sequence instead of one open rectangle. Even a small change in material between the dining patio and lawn can make the space easier to understand.
What’s actually slowing this PC down?
Pick the symptom - the matching free tool is one click away.
Sloped yard
Sloped yards need grade strategy first. Look at terraces, broad steps, seat walls, retaining walls, and drainage paths before selecting finish materials. Budget extra for excavation, base stone, wall drainage, and inspections.
Small lot
Small yards need tighter planning, not fewer transitions. Use built-in benches, raised planters, narrow planting buffers, sliding or outswing door coordination, and one strong path. Avoid oversized features that force people to walk through seating areas.
Pool yard
Pool transitions need slip resistance, drainage, shade, towel storage, lighting, and a clean route to a bathroom or changing area. Keep gravel away from pool edges where loose stone can migrate into the water or become uncomfortable under bare feet.
Aging-in-place yard
Prioritize wide paths, gentle slopes where feasible, sturdy handrails where required, even lighting, high-contrast step edges, and stable surfaces. Avoid loose materials on primary routes. If a ramp is needed, plan it early because compliant slope and landing requirements take more space than many homeowners expect.
Indoor-outdoor remodel
Coordinate door systems, floor elevations, waterproofing, ledger details, roof runoff, and exterior-rated finishes before construction starts. Large sliders or folding doors can transform a space, but they also make threshold, drainage, flashing, and landing details more critical.
Independent reader supportYour contribution helps us test, update, and keep practical guides available for everyone.When to DIY and When to Hire a Pro
Some backyard transition work is reasonable for a careful homeowner. Planting bed edges, mulch paths, small gravel garden paths, container screens, portable shade, freestanding furniture layouts, and low-voltage lighting kits can be good DIY projects when they do not affect drainage, structure, utilities, or code-required access.
DIY becomes risky when the work changes elevation, carries structural loads, touches the house, manages stormwater, or adds utilities. Deck ledgers, stairs, guards, retaining walls, gas lines, outdoor kitchens, patio covers, electrical circuits, and drainage corrections deserve professional design and installation. Mistakes in those areas do not just look bad. They can cause water intrusion, settlement, unsafe stairs, failed inspections, or expensive rework.
Rank #4

- No Digging: These lawn edgings are simple to install. Just hammer these spikes into the ground to reinforce the shape to prevent warping. It's easy to create a beautiful garden by yourself without hiring a professional.
- Flexible and Durable: This plastic landscape edging border made of polyethylene (PE) is very strong and flexible. It bends easily into curves without breaking. Each bundle is tied with straps for easy transportation and portability.
- Easy to Trim & Long Life: This plastic lawn edging is easier to trim to any length to separate garden flower bed areas than metal garden edging! It won't rust and will keep the garden looking good for a long time.
- Suitable for: This garden edging border is suitable for loose ground and provides a good separation between grass and garden. It can be used to improve the appearance of landscape edges and create clean gardens and pathways. Ideal for landscape edging, patio gardens and lawns.
- More Spikes: Ours kit includes 2 pack 50ft edging for landscape and 150 pcs landscape spikes (We provide 5 spikes per 1 meter and others provide 3 spikes per meter). You can buy as many as you need depending on the size of your garden.
A useful dividing line is reversibility. If a weekend project can be adjusted with a shovel and a few bags of stone, DIY may be fine. If the work requires footings, inspections, gas, electrical, plumbing, structural attachment, engineered wall design, or heavy equipment, hire the right trade from the start.
Permits, Codes, and Construction Sequence
Not every backyard upgrade needs a permit, but many transition features can trigger one. A decorative planting edge may not. A deck ledger attached to the house, stair system, guardrail, retaining wall, gas line, outdoor kitchen, electrical circuit, roofed patio cover, or major grading change often does. Requirements vary by city, county, HOA, and state, so verify locally before work begins.
Code-triggering transitions deserve extra attention because they often sit at the exact point where people move between spaces. Stair rise and run, landing dimensions, guard heights, handrails, deck connections, footing depth, lateral bracing, frost requirements, and termite protection in applicable regions can all affect the design. The 2024 and 2021 IRC provisions include requirements that may apply to residential construction details, and local amendments can modify them.
The right sequence prevents most expensive mistakes. A solid backyard project typically follows this order: design and survey, permit review, utility locates, demolition, grading and drainage, underground utilities and sleeves, footings and base preparation, hardscape or deck framing, electrical and plumbing trim, planting, lighting adjustment, furniture, and final walkthrough.
Skipping that sequence is where budgets get hurt. For example, installing a paver patio before deciding on an outdoor kitchen can mean pulling up finished work for gas, electrical, or plumbing. Building a pergola before confirming footings and drainage can create structural or water-management problems. Planting before grading is complete usually leads to damaged beds and compaction.
Recommended Free Tools
How to Budget Without Overbuilding
The best budget strategy is to identify the permanent framework first. Spend money on grading, drainage, the main patio or deck, structural shade, utility sleeves, and safe circulation. Furniture, planters, portable heaters, and some lighting can be phased later.
For a modest backyard, a practical first phase might be a $3,000-$11,185 patio foundation, a $20-$35 per square foot paver path, corrected drainage, and basic lighting. For a midrange outdoor living plan, the budget may include a deck or patio, a pergola in the $1,463-$7,994 range, planting buffers, and a grill station. A larger project with a covered patio, outdoor kitchen, retaining walls, and integrated lighting can move into the $50,000-$100,000+ range quickly.
We advise homeowners to keep 10% to 20% of the construction budget available for site conditions and decisions that happen after excavation starts. Roots, old concrete, poor soil, buried drain lines, irrigation surprises, and grade corrections are common. A good plan reduces surprises, but it cannot make the ground perfectly predictable.
The Builder’s Takeaway
A seamless backyard is built in the spaces between the obvious features. The deck matters, but so does the stair landing. The patio matters, but so does the joint where it meets the lawn. The outdoor kitchen matters, but so does the route from the kitchen door, the lighting at the grill, the drainage underfoot, and the shade at dinner time.
The Tool Desk
Outbyte Driver Updater FREEFix the driver behind crashes, sound loss and screen glitchesFind Drivers →Outbyte PC Repair FREERepair Windows errors before they cause bigger problemsFix Now →If you want the yard to feel finished, design the transitions first. Start at the door, make the main route generous, handle grade changes visibly, repeat a disciplined material palette, build drainage into the layout, rough in utilities before finish surfaces, and use lighting to connect the spaces after dark. That is how a backyard becomes more than a collection of features. It becomes an outdoor living system that works every day.
Frequently Asked Questions
What is a backyard transitional zone?
A backyard transitional zone is any in-between space that connects one area to another, such as a door landing, deck step, patio edge, walkway, planting buffer, pergola, seat wall, pool surround, or drainage strip. Its job is to make movement, views, comfort, and water management feel intentional.
How wide should a backyard walkway be?
For a primary backyard route, 4 feet wide or more is often comfortable because two people can pass and furniture does not crowd the path. Secondary garden or side-yard paths can be narrower if local code, access needs, and actual use allow it.
How much does it cost to create better backyard transitions?
Small upgrades such as a simple path, lighting, planting edge, or concrete pad may cost a few thousand dollars. Larger projects with patios, decks, pergolas, kitchens, drainage, walls, and utilities commonly range from $30,000 to $100,000+, with luxury or difficult sites going higher.
Do backyard transitions require permits?
Some do and some do not. Planting beds and simple nonstructural paths may not require permits, but decks, stairs, guardrails, retaining walls, gas lines, electrical circuits, patio covers, outdoor kitchens, and major grading changes often require local review.
What is the best material for connecting a patio to a lawn?
Pavers, concrete bands, stone edging, gravel strips, and low planting beds can all work. The best choice depends on drainage, mowing, slope, soil, style, and foot traffic. The edge should stay stable, drain properly, and make the change from hardscape to grass feel deliberate.
Can I build transitional backyard features myself?
DIY can make sense for planting edges, small gravel paths, container screens, portable shade, and some low-voltage lighting. Hire a pro for structural decks, stairs, retaining walls, drainage corrections, electrical, plumbing, gas lines, patio covers, and anything attached to the house.
Quick Recap
Product prices and availability are accurate as of the date/time indicated and are subject to change. Any price and availability information displayed on Amazon at the time of purchase will apply.
Do these 3 things before closing this tab:
1Fix the driver behind crashes, sound loss and screen glitches2Clear out junk files and repair common Windows errors3Scan for outdated or missing drivers - takes under a minute
