The Tool Desk
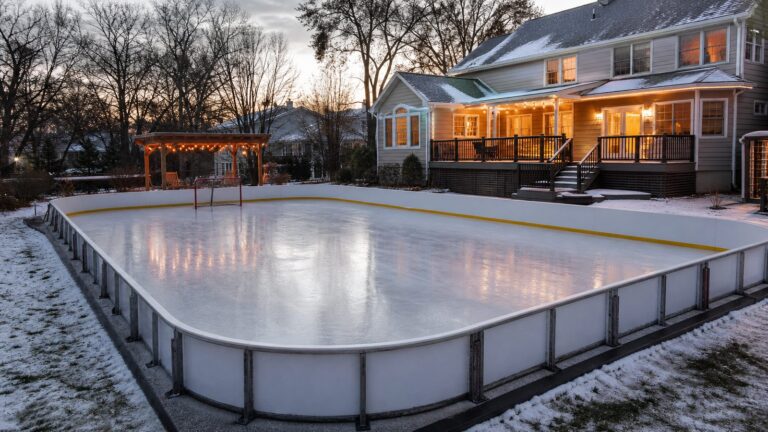
Outbyte Driver Updater FREEScan for outdated or missing drivers - takes under a minuteDriver Scan →Outbyte PC Repair FREEClear out junk files and repair common Windows errorsFree Scan →A backyard ice rink is a temporary winter construction project: pick a flat area, build a framed basin, line it with one continuous liner, fill it once during sustained freezing weather, and maintain the ice with snow removal and thin resurfacing floods. For most homeowners, the practical starter rink is 16 ft. x 32 ft. for kids and casual skating or 20 ft. x 40 ft. for stickhandling and small hockey play.
The two numbers that decide whether the project goes smoothly are slope and water depth. A yard that looks flat can easily have 6 inches of fall across the rink. That can mean about 4 inches of ice at the shallow end and roughly 10 inches at the deep end. More depth means more water, more board pressure, longer freeze time, and more spring drainage to manage.
On our job sites, we treat any seasonal structure the same way we treat a deck layout, drainage correction, or temporary access path: measure first, build square and braced, keep water away from the house, and plan removal before the thaw becomes a problem. The rink itself can be DIY. The mistakes usually happen around grading, bracing, lighting, and drainage.
Start With the Site, Not the Kit
The best backyard ice rink location is a flat, shaded section of yard with safe drainage away from the house. Avoid septic fields, wells, irrigation valve boxes, low basement windows, window wells, deck footings, downspout discharge areas, and any low spot that sends spring meltwater toward the foundation or a neighbor’s property.
Free tools Windows power users keep installed
One-click scans. No signup required.
#1 Best Overall

- ⛸️【Practical Outdoor-Friendly Design】: The ice rink liner features a white reflective surface that supports ice firmness and helps minimize melting during colder months. It creates a solid base for your home rink, making every skating moment enjoyable.
- 📏【Flexible Sizing Options】: The backyard ice rink kit liner is available in various sizes to fit different setups. For optimal use, select a liner at least 5 feet longer and wider than your rink frame. Please measure your area carefully before purchasing.
- 🧊【Durable Material】: Made from robust LDPE with a 7.1 mil thickness, this ice rink liner resists tears and punctures, and is suitable for repeated use throughout the season.
- 🛠️【Simple Installation】: Easily install your backyard ice rink kit liner by laying it flat over the frame, adding water in layers, and letting each layer freeze before adding more. Enjoy a quick and straightforward setup for your skating area.
- 🏒【Multipurpose for Winter Activities】: Designed with a seamless structure for a smooth and consistent surface, perfect for recreational skating, ice games, or practice sessions during winter days.
Shade matters more than most first-time rink builders expect. A rink in full afternoon sun will soften faster, need more resurfacing, and develop rougher edges. If you have a choice, orient the rink where it gets morning light and afternoon shade. Keep it away from roof drip lines, because even a small amount of meltwater dripping from shingles can carve grooves into the surface.
Before buying boards or a liner, measure the planned rectangle. Use a laser level, transit, water level, or a tight string line and tape measure. Check the four corners and the midpoints of each side. Your goal is to know the difference between the high point and the low point.
For a first rink, a slope under 6 inches is the sweet spot. A slope in the 6 to 8 inch range can work, but it requires taller boards and stronger bracing on the low side. Around 12 inches of slope, some modern board systems can still handle the load, but the project becomes less forgiving. You are paying for more water, waiting longer for freeze-up, and putting more pressure on the frame.
Choose the Right Backyard Rink Size
A rink does not need to be regulation size to be useful. The best size is the largest rectangle your yard can support with manageable slope, safe drainage, and room to walk around the frame. Leave at least 2 to 3 feet around the outside where possible so you can shovel, inspect boards, and manage the liner edge.
Common backyard sizes are straightforward:
- 16 ft. x 32 ft.: good for young kids, first-time skaters, and a modest yard. This is often the most practical first DIY rink.
- 20 ft. x 40 ft.: better for family skating, stickhandling, goalie practice, and small hockey play. This is a strong all-around home size.
- 40 ft. x 60 ft.: large enough for more realistic hockey movement, but it requires more water, more snow removal, and better site planning.
- 40 ft. x 80 ft. and larger: a serious backyard rink. At this size, board bracing, lighting, drainage, and neighbor impact should be planned like a small seasonal sports facility.
For hockey, do not assume taller hard boards everywhere are the answer. Higher boards increase cost and load. A better layout is often solid boards where the puck contacts the frame, plus netting behind the goals. Netting protects siding, windows, vehicles, and neighbors without turning the whole rink into a heavy wall system.
Backyard Ice Rink Costs in 2026
For 2026 planning, a basic backyard ice rink can be as low as a few hundred dollars if you reuse lumber and keep the rink small. A typical homeowner should budget $300 to $1,500 for a DIY lumber-and-liner rink. A more finished modular system commonly runs from about $2,000 to $10,000. Premium backyard systems with better boards, bumpers, lighting, accessories, and site work can reach $10,000 to $20,000 or more.
As a broad national planning number, figure around $2 per square foot for a basic installed backyard rink, with an average project near $3,000. That number moves quickly with slope, size, board height, liner quality, and whether you need water delivery or electrical work.
| Rink Type | Typical 2026 Cost | Best For | What Drives the Price |
|---|---|---|---|
| DIY lumber and liner | $300-$1,500 | Handy homeowners, small to mid-size rinks | Lumber, liner thickness, brackets, stakes, fasteners, hose setup, resurfacing tools |
| Entry rink kit | $180-$500 before some boards or plywood | First-time builders who want layout help | Kit hardware, liner size, whether side boards are included |
| No-tool modular kit | About $700 for some 16 ft. x 32 ft. kits; around $3,900 for some 20 ft. x 40 ft. pro-style home kits | Homeowners who want faster setup and less carpentry | Board system, brackets, corners, liner, bumpers, shipping |
| Standard backyard rink system | $2,000-$10,000 | Repeat seasonal use and cleaner installation | Size, board height, rounded corners, liner quality, accessories |
| Premium home rink | $10,000-$20,000+ | Hockey-focused families and long-term seasonal setups | Professional boards, lighting, netting, leveling, storage, yard repair |
| Refrigerated residential rink | Often $45,000-$500,000 for true residential seasonal systems | High-end specialty builds | Chillers, piping, controls, electrical service, design, installation |
| Synthetic ice panels | $10-$25 per sq. ft. | Warm climates or year-round skating practice | Panel quality, subbase, edging, maintenance needs |
Water is usually not the largest line item, but it matters. A municipal hose fill may be inexpensive, but it can take many hours and depends on water pressure. Bulk water delivery is faster. One 2025/2026 seasonal reference point is about $600 for a 6,000-gallon truckload, which is enough for a flat 40 ft. x 60 ft. rink at about 3 inches of depth. Local access, distance, truck size, and minimum charges can change that number.
Calculate Water Volume Before You Fill
Use this formula before you commit to a size:
Length x width x average depth x 7.5 = gallons
Depth must be in feet. A 4-inch average depth is 0.333 feet. For example, a 20 ft. x 40 ft. rink at 4 inches average depth is about 1,995 gallons. A 40 ft. x 60 ft. rink at 3 inches average depth is about 4,500 gallons.
The key word is average. If your shallow end is 4 inches and your deep end is 10 inches, your average depth is about 7 inches. That changes the water volume and the load on the boards.
Water weighs about 8.34 pounds per gallon. A 2,000-gallon rink contains about 16,680 pounds of water. A 4,500-gallon rink contains about 37,530 pounds. The ground can support that when the rink is properly placed, but the side boards are resisting outward pressure, especially at the low side and corners. That is why bracing is not cosmetic.
Rank #2

- PLEASE NOTE - Liner sizes are the size of the liner that you are receiving, not the size of the rink that they will work with. When selecting a liner, select a size that is at least 5' longer and 5' wider than your ice rink to account for rink board height.
- Creates Quality Ice - Our white ice rink liner reflects light easily, keeping your ice thick and solid throughout the season. The white plastic is perfect for making a professional looking backyard ice rink that will last the entire season.
- 6 Mil Thickness - Iron Sleek’s ice rink liner is engineered to a thickness of 6 Mil - creating a tear and puncture resistant liner that is perfect for any outdoor ice rink. It is an incredible liner that works with your existing ice rink kit. We offer a variety of different sizes for just about any skating rink kit.
- UV Resistant - Constructed with UV additives, our ice rink liner will not degrade over the season due to UV rays. This is an absolute necessity for an outdoor ice skating rink as UV rays can severely affect the quality of plastic over time. Skate all winter long with no worries!
- Tough & Durable - Iron Sleek’s ice rink liner is manufactured with strong virgin polyethylene resins, which means no recycled materials. This is to increase the use-life of the plastic and to ensure the overall integrity of the plastic. All of Iron Sleek’s liners are manufactured with high quality low density polyethylene plastic (LDPE).
Materials and Tools for a Real-Ice Backyard Rink
A basic lumber-and-liner rink needs a frame, bracing, a liner, water, and maintenance tools. Do not install the liner until the frame is ready and the ground is clean. Wind, shoes, pets, sticks, and exposed fasteners can damage a liner before water pins it in place.
Frame and Boards
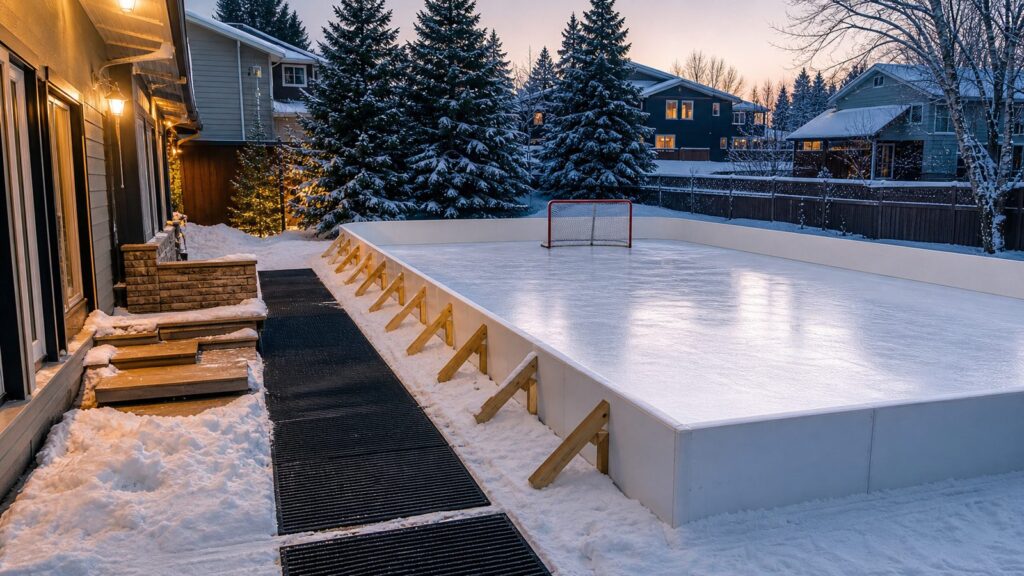
For a small casual rink, many homeowners use 2×8, 2×10, or 2×12 lumber for the perimeter. If your slope creates a deeper low side, that side may need taller boards, doubled lumber, plywood panels, or a purpose-built rink board system. Keep fastener heads away from the liner side, and cover or pad any rough edge that could rub through plastic.
Brace corners heavily. Corners concentrate liner tension and board movement. On deeper sides, use stakes or angled braces at tighter spacing. A light board that looks fine empty can bow once several thousand gallons of water push against it.
Liner
Use one continuous white or clear rink liner sized larger than the frame. The liner should reach up and over the boards with enough slack to settle into the corners. Do not stretch it tight like a tarp. Water needs to push it into place. A tight liner is more likely to tear as the water level rises or the ice expands.
Do not use multiple small tarps overlapped together for the main basin. Seams are failure points. One-piece liners are popular because they let the water self-level and freeze as a single sheet.
Lighting and Access
For evening skating, use outdoor-rated lighting aimed down and away from neighboring windows. Keep cords out of walking paths and away from standing water. If you are adding permanent fixtures, new exterior circuits, or hardwired lighting, plan on an electrical permit in many municipalities.
Build a dry route from the house to the rink. Rubber mats are useful because skates should not cross gravel, pavers, concrete, or metal edging. This protects blades and reduces slips near the rink entrance.
Step-by-Step: How to Build the Rink
1. Mark the Layout
Stake the four corners and measure diagonals to square the rectangle. If both diagonals match, the frame is square. For a 20 ft. x 40 ft. rink, even a few inches out of square is not the end of the world, but a square frame makes liner placement, board bracing, and hockey layout cleaner.
2. Confirm Slope and Board Height
Measure the high and low points again before cutting or setting boards. Plan for at least 3 to 4 inches of ice at the shallow end. If the yard drops 6 inches, that means the deep end may hold 9 to 10 inches of water. Your low-side boards must be tall enough for the water depth plus freeboard above the waterline.
3. Build and Brace the Frame
Set the perimeter boards, connect corners securely, and brace the outside. Keep sharp hardware and splinters away from the liner. On the deep side, reduce brace spacing and inspect for bowing before the fill is complete.
4. Clean the Ground
Remove sticks, stones, sharp ice chunks, toys, garden stakes, and anything else that can puncture the liner. Photograph irrigation heads, drains, utility covers, and yard conditions before snow hides them. That record helps you avoid stake damage and makes spring restoration easier.
Rank #3
- ⛸️【Practical Outdoor-Friendly Design】: The ice rink liner features a white reflective surface that supports ice firmness and helps minimize melting during colder months. It creates a solid base for your home rink, making every skating moment enjoyable.
- 📏【Flexible Sizing Options】: The backyard ice rink kit liner is available in various sizes to fit different setups. For optimal use, select a liner at least 5 feet longer and wider than your rink frame. Please measure your area carefully before purchasing.
- 🧊【Durable Material】: Made from robust LDPE with a 7.1 mil thickness, this ice rink liner resists tears and punctures, and is suitable for repeated use throughout the season.
- 🛠️【Simple Installation】: Easily install your backyard ice rink kit liner by laying it flat over the frame, adding water in layers, and letting each layer freeze before adding more. Enjoy a quick and straightforward setup for your skating area.
- 🏒【Multipurpose for Winter Activities】: Designed with a seamless structure for a smooth and consistent surface, perfect for recreational skating, ice games, or practice sessions during winter days.
5. Install the Liner
Choose a calm day if possible. Lay the liner loosely inside the frame with slack at the corners. Let it drape over the boards. Do not walk on it more than necessary, and do not pull it tight. Use temporary clips or light weights outside the boards to keep wind from moving it.
6. Fill Once During Sustained Freezing Weather
Wait until the forecast shows several consecutive days below freezing with colder nights. A good target is a stretch of weather where the rink can begin freezing without repeated thaw cycles. Fill the rink in one large initial fill so the water self-levels. Do not build the rink by spraying many thin layers over bare grass. That older method is slower, uneven, and more prone to shell ice.
Recommended Free Tools
Once filled, leave it alone. Walking on partially frozen ice is one of the most common ways homeowners tear liners or create water pockets between layers. The top can look solid while the sheet underneath is still weak.
7. Open the Rink Only When the Ice Is Ready
For a home rink, aim for at least 3 to 4 inches of solid ice at the shallow end before casual skating. Deeper sections will take longer to freeze. Snow on top slows freezing, so remove snow carefully once the ice can support light shoveling from the edge.
Maintaining the Ice Through Winter
A backyard rink is not a set-it-and-forget-it feature. Maintenance is not difficult, but it is recurring. The best routine is simple: shovel quickly, repair small defects, and resurface only in the right weather.
After snowfall, shovel before the snow turns into slush or bonds to the surface. Use plastic shovels or snow pushers that will not gouge the ice. Keep piles off the boards where weight can push the liner or frame.
Outdated Drivers Are Slowing You Down
One free scan finds every outdated or missing driver and matches the right update for your exact hardware.Free scan · exact hardware matchWindows Errors? Fix Them Before They Spread
Repair common Windows errors and clear accumulated junk for a smoother, more stable PC - no reinstall needed.Free scan · no reinstallFor cracks, chips, and low spots, use cold water or a snow-and-water slurry. Pack the defect, let it freeze, then shave or scrape the high spot. For resurfacing, apply a thin flood when temperatures are low enough to freeze cleanly. Many homeowners use warm water for a smoother finish, but cold water can work if conditions are right. Thin layers are the rule for maintenance; the single large fill is for the initial basin.
Do not flood during marginal temperatures just because the surface looks rough. Water that does not freeze promptly can create cloudy shell ice, weak layers, and drain paths along the boards. If the rink is soft in the afternoon, wait for evening or overnight cold.
Hockey Details That Make the Rink Work Better
A skating rink and a hockey rink are not the same build. Hockey adds impact, pucks, sticks, lighting needs, and neighbor risk. Plan for those from the start.
For young players, a 20 ft. x 40 ft. rink is enough for shooting, passing, tight turns, and goalie work. A 40 ft. x 60 ft. rink gives better movement but also creates much more snow removal and water volume. If the yard is tight, keep the rink smaller and invest in good boards behind the nets, a clean shooting lane, and puck netting.
What’s actually slowing this PC down?
Pick the symptom - the matching free tool is one click away.
Rounded corners are useful because they reduce dead spots and make puck movement smoother. They also cost more. For a first rink, square corners are acceptable if the goal is casual play. For repeat hockey use, rounded corners and better kick plates are worth considering.
Rank #4
- PLEASE NOTE - Liner sizes are the size of the liner that you are receiving, not the size of the rink that they will work with. When selecting a liner, select a size that is at least 5' longer and 5' wider than your ice rink to account for rink board height.
- Creates Quality Ice - Our white ice rink liner reflects light easily, keeping your ice thick and solid throughout the season. The white plastic is perfect for making a professional looking backyard ice rink that will last the entire season.
- 6 Mil Thickness - Iron Sleek’s ice rink liner is engineered to a thickness of 6 Mil - creating a tear and puncture resistant liner that is perfect for any outdoor ice rink. It is an incredible liner that works with your existing ice rink kit. We offer a variety of different sizes for just about any skating rink kit.
- UV Resistant - Constructed with UV additives, our ice rink liner will not degrade over the season due to UV rays. This is an absolute necessity for an outdoor ice skating rink as UV rays can severely affect the quality of plastic over time. Skate all winter long with no worries!
- Tough & Durable - Iron Sleek’s ice rink liner is manufactured with strong virgin polyethylene resins, which means no recycled materials. This is to increase the use-life of the plastic and to ensure the overall integrity of the plastic. All of Iron Sleek’s liners are manufactured with high quality low density polyethylene plastic (LDPE).
Lighting should be bright enough for puck visibility but aimed down. Light spill and late-night noise are neighborhood issues. Set practical skating hours, especially if slap shots echo between houses.
Independent reader supportYour contribution helps us test, update, and keep practical guides available for everyone.Permits, Safety, and Property Risks
Most temporary backyard rinks do not require a building permit when they are seasonal, low, and not connected to permanent utilities. That said, local rules vary. Some cities regulate temporary structures, exterior electrical work, lighting, grading, drainage changes, or accessory structures. If you are building tall boards, adding permanent lights, bringing in a contractor for electrical work, or changing grade, check with your local building department before work starts.
Electrical safety deserves extra attention. Use outdoor-rated fixtures, GFCI-protected outlets, weatherproof covers, and cords rated for cold outdoor use. Keep cords elevated or routed away from meltwater. Do not bury temporary extension cords under snow where they can be hit by shovels or become hidden trip hazards.
Do these 3 things before closing this tab:
1Scan for outdated or missing drivers - takes under a minute2Repair Windows errors before they cause bigger problems3Fix the driver behind crashes, sound loss and screen glitchesDrainage is the other major risk. A 2,000 to 6,000 gallon thaw needs somewhere to go. Direct meltwater away from foundations, basement windows, neighboring lots, sidewalks, and driveways where refreezing can create a slip hazard. If the yard naturally drains toward the house, solve that before installing a rink.
Also consider turf damage. A liner left too long after thaw can suffocate grass. Poor drainage can leave ruts and dead patches. Plan spring removal before prolonged warm weather. Remove boards, fold the liner carefully, spread out remaining snow piles, and repair turf early enough for spring recovery.
When to DIY and When to Hire a Pro
DIY makes sense when the rink is small, the yard is reasonably flat, drainage is obvious, and you are comfortable building a square frame. A 16 ft. x 32 ft. or 20 ft. x 40 ft. rink with less than 6 inches of slope is a good homeowner project. Expect one day for layout and frame work, a few hours for liner placement and filling, and several days of freezing weather before use.
Hire help when the yard has more than 6 to 8 inches of slope, when the low side needs serious bracing, when water could drain toward the house, or when hockey impact will be heavy. A contractor can help with temporary leveling, board design, bracing, lighting, access paths, and spring restoration without turning the rink into a permanent structure.
Quick wins for a faster PC:
Repair Windows errors before they cause bigger problemsFix Now →Fix the driver behind crashes, sound loss and screen glitchesFind Drivers →Clear out junk files and repair common Windows errorsFree Scan →You should also bring in a licensed electrician for new exterior circuits, hardwired lights, additional GFCI protection, or any permanent power work. Temporary plug-in lights are one thing. A backyard sports area with mounted fixtures is another.
Refrigeration is rarely a normal DIY upgrade. True residential refrigerated systems require specialty design, mechanical equipment, piping, controls, and electrical capacity. Some small add-on concepts are marketed at lower numbers, but full seasonal residential refrigeration commonly falls into a specialty-build range from tens of thousands to several hundred thousand dollars. For most families, a better investment is a flatter site, better shade, stronger boards, and a reliable resurfacing routine.
Common Backyard Rink Mistakes to Avoid
The first mistake is buying a kit before measuring slope. The rink size should fit the yard, not the other way around. A smaller rink on flat ground is usually better than a larger rink fighting a deep low side.
The second mistake is filling too early. If the ground is warm and the forecast is mixed, water moves, liners shift, and the top can freeze while the bottom stays unstable. Wait for sustained cold.
Outdated Drivers Are Slowing You Down
One free scan finds every outdated or missing driver and matches the right update for your exact hardware.Free scan · exact hardware matchWindows Errors? Fix Them Before They Spread
Repair common Windows errors and clear accumulated junk for a smoother, more stable PC - no reinstall needed.Free scan · no reinstallBest Value
- Practical Design for Ice: the white rink liner isn't just for aesthetics, its reflective properties work in maintaining the ice's integrity, by reflecting light, the liner ensures your ice remains robust and melt resistant throughout those chilly winter months
- Suitable Size: choosing the right size for your ice rink liner is crucial, our 10 x 20 ft liner is designed for rinks smaller than its dimensions, Double check dimensions before your purchase to ensure a snug fit
- Reliable Quality: our ice liner is crafted from LDPE material, boasting a thickness of 6 mils; This design choice ensures resistance against potential tears and punctures, making it a reliable choice for outdoor rinks
- Versatility: whether you're a hockey enthusiast, a curling aficionado, or just someone who loves to skate, our liner has got you covered; With no seams, grommets, or heat welded joints, it's ideal for a range of icy activities, from training sessions to fun filled games
- Easy to Use: dreaming of a winter rink in your backyard, our ice rink kit liner makes it a breeze; Simply wait for the cold weather, spread out the liner to fit your frame, and fill the rink with water in stages, let each layer freeze before adding the next, and your icy playground awaits
The third mistake is under-bracing the deep side. Empty boards do not show the load. Thousands of gallons of water will. Brace the low side and corners more aggressively than the high side.
The fourth mistake is ignoring spring. Before winter starts, know where the meltwater will go. A rink that was fun in January can become a foundation, turf, or neighbor problem in March if drainage was not planned.
The fifth mistake is treating hockey as casual skating with nets. Pucks change the build. Add netting, protect windows, control lighting, and think about where missed shots will go.
Bottom Line
A good backyard ice rink is simple, but it is not random. Start with a flat, shaded location. Measure slope. Choose a size the yard can support. Use one continuous liner, fill once during sustained freezing weather, and maintain the sheet with prompt shoveling and thin resurfacing floods.
For many homeowners, the best first build is a 20 ft. x 40 ft. rink with 3 to 4 inches of shallow-end ice, strong low-side bracing, a clean path from the house, and lighting that does not bother the neighborhood. Budget $300 to $1,500 for a practical DIY setup, more for modular boards, and much more for premium or refrigerated systems. The rink will only be as good as the site preparation beneath it.
Frequently Asked Questions
How thick should backyard rink ice be for skating?
For a home rink, plan on at least 3 to 4 inches of solid ice at the shallow end before casual skating. Deeper areas caused by yard slope will take longer to freeze.
What is the best size for a backyard hockey rink?
A 20 ft. x 40 ft. rink is a practical home size for stickhandling, shooting, and small hockey play. A 40 ft. x 60 ft. rink gives better movement but requires much more water, bracing, and snow removal.
How much does a backyard ice rink cost in 2026?
A DIY lumber-and-liner rink commonly costs $300 to $1,500. Modular and pre-assembled home rink systems often range from $2,000 to $10,000, while premium setups can exceed $20,000.
Free tools Windows power users keep installed
One-click scans. No signup required.
Can I build a backyard rink on a sloped yard?
Yes, but slope is the main constraint. Less than 6 inches of slope is ideal for first-time builders. Slopes of 6 to 8 inches can work with taller boards and stronger bracing. Around 12 inches, the project becomes much more demanding.
Should I fill a backyard rink in layers?
For most modern backyard rinks, no. Use a liner and one large initial fill so the water self-levels before freezing. Thin floods are best reserved for resurfacing after the base sheet is frozen.
Do backyard ice rinks need permits?
Many temporary seasonal rinks do not need a building permit, but local rules vary. Check your municipality if you are adding permanent lighting, changing grade, building tall boards, or affecting drainage.
Quick Recap
Product prices and availability are accurate as of the date/time indicated and are subject to change. Any price and availability information displayed on Amazon at the time of purchase will apply.
Quick wins for a faster PC:
Fix the driver behind crashes, sound loss and screen glitchesFind Drivers →Clear out junk files and repair common Windows errorsFree Scan →Scan for outdated or missing drivers - takes under a minuteDriver Scan →