Quick wins for a faster PC:
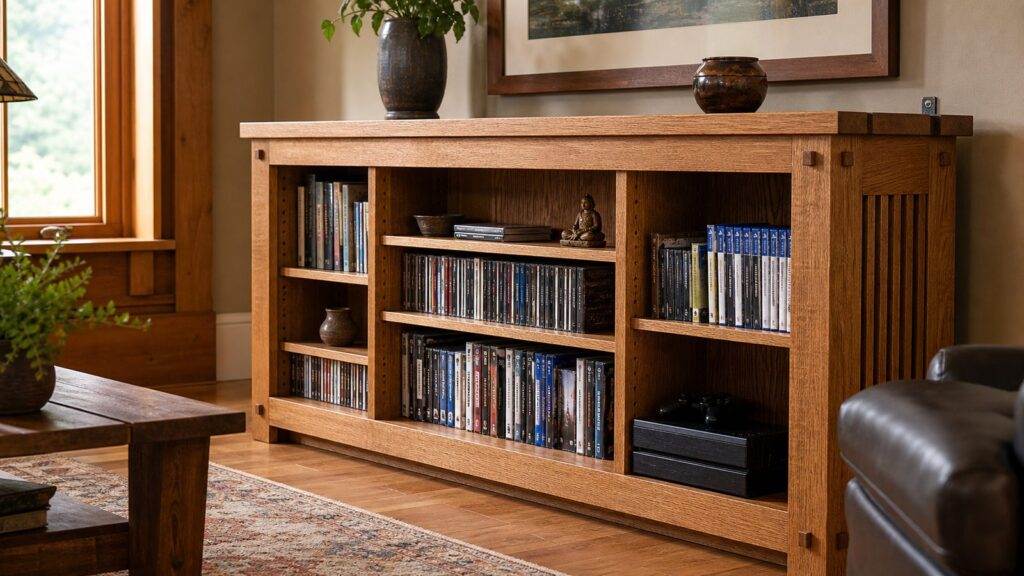
Repair Windows errors before they cause bigger problemsFix Now →Scan for outdated or missing drivers - takes under a minuteDriver Scan →Clear out junk files and repair common Windows errorsFree Scan →An Arts and Crafts CD and DVD storage rack is still a useful woodworking project, but the smart 2026 version should not be built as a fixed CD tower. Build it as small furniture: stable, adjustable, properly finished, and sized for mixed media. That means CDs, DVDs, Blu-rays, console games, boxed sets, remotes, paperbacks, collectibles, and whatever replaces them later.
The basic idea is simple: a narrow wood case with shelves. The details decide whether it looks like a shop-class project or a piece that belongs in a living room. On our job sites, the failures we see in small storage pieces are usually predictable: shelves fixed at the wrong height, cases that rack out of square, blotchy stain, weak backs, no wall anchoring, and glass shelves treated like an afterthought.
As an Amazon Associate I earn from qualifying purchases.
If you are starting from a commercial Arts and Crafts CD/DVD woodworking plan, expect the plan itself to cost about $0 to $15. One current paper plan listing for an Arts and Crafts CD/DVD storage rack is $12.95 and highlights reshufflable glass shelves for different media sizes. That adjustable-shelf idea is the part worth keeping. The rest should be checked against your room, your collection, your safety needs, and your budget before you cut the first board.
Free tools Windows power users keep installed
One-click scans. No signup required.
Start With What the Rack Must Hold
Physical media storage is a dimension problem before it is a style problem. A standard CD jewel case is about 5.6 inches square. DVD and Blu-ray cases are taller, usually around 7.5 inches high, and many box sets are deeper or wider than a standard case. Game cases often land close to Blu-ray dimensions, but collectors’ editions can be unpredictable.
#1 Best Overall
- Flexible Storage: Our media storage cabinet features adjustable shelves, customizing shelf height to fit items of different sizes. Easily adapt the layout to your collections, maximizing space while keeping everything neatly organized and displayed
- Stable & Secure: Built with a widened base for enhanced stability, this DVD storage cabinet resists wobbling and stays firmly in place. The anti-tip kit adds extra protection against accidental bumps, safeguarding your collections for reliable use
- Clear & Organized Storage: This CD cabinet includes kraft paper labeling stickers, so you can mark each compartment your way. Easily sort and identify collectibles at a glance, keeping your media collection neatly organized at all times
- Large-Capacity Storage: The spacious interior and a space-efficient layout maximize every inch of storage. Our movie shelf easily holds multiple CD collections, delivering high storage efficiency in a compact space
- Versatile Design: More than just a CD and DVD cabinet, this manga shelf also stores books, ornaments, and collectibles with ease. Its flexible layout adapts to your various needs, helping you create a more personalized and functional space
For a practical mixed-media rack, we usually design around the largest regular item first, then use adjustable shelves to tighten the spacing for smaller items. A rack that can only hold CDs wastes its usefulness. A rack that can hold 8-inch-tall items on several adjustable shelves stays relevant much longer.
Useful Shelf Dimensions
For CDs only, a shelf opening of 6 inches high works. For DVDs, Blu-rays, and game cases, plan for at least 8 inches of clear vertical space. For small books, box sets, or display objects, leave at least one bay that can open up to 10 to 12 inches.
Depth matters too. A CD rack can be shallow, but a mixed-media unit should usually have 7 to 9 inches of usable shelf depth. If you want items to sit slightly recessed instead of flush with the front edge, use an 8-inch to 10-inch-deep case. A deeper base, rear foot, or low plinth can also improve stability while preserving the Arts and Crafts silhouette.
The Tool Desk
Outbyte PC Repair FREERepair Windows errors before they cause bigger problemsFix Now →Outbyte Driver Updater FREEFix the driver behind crashes, sound loss and screen glitchesFind Drivers →Here is a practical sizing guide:
| Item Type | Typical Size to Allow For | Recommended Shelf Opening | Recommended Shelf Depth |
|---|---|---|---|
| CD jewel cases | About 5.6 in. square | 6 to 6.5 in. high | 6 to 7 in. |
| DVD cases | About 7.5 in. tall | 8 to 8.5 in. high | 7 to 8 in. |
| Blu-rays and games | Similar to DVD height, often shallower | 8 to 8.5 in. high | 7 to 8 in. |
| Box sets and small books | Varies widely | 10 to 12 in. high | 8 to 10 in. |
| Collectibles or remotes | Varies | Adjustable | 8 to 10 in. |
What Makes It Arts and Crafts Instead of Just a Shelf
Arts and Crafts furniture is not about decoration pasted onto a box. The style works because the structure is visible and honest: straight lines, strong posts, exposed rails, simple joinery, stained wood, and balanced proportions. For a media rack, that usually means square side posts, a slightly proud top, lower rails or stretchers, and shelves that look intentional instead of temporary.
Quarter-sawn white oak is the classic choice because the ray fleck and straight grain fit the style beautifully. Straight-grain red oak is a practical second choice. Stained poplar can work when budget matters, though it needs careful sample testing because it can stain unevenly. Pine is affordable and easy to machine, but it dents easily and can blotch. Plywood and MDF can be useful for backs, hidden panels, and painted versions, but an Arts and Crafts piece usually benefits from real wood on the visible frame.
For a freestanding rack in the 36-inch to 60-inch height range, a common build uses 3/4-inch solid stock for side panels and shelves, 1-1/2-inch to 2-inch square legs or posts, and a 1/4-inch or 1/2-inch plywood back let into rabbets. That plywood back is one of the highest-value upgrades in the whole project. It keeps the case square, resists racking, and gives the shelf unit a much more solid feel.
2026 Cost to Build or Buy the Work
Costs vary widely because this project can be anything from a weekend pine build to a small custom furniture commission. Lumber pricing remains sensitive to species, grade, region, drying, and whether you buy rough or surfaced stock. Glass, finish quality, and labor are often bigger swing factors than homeowners expect.
PC Slower Than It Used to Be?
A free scan shows the junk files, broken settings and background clutter dragging Windows down - then fixes them in one click.Free scan · Windows 10 & 11Outdated Drivers Are Slowing You Down
One free scan finds every outdated or missing driver and matches the right update for your exact hardware.Free scan · exact hardware matchFor a DIY budget build using pine or poplar, plywood back, screws, shelf pins, stain, polyurethane, and basic anti-tip hardware, plan on about $75 to $175 in materials. For a hardwood Arts and Crafts build using oak, better hardware, tempered glass shelves, dye or stain, topcoat, and a realistic waste allowance, $175 to $500 or more is a more honest range.
Tempered glass shelves currently run roughly $10 to $38 per square foot in market references. The higher end applies when you need thicker glass, custom sizing, polished or rounded edges, low-iron glass, frosted glass, or a local glass shop minimum charge. Do not price glass only by the square foot; ask about edge finishing, thickness, lead time, and minimum order.
Professional installation numbers need context. Homewyse’s May 2026 national estimate for installed shelving starts at $21.67 to $33.48 per linear foot, but that is a baseline for shelving installation, not fine-furniture work with joinery, glass, stain, delivery, and shop time. A custom freestanding media rack commonly lands around $400 to $1,500 or more. Basic open built-ins often start around $1,000 to $3,000, while mid-range custom built-in media storage can run $3,000 to $7,000 or more. Full-wall shelving can average around $2,500 to $6,000 and exceed $10,000 with premium millwork, doors, lighting, electrical changes, or wall modifications.
| Approach | Typical 2026 Cost | Best For | Watch For |
|---|---|---|---|
| DIY from free or paper plan | $0 to $15 for plan | Woodworkers who already own tools | Plan may need updated dimensions and safety details |
| DIY budget materials | $75 to $175 | Pine, poplar, plywood, wood shelves | Blotch-prone stain, softer wood, less formal look |
| DIY hardwood build | $175 to $500+ | Oak Arts and Crafts appearance | Board-foot waste, glass cost, finishing mistakes |
| Custom freestanding rack | $400 to $1,500+ | Homeowners who want furniture-grade results | Shop minimums, delivery, finish schedule |
| Built-in media storage | $1,000 to $7,000+ | Permanent room upgrade | Wall conditions, trim tie-ins, electrical, permits |
Materials That Make Sense for This Project
For the visible frame, 3/4-inch hardwood is the normal starting point. If you want an authentic Arts and Crafts look, oak is worth pricing first. White oak costs more than pine or poplar, but it gives the piece its character. Red oak is easier to find in many areas and can still look appropriate with the right stain. Poplar is better for painted work or dark stained budget builds. Pine is acceptable for a casual rack, but we do not treat it as a premium furniture choice.
For shelves, you have two practical options: wood or glass. Wood shelves are easier, warmer-looking, and less fragile during fabrication. Glass shelves make the rack feel lighter and allow light to pass through the case. If you use glass, specify tempered glass with polished edges. Tempered glass is commonly described as about four times stronger than annealed glass and breaks into small pellets instead of sharp shards. That does not mean it is unbreakable, but it is the safer choice for removable adjustable shelves.
For the back, use plywood rather than hardboard if the rack is tall or narrow. A 1/4-inch plywood back is enough for many small cases if it is fully captured in rabbets or dados. A 1/2-inch back makes sense for taller racks, heavier loads, or units that may be moved more than once. The back should be squarely installed before final fastening. If the case is out of square at that stage, the shelves and doors, if any, will keep reminding you.
Plan Upgrades We Would Make Before Cutting
A published CD/DVD woodworking plan is a good starting point, but older media plans often assume fixed media sizes and lighter use. Before cutting material, revise the plan around four things: adjustability, stability, load, and finish access.
Use Adjustable Shelf Pins
Drill shelf-pin rows with a story stick, template, or shelf-pin jig so both side panels match exactly. Misaligned holes are one of the fastest ways to make adjustable shelves wobble. Keep shelf pins far enough from edges to avoid blowout and weak bearing. For 3/4-inch side panels, common 5 mm or 1/4-inch shelf pins work well, but follow the hardware manufacturer’s spacing and drill-bit recommendation.
What’s actually slowing this PC down?
Pick the symptom - the matching free tool is one click away.
Use a consistent vertical pattern. A 32 mm cabinet system pattern is clean and flexible, but 1-inch spacing is also fine for a one-off furniture project. What matters is repeatability. Mark the front and bottom of each side panel before drilling so you do not accidentally mirror one part incorrectly.
Rank #2

- Flexible Storage: Featuring adjustable shelves, the media storage cabinet allows you to customize shelf height to accommodate items of different sizes, ensuring efficient storage and display flexibility.
- Stable Design: Our DVD shelf is equipped with a widened base for enhanced stability, preventing wobbling. It includes an anti-tip design to secure against accidental bumps, ensuring your collection remains safe during everyday use.
- Efficient Organization: Equipped with kraft classification labels, you can easily categorize and manage each compartment according to your preferences, ensuring a well-organized media collection.
- Large Storage Capacity: With spacious inner space, our DVD cabinet efficiently utilizes every inch of space, accommodating rich CDs comfortably, maximizing storage capacity in limited space.
- Multi-functional Storage Cabinet: Need a space that stores your music and movies while showcasing precious memories and collections? Our media shelf meets all your needs, accommodating CDs, DVDs, books, and more, adding a personalized touch to your collection.
Strengthen the Base
Tall, narrow racks are naturally easier to tip than wide cabinets. A slightly deeper base, rear foot, or plinth helps. If the case is 8 inches deep, consider a base footprint closer to 9 or 10 inches deep if the design allows it. Keep the front visually light with Arts and Crafts rails, but give the unit enough contact with the floor to behave like real furniture.
Pre-Finish Tight Areas
Stain and topcoat are much easier before the interior becomes a narrow tunnel. We often pre-finish inside faces, shelves, and back panels before final assembly, leaving glue areas masked or unfinished. This is especially useful with dark stains, where missed corners show.
Template Glass After Assembly
If you are using glass shelves, do not order them from theoretical plan dimensions unless the case is very simple and your shop accuracy is proven. Assemble the case, confirm it is square, apply enough finish to stabilize the wood, then template or measure the real openings. Leave small clearances so the shelves lift out easily. A tight glass shelf can chip wood, bind during seasonal movement, or break if forced.
Do these 3 things before closing this tab:
1Repair Windows errors before they cause bigger problems2Scan for outdated or missing drivers - takes under a minute3Clear out junk files and repair common Windows errorsBuild Sequence for a Clean Result
A good build sequence prevents most mistakes. Start by milling all visible stock flat, square, and consistent. Let boards acclimate in the house or shop environment before final milling when possible. Construction lumber that is too wet or unstable is a poor choice for indoor furniture; it can twist, open gaps, and reject finish.
Cut side posts, rails, top, bottom, and shelves to final dimension only after confirming your cut list against the media sizes you actually need. Dry-fit the side assemblies first. If the design uses frame-and-panel sides, keep panels free to move. If it uses simple solid sides, pay attention to grain direction and seasonal movement.
Next, cut rabbets for the plywood back. A captured back should sit cleanly without forcing the case out of square. Dry-fit the entire case with clamps and measure both diagonals. If the diagonal measurements match, the case is square. If they do not, adjust before glue sets.
Drill shelf-pin holes before assembly if access will be easier, but only after clearly marking panel orientation. Sand progressively, usually to 150 or 180 grit for stained oak. Going too fine can reduce stain penetration on some woods. Test stain and topcoat on offcuts from the same boards. Oak, poplar, pine, and plywood veneer all absorb finish differently, and a sample from a different species tells you very little.
After assembly, install the back, apply final finish coats, add shelf pins, place shelves, and load the rack gradually. If using glass shelves, inspect each shelf for chipped corners or rough edges before installation.
Finish Choices That Hold Up
Arts and Crafts furniture usually looks best with a warm brown stain, dye, or layered finish that highlights grain without making the piece muddy. Oak can handle darker stains well. Poplar and pine need more caution. For blotch-prone woods, test a conditioner, washcoat, gel stain, or dye-and-topcoat system before committing to the whole piece.
For a homeowner-friendly finish, oil-based polyurethane, water-based polyurethane, or a stain-and-poly product can all work. Quart-size interior stain/poly products and polyurethane finishes are widely available at home centers. The practical choice depends on odor tolerance, dry time, color, and the look you want. Water-based topcoats dry faster and stay clearer. Oil-based finishes add warmth but need more ventilation and longer cure time.
Plan for the finish schedule. A stain plus two to three topcoats can easily add two to four days because of dry time, sanding between coats, and cure time before loading. Do not load hundreds of cases onto shelves the morning after the final coat. Even when a finish is dry to the touch, it may still be soft enough to scuff or imprint.
Safety: Anchor the Rack
A media rack is not a dresser, but it can still tip. The CPSC’s Anchor It campaign continues to recommend anchoring furniture with shelves, drawers, or doors to help prevent tip-over injuries. The federal STURDY rule applies to clothing storage units, and industry guidance notes that ASTM F2057-23 does not cover shelving units such as bookcases or entertainment furniture. The practical takeaway is simple: do not assume a tall media rack has been stability-tested just because other furniture categories are regulated.
We recommend anchoring any narrow freestanding rack over about 30 inches tall, especially in child-accessible rooms, rentals, playrooms, bedrooms, and family rooms. Use low-profile anti-tip brackets, furniture straps, or a cleat fastened into wall studs. Drywall anchors alone are not the same as fastening into framing. If the rack has a plywood back, you can often place the anchor neatly through the back rail or upper structure so it is not visible from normal viewing angles.
Load heavier items low. Glass shelves, box sets, and books should not all be concentrated near the top. A slightly deeper base helps, but anchoring is still the better answer.
Independent reader supportYour contribution helps us test, update, and keep practical guides available for everyone.Permit and Code Considerations
A freestanding media rack normally does not require a building permit. Local permit handouts in several U.S. cities commonly exempt ordinary shelving, cabinets, and similar nonstructural work when you are not changing walls, electrical systems, plumbing, mechanical systems, fire ratings, or egress. That said, local rules control, and the line changes when a furniture project becomes built-in carpentry.
Recommended Free Tools
You should check with your local building department if the project includes built-in wall attachment beyond simple anti-tip anchoring, new electrical outlets, low-voltage wiring inside walls, hardwired lighting, wall removal, structural changes, fire-rated assemblies, or work in a condo, historic district, or multifamily building. A basic freestanding rack anchored to studs is usually a furniture safety measure. A full-wall media built-in with lighting and outlet relocation is a construction project.
Rank #3

- Enclosed Storage: Closed media storage cabinet doors keep your collection neatly hidden and shielded from dust, while opening them provides clear visibility and easy access. This design delivers tidy organization and reliable protection for valuables
- Stable & Secure: Built with a widened base for enhanced stability, this DVD storage cabinet resists wobbling and stays firmly in place. The anti-tip kit adds extra protection against accidental bumps, safeguarding your collections for reliable use
- Clear & Organized Storage: This CD cabinet includes kraft paper labeling stickers, so you can mark each compartment your way. Easily sort and identify collectibles at a glance, keeping your media collection neatly organized at all times
- Large-Capacity Storage: The spacious interior and a space-efficient layout maximize every inch of storage. Our movie shelf easily holds multiple CD collections, delivering high storage efficiency in a compact space
- Versatile Design: More than just a CD and DVD cabinet, this manga shelf also stores books, ornaments, and collectibles with ease. Its flexible layout adapts to your various needs, helping you create a more personalized and functional space
On our projects, we treat electrical changes as the trigger that deserves early planning. If a client wants LED lighting, concealed outlets, speakers, or cable routing, we coordinate that before cabinets are built. Retrofitting wiring after finished millwork is installed is slower, messier, and more expensive.
When to DIY vs When to Hire a Pro
This is a good DIY project if you already have accurate measuring tools, a table saw or track saw, a drill guide or shelf-pin jig, clamps, sanding equipment, and a suitable place to finish wood. A careful DIY builder can complete the woodworking in a weekend and the finish over several additional days. For a first furniture project, allow two weekends.
Hire a pro if you want quarter-sawn oak, glass shelves, furniture-grade joinery, a flawless stained finish, or a rack that needs to match existing trim and built-ins. Also hire help if the rack will be unusually tall, installed in a child-heavy space, or integrated with electrical or low-voltage wiring.
| Choose DIY If | Hire a Pro If |
|---|---|
| You are comfortable cutting square case parts | The rack must match existing cabinetry or trim |
| You can tolerate minor finish variation | You want premium oak, glass, and shop-grade finish |
| The unit is freestanding and modest in size | The unit is tall, narrow, or part of a built-in wall |
| You already own most tools | You would need to buy tools just for this project |
| Your budget is $75 to $500 | Your budget supports $400 to $7,000+ depending on scope |
Common Mistakes to Avoid
The biggest mistake is building fixed CD-height shelves. That locks the rack into one use and wastes the chance to make a flexible storage piece. Adjustable shelves are not difficult, and they are worth the extra layout time.
The second mistake is skipping the back. A tall open case without a proper back or bracing can rack out of square. A plywood back let into rabbets is stronger and cleaner than a loose panel tacked on as an afterthought.
The third mistake is underestimating weight. Hundreds of discs, glass shelves, and hardwood add up. Build the base accordingly, keep heavy items low, and anchor the rack.
The fourth mistake is using the wrong glass. Thin annealed glass with rough edges does not belong in a media rack. Use tempered glass sized for the span, with polished edges, and support it properly.
The fifth mistake is finishing without samples. Stain that looks rich on oak can look dirty on poplar and blotchy on pine. Test on offcuts from the actual boards, then write down the exact sanding grit, stain time, and topcoat schedule that worked.
A Practical Spec for a Better Media Rack
For most homes, a strong all-around version would be about 42 to 54 inches tall, 22 to 30 inches wide, and 8 to 10 inches deep. Use 3/4-inch oak or poplar for the case, a 1/4-inch to 1/2-inch plywood back captured in rabbets, adjustable shelf holes at 1-inch or 32 mm spacing, and shelves sized for at least 8 inches of clear height where DVDs, Blu-rays, and games will live.
Use wood shelves if durability and simplicity matter most. Use tempered glass shelves if you want a lighter display look and are willing to pay for custom glass. Add a slightly deeper base or plinth, then anchor the rack into studs with low-profile hardware.
That combination gives you the best of the old Arts and Crafts plan and the practical needs of a modern house. It looks like furniture, stores more than CDs, resists movement, and does not ignore safety. That is the difference between building a nostalgic rack and building a piece your home can actually use.
Frequently Asked Questions
How much does it cost to build a wooden CD and DVD storage rack in 2026?
A DIY plan usually costs $0 to $15, with one current Arts and Crafts CD/DVD paper plan listed at $12.95. Budget materials typically run $75 to $175, while an oak Arts and Crafts build with better hardware, finish, and glass shelves can cost $175 to $500 or more.
What wood is best for an Arts and Crafts media storage rack?
Quarter-sawn white oak is the classic choice. Straight-grain red oak is a practical alternative. Poplar can work for a lower-cost stained or painted rack, while pine is best for casual budget builds because it dents and blotches more easily.
Should a freestanding CD/DVD rack be anchored to the wall?
Yes, especially if it is over about 30 inches tall, narrow, heavily loaded, or located where children may access it. Use anti-tip brackets, straps, or a cleat fastened into wall studs.
Are glass shelves safe for media storage?
Glass shelves can be safe when they are tempered, properly sized for the span, polished on the edges, and supported correctly. Avoid thin annealed glass for adjustable shelves.
The Tool Desk
Outbyte PC Repair FREERepair Windows errors before they cause bigger problemsFix Now →Outbyte Driver Updater FREEScan for outdated or missing drivers - takes under a minuteDriver Scan →Do I need a permit to build or install a media rack?
A freestanding rack usually does not require a permit. Check locally if the project becomes a built-in, changes walls, adds lighting, moves outlets, affects wiring, or is in a condo, multifamily building, or historic district.
Can an old CD/DVD rack plan be adapted for modern storage?
Yes. Add adjustable shelves, increase depth to about 8 to 10 inches, allow 8 inches or more of clear shelf height for DVDs and games, strengthen the back, and include anti-tip anchoring.
Quick Recap
Product prices and availability are accurate as of the date/time indicated and are subject to change. Any price and availability information displayed on Amazon at the time of purchase will apply.




