What’s actually slowing this PC down?
Pick the symptom - the matching free tool is one click away.
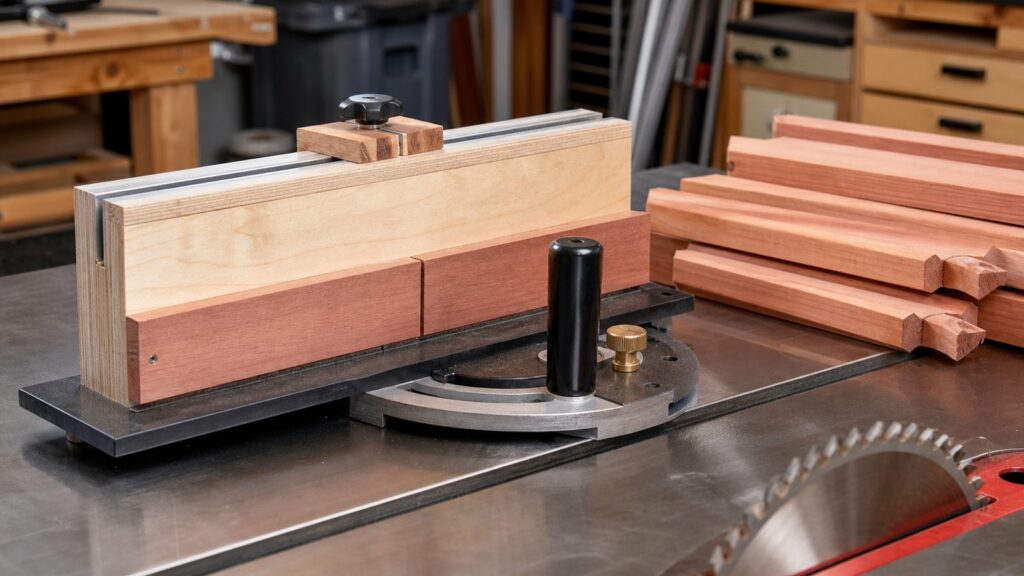
A wear-resistant miter-gauge fence is one of the highest-value shop jigs a homeowner can build for outdoor-structure work. It is not a deck, fence, or pergola part itself. It is the auxiliary fence you bolt to a table saw miter gauge so short parts stay supported, crosscuts come out cleaner, and repeated pieces land at the same length.
The simple version is a straight board screwed to the miter gauge. The better version is a rigid 3/4-inch fence body with a replaceable sacrificial face, a dust-relief groove, safe fastener layout, and an optional T-track stop system. That is the version worth building if you cut balusters, pickets, blocking, trim boards, lattice frames, gate parts, planter pieces, or repair components in batches.
For most home shops, plan on an 18- to 30-inch fence, 3 to 4 inches tall, made from cabinet-grade plywood, MDF, or straight hardwood. A basic build usually costs about $15 to $35 if you already own the miter gauge. A more durable setup with T-track, knobs, a flip stop, adhesive measuring tape, UHMW tape or laminate, and finish typically lands around $45 to $90 in 2026. Commercial miter-gauge fence and stop systems commonly run about $160 to $300 or more, so a shop-made fence makes sense when you need accuracy but not a full production setup.
What This Fence Does Better Than the Stock Miter Gauge
The small metal face on many factory miter gauges is barely enough to register a workpiece. It may be accurate after calibration, but it does not give much support. A longer auxiliary fence changes that. It gives the board a straight reference surface before and during the cut, backs up the wood fibers at the blade, and gives you somewhere to mount a stop block.
On our job sites, this matters most when we are making several parts that need to match: deck railing blocks, fence pickets, pergola spacer blocks, stair trim returns, cedar slats, and small repair pieces. A 1/16-inch error repeated 20 times turns into a visible layout problem. A properly built miter-gauge fence helps keep those cuts consistent.
#1 Best Overall

- Includes: (1) table saw miter gauge, (1) multi-track miter fence, (1) t-track flip stop
- Function: cost effective 3-piece set designed to give you everything you need to produce higher precision cuts (including cross cutting) while with quick and accurate project results
- High precision miter gauge: features 27 angle indexing stops with 1-degree step spacing and positive stops at 0°, 10°, 22½°, 30°and 45°and nine others, both left and right (Works in standard 3/4” x 3/8” miter slot, with or without t-slots, but will not work with smaller saws or tool with 5/8” miter slots.)
- Multi-track miter fence: smooth, built-in laser engraved measuring scale, extruded aluminum profile with a universal design that accepts accept 1/4"-20 hex Bots, 1/4” t-bolts and 5/16” T- bolts, and T-track accessories
- Miter saw flip stop: delivers exceptional cut-length control, with a toolless locking mechanism and adjustable settings to quick change to the left or right side of the blade
The sacrificial face is the key to cleaner cuts. After you install the fence, you push it through the blade once. That creates a zero-clearance kerf exactly where your blade passes. The wood fibers are supported as the blade exits the back of the workpiece, which reduces tear-out on trim, cedar, pressure-treated boards, and plywood project parts.
Materials and 2026 Cost Range
You can build this fence from common home-center material. Use straight, stable stock. Do not grab a twisted scrap and expect the jig to solve accuracy problems. The fence has to be flat before calibration matters.
| Build Level | Typical Materials | 2026 Cost Range | Best Use |
|---|---|---|---|
| Basic fence | 3/4-inch plywood or MDF, screws or bolts, finish | $15-$35 | Occasional crosscuts, small trim, simple shop use |
| Wear-resistant fence | Cabinet-grade plywood, replaceable hardboard or plywood face, threaded inserts, UHMW tape or laminate, finish | $30-$60 | Regular outdoor-project cutting and cleaner zero-clearance support |
| Stop-system fence | Fence body, replaceable face, T-track, knobs, bolts, flip stop, measuring tape | $45-$90 | Batch-cutting balusters, slats, spacers, and repeated parts |
| Commercial system | Manufactured miter gauge, aluminum fence, precision stop components | $160-$300+ | High-volume shop work or when your stock miter gauge is poor |
Home-center pricing varies by region, but 2026 listings show common 2-foot by 4-foot MDF and sanded plywood project panels around $16 to $34. A 3/4-inch birch project panel is commonly around $30. That size panel is enough for several fence bodies and replacement faces.
Lumber markets affect decks, fences, and pergolas far more than this jig. As of July 2026, framing lumber was still moving week to week: NAHB reported framing lumber prices up 1.4% for the week ending July 24, 2026, up 3.1% from one month earlier, and slightly lower than one year earlier. Trading Economics listed lumber around $615 per 1,000 board feet on July 31, 2026, while Gordian reported Q2 2026 framing lumber at $916.62 per MBF. For this jig, the practical takeaway is simple: do not overthink lumber futures for a $30 panel, but do plan outdoor-project budgets with current local pricing.
Recommended Design and Dimensions
A good general-purpose miter-gauge fence is long enough to support the work but short enough to control. For most table saws, 24 inches is the sweet spot. An 18-inch fence works well on compact saws. A 30-inch fence can help with longer trim and railing parts, but it needs a solid miter gauge and a table with enough support.
Use these dimensions as a starting point:
- Main fence body: 3/4 inch thick by 3 1/2 inches tall by 24 inches long.
- Sacrificial face: 1/4 inch hardboard, 1/2 inch plywood, or UHMW strip, 3 inches tall by 24 inches long.
- Bottom dust relief: 1/8-inch chamfer or shallow groove along the bottom rear edge.
- Fasteners to miter gauge: 1/4-20 machine screws or bolts, usually 2 to 3 fasteners depending on the gauge.
- Replaceable face fasteners: #8 flat-head screws, threaded inserts, or T-nuts spaced about 6 to 8 inches apart.
Avoid making the fence too tall. A 6-inch-tall fence looks substantial, but it adds weight, can flex a light miter gauge, may interfere with the blade guard, and can make the gauge harder to push smoothly. For outdoor-structure parts, 3 to 4 inches of height is usually enough.
Best Material Choices
Cabinet-grade plywood is the best all-around choice. Baltic birch or high-quality birch plywood stays flatter than construction sheathing and holds screws well. MDF is flat and inexpensive, but it dents more easily and does not tolerate damp garages or job trailers as well unless sealed. Hardwood works if it is dry, straight, and stable, but a wide hardwood fence can move with humidity.
Do these 3 things before closing this tab:
1Scan for outdated or missing drivers - takes under a minute2Clear out junk files and repair common Windows errors3Fix the driver behind crashes, sound loss and screen glitchesFor the replaceable face, hardboard is cheap and easy to replace. A thin plywood face is tougher. UHMW plastic is slick and durable, but it costs more and needs careful fastening because glue does not bond to it reliably. Laminate is another good wear surface on the non-sacrificial areas, especially if you want a slick face that resists scuffing.
Hardware Layout That Keeps the Blade Away From Metal
Layout matters more than fancy hardware. Before drilling anything, mark the blade path on the front face of the fence. We use a bright witness line, red tape, or both. Then mark a no-screw zone at least 1 inch wide on each side of that blade path. If you ever plan to use a dado blade with this fence, widen that no-metal zone to match the maximum dado width plus extra clearance.
Rank #2

- 【Micro Adjustable Flip Stop with Magnifier Glass】The micro adjustable flip stop of GOINGMAKE miter gauge is rock-solid when locked and accuracy is up to 0.001". Ensure accurate cutting every time. The adjustment is smooth and fluid with minimal backlash. You can easily to read scales and adjust through micro adjust function and magnifier glass. We also support square face and angle faces workpieces with locating pin.
- 【Upgrade Angle Stops with Button and Precision Holes】GOINGMAKE miter gauge is a must have table saw accessories for miter cuts and square cuts. Rapid, precision miter gauge adjustment-set exact angles quickly and accurately for flawless crosscuts and miter cuts. Provides a new precision angle adjust stops with one simple button and position holes. You can easily pull up and rotate the button and turn the protractor. The pin locates your angle you need precisely and lock angles security while you tighten the handle. Provides 13 accurate positive angle stops from -67.5-67.5° and a locking handles. Includes Angle Stops: 90°,67.5°,60°,45°,30°,22.5°,15°,0°,-67.5°,-60°,-45°,-30°,-22.5°,-15°.
- 【Easy to Set Up and Use】GOINGMAKE table saw miter gauge protractor is easy to set up and use. Multifunction micro adjust flip stop is easy to zero calibration and make you can get right 0 position on the miter gauge fence. And you can use the scales on the fence to cut any length you need, you do not have to use a tape and rulers. You can change angles fast and accurate through positioning button and holes for miter cuts and square cuts.
- 【Precision 18 Inch Extruded with mm and inch Scales】GOINGMAKE miter gauge for table saw includes 18 inch precision extruded fence with mm and inch scales. After zero calibration, you do not have to go back to using a tape and rulers and you can get exact length according to the scales. Micro adjustable flip stop on fence make accurate adjust and magnifier glass on pointer make easy to read and align scales on miter gauge fence.
- 【Zero Fit Miter Bar Fits for Most Table Saw】GOINGMAKE miter gauge for table saw fits standard 3/8" x 3/4" T slot and U slot. The adjustable miter bars fits for most table saw. GOINGMAKE miter bars adapts to any table saw with a 3/8" x 3/4" miter slot. The 4 adjustable rings can easily adjust to fits the slot and keep the bar perfectly aligned. No play on the miter slots and slides smooth ensure accurate cuts all the time. GOINGMAKE miter gauge is made of aluminum alloy and also includes a sliding pad on the back for smooth sliding on table top and prevents damage from table saw tops.
Mount T-track on the top of the fence, not on the blade-facing sacrificial face, unless the track is completely outside every blade path. Screws in T-track are easy to forget, and a carbide blade hitting a hidden screw can ruin the blade and create a serious hazard.
If your miter gauge has slotted holes, use them. If not, drill elongated mounting slots in the fence body so you can shift the fence slightly during calibration. A 1/4-20 bolt through a 5/16-inch-wide slot gives enough adjustment without making the fence sloppy. Use washers under the bolt heads, and countersink or counterbore any hardware that might contact the workpiece.
Step-by-Step Build
1. Cut the Main Fence Body
Cut the main fence body to size from straight 3/4-inch material. A practical size is 3 1/2 inches by 24 inches. Check the face against a reliable straightedge. If it rocks, bows, or shows daylight in the middle, cut another piece.
Label the front face, back face, top, and bottom. This sounds minor, but it prevents drilling from the wrong side once the fence is on the bench.
2. Add the Dust-Relief Chamfer
Plane, sand, or rout a small chamfer along the bottom edge of the workpiece side. A 1/8-inch chamfer is enough. The purpose is to give sawdust somewhere to go so a few chips do not hold the board off the fence and throw off the cut.
This is one of those small details that separates a useful jig from a frustrating one. Outdoor lumber is rarely spotless. Pressure-treated boards, cedar, and fence stock bring dust, grit, and damp fibers into the shop. The groove gives that debris a place to clear.
Quick wins for a faster PC:
Clear out junk files and repair common Windows errorsFree Scan →Scan for outdated or missing drivers - takes under a minuteDriver Scan →Repair Windows errors before they cause bigger problemsFix Now →3. Drill the Miter-Gauge Mounting Holes
Set the miter gauge to 90 degrees and place the fence against it. Transfer the factory hole locations onto the fence. Drill clean holes or short slots for the mounting bolts. If the gauge face is not perfectly flat, use washers or spacers so tightening the bolts does not twist the fence.
Do not fully tighten yet. Snug the bolts enough to hold the fence while still allowing small adjustments.
4. Make the Replaceable Sacrificial Face
Cut the sacrificial face slightly shorter than the main fence or exactly flush, depending on preference. Attach it with screws into threaded inserts or T-nuts installed in the main body. Spacing fasteners every 6 to 8 inches keeps the face flat without overbuilding it.
Rank #3

- Precision Miter Gauge System: Complete miter gauge solution with adjustable fence designed for accurate, repeatable angle cuts on table saws
- High-Accuracy Angle Control: Engineered for precise miter cuts to improve consistency across woodworking and shop projects
- Smooth, Controlled Operation: Designed to glide easily in miter slots for stable, repeatable cutting performance
- Heavy-Duty Construction: Built with durable materials to withstand frequent use in professional and DIY workshops
- Premium Kreg Tools: We offer products that help woodworkers close the gap between idea and outcome
Keep all screws outside the blade path. Mark the no-screw zone directly on the sacrificial face. When the kerf gets wide, ragged, or no longer supports the cut, remove the face and install a new one. That is the point of the two-layer design.
Windows Errors? Fix Them Before They Spread
Repair common Windows errors and clear accumulated junk for a smoother, more stable PC - no reinstall needed.Free scan · no reinstallCrashes, No Sound, or Screen Glitches?
Random freezes, missing sound and display glitches usually trace back to one bad driver. Find and replace yours safely.Free scan · under a minute5. Seal the Fence
Seal every face and edge with shellac, polyurethane, lacquer, or a hard wax finish. Two light coats are usually enough. Sealing slows moisture movement, which matters in garages, sheds, and trailers where humidity changes quickly.
Do not leave MDF edges raw. They swell easily. If you use MDF, give the edges extra finish and let them dry fully before final calibration.
6. Add T-Track and a Stop Block, If Needed
If you batch-cut parts, a top-mounted T-track and flip stop are worth the added cost. Keep the track parallel with the fence face and place it high enough that screws stay far from the blade path. A 24-inch track is usually enough for this size fence.
A stop block should help you repeat lengths without trapping offcuts. For table saw work, never use the rip fence as a length stop in a way that pins the cutoff between the blade and the fence. If you need a reference stop, it should clear the work before the cut reaches the blade or be part of the miter-gauge fence setup so the work moves through as one controlled assembly.
Recommended Free Tools
Calibration: Where Accuracy Is Won or Lost
After the fence is mounted, square the miter gauge to the blade. Do not assume it stayed accurate when you tightened the bolts. Use a reliable machinist square, combination square, or a five-cut style test if you need high precision.
A simple field check works well for construction parts. Cut a clean test piece. Flip one half over and place the two cut ends against a straightedge or square. If the joint opens at the front or back, the miter gauge is slightly off. Adjust, tighten, and test again.
Once the gauge is square, check that the auxiliary fence is straight and not pulling the miter gauge out of alignment. Tighten the bolts gradually, alternating between them. If tightening one bolt changes the reading, the back of the fence or the miter-gauge face needs a shim or a flatter bearing surface.
Finally, make the first zero-clearance cut into the sacrificial face. Raise the blade only as high as needed for your work. Push the miter gauge steadily through the blade, then pull it back only after the blade stops or after the work is clear and controlled according to your saw setup.
Free tools Windows power users keep installed
One-click scans. No signup required.
Using the Fence for Outdoor-Structure Parts
This jig shines on small and medium parts, not heavy structural stock. Use it for balusters, slats, pickets, trim returns, spacer blocks, short blocking, lattice components, gate trim, and repair patches. A 24-inch fence gives plenty of control for many parts under 30 inches long.
Rank #4

- 【Extendable Aluminum Alloy Fence from 18 to 32 Inch】GOINGMAKE miter gauge for table saw includes the precision extruded fence extendable from 18 inch to 32 inch. When you need the fence extended, you do not have to go back to using a tape and rulers. Just lock the flip stop on the mark of 16 inch on the main fence and set your dimension on 16 inch scale of the extension bar. And you can get exact extendable length according to the scales. Including mm and inch scales for your different needs. Micro adjustable flip stop on fence make accurate adjust and magnifier glass on pointer make easy to read and align scales on miter gauge fence.
- 【Micro Adjustable Flip Stop with Magnifier Glass】The micro adjustable flip stop of GOINGMAKE table saw miter gauge is rock-solid when locked and accuracy is up to 0.001". Ensure accurate cutting every time. The adjustment is smooth and fluid with minimal backlash. You can easily to read scales and adjust through micro adjust function and magnifier glass. We also support square face and angle faces workpieces with locating pin.
- 【Upgrade Angle Stops with Button and Precision Holes】GOINGMAKE miter gauge is a must have table saw accessories for miter cuts and square cuts. Rapid, precision miter gauge adjustment-set exact angles quickly and accurately for flawless crosscuts and miter cuts. Provides a new precision angle adjust stops with one simple button and position holes. You can easily pull up and rotate the button and turn the protractor. The pin locates your angle you need precisely and lock angles security while you tighten the handle. Provides 13 accurate positive angle stops from -67.5-67.5° and a locking handles. Includes Angle Stops: 90°,67.5°,60°,45°,30°,22.5°,15°,0°,-67.5°,-60°,-45°,-30°,-22.5°,-15°.
- 【Zero Fit Miter Bar Fits for Most Table Saw】GOINGMAKE miter gauge for table saw fits standard 3/8" x 3/4" T slot and U slot. The adjustable miter bars fits for most table saw. GOINGMAKE miter bars adapts to any table saw with a 3/8" x 3/4" miter slot. The 4 adjustable rings can easily adjust to fits the slot and keep the bar perfectly aligned. No play on the miter slots and slides smooth ensure accurate cuts all the time. GOINGMAKE miter gauge is made of aluminum alloy and also includes a sliding pad on the back for smooth sliding on table top and prevents damage from table saw tops.
- 【Easy to Set Up and Use】GOINGMAKE table saw miter gauge protractor is easy to set up and use. Multifunction micro adjust flip stop is easy to zero calibration and make you can get right 0 position on the miter gauge fence. And you can use the scales on the fence to cut any length you need, you do not have to use a tape and rulers. You can change angles fast and accurate through positioning button and holes for miter cuts and square cuts.
For deck boards, wet 2x lumber, long railing stock, 4×4 posts, and bowed framing, use a miter saw, circular saw guide, or track saw setup instead. OSHA table-saw guidance emphasizes maintaining stock clearance, standing to the side of the blade, and avoiding long-board crosscuts on a table saw because long stock is hard to control near the blade. That is not theoretical. Long, heavy, damp lumber can twist during the cut and put your hands too close to trouble.
For outdoor work, confirm your first cut against the actual opening or field measurement before you lock in a stop block. Decks, fences, and pergolas are rarely perfectly square after weather, settling, and previous repairs. Batch-cutting 24 identical pieces is efficient only after the first piece actually fits.
Independent reader supportYour contribution helps us test, update, and keep practical guides available for everyone.Safety Details Worth Building Into the Jig
A miter-gauge fence should make the saw easier to control, not more complicated. Keep the fence light enough to slide smoothly. Make sure no screw heads are proud of the surface. Confirm the blade guard, riving knife, and dust collection setup work with the fence for the cut you are making.
The Tool Desk
Outbyte Driver Updater FREEScan for outdated or missing drivers - takes under a minuteDriver Scan →Outbyte PC Repair FREEClear out junk files and repair common Windows errorsFree Scan →Stand slightly to the side of the blade path, not directly behind it. Keep hands away from the no-screw and blade-path zone. Use clamps or hold-downs for short parts when your hands would otherwise be too close. Let the blade reach full operating speed before cutting.
Do not crosscut long boards on the table saw just because the miter fence is longer than the factory gauge. If the board wants to tip, drag, or rotate, move the operation to a better tool. A good jig does not change the basic limits of the saw.
When to DIY vs When to Hire a Pro
Most homeowners who already own a table saw can build this jig in 2 to 4 hours, not counting finish drying time. The work is straightforward: measure, cut, drill, mount, seal, and calibrate. If you have a square, drill, countersink bit, and basic saw setup, DIY is usually the right call.
Hiring someone only to build a miter-gauge fence rarely makes financial sense. In 2026, handyman rates commonly run $60 to $125 per hour, and HomeAdvisor reports an average handyman job cost around $390. At those rates, a simple shop jig can cost more in labor than a commercial miter-gauge system.
It can make sense to have a carpenter build or tune the jig while already on site for a larger deck, fence, pergola, or repair project. It also makes sense to buy a commercial miter gauge if your existing gauge is loose in the slot, hard to calibrate, or too light to carry a longer fence. The fence cannot fix a sloppy miter bar or a gauge head that does not lock reliably.
Permit Context for the Projects This Jig Supports
You normally do not need a building permit to build a shop jig. The permit question belongs to the outdoor structure you are cutting parts for. Decks, fences, pergolas, sheds, and accessory structures are regulated locally, and rules change by city and county.
Some jurisdictions allow low fences, small sheds, or minor repairs without a permit. Others require permits based on height, square footage, attachment to the house, electrical work, setbacks, wind exposure, or structural load. For example, residential fence, deck, and outdoor-project rules are commonly handled by local building departments, and accessory-structure requirements vary by county. Before you batch-cut material, check the current rule for your address, not a generic national answer.
Best Value

- 27 Positive Angle Stops: Set common angles from 0° to 60° in 5° increments, plus 22.5°, for quicker setup on square and angled crosscuts. The reading index also supports non-preset angles, helping reduce repeated trial-and-error. Square and calibrate the table saw miter gauge before first use
- 22-36 in Extension Fence: Extend the aluminum miter gauge fence to support wider workpieces and keep more of the board registered during crosscuts. The front T-track accepts user-supplied 3/4 in plywood faceplates using the included mounting hardware; users provide the faceplate material
- Adjustable Flip Stop: Slide and lock the flip stop to set repeated workpiece lengths, helping reduce repeated measuring when cutting multiple parts for cabinets, frames, and other woodworking projects. Install and calibrate the included scale tape before relying on its readings
- Reversible Fence Setup: Configure the miter gauge with fence for use on either side of the saw blade, helping match left- or right-side table layouts and workflows. The flip stop also supports left- or right-mount configurations; reversing the fence requires repositioning the extension tube and hardware
- Zero Play Fit Adjustment: Fine-tune four expansion washers to reduce side clearance in a compatible 3/4 x 3/8 in miter slot, addressing the loose fit found with many basic stock gauges. Three underside gliding pads help the fence move across the table surface. Remove the retaining flange for a compatible straight slot
From a builder’s standpoint, this matters because accurate cuts do not make an unpermitted structure compliant. Confirm height limits, setbacks, footing requirements, guardrail rules, and inspection requirements before you invest time in cutting finished parts.
Maintenance and Replacement Schedule
Inspect the fence before any batch-cutting session. Check that the face is tight, the bolts are snug, the T-track screws are secure, and the zero-clearance kerf is still narrow enough to support the work. If the kerf is chewed up or widened from blade changes, replace the sacrificial face.
Store the fence hanging flat or supported along its length. Do not lean it in a damp corner where it can bow. If it lives in a garage or trailer, reseal worn edges once or twice a year. Replace hardboard faces as consumables. A few dollars in face material is cheaper than fighting tear-out or inaccurate trim cuts.
A well-built miter-gauge fence is not complicated. The durable version comes from disciplined details: stable material, sealed edges, no metal in the blade path, a replaceable face, a dust-relief chamfer, and calibration after tightening. Build those into the jig once, and it will make cleaner, more repeatable parts for years of deck, fence, pergola, and exterior repair work.
Frequently Asked Questions
What is a miter-gauge fence used for?
A miter-gauge fence supports workpieces during table saw crosscuts. It improves control, reduces tear-out with a sacrificial zero-clearance face, and gives you a place to mount stop blocks for repeated cuts.
Quick wins for a faster PC:
Clear out junk files and repair common Windows errorsFree Scan →Fix the driver behind crashes, sound loss and screen glitchesFind Drivers →What is the best material for a miter-gauge fence?
Cabinet-grade 3/4-inch plywood is the best all-around choice because it is stable, strong, and easy to fasten. MDF is flat but less moisture-resistant. Hardwood works if it is straight, dry, and sealed.
How long should a table saw miter-gauge fence be?
Most home shops do well with an 18- to 30-inch fence. A 24-inch fence is a practical middle ground for crosscutting small and medium outdoor-project parts without making the miter gauge unstable.
How do you make a sacrificial miter-gauge fence replaceable?
Build a rigid main fence and attach a thinner face with screws, threaded inserts, or T-nuts. Keep fasteners out of the blade path, then replace the face when the kerf gets wide, ragged, or no longer supports clean cuts.
Can I use a stop block with a miter gauge safely?
Yes, if it does not trap the cutoff between the blade and a fixed fence. Use a stop mounted to the miter-gauge fence system, or position any reference stop so the workpiece is clear before it reaches the blade.
Recommended Free Tools
Do I need a permit to build outdoor structures cut with this jig?
You usually do not need a permit for the jig itself, but the deck, fence, pergola, shed, or accessory structure may require one. Check local rules for height, setbacks, attachment, footings, and structural requirements before cutting materials.
Quick Recap
Product prices and availability are accurate as of the date/time indicated and are subject to change. Any price and availability information displayed on Amazon at the time of purchase will apply.