What’s actually slowing this PC down?
Pick the symptom - the matching free tool is one click away.
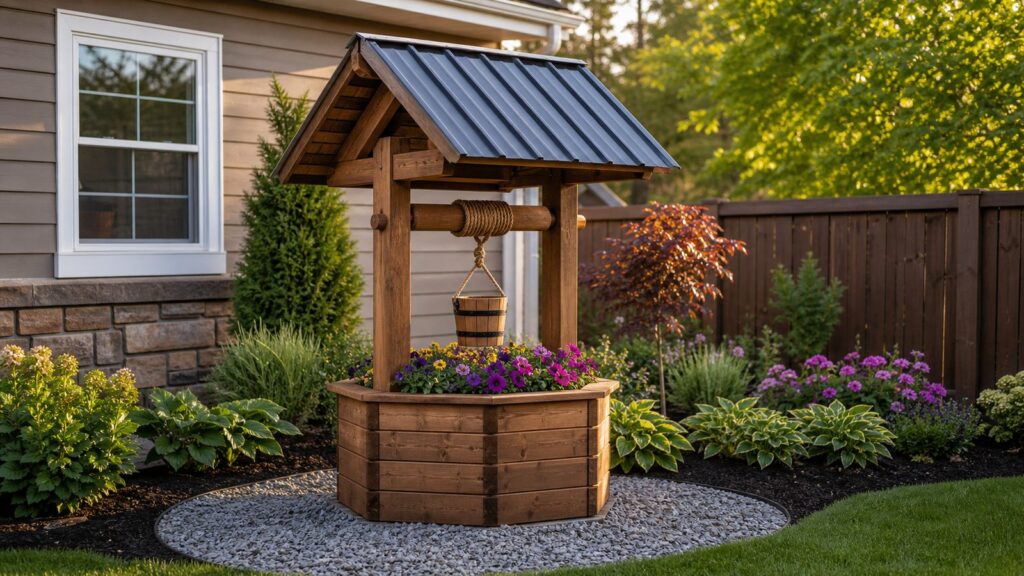
A DIY decorative garden well is usually a non-working landscape feature: a rustic planter, a cover for a wellhead or utility eyesore, or a farmhouse-style focal point for a backyard bed. The best version looks charming, but it is still an outdoor structure. It has to shed water, resist rot, stay upright in wind, and avoid creating a hazard for children or service contractors.
For most U.S. homeowners in 2026, a small rustic wood wishing well costs about $120 to $450 to build if you already own basic tools. A more polished cedar, metal-roof, stone-base, or lighted version can run $500 to $1,200+. Most finished wells land around 3 to 5 feet tall and 18 to 36 inches wide, which is large enough to read as a real garden feature without overpowering a residential landscape bed.
On our job sites, we treat small outdoor carpentry projects the same way we treat larger exterior work: start with drainage, choose the right fasteners, keep service access open, and make sure the piece cannot rack, tip, or rot from the bottom up. That approach makes a decorative well last years longer than a quick weekend build set directly on mulch.
What You Are Building
A good backyard decorative well is easiest to build as three separate assemblies:
#1 Best Overall

- Superior Corrosion Resistance
- External Hex Drive
- ASTM A307 Compliant
- Hot Dipped Galvanized
- Base or planter box: the lower wood sleeve or planter that gives the well its footprint and visual weight.
- Two upright posts: the vertical supports that hold the roof and optional crank.
- Removable roof: a small pitched roof that can be finished separately and lifted off later for repair or access.
That three-part layout matters. It makes the well easier to cut, stain, transport, and repair. If you are covering a real wellhead, cleanout, irrigation valve, or pump component, it also lets you lift the decorative cover without dismantling the whole project.
A practical homeowner-size version is about 24 inches wide, 24 inches deep, and 48 inches tall to the roof peak. The base can be 18 to 24 inches high, the posts can rise another 24 to 30 inches, and the roof can overhang the base by 2 to 4 inches on each side. That footprint is big enough for seasonal flowers, trailing herbs, or a decorative bucket, but not so large that it needs heavy framing.
2026 Cost to Build a DIY Decorative Garden Well
Material cost depends heavily on wood choice, roof material, finish, and whether you already own a saw and drill. Pressure-treated pine keeps the budget low. Cedar costs more, but it is lighter, naturally rot resistant, and easier to finish attractively. A stone veneer base, standing-seam metal roof, solar lighting, or custom bucket can quickly move the project into premium territory.
| Build Level | Typical 2026 Cost | What It Usually Includes |
|---|---|---|
| Budget DIY wood well | $120-$250 | Pressure-treated pine, exterior screws, basic stain, rope, plastic or simple wood bucket, gravel or paver pad |
| Mid-range rustic well | $250-$500 | Cedar or higher-grade treated lumber, planter liner, better hardware, cedar-shake or small metal roof, upgraded finish |
| Premium centerpiece | $500-$1,200+ | Cedar, composite, stone veneer, copper or standing-seam roof, solar lighting, custom crank, concrete footings, professional carpentry |
| Prebuilt comparison | $120-$895 | Marketplace wood planters often run $120-$580, handcrafted cedar versions around $445-$465, and poly-lumber versions near $895 |
| Custom installed by pro | $400-$1,500+ | Carpenter or handyman build with site prep, anchoring, finish, and installation; masonry or lighting costs more |
Representative 2026 material pricing from national retailers puts many pressure-treated 2x4x8 boards in the single digits to low teens, with 2x4x10 boards around $8 and 2x4x12 boards around $10 in many markets. Ground-contact 4x4x8 posts are common outdoor-project items, but local pricing varies by store and inventory.
Do not forget the small-ticket items. Exterior screws or structural screws can add $10 to $35 per box. Galvanized or stainless connectors may cost $5 to $25 each. Exterior stain or sealer usually adds $20 to $60. Gravel, landscape fabric, and pavers can run $25 to $150. Rope, a bucket, and small decorative hardware typically land between $15 and $75. Solar lighting can add another $20 to $80.
If you do not own tools, the first build costs more. A circular saw or miter saw can run $60 to $300+, a drill/driver $50 to $200+, a jigsaw $40 to $150, and basic clamps, square, level, and PPE another $30 to $100. Borrowing or renting tools can make more sense than buying everything for one garden feature.
Recommended Size and Cut List
The following cut list is for a sturdy decorative well approximately 24 inches wide, 24 inches deep, and 48 inches tall. Adjust it to match your space, but keep the proportions balanced. A narrow base with a large roof is the most common reason these wells wobble or blow over.
Basic Lumber List
- Base frame: four 2x4s at 24 inches and four 2x4s at 21 inches for upper and lower square frames.
- Base siding: 1×6 cedar, fence pickets, or treated boards cut to 18 to 22 inches tall, enough to cover all four sides.
- Upright posts: two 4×4 posts cut to 42 to 48 inches, depending on roof height.
- Roof rafters: four 2×4 pieces cut to 18 to 24 inches with matching angled ends.
- Roof deck: cedar boards, exterior plywood, metal panel, or cedar shakes sized for a roof about 32 inches wide by 24 inches deep.
- Crank dowel: one 1-inch to 1-1/4-inch wood dowel or metal pipe, about 28 to 32 inches long.
- Planter liner: one plastic insert, nursery pot, or pond-liner-style liner with drainage holes.
For a smaller bed, you can reduce the footprint to 18 by 18 inches and keep the height around 36 to 42 inches. For a larger focal point, a 30 to 36 inch base can work, but widen the base and strengthen the roof framing. Once the roof gets wider than about 36 inches, wind load and racking deserve more attention.
Quick wins for a faster PC:
Scan for outdated or missing drivers - takes under a minuteDriver Scan →Repair Windows errors before they cause bigger problemsFix Now →Fix the driver behind crashes, sound loss and screen glitchesFind Drivers →Best Materials for an Outdoor Wishing Well
Use materials that are meant to live outdoors. The base is exposed to splashback, wet mulch, irrigation overspray, and freeze-thaw movement. Interior lumber, drywall screws, and untreated trim are false economy outside.
Pressure-Treated Pine
Pressure-treated lumber is the budget workhorse. Use ground-contact-rated material anywhere wood may touch soil, mulch, gravel, or frequent splash zones. It is heavier and often wetter than cedar when purchased, so let it acclimate before staining if the boards feel damp. Treated pine is a sensible choice for framing, the bottom frame, and any concealed structure.
Cedar
Cedar is our preferred visible material when the budget allows. It is lighter, naturally rot resistant, takes stain well, and gives the well a cleaner rustic look. Cedar is excellent for siding, roof boards, trim, and bucket details. For a mid-range decorative well, a good compromise is treated framing with cedar cladding.
Hardware and Fasteners
Match fasteners to the environment and lumber. For pressure-treated wood, coastal conditions, high-moisture sites, or hardware exposed to irrigation, upgrade to hot-dip galvanized, ZMAX/G185-equivalent, or stainless steel connectors and fasteners based on manufacturer corrosion guidance. Interior screws and drywall screws can rust, stain the wood, loosen, and fail prematurely.
Recommended Free Tools
Use exterior-rated deck screws for cladding and trim. Use structural screws, bolts, or rated connectors where the posts attach to the base. If the well will be moved, do not rely on toenails or a few small screws through end grain to carry the whole roof assembly.
Rank #2

- 50 Piece Bulk Pack Save Cost Reduce Reorders: Get 50 heavy duty 1/2" x 4" lag screws in one pack, enough for medium to large projects; Save on each piece and minimize frequent reordering, so you can stay focused on building without interruption
- Hot Dip Galvanized Finish Ultimate Outdoor Rust Protection: Unlike ordinary zinc plating, our hot dip galvanized coating provides maximum corrosion resistance; Ideal for decks, fences, pergolas, and pressure treated lumber outdoors; No more worry about rust streaks or weakened joints
- Carbon Steel Construction High Load Capacity: Made from high strength carbon steel, these lag screws resist bending, shearing, and breaking under heavy loads; Good for structural connections like beam supports, swing sets, and load bearing wood frames
- Deep Sharp Threads Aggressive Bite into Hardwood: Engineered with precision cut, deep threads that grip instantly and hold tight; Prevents stripping, spinning, or loosening over time, even in dense hardwoods like oak or pressure treated pine
- Complete Set with Washers No Extra Purchase Needed: Each screw comes with a matching metal washer, increasing surface contact, preventing pull through, and protecting wood surfaces from crushing; One purchase, everything you need
Site Prep: Drainage, Leveling, and Placement
The biggest durability mistake is setting the well directly on soil or mulch. Mulch holds moisture against the bottom boards, and wet soil moves after rain and freeze-thaw cycles. The well slowly leans, the bottom frame rots, and the rustic centerpiece starts looking abandoned for the wrong reason.
Build a pad that is at least 4 to 6 inches wider than the well footprint on every side. For a 24-inch well, prepare a pad around 32 to 36 inches square. Excavate only enough to remove loose organic material, lay landscape fabric if needed, and install 2 to 4 inches of compacted gravel or a few level pavers. The goal is simple: keep wood out of mud, reduce splashback, and create a flat surface.
If you plan to dig post holes, install ground anchors, or set footings, call 811 before digging. Many state 811 programs make clear that utility locating applies even to small residential landscape projects. Shallow work can still hit irrigation lines, low-voltage lighting, gas, communications, or electrical service. Make the call early; utility marking can take a few business days depending on your state and local rules.
Crashes, No Sound, or Screen Glitches?
Random freezes, missing sound and display glitches usually trace back to one bad driver. Find and replace yours safely.Free scan · under a minuteWindows Errors? Fix Them Before They Spread
Repair common Windows errors and clear accumulated junk for a smoother, more stable PC - no reinstall needed.Free scan · no reinstallChoose a location where the well will be seen from the patio, kitchen window, or main garden path. Avoid low spots where water collects. If using it as a planter, place it where it gets the right sun for the plants you want. If using it as a cover, maintain clearance around the item being covered and make sure the whole assembly can be lifted or opened.
Step-by-Step Build
1. Build the Base Frame
Start with two square frames made from 2x4s: one for the bottom and one for the top of the planter box. For a 24-inch outside dimension, cut two pieces at 24 inches and two at about 21 inches for each frame, depending on actual lumber thickness. Fasten each frame with exterior screws, check for square by measuring diagonals, and correct it before adding siding.
If the well will be freestanding, build the base with real weight and width. You can add a lower shelf to hold pavers, concealed concrete blocks, or a planter insert. That hidden mass helps resist wind and keeps the well from tipping if someone pulls the rope or bumps the side.
2. Add Siding or Cladding
Attach vertical cedar boards, treated fence pickets, or 1×6 material around the base. Leave small gaps if the boards are wet or likely to swell. Keep the bottom ends slightly above the bottom of the frame so they are not wicking moisture from the pad. Pre-stain boards before assembly where faces will be hard to reach later, then touch up screw heads and cut ends after assembly.
Do these 3 things before closing this tab:
1Repair Windows errors before they cause bigger problems2Fix the driver behind crashes, sound loss and screen glitches3Clear out junk files and repair common Windows errorsFor a more finished look, add corner trim and a top cap. A 1×4 cap around the top edge protects end grain and gives the planter a heavier, more intentional profile. Slope or detail horizontal surfaces so water does not sit against the posts.
3. Install the Upright Posts
Set two 4×4 posts inside or just outside the base, centered on opposing sides. For a 48-inch-tall well, posts cut around 42 to 48 inches usually work, depending on roof pitch. Through-bolt the posts to the base or use rated exterior connectors. Add blocking inside the base so the posts are tied into more than thin siding.
Check the posts for plumb in both directions. Temporary braces help while you fasten them. If you are building a removable cover for a real wellhead, make sure the posts and base do not interfere with caps, conduit, pressure switches, valves, or required service clearance.
4. Frame the Roof
A pitched roof sheds water better than a flat decorative cap. For this size well, a roof about 30 to 32 inches wide and 22 to 26 inches deep gives a useful overhang without becoming a sail. Cut matching rafters from 2×4 or 2×3 stock, fasten them to a ridge board, and secure the roof frame to the tops of the posts.
Add roof decking with cedar boards, exterior plywood plus roofing, metal panel, or cedar shakes. Keep the roof slope steep enough to drain. Add a simple drip edge or 2-inch overhang so rain drops clear the posts and planter boards instead of running down them.
5. Add the Bucket, Rope, and Crank
A decorative crank is optional, but it sells the wishing-well look. Use a wood dowel or metal pipe through the posts, with washers or bushings to reduce wear. Secure the handle so it cannot slide out. If children use the yard, avoid pinch points and do not create a working winch that can trap fingers or lift heavy weight.
Rank #3

- 50 Piece Bulk Pack Save Cost Reduce Reorders: Get 50 heavy duty 1/2''x6'' lag screws in one pack, enough for medium to large projects; Save on each piece and minimize frequent reordering, so you can stay focused on building without interruption
- Hot Dip Galvanized Finish Ultimate Outdoor Rust Protection: Unlike ordinary zinc plating, our hot dip galvanized coating provides maximum corrosion resistance; Ideal for decks, fences, pergolas, and pressure treated lumber outdoors; No more worry about rust streaks or weakened joints
- Carbon Steel Construction High Load Capacity: Made from high strength carbon steel, these lag screws resist bending, shearing, and breaking under heavy loads; Good for structural connections like beam supports, swing sets, and load bearing wood frames
- Deep Sharp Threads Aggressive Bite into Hardwood: Engineered with precision cut, deep threads that grip instantly and hold tight; Prevents stripping, spinning, or loosening over time, even in dense hardwoods like oak or pressure treated pine
- Complete Set with Washers No Extra Purchase Needed: Each screw comes with a matching metal washer, increasing surface contact, preventing pull through, and protecting wood surfaces from crushing; One purchase, everything you need
Attach a small bucket with natural rope or exterior-rated cord. Keep the bucket light. A plastic liner inside a decorative wood bucket works well for flowers because it protects the wood from wet soil. If the bucket is purely decorative, secure it so wind cannot swing it into the posts all day.
6. Finish and Seal
Sand splinters, soften sharp corners, and remove protruding screws. Apply exterior stain or sealer to all exposed faces, with extra attention to end grain. Cut ends are thirsty and fail early when left raw. Recoat according to the finish manufacturer, but expect many outdoor wood features to need touch-up every 1 to 3 years depending on sun, irrigation, and climate.
Planter Design: Do Not Fill the Wood Box With Wet Soil
A decorative well makes an excellent planter, but do not shovel soil directly into the wood base unless you are comfortable shortening its life. Wet soil against wood creates a rot box. It also makes the well extremely heavy and harder to move for maintenance.
Use a plastic planter insert, nursery pot, or pond-liner-style liner with drainage holes. Set the insert on small blocks or a slatted shelf so water can drain away. Drill weep holes through the base if needed, but keep them clear. Add a saucer only if you can empty it after watering; trapped water underneath defeats the point of the drainage pad.
For planting, keep the scale controlled. A 24-inch well looks good with trailing annuals, compact ornamental grasses, herbs, or seasonal color. Avoid large shrubs that will root-bind quickly or make the structure top-heavy. If you want a permanent planting, build a larger open-bottom sleeve around an in-ground planting area rather than turning the well into a sealed container.
Anchoring and Wind Stability
A small wishing well has more wind exposure than homeowners expect because the roof overhang acts like a little wing. If the well sits in an open yard, near a fence gap, or on a hill, plan for anchoring from the start.
The Tool Desk
Outbyte PC Repair FREERepair Windows errors before they cause bigger problemsFix Now →Outbyte Driver Updater FREEFix the driver behind crashes, sound loss and screen glitchesFind Drivers →For a freestanding decorative-only well, the simplest solution is a wider, heavier base. A 24-inch base is stable for a modest roof; a 30-inch base is better for a taller or wider version. Concealed pavers or concrete blocks inside the lower base add useful ballast. Exterior L-brackets can tie the base to pavers or a small platform.
For a more permanent installation, use ground anchors or small concrete footings, but call 811 first. If posts are set in the ground, use ground-contact-rated lumber and keep water draining away from the post bases. In freeze-thaw climates, shallow pads and anchors can move; compacted gravel and proper drainage reduce that movement.
Do not rely on the planter soil alone as ballast. Soil weight changes with moisture, and a saturated planter can strain weak framing. Build the structure to stand on its own, then add planting as a separate load.
Covering a Real Wellhead, Pump, or Cleanout
A decorative garden well can hide an actual wellhead, septic cleanout, irrigation valve, or pump equipment, but service access comes first. Build it as a removable cover, not a tight box that traps moisture and blocks the components.
Free tools Windows power users keep installed
One-click scans. No signup required.
Private wells are generally the owner’s responsibility and are not federally regulated under the Safe Drinking Water Act. If you cover a private wellhead, do not change drainage so water runs toward the casing. Do not block inspection, ventilation, sanitary setbacks, caps, conduit, or service clearance. Leave enough room for a contractor to remove caps and work around the equipment.
Abandoned or unused real wells are a different issue. Old wells can contaminate groundwater and create fall hazards. They should be professionally retired or sealed according to state and local requirements. A decorative cover is not a substitute for proper well abandonment.
If there is any question about whether a pipe, casing, or cap is active, have it evaluated before building. We would rather spend an hour confirming access than build a beautiful cover that has to be torn apart during the next service call.
Rank #4
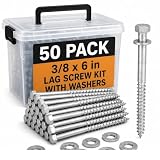
- 50 Piece Bulk Pack Save Cost Reduce Reorders: Get 50 heavy duty 3/8''x6'' lag screws in one pack, enough for medium to large projects; Save on each piece and minimize frequent reordering, so you can stay focused on building without interruption
- Hot Dip Galvanized Finish Ultimate Outdoor Rust Protection: Unlike ordinary zinc plating, our hot dip galvanized coating provides maximum corrosion resistance; Ideal for decks, fences, pergolas, and pressure treated lumber outdoors; No more worry about rust streaks or weakened joints
- Carbon Steel Construction High Load Capacity: Made from high strength carbon steel, these lag screws resist bending, shearing, and breaking under heavy loads; Good for structural connections like beam supports, swing sets, and load bearing wood frames
- Deep Sharp Threads Aggressive Bite into Hardwood: Engineered with precision cut, deep threads that grip instantly and hold tight; Prevents stripping, spinning, or loosening over time, even in dense hardwoods like oak or pressure treated pine
- Complete Set with Washers No Extra Purchase Needed: Each screw comes with a matching metal washer, increasing surface contact, preventing pull through, and protecting wood surfaces from crushing; One purchase, everything you need
Permits, Zoning, and Setbacks
Most small decorative wells do not require a building permit when they are lightweight, non-habitable, and not connected to utilities. That said, local rules vary. Some municipalities regulate accessory structures by size, height, setbacks, location, roofed area, or whether the structure is anchored.
Check your local building department if the well is unusually large, permanently anchored, set near a property line, placed in an easement, or built to cover actual utility or well equipment. A 4-foot planter in a garden bed is usually treated very differently from a roofed structure on footings near a lot line.
Homeowner associations may also have rules for visible yard ornaments, structures, colors, and front-yard landscaping. It is easier to check before building than to move a finished cedar and stone feature later.
Common Mistakes to Avoid
The first mistake is building directly on mulch. Mulch looks tidy on day one, but it holds water against the base. Use gravel or pavers and keep the wood slightly elevated.
The second mistake is using the wrong fasteners. Drywall screws and interior hardware are not outdoor structural connectors. Use exterior-rated screws and corrosion-resistant hardware compatible with your lumber and climate.
Recommended Free Tools
The third mistake is skipping utility locating because the holes are shallow. If you dig, call 811. Landscape lighting, irrigation, communications, electrical, and gas lines can be closer to the surface than expected.
The fourth mistake is making the roof too large for the base. A big roof on a narrow box looks cute until wind catches it. Keep the overhang modest, widen the base, or anchor the structure.
The fifth mistake is trapping water in the planter. Use a liner with drainage holes. Do not create a sealed wet cavity inside wood framing.
The sixth mistake is ignoring child safety. Remove splinters, cover protruding screws, secure the bucket, avoid finger pinch points at the crank, and never create a deep open hole a child could climb into.
Do these 3 things before closing this tab:
1Scan for outdated or missing drivers - takes under a minute2Repair Windows errors before they cause bigger problems3Fix the driver behind crashes, sound loss and screen glitchesThe seventh mistake is covering a real wellhead too tightly. Service contractors need access, and drainage must move away from the casing. A decorative cover should lift off or open without demolition.
When to DIY vs. When to Hire a Pro
This is a good DIY project if you are comfortable measuring, cutting, fastening, leveling, and staining. A basic pressure-treated or cedar version can be built over a weekend: about 4 to 8 hours for cutting and assembly, plus finishing time. Add another half day for a gravel or paver pad if the site needs preparation.
DIY makes the most sense when the well is decorative-only, under about 5 feet tall, placed on a simple pad, and not tied to electrical, plumbing, masonry, or actual well components. It is also a good project if you want a custom size to fit a specific bed or hide a small yard feature.
Hire a pro when the well needs to cover active equipment, sit on a slope, include masonry or electrical lighting, attach to permanent footings, or match higher-end exterior details. Professional help is also worth it if you want a larger structure, stone veneer base, copper or standing-seam roof, or a finish that coordinates with a deck, fence, or outdoor kitchen.
PC Slower Than It Used to Be?
A free scan shows the junk files, broken settings and background clutter dragging Windows down - then fixes them in one click.Free scan · Windows 10 & 11Outdated Drivers Are Slowing You Down
One free scan finds every outdated or missing driver and matches the right update for your exact hardware.Free scan · exact hardware matchBest Value

- 10 Pieces Total
- Diameter/Pitch: 1/4"-10 | Length Under Head: 2-1/2"
- Wrench Size: 3/8" | Point Type : Gimlet Point
- Finish: Hot Dip Galvanized | Grade: Steel
- Partial Threads
A handyman or carpenter-built decorative well may cost $400 to $1,500+ installed depending on size, materials, anchoring, finish, and site prep. That can still be the better value if it avoids callbacks, service-access problems, or a structure that leans after the first storm season.
Design Upgrades That Look Rustic Without Looking Cheap
The best rustic garden wells use restraint. Mix a few real textures instead of adding too many fake details. Cedar siding, black galvanized hardware, natural rope, a gravel or stone base, and simple planting usually look better than oversized signs, bright paint, and a loose bucket that swings in the wind.
For a higher-end finish, consider a small metal roof, cedar-shake roof, stone veneer around the base, or solar downlight tucked under the roof. Use warm white lighting, not harsh blue-white light. Keep wiring accessible and rated for outdoor use.
Color should relate to the house and landscape. Natural cedar, medium brown stain, weathered gray, soft black hardware, and muted planting usually age well. If you paint, use exterior primer and paint, and expect more maintenance where water hits horizontal surfaces.
Scale the planting to the well. Trailing flowers can soften the edge. Herbs work well near patios. Ornamental grasses add movement without overwhelming the structure. Leave enough negative space that the well still reads as a built feature, not just a crowded planter box.
Maintenance Schedule
Inspect the well twice a year: once in spring and once before winter. Look for loose screws, roof movement, cracked boards, rust stains, clogged drainage holes, and soil or mulch piled against the base. Tighten hardware before movement enlarges screw holes.
Clean leaves out of the roof and planter. Touch up exposed cut ends and screw heads. Reapply stain or sealer every 1 to 3 years, depending on exposure. In high-sun or high-moisture areas, expect the shorter end of that range.
If the well covers equipment, lift it off or open it during the inspection and confirm there is no standing water, pest nesting, blocked ventilation, or restricted access. A decorative cover should make the yard look better without making maintenance harder.
Bottom Line
A DIY decorative garden well is a manageable weekend project, but the durable version is built like exterior carpentry. Keep it off wet soil, use outdoor-rated lumber and corrosion-resistant fasteners, give the planter real drainage, size the roof to the base, and anchor it if wind or children could tip it.
For most homeowners, a 24-inch-wide by 48-inch-tall rustic wood well is the sweet spot: visible, useful as a planter, affordable to build, and easy to maintain. Budget $120 to $450 for a practical DIY build, more if you upgrade to cedar, metal roofing, lighting, masonry, or professional installation. Done correctly, it becomes a backyard centerpiece instead of another short-lived yard decoration.
Frequently Asked Questions
Do I need a permit to build a decorative garden well?
Usually not for a small, lightweight, decorative-only planter, but local rules vary. Check your building department if it is large, permanently anchored, near a property line, in an easement, or covering real well or utility equipment.
How much does it cost to build a DIY wishing well in 2026?
A budget pressure-treated wood version typically costs about $120 to $250. A mid-range cedar or metal-roof version usually costs $250 to $500. Premium versions with stone, lighting, custom roofing, or professional installation can run $500 to $1,200 or more.
Free tools Windows power users keep installed
One-click scans. No signup required.
What is the best wood for an outdoor decorative well?
Use ground-contact-rated pressure-treated lumber for framing near soil, mulch, or splash zones. Cedar is better for visible siding, trim, and roof boards when the budget allows because it is lighter, naturally rot resistant, and finishes well.
Can I use a decorative well to cover a real wellhead?
Yes, but build it as a removable cover with clearance for inspection and service. Do not block caps, ventilation, drainage away from the casing, sanitary setbacks, or contractor access. Abandoned wells should be professionally sealed, not just covered.
Do I need to call 811 before installing a decorative well?
Call 811 before any digging, including shallow post holes, ground anchors, or footings. Small landscape projects can still hit irrigation, gas, electrical, communications, or low-voltage lines.
Is it cheaper to build or buy a wooden wishing well planter?
DIY is often cheaper if you already own tools and want a simple pressure-treated or cedar build. Prebuilt wooden versions commonly range from about $120 to $580, while higher-end handcrafted cedar or poly-lumber options can cost several hundred dollars more.
Quick wins for a faster PC:
Scan for outdated or missing drivers - takes under a minuteDriver Scan →Repair Windows errors before they cause bigger problemsFix Now →Fix the driver behind crashes, sound loss and screen glitchesFind Drivers →Quick Recap
Product prices and availability are accurate as of the date/time indicated and are subject to change. Any price and availability information displayed on Amazon at the time of purchase will apply.