Do these 3 things before closing this tab:
1Fix the driver behind crashes, sound loss and screen glitches2Clear out junk files and repair common Windows errors3Scan for outdated or missing drivers - takes under a minutePine stains unevenly because it does not absorb color evenly. The soft earlywood drinks stain fast, the harder latewood takes less, knots and resin pockets behave differently again, and end grain can turn almost black if you treat it like the face of the board. The fix is not one magic product. The fix is a controlled finish schedule: choose clean, dry pine, sand every piece the same way, test on offcuts, control absorption with conditioner or a sealer, use the right stain, wipe consistently, and topcoat the sample before approving the color.
On our job sites, we treat pine as a blotch-prone material from the start. That means we do not open a can of stain and begin on the finished shelf, cabinet face frame, stair skirt, or trim run. We build a sample first, write down the exact grit sequence and timing, and repeat that recipe. That simple discipline is the difference between a warm, even pine finish and a project that looks striped, muddy, or patched.
| # | Preview | Product | Price | |
|---|---|---|---|---|
| 1 |

|
Varathane Pre-Stain Wood Conditioner | $18.29 | Buy on Amazon |
| 2 |

|
Varathane Wood Conditioner | $21.55 | Buy on Amazon |
| 3 |

|
General Finishes Oil Based Pre-Stain Wood Conditioner, 1/2 Pint | $28.95 | Buy on Amazon |
Why Pine Stains Blotchy
Pine is a softwood with uneven density. The lighter earlywood between growth rings is more porous and absorbs stain more aggressively. The darker latewood is denser and resists stain. When a thin penetrating stain hits both areas at the same time, one section can go dark while the next stays pale. That is the classic blotchy pine problem.
Knots make the issue worse. A knot can contain resin that blocks stain, darkens unpredictably, or telegraphs through the finish later. Around knots, the grain often swirls and changes direction, so sanding scratches and stain absorption vary within a few inches. Construction-grade pine, common boards, and knotty pine paneling can all be finished well, but they require more prep than hardwoods such as oak or maple.
#1 Best Overall
- Pre-stain wood conditioner preps wood for even color
- Easy to use, water-based formula dries fast for quick project completion
- Low odor wood conditioner prevents blotching on soft woods and ensures a high quality finish
- Cleans up with soap and water; great for use on furniture, cabinets, trim, wood floors and more
- Apply to bare wood before Varathane Wood Stain for best results
Glue is another common culprit. Dried glue squeeze-out blocks stain and leaves pale fingerprints, seams, and smears. Stain will not hide glue. It exposes it. The same is true for dents, mill glaze, planer marks, random-orbit swirl marks, and sanding skips. Before staining pine, assume every prep mistake will become more visible after color goes on.
The Best Method for Consistent Pine Color
The most reliable way to stain pine a consistent color is to control absorption before you apply the stain. For most homeowners, that means using a pre-stain wood conditioner, a washcoat, dewaxed shellac on knots, or a gel stain. A conditioner is specifically made to promote more uniform stain acceptance on soft woods such as pine. Gel stain can be even more forgiving because it sits more on the surface instead of relying entirely on penetration.
The tradeoff is color depth. Conditioner usually reduces how much stain the pine absorbs, so the finished color often comes out lighter than the sample on the can. If you want a medium walnut look, you may need to test a darker stain over conditioner to land on the right final tone. Do not skip that test. Pine stained to the right color before topcoat can look warmer, darker, glossier, or more amber after polyurethane.
Our Standard Pine Staining Schedule
- Pick pine from the same batch when possible, and avoid wet, resin-heavy, damaged, or wildly mismatched boards.
- Sand consistently through the grits, usually ending at 180 or 220 grit for interior pine.
- Sand end grain one or two grits finer than the face grain, or pre-seal it.
- Remove dust with vacuuming, a clean cloth, and the method recommended by the finish manufacturer.
- Spot-seal knots with dewaxed shellac if knots are resinous or color-sensitive.
- Make a sample board using the same grit, conditioner, stain, wipe time, and topcoat.
- Apply compatible pre-stain conditioner or use gel stain if uniformity matters more than deep penetration.
- Apply stain in manageable sections, stir often, and wipe off excess evenly.
- Let the stain dry fully, then apply the selected clear topcoat.
Materials and Tools You Need
For a small pine furniture, shelving, or trim project, expect to spend about $35 to $120 in consumables if you already own a sander. A typical 2026 DIY basket includes sandpaper at $5 to $20, pre-stain conditioner at about $10 to $20 per quart, stain at $10 to $25 per quart, brushes, rags, gloves, and trays at $10 to $30, and a clear topcoat at $15 to $35 per quart. If you need to buy a basic random-orbit sander, add roughly $40 to $100 or more. A respirator and cartridges can add another $25 to $60 depending on the product and exposure.
For a clean setup, gather pine offcuts from the same stock, a random-orbit sander, sanding blocks, 80, 100, 120, 150, 180, and 220 grit paper, a vacuum, clean lint-free rags, nitrile gloves, stir sticks, painter’s tape, brushes or stain pads, pre-stain conditioner, stain, dewaxed shellac for knots if needed, and a compatible topcoat. For cabinet or built-in work, add masking film, drop cloths, screw bags, labels, and drying racks for doors and drawer fronts.
| Project type | Typical 2026 cost range | What drives the price |
|---|---|---|
| Small DIY pine shelf, bench, or furniture piece | $35-$120 in consumables | Sandpaper, conditioner, stain, brushes, rags, gloves, and topcoat |
| DIY project with tool purchase | Add $40-$100+ for a sander; $25-$60 for respirator gear | Tool quality, dust control, and product type |
| Professional staining and finishing of general woodwork | $4.60-$9.05 per linear foot | Masking, profile detail, access, number of coats, and stripping needs |
| Professional cabinet staining | $7.28-$14.80 per square foot | Door removal, cleaning, sanding, staining, controlled topcoating, and repairs |
| Professional cabinet staining project | Often $1,500-$4,000 | Kitchen size, finish condition, repairs, and finish system |
| Deck or exterior pine staining | $1.50-$6.50 per square foot; $2.50-$8.20 with stripping or sanding | Cleaning, prep level, exposure, railings, stairs, and old coating removal |
Step 1: Choose Better Pine Before You Sand
Consistent color starts at the lumber rack. If you are building a visible project, do not mix bright white pine, yellow pine, blue-stained boards, and knot-heavy stock unless you want a rustic result. Pull boards from the same pile, compare them in daylight, and look for similar grain, similar color, and similar knot pattern. For cabinetry, shelves, wall boards, and wide trim, take time to sequence the boards before cutting so the most visible faces are the most compatible.
Moisture matters too. Damp exterior pine or recently stored construction lumber will not finish predictably. Interior pine should be acclimated to the house before final sanding and staining. Exterior pine should be dry enough for the stain manufacturer’s requirements, and all cut ends should be sealed because end grain pulls in moisture and stain much faster than face grain.
Step 2: Sand Pine the Same Way Everywhere
Sanding consistency matters as much as product choice. For rough spots, planer marks, dents, or old finish removal, start around 80 to 100 grit only where needed. Then progress to 120 or 150, and finish at 180 or 220 for most interior pine staining. Do not jump from 80 directly to 220. Skipping too far leaves coarse scratches that may not show until stain turns them dark.
For new pine trim, shelves, and furniture parts, a common schedule is 120, 150, then 180 grit. If the board has visible machining marks, start at 100. If you want a slightly smoother surface under a clear finish, test 220. Be careful about sanding too fine. Over-polished pine can absorb stain poorly and unevenly, especially with penetrating stains. Under-sanded pine leaves scratches, swirl marks, and fuzzy grain.
Use raking light before staining. Set a work light low across the surface and look for glue smears, dents, cross-grain scratches, and random-orbit pigtails. Circle defects lightly with pencil, sand them out, and remove the pencil marks during final sanding. For edges and routed profiles, hand-sand with the grain so you do not round crisp details or create scratch patterns the stain will highlight.
End Grain Needs Different Prep
End grain absorbs far more stain than face grain. On pine shelves, table tops, stair parts, door rails, and exposed trim returns, the ends can turn much darker than the rest of the piece. Sand end grain one or two grits finer than the face grain. If the face stops at 180, try 220 or 320 on the end grain. For very dark stains, a light washcoat or conditioner on end grain can help keep edges from looking burned.
Step 3: Build a Sample Board and Write Down the Recipe
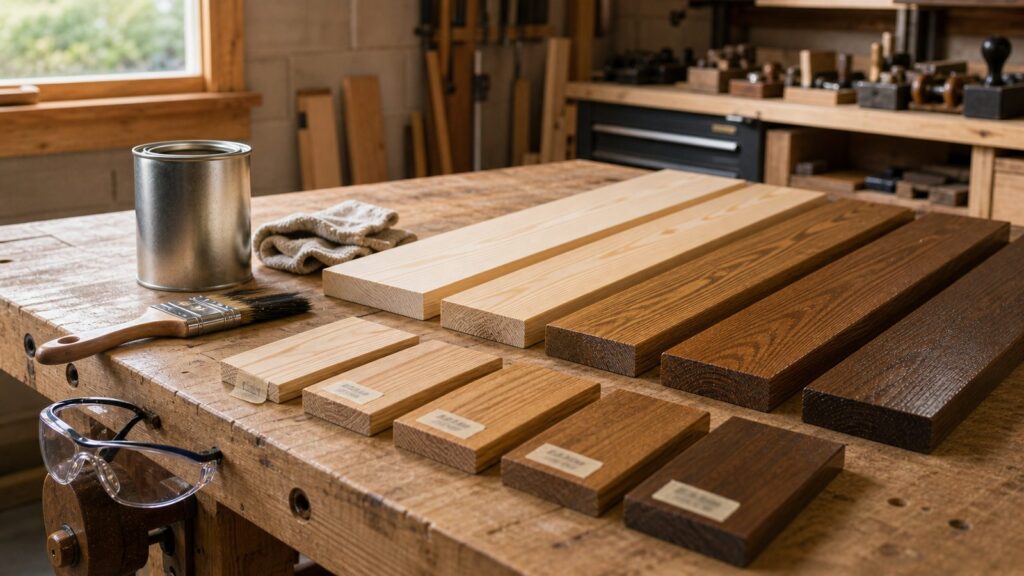
A sample board is not optional with pine. Use offcuts from the same boards, not a random scrap from another project. Sand the sample with the same grit sequence you plan to use on the finished piece. Then test the entire finish schedule: conditioner timing, stain color, wipe-off timing, drying time, and topcoat. Mark the back of each sample with the grit, product names, application times, and number of topcoat coats.
Recommended Free Tools
Make at least three samples if the color matters. For example, test natural stain over conditioner, medium brown gel stain over conditioner, and a darker penetrating stain over conditioner. Wipe one sample after 3 minutes, another after 7 minutes, and another after 10 minutes if the product allows that range. Once dry, topcoat each sample. A waterborne topcoat may keep pine cooler and lighter. Oil-based polyurethane often adds amber warmth. Lacquer, varnish, and exterior finishes can all shift the final look.
If you are matching existing trim or cabinets, bring a removable drawer front, shelf, or trim piece to the paint or stain store. Expect custom tinting and field samples. A stock stain name is not a guarantee, especially on pine. The same stain can look different on white pine, southern yellow pine, old pine, new pine, and pine veneer.
Step 4: Control Blotching With Conditioner, Shellac, or Gel Stain
Pre-stain conditioner is the usual starting point for pine because it evens out absorption. Apply it according to the label, let it penetrate for the specified time, wipe off excess if required, and apply stain within the product’s recommended window. Some conditioners require stain fairly soon after application. Waiting too long can reduce the benefit or change the result.
Rank #2
- Ideal for use on interior wood furniture, cabinets, doors, trim, floors and paneling
- Oil-based formula penetrates deep into wood to provide better appearance after staining
- Dries to the touch in 1-2 hours and covers between 110-220 sq. ft. per quart
- Wood sealing provides allows for an even, deeper stain
- Works with any oil-based stain
Water-based conditioners and stains dry faster and have lower odor, but they raise the grain. If you use a water-based system, consider water-popping the pine first on a sample: wipe the surface lightly with water, let it dry, then de-nib with fine paper before conditioning and staining. This reduces roughness after the stain goes on. Oil-based products usually provide longer working time and familiar warmth, but they require solvent cleanup, ventilation, and careful rag disposal.
Free tools Windows power users keep installed
One-click scans. No signup required.
When Gel Stain Is the Better Choice
Use gel stain when the main goal is uniform color. Gel stain is thicker and sits more on the surface, so it is less dependent on pine’s uneven absorption. It can be especially useful on pine doors, furniture, stair parts, and previously sealed or mixed-grain surfaces. The look is different from a deep penetrating stain. You may see less grain contrast, but you usually get better color control.
How to Handle Knots
For resinous knots, spot-seal with dewaxed shellac before the main conditioner and stain schedule. Keep the shellac tight to the knot and feather the edge. Once dry, lightly scuff if your sample shows adhesion or sheen issues. Then proceed with the same conditioner and stain schedule across the full piece. Always test this sequence because sealed knots may stain lighter than the surrounding pine.
Step 5: Apply Stain Without Creating Lap Marks
Stir stain thoroughly before you start and keep stirring during the job. Pigment settles in the can. If you do not stir, the first boards can be weak and the last boards can be heavy and muddy. Do not shake stain unless the manufacturer allows it, because bubbles can affect the finish.
Work in manageable sections. On shelves, stain one full board face at a time. On wall boards or long trim runs, keep a wet edge and avoid stopping in the middle of a visible span. Apply stain with a brush, pad, or rag, let it sit for the tested amount of time, then wipe off excess with clean rags using long strokes with the grain. The key is repeatability. If your sample was wiped after 5 minutes, do not let one shelf sit for 2 minutes and the next for 15.
Crashes, No Sound, or Screen Glitches?
Random freezes, missing sound and display glitches usually trace back to one bad driver. Find and replace yours safely.Free scan · under a minutePC Slower Than It Used to Be?
A free scan shows the junk files, broken settings and background clutter dragging Windows down - then fixes them in one click.Free scan · Windows 10 & 11Do not try to fix blotchy stain by adding more stain over the dark areas. That usually increases contrast. If the color is uneven while wet, wipe aggressively before it sets. If it dries blotchy, the real fix may be sanding back, sealing, and switching to a more controlled approach such as gel stain or a tinted topcoat. For expensive cabinet fronts or built-ins, stop early and reassess rather than burying the problem under more pigment.
Step 6: Topcoat for the Actual Use
Stain changes color; topcoat protects the work. For interior pine furniture, shelves, trim, and built-ins, polyurethane, waterborne clear coat, lacquer, or varnish may be appropriate depending on wear, odor tolerance, and desired sheen. For kitchen cabinets, use a durable cabinet-grade clear finish and allow proper cure time before reinstalling doors and hardware. Dry to touch is not the same as cured.
For exterior pine, use an exterior-rated stain and finish system. Interior furniture stain is not designed for sun, rain, freeze-thaw movement, and UV exposure. A semi-transparent or solid exterior stain with UV and moisture resistance is usually more durable outside. Seal all cut ends, avoid staining in direct sun, and stay within the temperature and humidity range on the label. Staining damp exterior pine is one of the fastest ways to get poor penetration and early failure.
Oil-Based vs Water-Based Stain on Pine
Oil-based stain gives longer open time, which helps on larger pieces and long trim runs. It also tends to add warmth to pine. The downsides are odor, solvent cleanup, longer dry times, and oily rag safety. Water-based stain dries faster, has lower odor, and cleans up with water, but it can raise grain and requires quicker, more disciplined application.
| Stain type | Best use on pine | Watch-outs |
|---|---|---|
| Oil-based penetrating stain | Warm traditional color, longer working time, trim and furniture | Can blotch without conditioner; solvent cleanup; oily rag fire risk |
| Water-based stain | Lower odor projects, quicker dry time, cooler color control | Raises grain; shorter working time; sample carefully |
| Gel stain | Most consistent color, doors, furniture, blotch-prone pine | Less penetration; can obscure some grain if applied too heavily |
| Tinted topcoat or toner | Fine color adjustment after stain | Requires even spraying or careful application; mistakes affect the whole surface |
Common Pine Staining Mistakes
The biggest mistake is skipping the sample board. The second is believing conditioner alone will create the exact color shown on the can. Conditioner reduces blotching by limiting absorption, and that often makes the final color lighter. Plan for that by testing darker stain options or longer approved dwell times.
Uneven sanding is another frequent problem. If one section is sanded to 120 and another is burnished to 320, they will not take stain the same way. Glue squeeze-out is just as damaging. On our crews, we clean glue while assembling, then check again after sanding because even a thin smear can leave a pale patch.
Other mistakes include applying stain too heavily, failing to wipe off excess evenly, staining in poor light, mixing incompatible products, rushing topcoat over uncured oil stain, ignoring knots, treating end grain like face grain, and leaving oil-stained rags in a pile. Each one is preventable if you slow down before color goes on.
Rank #3
- Designed for use before staining new, soft and porous wood surfaces, such as aspen, cherry, birch, poplar or pine with an oil-based stain
- It penetrates the grain of the wood to promote uniform acceptance of oil-based wood stain
- Reduces streaking and blotching to help ensure beautiful, even coverage
- Apply to raw wood using a clean cloth, a foam brush or paint pad applicator
- Clean up with mineral spirits
When to DIY and When to Hire a Pro
DIY is reasonable for pine shelves, benches, furniture, simple trim pieces, closet systems, and small built-ins if you can work on samples first and tolerate some testing. Budget $35 to $120 for basic consumables if you have a sander, and plan for at least one prep day plus drying time. A small weekend project can easily stretch over 2 to 4 days once conditioner, stain, and topcoat dry times are included.
Quick wins for a faster PC:
Scan for outdated or missing drivers - takes under a minuteDriver Scan →Clear out junk files and repair common Windows errorsFree Scan →Fix the driver behind crashes, sound loss and screen glitchesFind Drivers →Hire a pro when the work is large, highly visible, already installed, or expensive to replace. Pine cabinets, stair systems, wall paneling, and full-room trim packages are less forgiving because small color differences repeat across the room. Professional woodwork staining and finishing commonly runs $4.60 to $9.05 per linear foot. Kitchen cabinet staining is often estimated around $7.28 to $14.80 per square foot, and full professional cabinet staining projects commonly land around $1,500 to $4,000. Repairs before staining can add $200 to $800. Cabinet refinishing ranges vary widely, from smaller light-scope projects in the hundreds to full refinishing projects around $1,992 to $4,495 depending on method, condition, and materials.
If your cabinets already have an old finish, the job is no longer just staining pine. It may involve degreasing, stripping or deglossing, sanding profiles, color matching, sealing, spraying, and controlled curing. That is where a professional setup earns its cost.
Safety, Ventilation, and Disposal
Read the product labels before opening anything. Use ventilation, gloves, eye protection, and a respirator when the product calls for it. Keep ignition sources away from solvent-based products. For indoor work, protect HVAC returns and isolate dust before finishing. Dust and stain do not mix well.
Oily stain rags require special handling because they can self-heat and ignite if left crumpled in a pile or trash can. Lay oily rags flat outdoors to dry in a safe area, or place them in a metal container with water and a tight-fitting lid according to local disposal guidance. Do not leave used oil-stain rags in a heap on the garage floor, in a plastic bucket, or in a job-site trash bag.
The Tool Desk
Outbyte Driver Updater FREEFix the driver behind crashes, sound loss and screen glitchesFind Drivers →Outbyte PC Repair FREERepair Windows errors before they cause bigger problemsFix Now →Most interior homeowner staining does not require a permit. Exterior work usually does not either, but local rules can apply to commercial coating work, disposal, volatile organic compound limits, historic districts, multifamily properties, and HOA-controlled exterior colors. If you are staining exterior pine on a deck, fence, or siding in a regulated area, check local requirements before buying materials.
The Bottom Line
To stain pine a consistent color, control the whole process. Sand every part the same way, treat end grain separately, seal problem knots, test the full finish schedule, use conditioner or gel stain to reduce blotching, wipe by the clock, and topcoat the sample before committing. Pine can look warm, clean, and professional, but it rewards discipline more than guesswork.
If you remember one job-site rule, make it this: the approved sample is the recipe. Once you have a sample that works, do not change grit, timing, product type, rag pressure, or topcoat halfway through the project.
Frequently Asked Questions
Why does pine stain blotchy?
Pine has uneven density. Soft earlywood absorbs more stain than harder latewood, while knots and resin pockets absorb differently again. That uneven absorption creates dark and pale patches unless you control it with sanding, conditioner, sealer, or gel stain.
What’s actually slowing this PC down?
Pick the symptom - the matching free tool is one click away.
Do I need pre-stain conditioner on pine?
For most pine projects, yes. Conditioner helps pine accept stain more uniformly. The tradeoff is that it can lighten the final color, so always make a sample and consider testing a darker stain than your target color.
Is gel stain better than regular stain for pine?
Gel stain is often better when uniform color matters most. It sits more on the surface and depends less on pine’s uneven absorption. Penetrating stain can still work, but it usually needs careful sanding and conditioner.
What grit should I sand pine to before staining?
Most interior pine should be sanded through 120 or 150 grit and finished at 180 or 220 grit before staining. Do not skip large grit steps. Sand end grain one or two grits finer to keep it from turning too dark.
How do I stain pine darker without blotches?
Use a controlled schedule: sand consistently, apply conditioner, then test darker stains or gel stain on offcuts. Because conditioner reduces absorption, the stain may need to be darker than expected to reach the final color.
How do I safely dispose of oily stain rags?
Do not leave oily rags crumpled in a pile or trash can. They can self-heat and ignite. Lay them flat outdoors to dry safely, or store them in a metal container with water and a tight lid according to local disposal rules.
Quick Recap
Product prices and availability are accurate as of the date/time indicated and are subject to change. Any price and availability information displayed on Amazon at the time of purchase will apply.