For a repeatable way to mount drawer slides and get an even reveal, mark centerlines, use a scrap spacer to set slide height, and leave the first screws adjustable until you have tested the drawer. The dimensions below— including a 7/8-inch cabinet-side offset and a 1/8-inch drawer-side setback—describe WOOD magazine’s demonstrated setup, not a universal standard. Check the instructions and clearance requirements for your selected slides before laying out the cabinet.
Before mounting: check the slides and cabinet
Choose slides that suit the cabinet, drawer size, and opening, then follow the hardware maker’s specifications for clearance, setback, length, and mounting orientation. WOOD magazine’s featured method uses full-extension slides; its presenter, Jeff Mertz, used slides rated for 100 pounds in that demonstration. That rating is his hardware choice, not a requirement for this method. See the WOOD magazine demonstration and transcript and its related guide, Make and Mount Super-Simple Drawers.
The related WOOD article says its full-extension slides typically need 1/2 inch of clearance on each side, so its example makes the drawer box 1 inch narrower than the cabinet opening. That is an example for the slides and method described there; do not use it in place of the clearance specification for your own hardware.
How to mount drawer slides with a repeatable layout
1. Mark and mount the drawer-side members
Mark a centerline on each drawer-box side so you can position the slide consistently. In the featured setup, the drawer-mounted slide sits 1/8 inch back from the front of the box. Use a combination square to establish that setback, then start a screw in an elongated slot. Do not fully tighten it yet: the slot lets you correct the position after checking the fit.
#1 Best Overall

- Premium Home Improvement Tool: Take the guesswork out of drawers with the Drawer Slide Jig; easily create level drawers that slide smoothly
- Eliminate Measuring: Kreg jig has built-in indexing tabs to precisely align drawer slides and drawers without measuring
- Works with Many Drawer Slides: Drawer jig aligns undermount, ball-bearing, and epoxy-coating slides
- Multipurpose Carpenter Tools: Works for cabinets, cases, drawers, desks, and more
- Premium Kreg Tools: We offer products that help woodworkers close the gap between idea and outcome
2. Make a spacer to repeat the slide height
Measure from the bottom of the glide to the bottom of the drawer box. Rip a piece of scrap to that width and use it to support the slide at the same height on the opposite side. Reuse the spacer for the other drawers so their slides follow the same layout. This simple, task-specific spacer is the low-cost option in the WOOD method; it helps repeat height but does not replace slide-specific measurements.
3. Lay out and mount the cabinet-side members
If it is practical and safe to handle, lay the cabinet on its side. For the demonstrated arrangement, set a gauge to 7/8 inch from the cabinet front and mark the drawer-hardware centerlines inside the case. Align the cabinet-side slides with those marks and the offset line. The 7/8-inch offset is tied to that setup’s 3/4-inch drawer front and 1/8-inch setback; another front style or slide arrangement may call for a different layout.
Rank #2
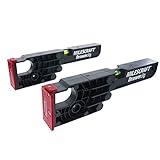
- Alignment fences and tabs make sure your jig is accurately aligned on both framed and frameless cabinets
- Large clamping area allows for tight and secure clamping to cabinet
- CABINET MUST BE AT LEAST 15" DEEP TO SUPPORT SLIDE INSTALLATION
- Reverse the DrawerJig and face outwards to support and align drawer while attaching slides
- Built-in level helps indicate if your cabinets have been installed accurate and true
Start screws in the cabinet-slide elongated holes, square each slide to the case front, and keep the screws loose enough for adjustment. The related WOOD guide also places its cabinet-mounted slides 7/8 inch from the case front and drawer-mounted slides 1/8 inch from the box front, but those measurements remain specific to its described method.
4. Test the drawers before locking the slides
Install each drawer and check that it travels smoothly, parallel to the cabinet, and square in the opening. Use the slots to fine-tune the position: the featured method adjusts the drawer box up or down and moves the cabinet slide in or out as needed. Tighten the initial screws only after the drawer’s fit and operation are acceptable.
Free tools Windows power users keep installed
One-click scans. No signup required.
Rank #3

- Drawer Slide Jig: Install drawer hardware quickly, accurately and more easily than ever with this innovative jig! Our center-mount drawer slide jigs are the ultimate aid for installing drawer slides of almost any type.
- Compatible With: Our cabinet hardware jig is compatible with almost any drawer slide including center-mount slides, epoxy-coated side mount, and ball bearing slides. Not compatible with Blum Tandem Drawer Slides.
- Locking Wedge: Our drawer jig features a locking wedge that holds the slide securely with no risk of slippage. Place our drawer slide jig against the face of your cabinet and position the cabinet drawer slides at level with the proper outback before use.
- Adjustable Indexing Rod: Our cabinet hardware jig tool can be clamped to the face of the cabinet. This woodworking jig features an indexing rod that references off of the face frame rails or cabinet bottom for fast, repeatable height settings.
- Rotating ABS foot: The rotating foot allows you to rotate the indexing rod from the top or bottom. And the cutouts in the cabinet jig allow easy access for drill and driver bits.
5. Position the fronts and set the reveal
Place shims around the opening to hold the drawer front in position. WOOD’s demonstration uses 1/8-inch shims to create a 1/8-inch reveal, temporarily attaches the front through existing mounting holes, and then secures the front to the drawer box once alignment is checked. Adjust the slide through its slots if the front is not flush. The 1/8-inch reveal is the target in that demonstration, not a guarantee or a universal reveal dimension.
After the final fit is confirmed, add screws in non-slotted holes to lock the slide positions. The demonstration also recommends labeling parts and returning them to their locations after finishing the project, which can help preserve the drawer-to-opening match.
Rank #4

- 【DRAWER SLIDE JIG】Works with most of standard drawer slide types (side-mount, undermount) and cabinet materials (wood, MDF, plywood). The magnetic arm securely holds slides during installation without damaging surfaces
- 【DRAWER TRACK MOUNTING JIG】The adjustable clamp (0 - 4cm/1.5inch range) locks slides in place with one press, eliminating measurement errors. Achieve perfect alignment every time for multiple drawers without recalibration, saving times on cabinet projects
- 【TIME-SAVING & EFFICIENT DESIGN】Constructed of durable plastic and stainless steel, lightweight and sturdy. Durable fade-resistant laser markings, simply align, mark the drill points and install the drawer slides in seconds without any measuring tools.
- 【WIDE APPLICATIONS】Suitable for any project - cabinets, drawers, nightstands, DIY furniture or professional woodworking, making it easy to achieve professional results in all your woodworking projects.
- 【NOTE】This drawer jig DO NOT fit for face-frame cabinets, only apply for frameless cabinets
Homemade spacer or drawer slide jig?
A scrap spacer suits the WOOD workflow when the main need is to repeat slide height. A commercial jig can support slides while they are fastened, but compatibility and cabinet construction still matter. Kreg’s Drawer Slide Jig is model KHI-SLIDE; Kreg lists it for face-frame and frameless cabinets and for ball-bearing, epoxy-coated, and undermount slides, with a minimum cabinet depth of 14 inches.
Kreg’s Drawer Slide Jig owner’s manual instructs users to follow the selected slide manufacturer’s directions. It also notes that face-frame cabinets may need mounting rails to provide a suitable surface. Choose between a spacer and jig based on the number of drawers, cabinet depth and construction, and whether the tool supports your slide type; the cited sources do not establish that a purchased jig is faster or more accurate than a homemade spacer.
Crashes, No Sound, or Screen Glitches?
Random freezes, missing sound and display glitches usually trace back to one bad driver. Find and replace yours safely.Free scan · under a minutePC Slower Than It Used to Be?
A free scan shows the junk files, broken settings and background clutter dragging Windows down - then fixes them in one click.Free scan · Windows 10 & 11Best Value

- Upgraded Drawer Slide Clamp: Features innovative removable clamping system with high-quality clamps and rubber heads. Secure drawer slides quickly by placing them in the desired position for stable fixation
- Creative Positioning Design: Built-in blue positioner for fast operation positioning. Special blue protrusions on the support arm fit tightly with wood to prevent displacement and ensure stability
- Magnetic Support Arm: Equipped with strong built-in magnets to hold long drawer slide tracks securely, freeing hands for precise adjustment. Provides alignment assist to ensure parallelism and verticality between slide tracks, cabinets and drawers
- Expandable Extension: With connector design, extend working length by connecting multiple stainless steel bodies for tall cabinet drawer slide installation
- Multiple Track Compatibility: Compatible with standard side-mounted and bottom-mounted drawer slides. Suitable for wood, MDF, plywood and common cabinet materials, ensuring stable and error-free installation
Adjustments when a drawer does not fit or run square
- Drawer rubs or travels out of parallel: Recheck the slide centerlines and use the elongated holes to adjust position. Test the drawer’s travel before tightening the screws fully.
- Front is proud, recessed, or uneven: Use shims to reposition the front, then adjust the slide in its slots if needed before fastening the front permanently.
- Clearance or setback seems wrong: Stop and compare the cabinet and drawer dimensions with the selected slide’s installation instructions. The 1/2-inch-per-side clearance, 7/8-inch cabinet offset, 1/8-inch box setback, and 1/8-inch reveal are examples from WOOD’s described method, not dimensions that fit every slide or cabinet.
For a hardwood installation using #6 panhead screws, the related WOOD guide specifies 3/32-inch pilot holes. Treat that as the guide’s instruction for its described parts and fasteners, not as a substitute for appropriate pilot-hole guidance for different materials or screws.
Quick Recap
Product prices and availability are accurate as of the date/time indicated and are subject to change. Any price and availability information displayed on Amazon at the time of purchase will apply.