Do these 3 things before closing this tab:
1Repair Windows errors before they cause bigger problems2Scan for outdated or missing drivers - takes under a minute3Clear out junk files and repair common Windows errorsA bevel cut tilts the blade so it cuts at an angle to the stock’s flat face. Choose the setup by the direction the stock travels: use a miter gauge for a bevel crosscut, a locked rip fence for a bevel rip, and both blade tilt and an angled miter-gauge setting for a compound bevel-miter cut. Keep the saw’s guard assembly installed for through cuts, and follow the operator’s manual for the correct guide position and adjustments on your model.
Choose the right bevel operation
The key distinction is not simply the angle: it is how the workpiece moves past the blade. Use only the guide intended for that direction of travel.
| Cut | How the stock travels | Guide | How the angle is made |
|---|---|---|---|
| Bevel crosscut | Across the blade | Miter gauge | Tilt the blade; the gauge is generally set for the crosscut. |
| Bevel rip | Along the blade | Rip fence | Tilt the blade; the fence guides the stock along the blade. |
| Compound bevel-miter cut | Across the blade | Miter gauge | Tilt the blade and set the miter gauge to a non-square angle. |
Bosch defines a bevel crosscut as a crosscut where the wood is also cut at an angle other than 90 degrees to its flat side in its 4100 table saw manual. A compound bevel-miter cut combines blade tilt with a non-square miter setting; the operator’s manual hosted by MyTurn also distinguishes these operations.
Set up the saw before cutting
- Identify the cut and consult the manual. Confirm the saw’s blade-tilt method, angle scale, guide position, guarding instructions, and any limits for your model. If the manual calls for disconnecting power during setup, do so before making adjustments.
- Install the guard assembly for a through cut. Keep it in place unless your saw’s manual specifies otherwise for a particular operation. Check that it is correctly installed and moves as intended.
- Set and lock the blade angle. Use the saw’s handwheel, scale, or other model-specific adjustment. Lock the setting securely before bringing stock to the blade. Do not assume another saw’s available angle range applies to yours.
- Fit the correct guide. For a bevel crosscut, remove the rip fence and guide the stock with the miter gauge. For a bevel rip, remove the miter gauge and lock the rip fence. For a compound cut, use the miter gauge at the required angle as well as the tilted blade.
- Check the work and support. Make sure the stock sits securely against the intended guide and will not rock or shift. Support long pieces at table height as directed by the manual. For a bevel rip, use an appropriate push stick or push block when the manual calls for one, especially with narrow stock; a push device does not make an unstable setup safe.
- Verify the result on scrap. Check the blade and guide settings, then make a test cut on scrap of suitable material. Adjust as needed before cutting the workpiece.
Make a bevel crosscut with the miter gauge
A bevel crosscut moves stock across the blade. Do not leave the rip fence in place as a second guide: a piece trapped between the fence and blade can bind. Remove the fence, set and lock the blade tilt, and set the miter gauge according to the cut and your saw’s manual. Bosch says its bevel crosscut may use either miter-gauge groove, but that does not establish the correct groove or arrangement for every saw.
Recommended Free Tools
#1 Best Overall

- VERSATILE DIGITAL ANGLE GAUGE AND LEVEL: Measure angles, check relative angles with zero calibration feature, or use as a digital level with ease
- HIGH VISIBILITY AND AUTO-ROTATING DISPLAY: Reverse contrast display improves visibility in low light conditions and automatically rotates when upside-down for easy viewing
- STRONG MAGNETIC BASE: Attach to ferromagnetic surfaces like pipe, electrical conduit, miter saw blades for woodworking, vents, ducts, and more for convenient hands-free operation
- V-GROOVE EDGES: Ensure optimal alignment on conduits and pipes for bending and alignment tasks
- WIDE MEASUREMENT RANGE: Measure between 0-90, or 0-180 degrees - useful when accounting for springback when bending conduit
Hold the stock securely against the gauge, with hands positioned as specified by the manual. Start the saw with the stock clear of the blade, allow it to reach speed, and feed steadily. Keep the guard assembly in place for a through cut. When the cut is complete, wait until the blade has stopped before removing offcuts or moving stock near it.
Make a bevel rip with the rip fence
A bevel rip moves stock along the blade. Remove the miter gauge, set and lock the blade tilt, and lock the rip fence at the cut width. Keep the stock controlled against the fence as you feed it; do not attempt to guide a rip freehand. Bosch warns that freehand ripping can cause binding and kickback and calls for a locked rip fence with the miter gauge removed during fence operations.
Rank #2
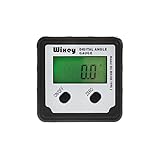
- Ultra-Precise Measurements – Set angles with confidence using the Wixey Digital Angle Gauge. Features 0.1° resolution and ±0.2° accuracy, making it perfect for bevel cuts, miters, and compound angles.
- Pocket-Sized & Workshop-Ready – Compact, lightweight design slips easily into your toolbox or pocket. Comes with an auto shut-off to extend battery life.
- Crystal-Clear Backlit Display – The large LCD screen with backlight ensures effortless readability, even in dim lighting. Use the zero calibration function to get reliable results, even on saws that aren’t perfectly leveled.
- Strong Magnetic Base – Powerful built-in magnets secure the gauge to saw blades, fences, and tables. This stable grip prevents slippage and guarantees consistent accuracy with every reading.
- Complete Angle Gauge Kit – Includes (1) Wixey Digital Angle Gauge with Backlight
Use a push stick or push block when appropriate, particularly for narrow stock, and follow the manual’s instructions on hand position and standing slightly to the side of the feed path. Keep the stock supported throughout the cut. Do not reach over or past a moving blade to retrieve material; wait for a complete stop before clearing the saw.
Make a compound bevel-miter cut
This cut combines two settings: blade tilt and a non-square miter-gauge angle. Remove the rip fence, set and lock the blade bevel, and adjust the gauge to the required miter angle. The resulting cut reflects both settings. Because guide placement and safe operating details vary among saws, check the exact manual before making this setup and test it on scrap first.
Rank #3

- High‑Precision Angle Gauge:Designed for auto repair, table saw/milling cutter calibration, machinery manufacturing and engineering decoration. Delivers fast, high‑accuracy angle measurement and horizontal detection in tight spaces, ideal for woodworking, construction and mechanical industries.
- V‑Groove Magnetic Base:Heavy‑duty magnetic base with V‑groove attaches firmly to pipes, saw blades, air ducts and other ferromagnetic surfaces. Convenient for setting up saw blades and woodworking jigs.
- Backlit Large LCD Display:Large backlit LCD screen powered by 2 AAA batteries for quick, clear readouts even in low‑light conditions.
- Dual Measurement Modes:Supports absolute and relative angle measurement. Perfect for woodworking angle control, equipment leveling and decoration alignment. Also works as a digital spirit level.
- Portable & User‑Friendly:Compact and easy to carry. Package Includes:1 × Digital Angle Gauge;1 × Storage Pouch;2 × AAA Batteries;1 × User Manual.
Angle ranges and guide positions depend on the saw
There is no single bevel capacity or guide-side instruction that applies to every table saw. For example, the Grizzly G0690/G0691 owner’s manual specifies left blade tilt from 0 to 45 degrees for those models; the manual identifies machines manufactured from June 2015 onward. That range should not be generalized to other saws.
Likewise, manuals can prescribe a particular miter slot or side arrangement for a model’s bevel crosscut or bevel rip. Treat such directions as model-specific, not as a universal rule. Look up the exact make and model rather than inferring guide placement from tilt direction or from another saw’s instructions.
Quick Recap
Best Value

- INCLUDES: (1) Digital Level Angle Finder Box (Battery NOT included). The Angle Gauge is ±0.2° in accuracy (±0.1° for 0° & 90°) and 0.05° in resolution. Measuring range 4*90°
- FUNCTION: Provides you with a convenient way of measuring angles with a higher degree of accuracy than analog devices. This magnetic woodworking tool is useful for measuring existing angles and marking up stock for angled cuts
- MAGNETIC: Digital angle finder features a strong, stable magnetic base that allows it to be attached to any ferrous metal surface, even curved ones. The angle meter also comes in a sturdy, nylon fabric case that protects it from damage when dropped or knocked around
- PORTABLE & VERSATILE: The digital protractor tool, small and lightweight enough to fit into the palm of your hand, is perfect for measuring angles in a variety of situations and easy to carry and use in tight spaces. It possesses a wide measuring range, so you can use it to measure angles on large objects or in difficult-to-reach places
- APPLICATIONS: Digital angle finder tool is perfect for woodworking projects, table saw and miter saw blade measurement, lathe woodturning, carpentry, automotive repair, machinery, manufacturing, construction engineering, and more
Rank #4

- 【Professional Table Saw Gauge】Neoteck table saw gauge is designed according to the standard miter grooves(3/8 inch x 3/4 inch). It can check table saw miter slot to blade squareness, blade and fence alignment, arbor and blade run-out, or any other alignment and measurement you want, in order to make the table saw in its best condition, which is suitable for most table saws and can be widely used for aligning and calibrating work,shop machinery,band saws,drill presses.
- 【Accurate Digital Dial Indicator】The measuring range of the digital indicator is from 0 - 1 inch (0 ~ 25.4 mm) with high resolution up to 0.0005 inch (0.01 mm),also it is switchable between mm and inch with zero setting function. Compared with the dial gauge, Neoteck digital indicator can provide more convenient use experience and quickly help you finish the alignment work.
- 【CNC Anodized Aluminum Bars】2PCS 3/4 inch adjustable, CNC-machined anodized aluminum bars with 3 chute partitions for enhanced stability and usability. The rod features 6 holes for a digital dial indicator, facilitating precise adjustments across various workshop machines, regardless of differences in chamfer groove and blade distances.(Note: Suitable for table saws with a groove width of 3/4" (19mm) or more; adjustable via screws for optimal fit if the groove width exceeds 3/4" (19mm))
- 【Easy to Install】You can quickly set-up, tune up and check the accuracy of your shop's tools. This system is the self-adjusting “Smart Bar” that will stay tight in a miter slot that isn’t the same size along it’s slot length. You only need to adjust the spring plungers once, and after that, its a perfect fit in the miter slot, which is more efficient and convenient.
- 【Practical Package】Package includes: 2 x anodized aluminum Bar, 1 x digital dial indicator, 1 x back cover, 2 x plum blossom nut, 2 x spring plunger, 2 x hexagon socket nut, 2 x hexagon socket wrench, 2 x metal shop. What's more,the practical storage case can well protect your table saw gauge set and it is more convenient for you to store the gauge and can be carried with you to everywhere.
Safety checks that prevent common mistakes
- Do not cut freehand. Use the miter gauge for crosscuts and the locked rip fence for rips; never improvise an unguided bevel cut.
- Do not use two competing guides. Remove the rip fence for a miter-gauge crosscut and remove the miter gauge for a fence-guided rip, unless the saw manual explicitly describes a safe, specific setup.
- Keep through-cut protection installed. Follow the machine-specific guard instructions, including any exceptions in the operator’s manual.
- Support long stock. Arrange outfeed or other support at table height as directed, so the piece stays level and controlled.
- Wait for the blade to stop. Do not clear cutoffs or remove stock near the blade while it is turning.
- Use the manual’s blade-height guidance. Manuals differ: Bosch’s 4100 safety guidance describes blade extension of about 1/8 inch above the workpiece, while another saw’s manual says to set the blade to the correct depth. Follow the guidance for your model rather than treating either instruction as universal.
Product prices and availability are accurate as of the date/time indicated and are subject to change. Any price and availability information displayed on Amazon at the time of purchase will apply.




