To tune up a woodworking bandsaw, unplug it, inspect the blade and tires, align the wheels if needed, set blade tension to the saw maker’s specification, track the blade by turning a wheel by hand, adjust the guides to the manual’s clearances, and check the table and fence with a test cut. Exact settings vary by saw, so use its owner’s manual rather than carrying measurements over from another model.
Before you adjust anything
Disconnect the bandsaw from power before opening its covers or changing the wheel, guide, table, or fence settings. Follow the owner’s manual for access and adjustment procedures.
| # | Preview | Product | Price | |
|---|---|---|---|---|
| 1 |
|
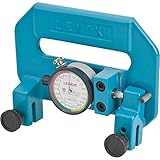
Lenox, 62126, Band Saw Blade Tension Meter | $364.97 | Buy on Amazon |
| 2 |

|
Starrett Saw Blade Tension Gage, Read Up to 60, 000 PSI or 4, 000Kg/Cm2 | $650.00 | Buy on Amazon |
| 3 |

|
iGaging Band Saw Gauge Bandsaw Companion | $29.75 | Buy on Amazon |
| 4 |

|
Continental 9001 Krikit Tension Gauge | $30.00 | Buy on Amazon |
| 5 |

|
Continental 9002 Krikit Tension Gauge | $22.51 | Buy on Amazon |
Inspect the blade for wear or damage and check the wheel tires for visible deterioration. Confirm that the blade is compatible with the saw and suitable for the cut you plan to make. Replace damaged or worn parts with compatible parts before tuning; there is no universal replacement interval established for blades or tires.
Check wheel alignment if tracking is inconsistent
The upper and lower wheels need to be coplanar—aligned in the same plane—for consistent tracking. A long straightedge can help check their alignment, but the adjustment method depends on the saw. Use the manufacturer’s procedure; do not remove wheels or add shims unless the manual directs you to.
#1 Best Overall
Set blade tension before tracking
Set tension according to the saw’s manual and the blade maker’s guidance, taking the saw’s permitted blade width into account. A generic deflection rule or another machine’s tension indicator is not a reliable substitute. As one operating manual puts it, “The blade tension must be correctly adjusted before tracking the blade.”
Track the blade on the wheels
- With the saw unplugged, move the guides clear as directed by the manual.
- Apply the specified blade tension.
- Turn a wheel slowly by hand and watch how the blade rides on the tire.
- Make small tracking adjustments, then rotate the wheel through several turns to check that the blade stays in position.
- Lock the adjustment as directed by the manual.
Some setup procedures call for the blade to ride at the center of the wheel crown, but the correct position depends on the saw’s design. Follow your model’s instructions rather than assuming that a centered blade is the rule for every machine.
Rank #2
- Versatile Measurement - Suitable for various saw types, directly measures tension on band saws and power hacksaws.
- Dual Units Display - Shows tension readings in both pounds and kilograms, catering to diverse user preferences.
- Compact & Portable - Size 6x4 inches, easy to handle and use, ideal for professional and DIY settings.
- High Capacity Reading - Graduated up to 60,000 PSI or 4000 kg/cm2, including suggested tensions for accuracy.
- The Standard for Excellence - Proudly made in the USA, Starrett combines over 140 years of American heritage and innovation with globally sourced materials to deliver exceptional quality tools and products.
Set the blade guides without pinching the blade
Adjust the upper and lower side guides and thrust bearings to the clearances specified in the manual. Guides should support the blade without pressing on it when it is at rest. A cited operating manual specifies about 0.15 mm clearance for its upper side guides and a thrust bearing that just clears the blade; that figure is specific to that manual, not a universal setting.
Guides set too close can create friction and heat, potentially damaging the blade and bearing. If a guide bearing spins or heats while the saw is idle, check the manual’s clearance instructions and reset it as needed.
PC Slower Than It Used to Be?
A free scan shows the junk files, broken settings and background clutter dragging Windows down - then fixes them in one click.Free scan · Windows 10 & 11Crashes, No Sound, or Screen Glitches?
Random freezes, missing sound and display glitches usually trace back to one bad driver. Find and replace yours safely.Free scan · under a minuteRank #3
- US Patent Pending
- 12” long with 16th and 32nd laser etched markings
- 4 Strong Rare Earth Magnets
- Aluminum Anodized Body
- 3 tools in 1: Band Saw Alignment / Marking Hook Ruler / Compass
Square the table and align the fence
Check that the table is square to the blade for the cut you intend to make. Align the fence with the blade’s actual cutting path, using the miter slot as a reference where the saw’s instructions call for it. Confirm the result with a controlled test cut, particularly after changing blades; the blade may follow a different path.
If the cut leads or drifts, do not assume that moving the fence is the only fix. Check the blade’s condition and suitability, tension, tracking, guides, wheel alignment, and table squareness before making a fence correction.
Rank #4
- Item Package Dimension: 5.0399999948592L x 1.3799999985924W x 1.0599999989188H inches
- Item Package Weight - 0.03968320716 Pounds
- Item Package Quantity - 1
- Product Type - ELECTROMECHANICAL GAUGE
Diagnose common bandsaw problems
The blade moves on the tire
Verify the tension against the saw’s specification, then repeat the hand-rotation tracking check. If tracking will not stay set, inspect wheel alignment and tire condition and review the model-specific setup procedure before making larger adjustments.
The cut wanders or burns
Inspect the blade for wear or damage and make sure it suits the cut. Then check tension, tracking, guide clearances, wheel alignment, and table and fence alignment. A fence adjustment alone will not correct a blade or setup problem.
Best Value
- Continental offers the purest line of Original Equipment
- Durable, and easy to carry and use
- Most cost effective way to measure belt tension
- Scale reads in pounds and kilograms
- Measures up to 7/8-inch top width belts
The fence does not produce a straight cut
Make a test cut and align the fence with the blade’s actual cutting path. Recheck this alignment after a blade change.
A guide bearing spins or heats at rest
Revisit the manual’s guide clearances. A guide set too close can rub against the blade and generate heat.
Tools and replacement parts
A long straightedge and the wrench or hex-key set specified by the manufacturer may help with setup. A blade tension gauge can be useful only if it is appropriate for the saw and blade; check the manual before buying one.
When replacing a blade, match its length and permitted width to the machine, then select a profile suited to the work—such as curve cutting, general-purpose cutting, or resawing—and follow the blade maker’s guidance for the material. If inspection shows that tires or guide bearings need replacement, confirm the exact saw model before ordering parts.
Quick wins for a faster PC:
Clear out junk files and repair common Windows errorsFree Scan →Fix the driver behind crashes, sound loss and screen glitchesFind Drivers →Quick Recap
Product prices and availability are accurate as of the date/time indicated and are subject to change. Any price and availability information displayed on Amazon at the time of purchase will apply.




