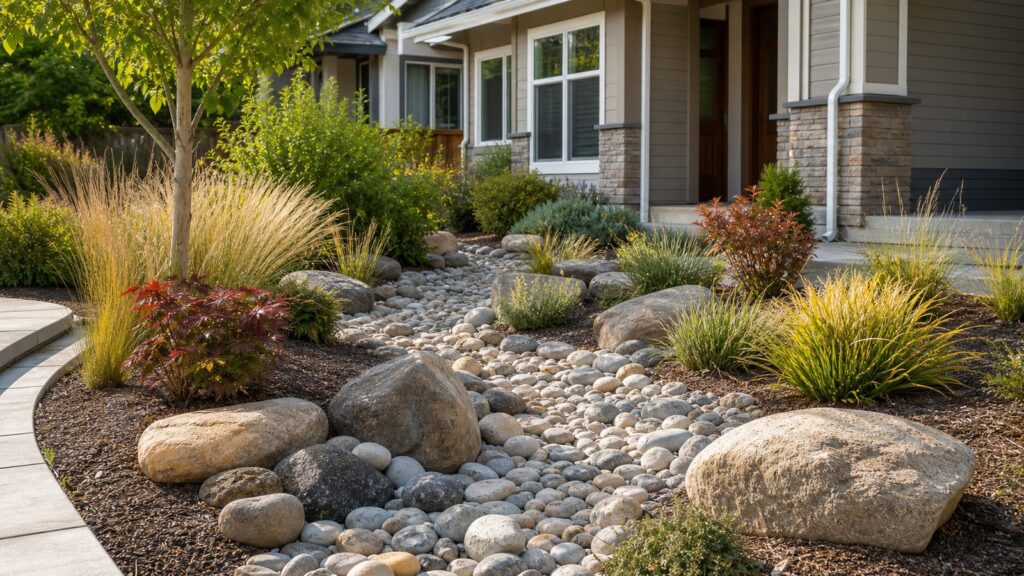
A dry creek bed is one of the rare landscape projects that can look good and solve a real site problem. At its simplest, it is a shallow, rock-lined swale that mimics a natural streambed. In a front yard, it can break up a flat lawn or xeriscape planting. In a side yard, it can move roof runoff away from the house. In a low spot, it can slow water down long enough for it to spread, sink, or reach a better outlet.
The key is knowing whether you are building a decorative creek or a drainage feature. A decorative 10- to 15-foot creek can be a weekend project with bagged stone, fabric, and a shovel. A functional 30- to 50-foot drainage creek needs slope, capacity, a legal discharge point, and enough stone mass to stay in place during a storm.
On our job sites, we treat dry creek beds as small grading projects first and landscape features second. If the water path is wrong, the prettiest river rock in the county will not fix it. Before you buy stone, watch the yard during a rain or run a hose test. Mark where water starts, where it concentrates, where it slows, and where it exits. That simple walk-through will tell you which of the seven ideas below fits your property.
Dry Creek Bed Basics: Decorative vs. Functional Drainage
A dry creek bed can be decorative, functional, or both. The build details change depending on the goal.
Free tools Windows power users keep installed
One-click scans. No signup required.
#1 Best Overall

- Heavy Duty and High Strength Material: Features 8oz tough and durable density, PP non-woven, 350N tensile strength, our weed barrier fabric features erosion-proof, damp-proof, tear-proof, and durable material compared with other woven ground covers.
- Easy to Install and Setup with Hassle-Free: This landscape fabric is super easy to carry, install or cut into single piece or exact dimensions, just roll down and put it in the preferred area.
- Exclusive Permeability & Soil-Friendly: The excellent permeability of this weed fabric barrier ensures better gravel filtration, water drainage, and air penetration to retain soil nutrients. Besides, this drainage design can filter gravel to work as a liner.
- Non-Woven Needle Punched Fabric: This heavy duty geotextile fabric is needle punched, keeping stable yet soft and flexible, meanwhile, this garden fabric can also be used for weed control to keep soil moisture by blocking the sunlight and reducing water evaporation.
- Versatile Uses: Our landscaping fabric is durable and high-quality. Suitable for many occasions, such as greenhouse, ground & road stabilization, landscaping, french drains, driveway or path, flower bed, bridge maintenance, gravel, underlayment, construction projects, erosion control, and farming/gardening application.
| Project Type | Best Use | Typical Size | Key Requirement |
|---|---|---|---|
| Decorative dry creek | Front-yard curb appeal, xeriscape accents, garden texture | 10-25 feet long, 12-24 inches wide, 3-6 inches of stone | Natural shape, good fabric, varied rock sizes |
| Light runoff creek | Small roof area, patio edge, minor lawn washout | 20-40 feet long, 24-36 inches wide, 6-10 inches deep | Positive slope and a safe outlet |
| Functional drainage swale | Side-yard drainage, concentrated stormwater, erosion control | 30-75 feet or more, often 3 feet wide or wider, 8-18 inches deep | Capacity, slope, stable stone, and discharge planning |
For drainage work, a practical planning target is about 1% to 2% fall, with 2% preferred where the yard allows it. That means a 50-foot creek drops about 6 inches at 1% or 12 inches at 2%. You do not need a steep trench. In fact, too much slope can create velocity and washout. What you need is a consistent downhill path that does not trap water in flat S-curves.
A useful sizing rule is a 2:1 width-to-depth ratio. A 24-inch-wide creek might be about 12 inches deep. A 36-inch-wide drainage creek might be 12 to 18 inches deep, depending on runoff volume and available grade. Several practical drainage builds start at about 3 feet wide when water flow is more than decorative.
What a DIY Dry Creek Bed Costs in 2026
Most homeowners underestimate the cost because the stone is only one part of the job. River rock material commonly runs about $60 to $170 per ton in 2026, though decorative rock can vary widely by type, color, and market. Delivery often adds $200 to $400, especially if the supplier has minimums or the site is far from the quarry.
Nationally, typical homeowner river-rock projects often land around $365 to $1,500, with an average near $655. Installed river rock projects are often reported around $300 to $1,600 for materials, delivery, and labor. A more complete 30- to 50-foot dry creek with mixed 1- to 6-inch rock, fabric, excavation, and boulder accents can run about $800 to $2,500 installed in some 2026 regional markets.
| Dry Creek Project | DIY Budget Range | Professional Range | Typical Scope |
|---|---|---|---|
| Small decorative accent | $150-$600 | $600-$1,200 | 10-15 feet, bagged or small bulk rock, light digging |
| Front-yard xeriscape creek | $500-$1,500 | $1,200-$3,000 | 25-50 feet, fabric, river rock, cobbles, plants |
| Functional side-yard drainage creek | $900-$2,500 | $2,000-$5,500+ | 30-75 feet, bulk stone, grading, outlet planning |
| Creek with bridge, boulders, or dry well | $1,500-$4,000+ | $3,500-$8,000+ | Structural accents, heavier stone, added drainage components |
For a rough material estimate, multiply average width by length by stone depth. Divide cubic feet by 27 to get cubic yards, then ask the supplier to convert to tons because stone density varies. A 40-foot creek that averages 3 feet wide with 4 inches of visible stone needs about 40 cubic feet, or 1.48 cubic yards, before waste and deeper pockets. Add base gravel, larger cobbles, and boulders separately.
1. Downspout-to-Rain-Garden Dry Creek
This is one of the most useful dry creek landscaping ideas for homes with roof runoff dumping into mulch beds or along a walkway. The creek starts near a downspout, follows a shallow downhill route, and ends in a rain garden, lawn area, dry well, or approved swale.
Do not simply aim a downspout into river rock and call it drainage. Roof water is concentrated flow. If the creek is too narrow or ends in a low spot, you can create a wet pocket, wash out the rock, or send water toward a neighbor. The outlet matters as much as the inlet.
Good dimensions
For one typical residential downspout, start with a creek about 24 to 36 inches wide and 8 to 12 inches deep. Use a wider channel if the downspout handles a large roof plane or two gutters combine. Keep the bottom slightly concave, not flat, so water stays centered during light storms.
Do these 3 things before closing this tab:
1Clear out junk files and repair common Windows errors2Fix the driver behind crashes, sound loss and screen glitches3Repair Windows errors before they cause bigger problemsUse a downspout adapter or splash transition at the inlet. Place larger cobbles where the pipe or elbow discharges, because that first few feet takes the most force. At the outlet, spread the creek into a planted rain garden or wider stone apron so water slows instead of cutting a trench.
Best materials
Use non-woven permeable geotextile under the stone, not plastic sheeting. Add a small gravel base, then 2- to 4-inch river rock or cobbles, with larger stones at the inlet and bends. Plastic blocks infiltration and can push water somewhere worse, which defeats the purpose of a dry creek.
2. Side-Yard Drainage Creek
Side yards are common trouble spots because homes, fences, and property lines leave little room for water to spread. A side-yard dry creek can move water through a narrow corridor, but this is where DIY drainage needs the most discipline.
First, confirm the outlet. Water should not be concentrated onto a neighboring lot, sidewalk, driveway, septic area, or foundation. In many neighborhoods, redirecting stormwater can trigger HOA review, municipal drainage rules, or permit requirements. If the side yard already collects water against the foundation, bring in a professional before digging.
The Tool Desk
Outbyte PC Repair FREERepair Windows errors before they cause bigger problemsFix Now →Outbyte Driver Updater FREEFix the driver behind crashes, sound loss and screen glitchesFind Drivers →Good dimensions
For functional side-yard drainage, plan on at least 3 feet of width where space allows. Typical excavation depth is 8 to 18 inches. Keep the channel bottom lower than the surrounding grade, but do not undermine fence posts, patios, AC pads, or foundation backfill.
Use a line level, laser level, or string line before you dig. A 2% slope is a useful target: about 2 inches of drop for every 8 feet of run. If the side yard is nearly flat, a dry creek alone may not fix the issue. You may need a catch basin, solid pipe, French drain, dry well, or professional regrading.
Construction tip from the field
We like larger stones on outside bends and at grade changes. Water speeds up in those spots. Small river rock alone tends to migrate, especially in a narrow side yard where flow is concentrated. Partly bury the larger stones so they lock into the channel instead of sitting loose on top.
3. Front-Yard Xeriscape Creek
A front-yard dry creek can replace a strip of thirsty turf, frame a walkway, or make a drought-tolerant planting bed feel intentional. This version may be mostly decorative, but it should still follow real grade. A creek that visually flows uphill looks wrong even when it never sees much water.
Recommended Free Tools
Rank #2

- MEDIUM DUTY – 4 Ounce Heavy Duty Geotextile – Don’t settle for lighter weights, the 4 ounce is tough and durable, non-woven fabrics are produced to be high-strength
- EASY TO INSTALL – Save time and money, we stock many sizes to cut down on scrap, one single piece cut to exact dimensions
- MADE TO LAST – Will last many years and stands up to the toughest conditions, Superior strength, dimensionally stable, UV/rot resistant
- MANY USES – Can be used for many different projects including Landscaping, Retaining walls, French drains, Underlayment, Erosion Control, Gardening, Riprap filter fabric, Pond underlayment, Construction Projects and More
- SUPERIOR QUALITY – Super Geotextile offers the highest quality products
The best front-yard designs mix rock with plants. A yard filled edge to edge with exposed stone can feel harsh, reflect heat, and look unfinished. Use the creek as a central ribbon, then soften the edges with native grasses, low shrubs, perennials, and mulch.
Good dimensions
For curb appeal, a 25- to 50-foot creek can vary from 18 inches wide in tight sections to 4 or 5 feet wide at wider bends. The variation is what makes it look natural. Keep stone depth around 3 to 6 inches for decorative areas, with deeper pockets where you want larger cobbles to sit securely.
Planting approach
Use plants that match the water pattern. At the low end or near the outlet, choose species that tolerate occasional wet soil. Along the higher edges, choose drought-tolerant plants. This gives the creek a natural transition and reduces the “rock dumped on fabric” look.
4. Boulder-Accent Natural Streambed
If you want a dry creek bed to look professional, use a mix of stone sizes. Nature does not sort every rock into one uniform size. A convincing creek uses pea gravel or small drain rock in the base, 2- to 4-inch river rock through the channel, larger cobbles at bends, and boulders as anchors.
Windows Errors? Fix Them Before They Spread
Repair common Windows errors and clear accumulated junk for a smoother, more stable PC - no reinstall needed.Free scan · no reinstallCrashes, No Sound, or Screen Glitches?
Random freezes, missing sound and display glitches usually trace back to one bad driver. Find and replace yours safely.Free scan · under a minuteBoulders should look like they belong to the ground. On our job sites, we set them partly buried, often one-third of the stone below grade, so they do not look placed on top after the fact. This also helps resist movement during storm flow.
Where boulders work best
Place boulders at outside bends, creek entries, transitions near steps or paths, and locations where planted beds need structure. Avoid lining both sides evenly like a necklace. Natural streambeds are irregular. One strong boulder cluster usually looks better than ten evenly spaced rocks.
DIY handling note
Stone weight adds up fast. Even a modest accent boulder can weigh 100 to 300 pounds. If you cannot move it safely with a dolly, straps, and at least two capable people, pay for placement or choose smaller cobbles. Back injuries cost more than delivery.
5. Dry Creek With a Bridge or Path Crossing
A bridge or stepping-stone crossing turns a dry creek into a usable landscape feature instead of a strip you walk around. This works well between a patio and lawn, across a front walk planting bed, or through a garden path.
For a simple DIY crossing, use large flat stones set on compacted base. Each stone should be stable, level enough for walking, and large enough for a full foot placement. A good minimum is about 18 by 18 inches per stepping stone, though larger is more comfortable.
Bridge basics
A small decorative bridge can work over a dry creek, but treat it like a walking surface. It needs stable bearing points on both sides, rot-resistant material, proper fasteners, and a non-slip surface. If the bridge is more than decorative, avoid flimsy garden-ornament products.
Drainage detail
Do not pinch the channel at the crossing. If the creek is 36 inches wide upstream and narrows to 18 inches under a bridge or stepping path, stormwater will back up or jump the edge. Keep the hydraulic opening similar to the rest of the creek, and use larger stone around the crossing where turbulence can move smaller rock.
6. Native-Planted Creek Edge
Plants make dry creek beds perform better and look better. Roots help stabilize soil at the edges, foliage softens the stone, and native species reduce long-term maintenance when they are chosen for the site conditions.
Think in zones. The bottom of the creek is mostly rock and should stay open enough to carry water. The immediate edge can use grasses, sedges, rushes, and low perennials that tolerate periodic runoff. The upper bank can use shrubs, groundcovers, and drought-tolerant perennials.
Spacing and maintenance
Leave room for mature plant size. A one-gallon grass may look small at planting, but many varieties spread to 24 to 36 inches wide. Keep plants out of the main flow line unless they are intended for a rain garden or bioswale condition.
Plan on seasonal cleanup. Leaves, mulch, sediment, and soil can fill the voids between rocks. Once or twice a year, rake debris out of the channel, reset displaced stones, and check the inlet and outlet after heavy rain.
7. Erosion-Control Creek for Slopes and Low Spots
Where runoff cuts through mulch, exposes roots, or leaves sediment on a patio, a dry creek can slow the water and armor the flow path. This is not about making water disappear. It is about controlling velocity and giving runoff a stable route.
Quick wins for a faster PC:
Repair Windows errors before they cause bigger problemsFix Now →Scan for outdated or missing drivers - takes under a minuteDriver Scan →Clear out junk files and repair common Windows errorsFree Scan →Rank #3

- Large Roll for Outdoor Projects: This 3 ft x 180 ft landscape fabric roll is suitable for garden beds, flower beds, walkways, gravel paths, mulch areas, greenhouses, and driveway base layers, making it a practical choice for home and landscaping projects.
- Helps Reduce Weed Growth: Dense weed barrier fabric helps limit sunlight exposure to reduce unwanted weed growth, creating a cleaner and lower-maintenance base layer for gardens, planting areas, and outdoor landscapes.
- Water & Air Permeable Design: Non-woven geotextile fabric allows water and air to pass through, helping support soil moisture and root respiration while keeping the surface neat under mulch, rocks, soil, or gravel.
- Heavy Duty Outdoor Ground Cover: Made from durable polypropylene material, this weed control fabric offers good tear resistance and tensile strength for outdoor use in yards, gardens, paths, flower beds, and gravel areas.
- Easy to Cut & Install: Simply roll out the garden fabric, trim it to the needed size or shape, place it over prepared soil, and secure with landscape staples as needed. Great for use under mulch, gravel, pavers, rocks, and artificial turf.
On slopes, use curves carefully. Gentle curves look natural, but flat S-curves can trap sediment and overflow. The creek still needs a consistent downhill path. At steeper sections, use larger stone, check-dam-style boulder clusters, or short step-downs to reduce speed.
Low-spot warning
A dry creek that ends in a low spot can become a wet, muddy, mosquito-prone problem after storms. If the yard has no workable outlet, consider a rain garden, dry well, engineered drain, or regrading plan. In clay soils or compacted urban lots, infiltration may be slow, so test before assuming the ground will absorb everything.
Independent reader supportYour contribution helps us test, update, and keep practical guides available for everyone.How to Build a DIY Dry Creek Bed
The exact build depends on the site, but the basic sequence is consistent.
- Observe water first. Watch a storm or run a hose test. Mark the inlet, flow path, low areas, and outlet.
- Call 811 before digging. Do this before excavation, especially near downspouts, irrigation, landscape lighting, gas, telecom, or electrical routes.
- Lay out the creek. Use a garden hose, marking paint, or flags. Keep curves gentle and pointed downhill.
- Check slope. Use a string line, line level, or laser level. Aim for consistent fall, often around 1% to 2% for functional drainage.
- Excavate the channel. Decorative beds may only need a few inches. Functional beds often need 8 to 18 inches of depth.
- Shape the bottom and sides. Keep the bottom slightly concave and the side slopes stable enough to hold edge stones.
- Install fabric. Use permeable non-woven geotextile or professional landscape fabric. Overlap seams by at least 12 inches and secure with staples.
- Add base gravel and rock. Start with smaller gravel, then 2- to 4-inch river rock, then cobbles and boulders.
- Stabilize bends and outlets. Use larger stones where water enters, turns, drops, or exits.
- Plant the edges. Keep the main flow line clear and use plants to blend the creek into the yard.
Permits, Safety, and Neighbor Issues
Dry creek beds feel like landscaping, but functional drainage work can affect foundations, sidewalks, streets, septic areas, and neighboring properties. That is where code and liability enter the picture.
What’s actually slowing this PC down?
Pick the symptom - the matching free tool is one click away.
As a baseline, water should drain away from the foundation. A common residential grading principle is positive drainage away from the building. If your creek would bring water closer to the house, stop and redesign. Do not cut into foundation backfill, direct downspouts toward basement walls, or create a channel that saturates soil beside footings.
Permit requirements vary by city, county, HOA, and stormwater district. You are more likely to need review if you are changing grade significantly, connecting to municipal storm drainage, working near a right-of-way, altering a swale, disturbing a protected area, or redirecting water across a property line. When in doubt, call the local building or stormwater office before work starts.
When to DIY vs. When to Hire a Pro
A dry creek is a reasonable DIY project when the work is shallow, the water source is minor, the slope is obvious, and the outlet is clearly safe. It is also a good DIY project when the goal is decorative and you are not relying on it to protect the house.
Hire a professional when the creek affects foundation drainage, receives multiple downspouts, crosses a steep slope, requires major regrading, needs a storm drain connection, or has no obvious outlet. Bring in help if you see standing water for more than 24 to 48 hours after storms, soil erosion near footings, basement moisture, driveway washout, or runoff disputes with a neighbor.
Professional installation costs more, but crews bring grading equipment, compaction tools, drainage fittings, material handling, and experience reading water movement. On a functional drainage project, the expensive mistake is not paying for labor. The expensive mistake is moving water to the wrong place.
Common Dry Creek Bed Mistakes to Avoid
- Building from photos only. Inspiration does not tell you where water enters and exits your yard.
- Making the channel too small. A 12-inch decorative strip will not handle real stormwater from a roof or slope.
- Using one rock size. Mixed gravel, river rock, cobbles, and boulders look more natural and stay more stable.
- Installing plastic under the creek. Plastic blocks infiltration and can create worse drainage problems.
- Skipping the outlet. Every drainage creek needs somewhere appropriate for water to go.
- Ignoring utilities. Call 811 before digging, even for shallow landscape work.
- Forgetting maintenance. Leaves, mulch, sediment, and weeds reduce capacity over time.
Final Builder’s Take
The best DIY dry creek beds start with drainage logic and finish with landscape detail. Follow the natural slope, size the channel for the water it will actually receive, use permeable fabric, mix stone sizes, and give the water a safe outlet. Then use plants, boulders, and crossings to make it look like it belongs to the property.
If you are building a small decorative creek, this can be a satisfying weekend project. If you are trying to solve foundation water, side-yard flooding, or slope erosion, slow down and treat it like a construction problem. Water always finds the weak point. A good dry creek bed gives it a better path.
Frequently Asked Questions
Do dry creek beds actually help with drainage?
Yes, when they are designed as shallow drainage swales with enough slope, width, stone depth, and a safe outlet. A decorative strip of river rock may not move much water. A functional dry creek should follow the yard’s natural fall, often around 1% to 2% slope, and discharge to a lawn area, rain garden, dry well, approved swale, or stormwater system where allowed.
Quick wins for a faster PC:
Scan for outdated or missing drivers - takes under a minuteDriver Scan →Clear out junk files and repair common Windows errorsFree Scan →Fix the driver behind crashes, sound loss and screen glitchesFind Drivers →How deep and wide should a dry creek bed be?
For decorative use, many dry creek beds are 12 to 24 inches wide with 3 to 6 inches of stone. For functional drainage, plan larger: often 24 to 36 inches wide at minimum, with 3 feet or more preferred for meaningful runoff. Typical functional excavation depth is about 8 to 18 inches, and a 2:1 width-to-depth ratio is a useful planning rule.
How much does a dry creek bed cost in 2026?
A small DIY decorative creek may cost $150 to $600. A front-yard or garden dry creek often runs $500 to $1,500 DIY depending on stone and length. A functional 30- to 50-foot drainage creek with fabric, bulk stone, cobbles, and boulders may cost $900 to $2,500 DIY or $2,000 to $5,500+ professionally, depending on grading, access, and outlet requirements.
Should I put landscape fabric under a dry creek bed?
Yes, in most cases use permeable non-woven geotextile or professional landscape fabric under the stone. It separates soil from rock, reduces settling, and helps control weeds. Do not use plastic sheeting or pond liner under a drainage creek unless an engineer specifically designs it that way, because impermeable material can block infiltration and redirect water poorly.
Can I connect a downspout to a dry creek bed?
You can, but only if the creek has enough capacity, consistent slope, erosion-resistant stone at the inlet, and a lawful outlet. A downspout concentrates roof runoff, so the creek must be sized for storm flow. If the outlet is unclear or water may move toward a foundation, sidewalk, neighbor, or low spot, use a rain garden, dry well, catch basin, or professional drainage design instead.
When should I hire a professional instead of DIYing a dry creek bed?
Hire a pro when the project affects foundation drainage, handles multiple downspouts, crosses a steep slope, requires major regrading, connects to municipal stormwater, or has no obvious safe outlet. Also bring in help if you have basement moisture, standing water longer than 24 to 48 hours after storms, active erosion, driveway washout, or neighbor drainage concerns.
Quick Recap
Product prices and availability are accurate as of the date/time indicated and are subject to change. Any price and availability information displayed on Amazon at the time of purchase will apply.