Free tools Windows power users keep installed
One-click scans. No signup required.
For resin, choose wet/dry sandpaper and start with the finest grit that will remove the defect or prepare the surface for its next coating. Move through progressively finer grits, removing the previous scratch pattern at each stage. Let the resin reach its full cure first; for a clear, glossy finish, fine sanding may still need a compatible polishing compound.
Choose sandpaper for the job, not a universal grit number
The right starting grit depends on the resin, the surface and what comes next. A small casting with a minor blemish needs less aggressive sanding than a large tabletop that must be levelled. A surface intended for paint or varnish also needs a different finish from a clear casting being polished for gloss.
- Removing a defect: Start with the least aggressive grit that will level it. Coarser paper removes material faster but leaves deeper scratches to remove later.
- Preparing for a coating: Follow the resin and coating makers’ preparation instructions. The goal is a fair surface with enough texture for adhesion, not necessarily a mirror polish.
- Finishing clear resin: Work through finer grits, then assess whether a compatible polishing compound is needed to remove sanding haze.
A wet/dry sandpaper assortment is a useful choice because it supports both dry and wet stages. Check that the paper is rated for wet use and that its grit range suits your job. Foam-backed sanding pads are another option for larger surfaces; Smooth-On includes them in its product-specific tabletop process.
How to choose and progress through grits
- Let the resin fully cure. Use the cure requirements in the technical data for your resin system; there is no reliable wait time that applies to every resin.
- Start with the finest grit that can do the work. Use only enough abrasion to remove the defect or create the surface required by the next finish.
- Move through available grades in order. At each stage, sand until the prior grit’s scratches are gone. Skipping grades can leave scratches that show through a polished finish.
- Clean and inspect between grits. Remove residue from the workpiece and abrasive, then check the surface in good light before proceeding. Debris caught in the paper can gouge resin.
- Stop at the right endpoint. For coating prep, use the coating maker’s specified finish. For clear gloss, continue to finer abrasives and polish if needed.
These examples illustrate why sequences should be treated as product- and task-specific, not as universal recipes:
#1 Best Overall

- Multi-Stage Sandpaper Assortment: This Shineboc 9x3.6 inch sandpaper pack includes 21 sheets with 7 grits (120/220/400/600/800/1000/2000), 3 sheets per grit, suitable for all sanding stages from rough to fine
- Premium Material: Crafted from high-quality silicon carbide, it is electrostatically coated to ensure an uniform distribution of grit. This results in long-lasting performance and high resistance to damage
- Wet and Dry Use: It can be utilized for both wet and dry sanding. Wet sanding helps reduce the occurrence of scratches and minimizes dust emissions, while dry sanding offers faster material removal and convenience
- Anti-Clogging: With excellent anti-clogging properties, it resists the accumulation of dust and debris. This guarantees a sharp cutting edge and less frequent replacement
- Tear-Resistant: A reinforced backing layer is incorporated, which prevents the sanding sheets from tearing under high pressure or when used on irregular surfaces
| Task or product context | Published grit guidance | How to interpret it |
|---|---|---|
| Formlabs clear 3D-printing resin | Start at 800 grit and move to 1200 grit for an ultra-smooth surface. | This is guidance for Formlabs’ clear-resin context, not a general epoxy sequence. Formlabs’ polishing guide |
| Smooth-On Epoxacast 690 tabletop process | Dry sand with a random-orbit sander from 60 through 1000 grit, then wet sand at 1200, 1500 and 2000 grit. | This is a specific process for Epoxacast 690 tabletops, not a required sequence for all resin or hand-sanding jobs. Smooth-On’s product FAQ |
| WEST SYSTEM epoxy under paint or varnish | 80–100 grit is usually sufficient for high-build or filling primer; 120–180 may suit some primers and high-solids coatings; 220–400 can provide a high-gloss finish for many paints or varnishes. | These are WEST SYSTEM recommendations. The appropriate finish depends on the coating, and very fine sanding may not leave enough tooth for adhesion. WEST SYSTEM surface-preparation instructions |
Wet sanding or dry sanding?
Both methods have a place. Wet sanding is commonly recommended for finer finishing because it can reduce airborne dust and keep abrasive paper from clogging. EPODEX recommends wet sanding after full cure, and Formlabs describes sanding under running water or with wet paper to help achieve a smooth finish. Follow the instructions for your particular resin and abrasive.
A process can also combine methods. Smooth-On’s Epoxacast 690 tabletop instructions use dry sanding for early levelling, then switch to wet sanding for the 1200–2000-grit stages. WEST SYSTEM notes that many users prefer wet sanding to reduce sanding dust. Wet sanding does not replace the protective measures required by the product’s safety information.
Rank #2
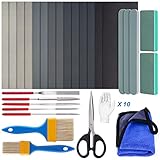
- Value Resin Polishing Kit: LET'S RESIN 33pcs Resin sanding and the polishing kit includes 5pcs resin files(Flat, Semicircle, Triangle, Square, Round), 14pcs sanding papers, 3pcs polishing strips, 2pcs polishing blocks, 2pcs wooden brushes, 1pc polishing cloth, 1pc scissors, 5 pairs of gloves. Just one set for all your sanding needs.
- Safer to Use: The resin supplies include 5 different shape files (flat, semicircle, triangle, square, round). They can help you shape the epoxy resin in all directions for easy use. After shaping, you can use a brush to brush off excess resin chips. In addition, we also match gloves to protect your hands and allow you to operate more safely and cleanly.
- High-Quality Sandpaper: The epoxy resin polishing kit has 7 kinds of sandpaper (320#, 600#, 1000#, 1500#, 3000#, 5000#, 7000#), two of each kind, 14 sheets in total, made of coarse-grained silicon carbide production. It has the characteristics of anti-blocking, anti-static, flexible, wear-resistant, and can be polished and smooth resin crafts. The sandpaper can be cut into small pieces according to your needs.
- Complete Set of Polishing Tools: Resin tool kits come with sanding sticks and blocks to help get a smoother finish to your work. One side is filed, and the other is polished. There is also a polishing cloth, dipped in polishing paste and then wiped, so a smoother and more perfect jewelry resin can be obtained.
- Wide Application: Resin polishing kits are suitable for epoxy resin craft polishing, jewelry-making projects, pendants, necklaces, gemstones, bracelets, key rings, and many other ornaments and craft projects. Whether you are a beginner or a craft enthusiast, you will love this kit!
Getting from a sanded surface to a clear gloss
Sanding refines scratches; it does not always make clear resin optically clear on its own. A fine-sanded surface may still look hazy. If the aim is a glossy, transparent casting, use a polishing compound compatible with the resin after sanding, following the compound and resin makers’ directions. EpoxyPrices describes polishing compound after fine sanding, while Smooth-On’s Epoxacast 690 tabletop process includes buffing and polishing stages.
For paint or varnish, do not keep sanding finer just because a finer grit is available. WEST SYSTEM cautions that some coatings need more surface tooth for adhesion. Use the coating system’s preparation requirements to choose the endpoint.
Quick wins for a faster PC:
Scan for outdated or missing drivers - takes under a minuteDriver Scan →Clear out junk files and repair common Windows errorsFree Scan →Fix the driver behind crashes, sound loss and screen glitchesFind Drivers →Rank #3
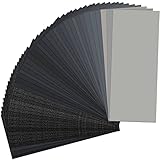
- Premium Silicon Carbide: Electrostatically coated for uniform grit distribution; anti-static reinforced waterproof backing resists tearing, clogging; delivers consistent cutting performance for extended use
- Wet & Dry Dual Use: Dry sanding removes material fast with less loading; wet sanding reduces scratches and dust for smooth finishes; works with sanding blocks and pneumatic tools
- User-Friendly Design: Precut 9 x 3.6 inch sheets trim to any size; grit numbers clearly printed on the back for quick identification; flexible backing conforms to curved and irregular surfaces
- Wide Application Scenarios: Ideal for wood furniture refinishing, auto body paint repair, metal rust removal, resin art, 3D print smoothing, jewelry buffing, glass detailing, drywall repair
- Complete 16-Grit Assortment: Three sheets each of 120/150/180/220/240/320/400/600/800/1000/1200/1500/2000/2500/3000/5000 grit; covers rough shaping to ultra-fine polishing; all-in-one variety sanding kit for workshops & DIY
Technique and safety while sanding resin
- Use light, even pressure. Check progress often, particularly at edges and on thin surface layers where it is easy to sand through.
- Manage heat. Work in short intervals and avoid pressing hard; heat and excessive material removal can damage the workpiece.
- Keep abrasive clean. Remove resin residue between stages so trapped particles do not scratch the surface.
- Wear suitable protection. Follow the resin’s safety documents for dust protection, eye protection, gloves and clothing. Smooth-On specifies a NIOSH-approved respirator, protective eyewear and protective clothing for sanding or polishing fully cured epoxy; EPODEX also advises a mask, goggles and gloves.
- Handle residue responsibly. Collect sanding dust or slurry and follow local disposal guidance rather than assuming it can be poured down a drain.
For resin-specific cure and sanding guidance, see EPODEX’s FAQ. Follow the technical data and safety documents for the exact resin you are using.
Quick Recap
Best Value

- What You Get: This all-in-one sanding kit includes a compact micro sanding block and 180 sandpapers in 9 grits 80/120/180/220/320/400/600/800/1000
- 3-Color Grit System: Red (coarse), yellow (medium), grey (fine) – grab the right grit instantly, no more guessing
- Quick-Change Hook & Loop Backing: Tool-free backing lets you change sandpapers in seconds for uninterrupted work
- Ergonomic Mini Sander: Measuring just 3.5 x 1.1 inches, this compact PU foam hand sander glides effortlessly into corners and grooves. The lightweight ergonomic design reduces hand fatigue
- Premium Material: Made with durable aluminum oxide abrasive, these sandpapers resist tearing, clogging, and crumbling. Built to last on wood, metal, plastic, and painted surfaces
Rank #4

- Multi-Grit Sandpaper Collection: This pack includes 45 sandpaper sheets in 15 grits (80/120/180/240/320/400/600/800/1000/1200/1500/2000/2500/3000/5000*3), providing everything you need from coarse shaping to finish polishing.
- Premium Silicon Carbide Construction: Made with electro-coated silicon carbide for uniform grit distribution, our waterproof and tear-resistant sandpaper ensures durability and long-lasting performance in all conditions.
- Wet & Dry Dual Use: Engineered for both wet and dry sanding. Use wet to reduce dust and scratches, or dry for fast material removal.
- Easy Cut & Clearly Marked: Each sheet can be trimmed to any size, and grit numbers are printed on the back for quick identification, saving time and reducing waste.
- Wide Application: Perfect for wood refinishing, automotive paint prep, metal polishing, jewelry making, and crafts. Ideal for workshops, garages, and creative studios
Product prices and availability are accurate as of the date/time indicated and are subject to change. Any price and availability information displayed on Amazon at the time of purchase will apply.