When a staple crown or leg remains above the wood, the usual causes are a staple that is too long for the material, insufficient drive power or depth, an incompatible or damaged fastener, or a jammed or defective mechanism. Stop firing the tool, identify its exact model and staple specification, then work through the checks below. The correct length, pressure and clearing procedure are model-specific; there is no universal staple size or pneumatic setting.
Start with a safe diagnosis
Do not keep pulling the trigger in an attempt to force a proud staple down. A partially driven fastener can damage the workpiece, bend inside the wood or leave the tool in a worse jam. Put the tool down with its nose pointed away from people and pets, and disconnect its energy source before opening a magazine or touching the driver.
As an Amazon Associate I earn from qualifying purchases.
| What you see | Most useful first check | Likely correction |
|---|---|---|
| The crown sits above the surface on every shot | Confirm leg length, wood hardness and the tool’s drive setting | Use a compatible, shorter staple where the manual calls for it, or increase drive depth only within the maker’s adjustment range |
| Only some staples remain proud | Inspect for knots, grain changes, foreign material and bent staples | Move the test point, replace damaged fasteners and follow the specified firing technique |
| The tool jams as soon as it fires | Check staple type and condition, then inspect the magazine | Unload and clear the obstruction with power or air disconnected; reload the specified fastener |
| Every shot is weak after a change of material | Check material thickness and hardness against the tool’s intended range | Choose a suitable leg length and use the model’s drive or pressure setting |
| The problem continues with correct staples and settings | Look for a loose, dirty or damaged magazine and a malfunctioning driver | Stop using the tool and contact the manufacturer or a qualified repair provider |
Why a staple stays out of the wood
The legs are too long for the material
A longer leg is not automatically a stronger or better fastener. In hard wood, the driver may not have enough energy to push the full leg below the surface, leaving the crown high. Leg choice depends on both the material’s thickness and its hardness, not on thickness alone.
Arrow’s ET2025 manual gives an example rather than a universal rule: approximately 3/16 to 1/4 inch of penetration in hardwood and up to about 3/8 inch in softwood. The same guidance says that a staple standing away from the work can indicate a leg that is too long and recommends trying the next shorter size. Those figures belong to that model’s instructions; use your own stapler’s manual for a different tool, wood species or application.
#1 Best Overall
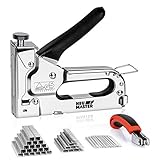
- ALL-STEEL CONSTRUCTION & ERGONOMIC GRIP – Built with a durable chrome-plated steel body for long-lasting rust resistance. The rubberized, non-slip handle reduces hand fatigue and delivers a secure, comfortable grip during extended use.
- 3-IN-1 VERSATILITY WITH 2000 STAPLES INCLUDED – Compatible with three staple types(size 5/16", 3/8" & 1/2") to tackle a wide range of projects — upholstery, fabric repair, carpentry, home decoration, furniture restoration, DIY crafts, and general renovations. Comes with 1000pcs T50 staples, 500pcs T18 staples and 500pcs 18 gauge staples. Everything you need, right out of the box.
- QUICK-LOAD & QUICK-JAM-CLEAR DESIGN – Features a bottom-loading magazine for fast, effortless reloading and a built-in jam-clearing mechanism that saves time and frustration. The quick-viewing window lets you check staple levels at a glance.
- ADJUSTABLE POWER CONTROL – Easily dial in the driving pressure with the top-mounted adjustment knob to match different material thicknesses — from thin fabric to dense wood — ensuring clean, professional results every time.
- RELIABLE PRODUCT SUPPORT – NEU MASTER stands behind every product with hassle-free replacement service. If you encounter any issues, our support team is ready to help — just reach out anytime.
The tool cannot deliver enough drive
Manual staplers rely on hand force and the tool’s spring. Electric models use a motor and an adjustable drive mechanism. Pneumatic models depend on compressed air within the pressure range specified by the manufacturer. A powered tool can leave a staple incompletely driven when its depth-of-drive setting is too low, its air pressure is below the stated operating range, or the selected fastener is unsuitable for the wood hardness. Increasing force or pressure outside the rating can create a dangerous failure rather than a flush staple.
The fastener does not match the stapler
Staples that look similar can differ in gauge, crown width, leg length, shape and magazine format. A tool designed for one family of staples may not feed another correctly. Bent, crushed, rusty or otherwise damaged staples can also stop the driver and cause a jam. Use the exact type and dimensions listed on the tool, magazine or model manual; do not rely on a package that merely says it fits a “heavy-duty” stapler.
The magazine or driver is obstructed
Dust, adhesive residue, a loose magazine or a staple left across the feed path can prevent the driver from completing its stroke. Manufacturer troubleshooting tables identify dirty or loose magazines as possible causes of poor driving and jams. Cleaning and tightening should follow the model’s service instructions; do not file, bend or lubricate internal parts unless the maker specifies that procedure.
What’s actually slowing this PC down?
Pick the symptom - the matching free tool is one click away.
The wood changes the staple’s path
Knots, irregular grain and buried foreign objects can deflect a leg inside the workpiece. An air-staple-gun manual warns that these conditions can change the staple’s path. A staple that drives correctly in clear sample wood can therefore stand proud or emerge at an angle at a knot. Keep hands, cables and other body parts out of the potential path, and do not try to hold the wood directly over a suspected obstruction.
Rank #2

- Versatile Fastening Tool - YEAHOME 4-in-1 Staple Gun accepts D-shaped, U-shaped, T-shaped, and Pin Staples. This kit comes with Remover, Gloves, 2000pcs of each 7/16" D-Type and 1/2" U-Type , 1000pcs of each 3/8" T-Type and 5/8" Pin Brad Nails for a wide variety of applications: general DIY repairs, crafting, decorating, upholstery projects, roofing, and more.
- Heavy-Duty Staple Gun - Features all chromed-steel construction and a chrome finish to provide strength and durability, and make the staple gun rust-proof. YEAHOME staple guns are assembled toughly so that it can handle the tough load and last as long as you need it!
- Power Adjustment - Change the pressure (from low to high) with the screw lever as per the requirement of your home improvement projects and professional construction jobs, to staple in soft as well as hard materials, make your projects easier.
- Easy to Use - Steel handle with over-molded grip to help provide comfortable usage and easy operation. Bottom load design and a steel magazine for quick and easy loading. Bonus heavy-duty staple remover and gloves included to remove staples quickly, cleanly and safely.
Contact and firing technique are wrong for the model
Some staplers require the nose to be fully seated against the material before the trigger can be operated; others specify a particular angle or contact sequence. The correct grip, contact pressure and firing order vary by model. Follow the instructions for your tool instead of transferring a technique from another stapler. An incorrectly seated nose can reduce the effective drive or allow the tool to move as it fires.
Identify the tool and the exact staple
Before changing anything, write down the model number and read the fastener section of its manual. The package and the tool should agree on staple type, gauge, crown and leg range. If any dimension is missing, treat the staple as unverified rather than guessing.
| Tool type | Energy source | Checks that matter most |
|---|---|---|
| Manual | Hand-operated spring or lever | Correct staple family, leg length for the wood, full nose contact and undamaged magazine |
| Electric | Corded or battery-powered motor | Specified staple dimensions, drive-depth adjustment, battery or power condition and a clear feed path |
| Pneumatic | Compressed air | Staple specification, maker’s operating-pressure range, regulator condition, hose connection and safe disconnection before service |
Do not substitute a generic pressure target for a model’s rating. A pneumatic gun’s label, manual or regulator instructions govern the permissible range. The same principle applies to electric drive controls: a higher setting is not automatically safe or appropriate for harder wood.
Recommended Free Tools
Fix incomplete drive step by step
1. Stop and isolate the energy source
- Release the trigger and place the nose on a stable surface pointed away from people.
- For an electric tool, remove the battery or unplug it. For a pneumatic tool, shut off and disconnect the air supply. A manual tool should be held in its normal safe position while the magazine is unloaded.
- Put on eye protection before inspecting a jam or testing a repair. Keep fingers away from the nose and driver channel.
2. Verify the staple specification
Compare the staples in the magazine with the model manual, not just with the tool’s general product description. Check type, gauge, crown and leg length. Discard any strip with bent legs, crushed crowns, corrosion or damaged glue joints. Load only a strip that is seated in the feed channel in the orientation shown by the manufacturer.
Rank #3
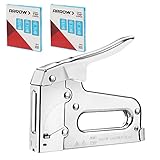
- 3750 Pieces T50 Staples: Come with 3750 Pieces 1/4", 3/8", 1/2" Arrow T50 staples (Each 1250 Pieces), providing options for a variety of projects
- Heavy Duty Construction Quality: Features a all chromed-steel housing which will have the strength for any job. The steel parts have been hardened in a 1,500-degree furnace for maximum durability
- Easy Operation: The rear-load magazine with jam-resistant mechanism provides a smooth stapling experience; The staple-viewing window takes the guesswork out of knowing when to reload that will make your work more efficient
- Comfortable Grip: The high leverage handle on this stapler provides a comfortable experience and helps ensure that each strike drives the staples though the materials you are fastening, save time and energy
- Wide Application: The Arrow T50 stapler is compatible with 1/4"(6mm)-9/16"(14mm) T50 staples. It's great for professional or household projects like installing insulation, upholstery, general repairs, and crafts; It belongs in the workshop of any builder, maker, or crafter
3. Match leg length to the wood
Measure the material stack and identify whether the wood is soft, medium or hard for the application. A leg must be long enough to hold the layers but short enough for the tool to drive through the stack. If a staple consistently stands proud in hard stock, test the next shorter size permitted by the manual. If it barely enters or fails to hold the layers, the problem may be an overly short leg rather than a weak drive.
Use scrap of the same species, thickness and finish for testing. A test in soft pine does not establish that a setting will work in dense hardwood, plywood with a hard face, or a board containing knots.
4. Set drive depth or pressure only as specified
On an electric or pneumatic model with a drive-depth control, begin at the manufacturer’s recommended setting and make small changes while testing on scrap. Do not bypass a safety contact or increase the setting beyond the marked range.
The Tool Desk
Outbyte PC Repair FREEClear out junk files and repair common Windows errorsFree Scan →Outbyte Driver Updater FREEFix the driver behind crashes, sound loss and screen glitchesFind Drivers →For a pneumatic tool, verify the regulator and hose supply against the manual before changing pressure. A low-pressure condition can cause incomplete drive, but pressure above the tool’s rating can damage the tool or propel a staple unpredictably. OSHA’s interpretation dated April 8, 1983, concerning certain light-duty pneumatic tackers says a regulator should prevent operating pressure from exceeding 100 PSI or the manufacturer’s recommendation, whichever is lower. That interpretation has a defined scope; it is not a universal setting for every pneumatic stapler.
Rank #4

- SAVE TIME AND ENERGY: This stapler is great for professional or household projects like installing insulation, upholstery, wood, general repairs, and crafts; it belongs in the workshop of any builder, maker, or crafter
- COMFORT AND CONSISTENCY: The high leverage handle on this stapler provides a comfortable experience and helps ensure that each strike drives the staples though the materials you are fastening
- EFFICIENCY AND VISIBILITY: The rear-load magazine with jam-resistant mechanism provides a smooth stapling experience; the staple-viewing window takes the guesswork out of knowing when to reload
- HEAVY DUTY CONSTRUCTION: Featuring a chromed-steel body, this tool has the strength for any job; the steel parts have been hardened in a 1,500-degree furnace for maximum durability
- STAPLE GUN STAPLES: This tool works best with Arrow T50 Staples in 1/4-Inch, 5/16-Inch, 3/8-Inch, 1/2-Inch, or 9/16-Inch (sold separately); T50 staples are used for heavy-duty applications – from crafting and general home repairs to upholstering chairs and window treatments
5. Test three or more shots on sample material
With the tool reconnected only after the manual’s safety checks are complete, fire into a clamped or otherwise stable sample. Inspect crown seating, leg penetration and the back of the sample where practical. Stop if the staple bends, exits at an unexpected angle, the driver sounds abnormal or the magazine begins to bind. A successful single shot does not prove that a jam has been cleared; test several shots before returning to the finished work.
Independent reader supportYour contribution helps us test, update, and keep practical guides available for everyone.Clear a jam without making it worse
Electric and manual tools
Stanley Tools Support’s guidance, displayed as updated December 5, 2025, states: “If your staple gun jams, the Important first step is to disconnect the unit from the power supply.” For the Stanley procedure covered by that support page:
- Disconnect the power supply.
- Open the magazine according to the tool’s instructions.
- Remove the staple that stalled the mechanism; use pliers only if the manual permits and keep the nose pointed away from you.
- Inspect the driver channel and feed path for additional bent pieces or debris.
- Reload the specified staples, close the magazine and reconnect power.
- Test on sample material before resuming the job.
This sequence is source-specific. Another model may require a different latch, unloading method or driver position, so its manual takes priority. Never reach into a loaded, connected tool to pull out a staple.
Do these 3 things before closing this tab:
1Repair Windows errors before they cause bigger problems2Scan for outdated or missing drivers - takes under a minute3Clear out junk files and repair common Windows errorsPneumatic tools
Shut off and disconnect the compressed-air source before opening the magazine or performing maintenance. Bleed residual pressure only in the manner specified by the manufacturer. The air-staple-gun safety guidance also calls for disconnecting the air supply before loading fasteners and keeping body parts clear because knots, grain irregularities or foreign objects can deflect a staple.
Best Value

- Versatile Fastening Tool - YEAHOME 4-in-1 Staple Gun accepts D-shaped, U-shaped, T-shaped, and Pin Staples. This kit comes with 1000pcs of each " D-Type, " T-Type, " U-Type , and " Pin Brad Nails for a wide variety of applications: general DIY repairs, crafting, decorating, upholstery projects, roofing, and more.
- Heavy-Duty Staple Gun - Features all chromed-steel construction and a chrome finish to provide strength and durability, and make the staple gun rust-proof. YEAHOME staple guns are assembled toughly so that it can handle the tough load and last as long as you need it!
- Power Adjustment - Change the pressure (between low to high) with the screw lever as per the requirement of your projects, to staple in soft as well as hard materials, make your projects easier.
- Easy to Use - Steel handle with over-molded grip to help provide comfortable usage and easy operation. Bottom load design and a steel magazine for quick and easy loading.
If the jam returns immediately
Do not repeatedly reconnect and fire the tool. Recheck staple dimensions, material suitability and magazine seating. A recurring jam with correct fasteners can indicate a loose or dirty magazine, a worn driver, a damaged nose or another internal fault. Manufacturer support or an authorized repair provider is safer than filing parts, forcing the driver or dismantling a mechanism that you cannot service.
Use the material to choose a better test
Hardwood and dense sheet goods
Dense material offers more resistance and exposes a marginal drive setting quickly. Use the shortest approved leg that provides the required hold, keep the nose square as directed by the manual and test away from knots. If the tool’s manual does not list the material or thickness, do not assume that a higher setting makes the application suitable.
Softwood
Softwood may accept a longer leg, but a long staple can still remain proud if the tool cannot complete its stroke or if the stack is thin. The Arrow ET2025 figures of up to about 3/8 inch penetration in softwood are an example for that model, not a recommendation for every softwood job.
Free tools Windows power users keep installed
One-click scans. No signup required.
Layered assemblies
For fabric, trim, insulation or thin boards over a backing, count the total material the legs must pass through and the holding depth required in the backing. A leg selected only by the top layer can either fail to hold or bottom out before the crown seats. Confirm the permitted stack and leg range in the manual before production work.
Prevent proud staples and jams
- Store staple strips dry and protected from crushing; inspect the first strip before loading.
- Keep the magazine closed when the tool is not being loaded, and clean it only as the manufacturer directs.
- Use a test piece whenever the wood species, thickness, finish or fastener batch changes.
- Mark the working pressure or drive setting that succeeds for a specific, repeatable assembly, but do not transfer it to another model.
- Keep the nose flat or at the angle required by the manual and maintain the specified contact sequence.
- Expect knots, hidden screws, nails and other foreign objects to change the staple path; never place a hand behind the firing area.
- Inspect the tool after a hard jam for a bent driver, cracked housing, loose magazine or damaged safety contact.
- Remove the battery, unplug the cord or disconnect air before transport, loading, cleaning or maintenance.
When to stop troubleshooting and get service
Stop using the stapler when the correct fastener and model setting still produce incomplete drive, when a driver remains stuck after the documented clearing procedure, or when the tool shows a crack, bent nose, leaking air connection, abnormal sound or inconsistent firing. Manufacturer troubleshooting guidance directs users to authorized repair when the tool has malfunctioned. Repeated firing can turn a minor feed problem into a damaged driver or an uncontrolled discharge.
Replace staples when they are bent, corroded, crushed or otherwise outside the manual’s specification. Replace or repair the tool only after identifying the required staple family, material range and operating method. A new tool that accepts the wrong crown or leg length will reproduce the same problem.
A practical decision path
- Is the staple specified for this model? If not, unload it and obtain the exact type and dimensions listed by the manufacturer.
- Is the material within the stated range? If the wood is harder or thicker than the manual covers, test a suitable application or choose equipment rated for it.
- Does the tool have an approved drive or pressure adjustment? Set it within the marked range and verify pneumatic pressure against the manual.
- Is the feed path clear? Disconnect the energy source, clear the jam using the model’s procedure and inspect for damage.
- Does it still fail on representative scrap? Stop firing and arrange manufacturer support or qualified repair.
The immediate fix is usually a compatible staple and a setting matched to the wood, not more trigger force. Model-specific instructions control every compatibility, pressure, adjustment and jam-clearing decision.
Quick wins for a faster PC:
Scan for outdated or missing drivers - takes under a minuteDriver Scan →Repair Windows errors before they cause bigger problemsFix Now →Quick Recap
Product prices and availability are accurate as of the date/time indicated and are subject to change. Any price and availability information displayed on Amazon at the time of purchase will apply.

