Repair a water-damaged ceiling in this order: make the area safe, stop the leak, identify the water source, determine whether the ceiling material is sound, dry everything quickly, remove contaminated or swollen porous materials, and only then patch and repaint. A brown mark alone does not tell you whether drywall can stay. EPA guidance allows drying drywall in place when it has no obvious swelling and its seams remain intact; swollen drywall or drywall with failed seams should be removed and replaced.
Keep people out from under a sagging, cracking, dropping, or visibly separating ceiling. Wet electrical components, sewage-contaminated water, hidden mold, extensive damage, and suspected asbestos or lead require qualified help rather than a cosmetic patch.
As an Amazon Associate I earn from qualifying purchases.
1. Make the ceiling safe before touching it
A ceiling can hold water well after a leak appears to stop. Added weight may cause plasterboard, drywall, fasteners, insulation, or a light fixture to fail without much warning.
Stay clear of warning signs
- A broad sag, a bulging bubble, or a section that is visibly dropping
- New cracks, widening cracks, or a line of fastener blisters
- Cracking sounds, movement, or a joint pulling away from the wall
- Drywall that appears to be separating from its supports
Do not stand below a ceiling showing these conditions, and do not probe or cut it from underneath. Washington State Building and Energy identifies sagging, cracking, dropping, and separation as signs requiring prompt inspection. Arrange an inspection by a qualified builder or structural professional before beginning repair.
#1 Best Overall

- Complete Repair Kit: Contains 1 pieces repair putty(8.5oz), 2 inch wall repair patches(2pcs), 4 inch wall repair patches(1pcs), 2 pieces of sandpaper, and 4 plastic scrapers.
- Waterproof Formula: The drywall repair kit contains a waterproof wall mending agent that dries quickly and leaves no residue.
- Strong Adhesion: Drywall repair patches are made from quality aluminum, making them lightweight yet strong and durable for long-lasting performance.
- Multipurpose: Wall repair patch is suitable for repairing most damaged surfaces around the home, kitchen, or office building, as well as factories and other industrial facilities.
- Ideal for DIY home renovations: Whether you're an experienced pro or a beginner, our wall patch repair kit makes wall repair a breeze, enhancing the beauty of your home.
Isolate electrical hazards
Water may have reached recessed lights, ceiling fans, junction boxes, wiring, or devices above the ceiling. Do not touch a wet fixture, switch, wire, or breaker with wet hands. If water is near electrical equipment, keep clear and have a qualified electrician assess and isolate the circuit. Do not restore power to equipment that may have been wet simply because the ceiling surface feels dry.
Protect the room
Move furniture and occupants away from the affected area. Place a container under an active drip only if doing so does not require standing beneath an unstable section. Photograph the damage and the suspected leak source before removing materials; the record can help with an insurance claim, even though coverage and documentation rules vary by policy and location.
2. Stop the leak and identify the water
Cosmetic work cannot succeed while moisture is entering. The EPA describes moisture control as the foundation of mold control: “The key to mold control is moisture control.” Shut off a leaking plumbing fixture or supply line, arrange roof or flashing repair, or correct the other entry point before closing the ceiling.
The Tool Desk
Outbyte Driver Updater FREEFix the driver behind crashes, sound loss and screen glitchesFind Drivers →Outbyte PC Repair FREEClear out junk files and repair common Windows errorsFree Scan →Clean water versus contaminated water
| Situation | Typical examples | Appropriate response |
|---|---|---|
| Potentially clean water | A limited roof penetration or a supply-line leak that has not contacted sewage or other contaminants | Stop the source, inspect hidden areas, dry promptly, and follow the material decision rules below. |
| Contaminated water | Sewage, a backed-up drain, floodwater of uncertain quality, or water that has contacted waste | Keep people away and contact a professional experienced in contaminated-water cleanup. Porous ceiling materials may require controlled removal and disposal. |
Do not assume water is clean because it looks clear. The route it took through a drain, wall cavity, roof assembly, or contaminated insulation matters.
Rank #2

- Drywall repair kit can be used for repairing interior or exterior surfaces like drywall, plaster, wood, brick and stone
- Color indicator spackle goes on pink and dries white providing confirmation the product is dry within 1 to 5 hours
- Wall patch dries within 1 hour for repairs 1/8" in depth; for repairs deeper than 1/8" apply two or more layers and allow spackle to dry between applications
- Durable spackling will not crack, crumble, flake or shrink and creates professional looking wall repairs that last
- No priming required when used indoors, kit contains: spackle, 5x5 fiber tough patch, 4x3 100 grit sandpaper and putty knife
Check the concealed side of the ceiling
Visible staining can be smaller than the wet area behind it. Water may have traveled along joists, pooled on top of ceiling tiles, soaked insulation, or left mold on the back of drywall. Open an access point only after the ceiling is judged stable and electrical hazards are controlled. If you cannot determine how far moisture traveled, a qualified inspector can investigate without unnecessarily enlarging the opening.
Consider older-material hazards
If cutting, drilling, sanding, or removing a ceiling in an older building could disturb asbestos-containing material or lead-based coatings, stop and obtain public-health guidance or a contractor trained for that material. Do not take a sample or sand a suspect surface casually; the safe procedure depends on the material and local requirements.
3. Decide whether the ceiling can be saved
Use the condition of the material, not the color of the stain, to choose a repair path. The EPA’s water-damage table gives the central drywall rule: drywall or gypsum board may be dried in place when there is no obvious swelling and the seams remain intact. Swelling or failed seams means removal and replacement.
Quick wins for a faster PC:
Clear out junk files and repair common Windows errorsFree Scan →Fix the driver behind crashes, sound loss and screen glitchesFind Drivers →Repair Windows errors before they cause bigger problemsFix Now →| Finding | Likely path | Why |
|---|---|---|
| Flat drywall, firm surface, no swelling, intact seams, no mold | Dry in place, then patch and finish after it is fully dry | The board may retain its strength if moisture is removed promptly and the paper and core remain sound. |
| Soft, swollen, delaminated, or crumbling drywall | Remove the affected section and replace it | Water has compromised the gypsum or paper; a surface patch will not restore the material. |
| Seams open, tape has failed, or fasteners have pulled through | Replace the failed section and refasten to sound framing | Failed joints indicate movement or loss of support that finishing compound cannot correct. |
| Mold in porous drywall or insulation | Remove and replace porous material as appropriate | Mold can penetrate pores and cavities, making complete cleaning unreliable. |
| Water-damaged ceiling tile | Discard and replace the tile | Ceiling tile is porous and difficult to clean completely after water intrusion. |
| Wet cellulose or fiberglass insulation | Arrange removal and replacement of affected insulation | Wet insulation can remain damp above the ceiling and conceal mold or other damage. |
A moisture meter can help compare readings in suspect drywall and surrounding material, and EPA worker guidance discusses using drying equipment and moisture measurements. A meter does not override the replacement criteria: visibly swollen, structurally failed, or moldy porous material still needs the appropriate removal.
Rank #3
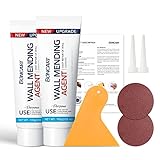
- The drywall repair kit includes 2x Wall mending agent (100g), 2x Nozzle Extender, 1x Scrapers, and 2x Sandpaper.
- This drywall patch repair kit Easily and quickly repair the damaged wall.Just gently squeeze out and use a spatula to smooth. spackle wall repair kit can be reused, Meet your various repair needs.
- The new upgrade wall patch repair kit is very safe, it does not contain formaldehyde. It is highly resistant to breakage, streak-free and waterproof.And the mending will be virtually invisible, then giving you professional-looking results.
- BONCART wall repair kit can solve all kinds of wall damage.Drywall cracks,wall stains,nail holes,wall peeling,wall stains,wall graffiti.Let your walls a new look.
- Best Service:Fast pre-sale and after-sale response, any questions about the product are welcome to contact us at any time.
4. Dry the area within 24–48 hours
EPA mold-prevention guidance says drying water-damaged areas and belongings within 24–48 hours is important to help prevent mold growth. The clock starts when the area becomes wet, not when the stain is first noticed. A hidden leak may mean the ceiling has been wet longer than it appears.
Drying procedure
- Remove standing water. Collect drips and wet debris without disturbing an unstable ceiling. If water is near electrical equipment, leave cleanup to a qualified person.
- Expose wet surfaces safely. Remove loose, collapsed, or clearly unsalvageable material only after confirming that the ceiling is stable and the water source is stopped.
- Increase air movement. Use fans or blowers to move air across—not merely at—the wet area. Do not direct air in a way that spreads contaminated droplets or mold debris.
- Lower humidity. Operate a dehumidifier in the room while keeping doors and windows configured for the local climate and the equipment’s instructions. Empty or drain it safely.
- Dry concealed spaces. Check the cavity above the ceiling, insulation, framing, and the back of remaining drywall. A surface that feels dry does not prove the assembly is dry.
- Verify dryness. Compare readings with an unaffected area using a moisture meter, and continue drying until the affected material is at a comparable, stable condition.
Fans and dehumidifiers accelerate drying; they do not make swollen drywall, moldy ceiling tile, or contaminated insulation suitable for reuse. Stop if air movement would spread contamination or if the ceiling becomes less stable.
5. Handle mold without spreading it
Do not paint or caulk moldy surfaces. EPA’s instruction is explicit: “Do not paint or caulk moldy surfaces.” Clean and dry sound, nonporous surfaces first; covering growth traps the problem and can cause the coating to fail.
What’s actually slowing this PC down?
Pick the symptom - the matching free tool is one click away.
Small, accessible areas
For a limited area on a hard, nonporous surface, clean with detergent and water and dry completely. For mold cleanup after disasters, the EPA interagency homeowner guide specifies at least an N-95 respirator, goggles, and protective gloves. Protect nearby rooms from dust and debris, and bag disposable materials according to local waste rules.
Rank #4
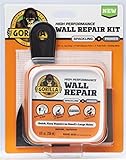
- ALL IN ONE WALL REPAIR KIT: Contains all of the tools you need to complete strong, durable repairs on walls, ceilings and both small and large holes for a fast, professional-looking finish
- KIT INCLUDES EVERYTHING NEEDED: 8 ounce tub of Spackling plus Primer, 4 in self-adhesive patch, 3 in putty knife and sanding block for complete drywall, plaster and ceiling repair projects
- SPACKLING AND PRIMER IN ONE: Paints like drywall with a heavy duty, lightweight, no sag formula that is shrink and crack proof for clean, professional looking finished wall and ceiling repairs
- FAST DRYING EASY TO SPREAD: Paintable in 15 minutes, with dry time assuming a hole 1/2 in diameter by 1/8 in deep, varying with temperature and humidity, and a smooth finish that does not require sanding
- INDOOR OUTDOOR DIY READY: Designed for interior and exterior wall fixes including nail holes, doorknob dents, hairline cracks and large holes, with exterior paint required outdoors and not for continuous water submersion
When porous material must go
Moldy drywall, ceiling tile, and insulation can hold growth inside paper faces, fibers, pores, and crevices. Cleaning the visible side does not reliably decontaminate the interior. Remove and replace porous material when it is moldy, swollen, structurally failed, or cannot be dried completely.
Use the area threshold correctly
EPA’s general homeowner guidance says people can usually handle mold areas smaller than about 10 square feet, roughly a 3-foot by 3-foot patch; larger areas may warrant a contractor. This is agency guidance, not a universal legal threshold. Contaminated water, hidden growth, extensive water damage, occupant health concerns, or difficult access justify professional advice even when the visible patch is smaller.
6. Repair sound drywall that stayed in place
Only begin cosmetic repair after the leak is fixed, the cavity and remaining board are dry, and the drywall is firm with intact seams.
Prepare the surface
- Remove loose paint, peeling paper, crumbling joint compound, and residue around the stain.
- Clean a sound, nonporous surface with detergent and water if mold was present, then allow it to dry fully.
- Check again for soft spots, swelling, open seams, damp insulation, or a continuing moisture source.
- Reattach or repair any loose trim only when the underlying framing and board are sound.
Patch minor surface damage
Shallow dents, small fastener depressions, and limited holes in sound board can be filled with compatible joint compound or a drywall repair product. Apply thin coats, allow each coat to dry, sand carefully, and keep dust contained. A patch kit is not an answer for swollen board, failed seams, moldy porous material, or an unstable ceiling.
Best Value

- Package includes 12 pieces of drywall repair patch in three different sizes (8 pieces of 4-inch, 2 pieces of 6-inch and 2 pieces of 8-inch), 2 pieces of sandpaper (240 grit), and 2 plastic scrapers.
- Bates drywall repair patches are made from quality aluminum, making them lightweight yet strong and durable for long-lasting performance.
- The self-adhesive backing makes it easy to apply the patch to the wall, ensuring good adhesion to nearly any kind of surface.
- Bates wall repair patch is suitable for repairing most damaged surfaces around the home, kitchen, or office building, as well as factories and other industrial facilities.
- To use this product effectively, first clean and dry out the hole you want to patch before peeling back the backing and applying the drywall patch. Evenly spread out plaster with a scraper afterwards for a more seamless look.
Repair a larger hole
A U.S. Department of Energy homeowner guide identifies a gypsum-board repair kit or equivalent as an option for large holes or water-damaged ceiling drywall. The general sequence is to cut back to solid material, support the replacement piece with existing or newly installed framing, fasten the gypsum board, tape the joints, apply joint compound, sand, prime, and paint. The guide does not establish one universally correct board thickness, fastener schedule, or ceiling assembly. Match the existing construction and follow local code, manufacturer instructions, and permit requirements.
Independent reader supportYour contribution helps us test, update, and keep practical guides available for everyone.7. Replace swollen or failed drywall
Replacement is appropriate when the board is swollen, soft, delaminated, moldy, or has seams that no longer hold. Have a qualified person confirm the ceiling is stable before cutting.
- Mark the removal area. Include all visibly failed material and extend cuts to sound, dry edges that can be supported. Avoid wires, pipes, and fixtures.
- Remove the damaged board carefully. Control dust and debris, and stop if you encounter suspect asbestos, lead, unexpected wiring, structural movement, or contaminated material.
- Inspect the cavity. Look for wet insulation, mold, damaged framing, loose fasteners, and water tracks. Do not close the cavity while these remain wet or unsafe.
- Replace wet porous contents. Remove insulation or ceiling tile that meets the replacement criteria, and dry or repair framing as needed.
- Install matching board. Fasten the replacement to sound existing or newly replaced joists or other supports. Because ceiling assemblies differ, use the material and fastening method required for the existing system and local code.
- Tape and finish joints. Apply joint tape and compound in multiple thin coats, feathering edges and allowing drying between coats.
- Prime and paint. Once the repair is dry and smooth, prime the repaired area and apply finish paint. Do not use paint to hide active moisture or mold.
8. Finish the ceiling only after moisture is controlled
Persistent discoloration after complete drying can be a residual stain, but it can also indicate ongoing moisture. Recheck the roof, plumbing, flashing, attic, and cavity before sealing the surface. If mold remains, return to remediation rather than applying primer.
When the substrate is sound, dry, and clean, sand joint compound smooth, remove dust, apply an appropriate primer, and repaint. Differences in texture or sheen may require coating the entire ceiling plane for a uniform appearance. Follow the paint manufacturer’s ventilation and recoat instructions.
9. Know when professional help is the safer repair
- Contaminated water: Sewage or water of uncertain quality requires a contractor experienced in contaminated-water cleanup.
- Extensive mold or damage: More than about 10 square feet of mold, widespread wet materials, or hidden growth may exceed ordinary homeowner cleanup.
- Structural warning signs: Sagging, dropping, cracking, fastener blisters, movement, or separation from supports needs inspection before work.
- Electrical involvement: Wet fixtures, wiring, junction boxes, or insulation near electrical equipment require qualified assessment.
- Hidden moisture: Water above ceiling tiles, soaked insulation, inaccessible cavities, or uncertain drying conditions can leave a concealed problem.
- Suspected asbestos or lead: Disturbance of older materials should be handled with appropriate testing, controls, and trained personnel.
- Health concerns: People with respiratory conditions, allergies, immune suppression, or other concerns should avoid mold cleanup and seek professional advice.
10. Troubleshoot the common failure modes
| Symptom after the repair | Likely cause | Action |
|---|---|---|
| The stain returns or grows | The leak or condensation source remains active | Stop repainting, trace the moisture source, and dry the assembly again. |
| Paint blisters or peels | Moisture remains below the coating or mold was covered | Remove failed coating, inspect and remediate the substrate, then repaint only when dry and clean. |
| A repaired seam cracks | Movement, failed backing, or a remaining damaged edge | Inspect framing and supports; replace or refasten failed board before refinishing. |
| A musty odor persists | Wet insulation, mold behind the board, or damp framing remains | Investigate the cavity rather than masking the odor with paint or fragrance. |
| The ceiling sags again | Water accumulation, inadequate support, or structural damage | Keep people clear and obtain an urgent inspection. |
| Drywall feels dry but a meter reads high | Moisture remains in the core or adjacent materials | Continue drying and investigate hidden areas before closing the ceiling. |
11. A practical decision checklist
Before you close the repair, confirm every applicable item:
- The leak source has been repaired, not merely covered.
- The ceiling is stable, with no active sagging, cracking, or separation.
- Electrical hazards have been assessed and isolated where necessary.
- The water was evaluated for sewage or other contamination.
- Swollen, failed, moldy, or uncleanable porous material has been removed.
- Remaining drywall and the cavity are fully dry, supported, and free of active mold.
- Wet insulation and damaged ceiling tile have been replaced where required.
- Any asbestos- or lead-related risk has been addressed before disturbance.
- Joints, patches, primer, and paint are being applied only to sound, dry material.
- Local permit, electrical, building-code, disposal, and insurance requirements have been checked.
What the repair decision comes down to
A water stain is a symptom, not a repair diagnosis. Stop the source, protect people from an unstable ceiling and wet electrical equipment, and determine whether the water was contaminated. Dry sound drywall quickly—ideally within 24–48 hours—and save it only when it has no obvious swelling and its seams remain intact. Replace swollen or failed drywall, moldy porous material, wet insulation, and damaged ceiling tile. Patch and repaint after the assembly is clean, dry, stable, and free of ongoing moisture. When the damage is contaminated, extensive, hidden, structurally unsafe, or associated with older hazardous materials, professional assessment is the correct repair step.
Quick Recap
Product prices and availability are accurate as of the date/time indicated and are subject to change. Any price and availability information displayed on Amazon at the time of purchase will apply.
Do these 3 things before closing this tab:
1Repair Windows errors before they cause bigger problems2Scan for outdated or missing drivers - takes under a minute3Clear out junk files and repair common Windows errors
