Crashes, No Sound, or Screen Glitches?
Random freezes, missing sound and display glitches usually trace back to one bad driver. Find and replace yours safely.Free scan · under a minuteWindows Errors? Fix Them Before They Spread
Repair common Windows errors and clear accumulated junk for a smoother, more stable PC - no reinstall needed.Free scan · no reinstallPreventing moisture and transport damage in a modular building requires one protection system that stays active from factory dispatch through delivery, storage, joining and final enclosure. Factory quality control is necessary but cannot protect a unit that is later punctured, poorly supported, left on wet ground or closed while damp. Plan the route and weather exposure, specify temporary membranes and drainage, control lifting and restraints, inspect at every handoff, and resolve wetting before cavities, joints or finishes are concealed. Project specifications, local requirements and the module manufacturer’s instructions control the final details.
Why damage can occur after a module leaves the factory
A completed module may be exposed to rain, snow, humidity, cold, heat, road spray, condensation and site water during several separate stages. Transport restraints can distort a frame or finish; lifting can tear a membrane; a temporary opening can admit water; and storage on poorly drained ground can wet the underside. Water may then remain between modules or inside a cavity where it is difficult to see or test.
As an Amazon Associate I earn from qualifying purchases.
The UK Government’s volumetric modular construction research describes moisture risks across transport, storage, module joining and occupancy. It also warns that condensation can lead to mould and that access limitations can make later moisture testing and repairs difficult. Treat each handoff as a new exposure event, not as proof that the unit remains in its factory condition.
Use a cradle-to-grave quality process with a named person or organisation responsible for protection, inspection and decisions when damage is found. A unit should not be accepted, joined or enclosed merely because the outside looks dry.
#1 Best Overall
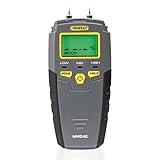
- HUMIDITY SENSOR: Our handy meter tool can quickly determine what level of remediation is needed to keep your family safe from black mold. High levels of dampness that go untreated are the leading cause of harmful fungus growth in the home.
- WATER LEAK DETECTOR: Finding the moisture content in your wood or drywall is the first step in early prevention. Continuously check and test suspicious water stains around the house so you can determine whether the area is wet or has already dried. Low, medium and high moisture tones and on-screen icons, Reading HOLD button
- MOISTURE READER: The mold test features large 0.3" high digits in a backlit LCD for quick and easy detecting. Our mildew scanner includes extra 8mm stainless steel pins, a protective cap that doubles as a calibration checker, and a “9V” battery.
- MOLD TESTER: For an accurate test read, stick the stainless steel pins into the surface of what you're measuring. The gauge has a broad range of 5 - 50% for wood and 1.5 - 33% for building materials such as concrete and drywall.
- GENERAL TOOLS: We're a recognized leader in designing and developing specialized precision tools dedicated to delivering exceptional customer service. We encourage artisans and DIYers to work smarter, measure better, and repair more productively.
Plan protection before fabrication and dispatch
Record the complete exposure profile
At project scoping, create a protection schedule for every module or module group. Record:
- Structural and finish materials, including timber, cross-laminated timber (CLT), gypsum linings, membranes and installed fitments.
- Overall dimensions, mass, centre-of-gravity information, designed lifting points and required temporary supports.
- Loading method, haul distance, route restrictions, expected stops, delivery order and erection sequence.
- Likely rain, snow, humidity, temperature swings, road spray and wind during the journey.
- The planned site, expected external-storage duration, stacking arrangement and date by which permanent cladding or roofing will be complete.
These are the transport-planning factors identified in UK Government research. The route assessment should be updated if the delivery date, carrier, route or storage location changes.
Assign decisions and acceptance criteria
State who checks a module after loading, unloading, lifting, storage and adverse weather; who can reject a delivery; who authorises drying or replacement; and who releases a module for joining or concealment. Put the contact names, inspection forms, photographs and escalation route in the installation documentation.
The Tool Desk
Outbyte PC Repair FREERepair Windows errors before they cause bigger problemsFix Now →Outbyte Driver Updater FREEFix the driver behind crashes, sound loss and screen glitchesFind Drivers →Define measurable project criteria before dispatch. They should cover membrane integrity, acceptable support condition, evidence of standing water, permissible exposure time, moisture-testing method and the conditions for repair or replacement. For timber, use the manufacturer’s specified instrument, sampling locations and acceptance range; there is no universal moisture-meter reading that applies to every system.
Set exposure and dwell limits
Specify the maximum time a unit may remain outdoors before installation and the maximum time between installation and completion of the permanent enclosure. Include shorter limits for forecast storms, snow, high humidity or a protection system that is easily punctured. Schedule deliveries close to the erection sequence so units do not become long-term site inventory.
Design temporary moisture protection as part of the enclosure
Protect all faces, not only the roof
WoodWorks guidance describes protecting all six sides of a module before outdoor transport or storage. As a design consideration, it discusses a roof-grade membrane on the top and suitable water-resistive barriers (WRBs) on vertical sides and the underside. The exact products, laps, attachment and vapour permeance must be adapted to the climate, assembly and final enclosure; this is not a universal specification.
Rank #2

- FIND HIDDEN WALL MOISTURE EARLY — Check suspicious drywall and building surfaces after a leak, water stain, or other moisture concern. Detect abnormal moisture before a small issue develops into more extensive damage and costly repairs
- CHECK BEFORE YOU REPAIR — Don't rely on a wall looking or feeling dry. Use the moisture meter to check questionable areas before painting, repairing, or covering the surface, helping you make decisions based on actual moisture readings.
- CHECK FIREWOOD BEFORE YOU BURN — Test firewood before placing it in your fireplace or wood stove. Knowing the moisture level of your firewood helps you choose wood that is ready for burning and avoid relying on appearance alone.
- PIN-TYPE TESTING FOR DIRECT MEASUREMENTS — The contact pins penetrate the material to measure moisture inside wood and building materials. This makes it useful for checking areas where surface conditions may not tell the whole story.
- ONE TOOL FOR TWO IMPORTANT HOME CHECKS — Keep it ready for two practical jobs: checking walls for hidden moisture and checking firewood before burning. A simple way to make informed decisions before a moisture problem becomes expensive or wood goes into the fireplace.
Protection must shed water rather than create a sealed pocket that holds it. Provide a visible path for rain and meltwater to drain, keep laps oriented to drain, and avoid low points where water can collect against timber, insulation or finishes. Check that temporary layers do not block designed drainage openings.
Detail openings, joints and lifting points
Show every temporary opening needed for lifting, connection, services or inspection. The plan should state how each opening is covered after use, how the seal is checked and when it may be removed. Detail continuity at module-to-module joints, corners, penetrations, lifting points and support locations; these are common places for a membrane to be cut or pulled away.
If a protective layer remains in the completed wall or roof, assess its vapour behaviour and condensation implications in the permanent design. A temporary membrane that is safe for a short, ventilated exposure can create a drying problem if trapped behind an impermeable finish.
Compare protection strategies against the actual exposure
Use a project-specific comparison rather than choosing a product by name. The following framework covers the decision factors identified in NHBC Standards 2025, Chapter 11.1, “MMC Systems,” and WoodWorks technical guidance.
| Protection approach | Most suitable context | Key strengths | Risks and checks |
|---|---|---|---|
| Roof-grade membrane over the top face | Rain and snow falling directly on a roof or upper surface during short-term transport, storage or erection | Sheds precipitation when sloped and continuously lapped | Inspect punctures, wind damage, edge lifting and blocked drainage; confirm compatibility with the permanent roof build-up |
| Water-resistive barrier on vertical sides and underside | Side and base exposure where splash, spray or wind-driven rain is expected | Maintains a continuous drainage plane when joints and penetrations are detailed | Protect from abrasion and lifting supports; verify vapour permeance and continuity at module joints |
| Shrink wrap or similar film | Short-duration protection where frequent inspection and repair are practical | Can cover irregular shapes quickly | It can be punctured and leak; trapped condensation and poor drainage are possible. Do not treat an apparently intact film as proof that the cavity is dry |
| Vented over-cover or secondary weather shield | Longer staging, severe weather or situations where a membrane needs protection from handling | Reduces direct wetting while allowing inspection and, when designed correctly, drying | Requires secure support, wind assessment, drainage and access for inspection; do not seal in water |
| Desiccants or absorbent materials | Supplementary control in enclosed spaces when the project procedure specifically allows them | May reduce humidity in a limited, monitored volume | They do not replace drainage or drying of wet materials. Define quantity, placement, replacement and disposal in the moisture plan |
For every option, compare expected rain, snow, humidity and temperature; puncture resistance; vapour permeance and drying potential; continuity at joints and lifting points; drainage; planned exposure duration; inspection access; and added material or labour. Record why the selected system fits the module and route.
Recommended Free Tools
Prepare modules for loading and handling
Use designed supports and lifting points
Follow the manufacturer’s lifting drawings, identified lifting points and designed temporary supports. NHBC guidance calls for transport restraint and temporary support or bracing that prevent undue movement, distortion and damage to structure and finishes. The installation documentation should identify both lifting points and temporary support locations.
Rank #3
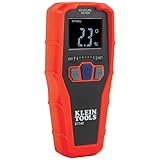
- WATER LEAK DETECTOR detects relative moisture content from leaks and flooding
- PINLESS MOISTURE METER measures relative moisture content in building materials
- NONDESRUCTIVE DETECTION up to 3/4-Inch deep using Electromagnetic field (EMF) technology
- USE ON DRYWALL, MASONRY, HARDWOOD, AND SOFTWOOD; calibrated for these materials only
- REVERSE-CONTRAST DISPLAY for easy viewing of reading and nine LED bars to indicate moisture range
Do not substitute an improvised sling position, forklift contact point or stacking arrangement. Confirm that the carrier’s equipment matches the module mass, geometry and lifting plan, and that restraints bear on structural locations rather than fragile finishes or service components.
Protect exposed finishes and fitments
Shield corners, windows, cladding edges, doors, installed fixtures and service connections from impact and abrasion. Close or cover temporary openings before the vehicle leaves the loading area. Photograph the protection and restraints after loading, including the underside where practical.
Minimise handling
Coordinate the delivery order with the erection sequence so a unit is handled as few times as possible. Every additional lift or transfer creates another opportunity to puncture a membrane, loosen a restraint or distort a frame. Reinspect after any unplanned transfer, collision, severe weather event or other incident that could affect protection.
Control the journey from factory to site
- Release only a documented unit. Confirm identity, dispatch condition, protection continuity, lifting points, restraints and shipping papers before loading.
- Brief the carrier and receiving team. Provide the route, weather-response procedure, lifting plan, support points, emergency contacts and instructions not to remove protective layers without approval.
- Check at planned stops or after incidents. Look for shifted restraints, torn covers, impact damage, pooling water and exposed openings. Record the location and time of each finding.
- Keep protection intact during unloading. Use the specified lifting sequence and supports. Do not drag a module or rest it on an unplanned surface.
- Record the handoff. The receiving party should sign the inspection record only after identity, visible condition, support and weather protection have been checked.
If a cover is damaged in transit, repair it only after checking the material beneath. Taping the outside of a wet assembly can conceal the problem and delay drying.
Store units safely before installation
Choose a suitable staging area
Use a clean, dry, level area away from standing water, mud, site traffic and activities that generate dust or sparks. Keep modules off the ground on the manufacturer’s specified supports. Maintain the required bearing points and spacing, and do not exceed the stated stacking height or load.
Arrange units so water cannot become trapped between stacked modules or beneath a membrane. Preserve access to inspect all faces, drain water and repair protection. Do not place a wrapped module directly on soil or allow packaging to form a basin around its base.
Rank #4

- 🌲【Accurate and fast measurements reveal hidden water leaks】: It has 2 high-precision pins that can penetrate the surface to be tested and quickly measure moisture content to estimate potential moisture increase throughout the home. COCZOW moisture meter is the ideal tool for measuring moisture.
- 🌲【Professional Wood Moisture Meter】: 6 calibrated scales. Our moisture meter is a great tool for manufacturers, floorers, inspectors and wood suppliers to quickly and easily measure moisture content (% Mc). You can quickly determine if the moisture content is low (5-12%), medium (12-17%) or high (17-60%). Checking moisture content prevents wood from cracking and warping.
- 🌲【Widely Used】: PM6811A moisture meter is ideal for carpentry, building construction, agricultural restoration and floor laying. Measure moisture content of wood products such as hardwood floors, cabinets, furniture, lumber, lath, beams, plywood, panels, composite boards, window frames, forestry wood, coils, building materials, etc.
- 🌲【User-friendly】: With LCD backlight, the backlight color is divided into three types of green, yellow and red, or display the moisture content of different measurement types. Hold function, maximum/minimum moisture measurement function and 5-minute automatic shutdown function (no power supply required).
- 🌲【Why choose COCZOW Wood Moisture Meter】: LED display function, large measuring range (wood: 2.0%-75.0%. Building materials: 1.5-30%), durable stainless steel needle, heat insulation, light weight and easy to carry. Get professional and accurate results with Peakmeter Wood Moisture Tester.
Control ventilation and packaging
Follow the manufacturer’s instructions for packaging, ventilation and any required opening of protective wraps. A fully sealed package can accumulate condensation when temperatures change; an unprotected package can admit driving rain. The correct balance depends on the assembly and exposure, so use the documented system rather than a generic rule.
Inspect throughout storage
Inspect on arrival, after heavy rain or snow, after high winds, and at the frequency stated in the moisture plan. Check the top, sides, underside, supports, drains, seals, openings and areas where units touch. Record the date, weather, photographs, observed water and corrective action. Limit storage duration and escalate any forecast that would exceed the planned exposure.
Use a formal receipt inspection
Complete the receipt inspection before a unit is accepted, joined to another module or covered by cladding. A practical record includes:
| Inspection point | What to verify | Action if unsatisfactory |
|---|---|---|
| Identity and documents | Module number, destination, delivery condition and approved lifting/support information | Quarantine or reconcile the unit before installation |
| Structure and finishes | Crushing, distortion, impact, cracked linings, damaged corners and displaced fitments | Photograph, notify the assigned decision-maker and obtain a repair disposition |
| Protective layers | Continuous membranes, intact laps, secure edges and sealed penetrations | Repair or replace protection after confirming the substrate is dry |
| Openings and joints | Temporary openings closed as planned; no unsealed module joints or lifting penetrations | Reseal and inspect adjacent cavities before acceptance |
| Water and condensation | Standing water, wet packaging, staining, droplets, damp odour or mould evidence | Stop concealment, map the affected area and begin the drying procedure |
| Supports and storage position | Correct bearing points, level condition, drainage and compliance with stacking limits | Re-support safely before moving or continuing storage |
| Moisture readings where required | Measurements taken with the specified instrument and method at defined locations | Compare with project criteria; do not rely on an unqualified reading |
NHBC guidance calls for inspections on arrival and during storage, with moisture-control planning and testing frequency defined. The inspection record should identify who owns any damage discovered at delivery and document its resolution before work proceeds.
Respond to wetting before the building is closed
- Stop concealment and isolate the area. Pause lining, insulation, cladding, joint closure or other work that would hide the affected assembly.
- Find the full extent. Trace water from the entry point through laps, cavities, module joints and the underside. Visible surface dampness may not show trapped water.
- Remove standing water. Use a method appropriate to the materials and finishes, while avoiding further abrasion or forcing water deeper into the assembly.
- Dry the assembly. Apply the approved ventilation, dehumidification or other drying method. Keep drainage paths open and protect the area from additional weather.
- Verify dryness. Test according to the project or manufacturer procedure, including specified timber moisture checks. Record instrument, location, date and result.
- Repair or replace damaged components. If gypsum linings show delamination or mould caused by construction moisture, NHBC guidance says to remove and replace them in accordance with the plasterboard manufacturer’s recommendations and check the supporting structure.
- Document release. Record the cause, affected areas, drying evidence, repairs and approval before closing the assembly.
Do not assume that a dry-looking face is proof that an enclosed cavity is dry. Water can remain between modules or components, and access constraints may make later testing and repair expensive.
What’s actually slowing this PC down?
Pick the symptom - the matching free tool is one click away.
Maintain protection during joining and enclosure
Keep a continuous weather break while modules are joined
Joining two dry modules can expose previously protected edges and create new horizontal ledges. Sequence the work so an open joint is covered or sealed promptly, and inspect the joint before it becomes inaccessible. Pay particular attention to lifting points, connection plates, service penetrations and the underside of the junction.
Best Value

- Easy to Read with Large LCD Screen: This wood moisture meter is easy to get an accurate reading from the surface of materials and displays accurate moisture readings on the 2.25" big screen. Use this handheld meter to check the moisture content in firewood or drywall, it can stand up on the table, the moisture content is displayed with a bar graph and percentage (_%RH) on the screen. Date Hold and Max/Min function is used to freezes readings, useful for writing down data
- Tricolor Backlight Display, Easy to Use: TopTes Moisture Meter TS-630 features an HD tri-color backlight to easily know if the wood/wall humidity is Dry, Moist, or Wet. Green backlight for Low moisture, orange backlight for middle moisture, and red moisture for high moisture. After selecting the mode, and putting pins into the firewood, easy and quick to get a visible alert from the clear screen
- Seven Calibration Scales, Two Material Mode: It is designed with built-in characteristic parameters of 7 calibration scales for wood and building material, ranging from 0.0% to 57%. This humidity meter is perfect for woodworking, water damage restoration, building construction, and home renovation. Easily Check and test suspicious water leaks around the wall/floor so you can quickly determine what level of remediation is needed
- Pin Type & Battery Operated: TopTes TS-630 moisture meter is a pin-type moisture meter and operates on batteries. With a high precision multi-material sensor, DON’T need calibration. It’ll support an accurate reading after inserting the stainless steel pins into the surface of the wood or building materials. It will auto shut off after 10 minutes of non-use to help save energy. A low-battery indicator will appear on the screen when the battery is running out
- What's in the Box: One TS-630 Moisture Meter, three AAA Batteries, one User Manual, one Carry Pouch, one Pair of Test Pins, one Mini Wrench
Coordinate temporary and permanent layers
The moisture plan should state when temporary membranes are removed, what remains in place and how the permanent roof, wall and cladding system takes over. If a temporary layer remains, confirm that its vapour resistance, laps and drainage are compatible with the final enclosure. Removing protection too early can expose unfinished materials; leaving an incompatible layer can restrict drying.
Set a final release gate
Before insulation, lining or cladding conceals a module, verify that the enclosure is complete enough to shed water, all wetting incidents are closed out, required moisture readings meet project criteria, and photographs and approvals are filed. This is the last practical point to correct a concealed transport or storage problem.
Adjust the plan for materials and climate
Timber and CLT systems
Timber can absorb moisture during transport, storage and assembly, while shrinkage or swelling can affect finishes and joints. CLT packaging, ventilation, elevation and storage duration need specific instructions. Use the structural-timber moisture procedure specified for the system; a consumer meter setting or a single reading without a sampling plan is not a verification method.
Do these 3 things before closing this tab:
1Clear out junk files and repair common Windows errors2Fix the driver behind crashes, sound loss and screen glitches3Repair Windows errors before they cause bigger problemsGypsum linings and finished interiors
Gypsum can be damaged by construction moisture even when the structural frame appears sound. Protect factory-finished interiors from rain entering through temporary openings, and inspect for softening, delamination, staining and mould before the unit is accepted.
Cold, heat and humidity cycles
Temperature swings can produce condensation inside wraps and cavities. Cold conditions can slow drying; heat can increase vapour movement and stress films; high humidity reduces the drying potential of exposed timber. Include these conditions in the route, storage and enclosure schedule rather than relying on a fixed number of dry days.
Common failure modes and corrective actions
| Failure mode | Why it happens | Corrective action |
|---|---|---|
| Factory protection ends at dispatch | Responsibility is not assigned after loading | Use one lifecycle plan with named owners at dispatch, transport, receipt, storage and erection |
| Cover is intact but water is trapped underneath | Low points, blocked drains or sealed edges prevent drainage | Open the drainage path, remove water, dry the assembly and redesign the detail |
| Shrink wrap leaks after handling | Punctures are caused by slings, corners or site traffic | Inspect after every handling event and repair only after checking the substrate |
| Module is stacked on unapproved supports | Site improvisation changes bearing and drainage | Re-support to the manufacturer’s drawing and check for distortion or finish damage |
| Wet cavity is concealed during a schedule rush | No release gate or clear authority to stop work | Stop concealment, map and dry the area, test it and document approval |
| Temporary membrane conflicts with final enclosure | Vapour behaviour and removal timing were not designed together | Review the permanent assembly, revise the sequence and confirm drying potential |
| Damage responsibility is disputed | Condition was not recorded at a handoff | Use dated photographs, signed inspections and a defined transfer-of-care process |
Project records that make protection enforceable
Keep a single controlled record containing the exposure profile, route and weather assessment, lifting and restraint drawings, storage layout, membrane details, exposure limits, inspection frequency, moisture-testing procedure, emergency drying plan and responsibility matrix. Attach dated photographs at dispatch, loading, unloading, receipt, after storage events, before joining and before concealment.
ASTM-published work by Kyle H. Jang, Elyse A. Henderson and Graham Finch describes moisture risks across transportation, storage, module joining and occupancy and recommends moisture-risk analysis and planning as a standardised process. Applying that principle turns protection from an informal wrapping task into a verifiable quality system.
Quick wins for a faster PC:
Fix the driver behind crashes, sound loss and screen glitchesFind Drivers →Repair Windows errors before they cause bigger problemsFix Now →Quick Recap
Product prices and availability are accurate as of the date/time indicated and are subject to change. Any price and availability information displayed on Amazon at the time of purchase will apply.

