Free tools Windows power users keep installed
One-click scans. No signup required.
For a straight, low-chip track-saw cut, align the guide rail to your marked line, clamp or otherwise secure it as your saw-and-rail manual directs, and use a sharp blade suited to the material. The rail’s splinter guard must be trimmed to the actual blade path before it can act as a zero-clearance edge. Because guard fit and trimming depth vary by saw, rail, blade kerf and model generation, treat the model manual—not a generic measurement—as the authority.
What creates a straight, clean track-saw cut
A track saw has two separate jobs to do. The guide rail keeps the saw moving in a straight path; the splinter guard controls the material right at the blade. A perfectly trimmed guard cannot correct a rail that is misaligned or moving, and a securely positioned rail cannot prevent all chipping if the blade is unsuitable, dull or incompatible with the guard.
As an Amazon Associate I earn from qualifying purchases.
The guide rail determines the path
Manufacturers describe their rails as straight-cut guides. The rail’s cut edge is also a reference: once the saw has been run along it, that edge shows where the blade will cut for that particular saw-and-blade combination. Position that edge on the waste side of your layout mark, not the center of the rail. The kerf removes material on one side of the blade, so use the cut edge as the reference only after confirming how your saw registers on the rail.
The Tool Desk
Outbyte Driver Updater FREEScan for outdated or missing drivers - takes under a minuteDriver Scan →Outbyte PC Repair FREEClear out junk files and repair common Windows errorsFree Scan →The splinter guard closes the gap at the edge
A rail splinter guard is a sacrificial, zero-clearance strip. It is intentionally cut by the saw during its first setup so the strip matches the blade path. The resulting edge both helps hold the top surface down and gives you a visible cut-line reference. Festool explains that the guard holds the top edge of the workpiece as the teeth move upward against it; DEWALT describes a trimmed guard as a visible blade cut line that reduces chipping. Those are manufacturer explanations, not independent measurements of a guaranteed percentage reduction.
#1 Best Overall

- 【Perfectly Compatible with festool track saw】Our track saw guide rail is specifically designed for Festool TS-55/TS-75/TS-60 track saws, ensuring a perfect fit and seamless operation. Seamless docking with festool track saw guide rail ,Perfectly compatible with festool track saw guide rail accessories, such as FT handle clamp, TSO parallel guide etc. Packing list: ① 55in track saw guide rail x 2 ②3m splinter guard x 2 ③ Guide Rail Connector
- 【2-Year AFTER】Feikeer always provide a 2 year on guide rail for festool track saw. For any reason you are not satisfied, you can unconditionally request a replacement. customer satisfaction is our unremitting pursuit. If you have any questions, you can contact us at any time. We will give you a satisfactory reply within 12 hours!
- 【Enhanced Design for Precision Woodworking】Our guide rail features 2 anti-friction strips on the front, providing optimal protection for your electric circular saw. With meticulous attention to detail, we have crafted this guide rail to enhance your focus on precision woodworking projects
- 【Reliable and Durable Guide Rail System】Crafted from professional-grade extruded aluminum, our track saw guide rail offers exceptional durability and resistance to deformation and rust. You can rely on its dependability and longevity for all your cutting tasks.
- 【Streamlined Track Saw Cutting Operations】Effortlessly create flawless results in your woodworking projects and furniture installations with our exclusive saw guide rail. Whether you need to craft sheets of plywood or make accurate and repeatable rip cuts, this guide rail ensures precision and efficiency in your cutting operations
Check compatibility before marking the board
Start by identifying the exact saw, rail and blade. A guard trimmed for another saw, another rail system or another kerf can sit in the wrong place. Before buying a replacement strip, verify the part number and the saw generation in the manufacturer’s parts information. Festool, for example, lists different splinter guards for different TS 55 and TSC 55 generations and advises replacing the guard when changing between kerf blades for best results.
- Read the saw manual and the rail manual for the model you will use.
- Confirm that the saw base is designed for that rail and that the replacement guard is listed for that rail.
- Inspect the rail edge for a crushed, lifted or torn section that could move into the blade path.
- Check that the blade is sharp, undamaged and appropriate for the material.
- Decide whether the rail can be clamped or secured in the exact way the manufacturer specifies.
Do not assume that a guard trimmed for a fine-kerf blade will remain aligned when a thicker-kerf blade is installed. If the blade, saw or rail changes, inspect the guard and follow the model-specific bedding-in procedure again.
Repeatable setup: mark, align, secure, then cut
- Prepare the workpiece. Support the sheet or panel so the waste side and the cut-off piece cannot pinch the blade as the cut progresses. Keep the surface under the rail clean; chips beneath the rail can change its position.
- Mark the intended cut. Use a clear line at the beginning and end of the cut. If the rail’s guard has already been trimmed for this saw and blade, its edge can serve as the cut-line indicator. If it has not, use your measured layout line and leave room to trim the guard safely before cutting the finished workpiece.
- Place the rail. Set the rail so its cut edge follows the intended cut, checking the alignment at both ends and at any intermediate reference marks. Remember that the guide edge, not the far edge of the rail, is the reference.
- Secure the rail as directed. DEWALT’s manual specifically instructs users to clamp the rail. Use the clamping or hold-down method approved for your rail; do not rely on hand pressure while the saw is moving. Recheck that clamps will not interfere with the saw base or motor.
- Inspect the saw’s seating. Set the saw on the rail and confirm that the anti-slip surfaces and guide ribs are engaged as the manual describes. Move the saw a short distance with the motor off to verify that it travels freely and cannot lift or twist away from the rail.
- Bed in a new or replacement guard. If the strip is untrimmed, damaged or no longer matches the current blade, follow the exact trimming procedure for your model before making the final cut. The guard must be cut in a controlled pass on a suitable supporting surface.
- Select the blade. Match the blade to the material and saw. DEWALT’s DWS520CK documentation recommends a fine-tooth blade for plywood; that is a material-specific recommendation, not a universal tooth-count rule for every panel, solid wood or saw.
- Make the cut. Keep the saw fully seated on the rail, operate it according to its manual and maintain a steady feed that does not force the blade. Use the saw’s supplied safety systems as intended; the cited DEWALT kit includes a riving knife and continuous anti-kickback mechanism.
- Inspect the edge. After the saw stops, examine the top and bottom faces and the full length of the cut. If chips remain, diagnose the guard, blade, rail security and material support before changing several variables at once.
How to trim a splinter guard without misaligning it
Trimming is not a universal setup step with one safe depth. The correct depth, speed and sequence depend on the saw and rail. Read the supplemental or operating manual for your exact model and use its dimensions only.
Example: the cited Festool TS 55 procedure
Festool’s TS 55 supplemental instructions describe a shallow trimming setup of approximately 6–7 mm, with about half a tooth entering the strip, followed by one smooth, continuous pass. The rail must be positioned so the guard can be cut without damaging the supporting surface. This 6–7 mm setting belongs to that procedure; it is not a recommendation for every track saw.
Rank #2

- Premium Home Improvement Tools: Universal compatibility fits most circular saws in the market with blades up to 7-1/4”
- Multiple Length Settings: Cuts 50” out of the box, or extends to any length required with optional GuideRail extensions to rip entire sheets
- Sturdy Woodworking Tools: All-metal construction Increases rigidity and reduces the flex for a more accurate cut
- Versatile Carpentry Tools: The low profile lets you cut over 1-3/4" deep - enough to cut through common interior door thickness
- Straight-Edge Guide: The red cutting-strip acts as a guide and helps reduce splintering and chipping
- Set the saw to the shallow trimming depth specified in the TS 55 instructions.
- Place the rail on a surface that supports it while allowing the guard to be trimmed safely.
- Confirm that the blade and guard are the listed combination and that the saw is fully engaged with the rail.
- Start the saw as directed, then make the single smooth pass described by the manual. Do not stop partway through and restart on the strip unless the instructions specifically allow it.
- Switch off, wait for the blade to stop and inspect the new guard edge. It should follow the blade path continuously without torn sections.
Other systems may specify a different depth, tooth position or trimming method. Never copy this example to another brand or model simply because the rail looks similar. A guard that is cut too deeply can be weakened; one that is not cut far enough will not show the true blade line.
Why the guard reduces splintering—and what it cannot do
During a cut, teeth on the upper part of the blade move upward toward the top face of the panel. A close-fitting guard supports that top edge immediately beside the kerf, reducing the distance in which fibers can lift before they are severed. The guard also makes the blade’s actual path visible, which helps you place the rail accurately.
The effect is limited by the rest of the setup. A damaged or lifted strip leaves a gap. A blade with the wrong geometry or a dull edge can tear fibers before the guard can restrain them. Excessive feed force, vibration, an unsecured rail or unsupported material can also spoil the edge. The manufacturer descriptions establish these operating principles, but they do not promise a perfect edge for every species, veneer, laminate or cutting direction.
Choosing the blade for the material
Plywood and veneered panels
For plywood, the DEWALT kit manual recommends a fine-tooth blade. Use that guidance with the saw’s approved diameter, arbor and kerf limits. A fine-tooth finish blade can be appropriate for a clean face cut, but the correct tooth design still depends on the panel construction and the saw’s specifications.
Rank #3
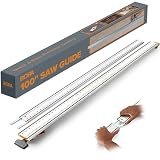
- 100 Inch Circular Saw Guide Rail: Professional track saw guide rail system combines 50 inch clamp edge and 50 inch extension; delivers precise straight edge cuts on plywood and large sheet materials with any circular saw
- Built-In T-Track System: Integrated dual T tracks transform this saw guide into a versatile workbench accessory; clamp edge saw guide adds instant functionality for routers, jigsaws and other circular saw accessories
- Quick Lock Clamp Technology: Ergonomic clamp handle provides one-sided adjustability for fast setup; straight edge clamp secures tightly to materials without movement, saving time on every cut with reliable grip
- Heavy-Duty Aluminum Construction: Rigid straight edge tool crafted from thick aluminum ensures your saw track stays perfectly straight; this cutting guide for circular saw delivers stable, consistent results on any project
- Universal Compatibility Kit: Complete saw guide rail for circular saw works with all brands; bora track saw guide includes connectors and large locking handles; perfect straight cut guide for woodworking and remodeling
When changing blades
Changing kerf changes the relationship between the teeth and the guard. Before a production cut, verify that the existing guard still coincides with the new blade path. Festool’s rail-guard listing advises replacing the guard when switching between kerf blades for best results. If your model’s manual calls for a new strip or a new trimming pass, follow that instruction rather than trying to widen the old opening.
Blade condition
Inspect the teeth for damage and check that the blade is mounted correctly. A worn blade increases resistance and can encourage a rough, wandering feed. Replace a blade that is damaged or no longer suitable for the material instead of compensating by pushing harder.
Rail alignment and securing details that prevent drift
Measure from the finished edge you need, then account for the position of the saw’s guide edge and the kerf. Make a short reference mark near each end of a long cut so a small angular error is visible before you clamp the rail. Sight along the guide edge and confirm that it touches the intended line at both ends.
Recommended Free Tools
Clamp the rail where the manual allows, keeping clamps clear of the saw’s travel. On rails designed for clamps, tighten them enough to prevent movement but do not distort the rail. If the manufacturer relies on high-friction strips or another hold-down system, clean those surfaces and use the specified method. A rail that shifts after the cut begins will produce a straight-looking edge in the wrong place.
Rank #4

- Ultimate Compatibility & System Integration: This 110-inch track saw guide rail is engineered as a direct replacement for Makita. 194368-5. It is fully compatible with Makita. XPS01, XPS02, DSP600, DSP601, and SP6000 track saws. Our design ensures seamless docking with major Makita. accessories, including the parallel guide and standard handle clamps, allowing you to instantly expand your existing track saw system with confidence support
- Flawless Finish: Achieve professional-grade edges on every pass. The integrated SM Splinter Guard works to prevent material tear-out on delicate sheet goods, including melamine and veneer, saving valuable time on finishing work. The splinter guard is securely pre-installed at the factory, requiring no additional setup on your part. This feature ensures precise, clean cuts in any application, giving your woodworking projects a polished, expert look
- 110-Inch Long-Cut Solution: The 110" Guide Rail set contains two robust 55-inch saw tracks and a connector kit that includes two 13.4-inch connectors, enabling you to quickly and securely join the tracks for extra-long cuts over 9 feet. The extruded aluminum construction ensures the entire guide rail system maintains rigidity and remains resistant to bending or deformation under heavy use
- Optimized for Smooth & Stable Operation: Experience superior control and protection with the integrated design features. Dual anti-friction strips along the rail's front edge facilitate effortless, snag-free saw movement, while also safeguarding your power tools and workpiece surface. This enhanced stability is critical for ensuring repeatable, high-accuracy results on large projects
- Purchase with Confidence – 2-Year Warranty: We stand by the longevity and craftsmanship of this track saw guide rail. We provide an extended two-year warranty and dedicated customer support. If you have any questions, please contact us and we will respond within 24 hours
For a long panel, check the rail again after the saw is placed on it. The saw’s weight can reveal a section that was not fully supported. If the panel flexes, add support under the workpiece in a way that does not pinch the blade or allow the cut-off piece to fall and twist.
Independent reader supportYour contribution helps us test, update, and keep practical guides available for everyone.Diagnosing chips, tear-out and an uneven line
| Observed problem | Checks to make | Corrective action |
|---|---|---|
| Chips along the top edge | Guard is untrimmed, worn, lifted or cut for another blade; blade is unsuitable or dull. | Re-trim or replace the guard using the exact model procedure, then fit a sharp material-appropriate blade. |
| Cut line is straight but in the wrong place | Rail’s guide edge was not placed on the layout line, or the kerf side was misread. | Re-measure from the required finished edge and align the rail’s cut edge at both ends before clamping. |
| Line wanders or the rail moves | Rail was not secured as directed, debris is under it, or the saw is not fully seated. | Stop, clean the contact surfaces, verify seating and secure the rail with the approved method. |
| Chipping begins after changing blades | New kerf no longer matches the guard opening. | Check the model instructions; replace or re-bed the guard if required for that kerf. |
| Rough edge despite a sound guard | Blade condition or material-specific blade choice; unsupported or pinched workpiece; excessive feed force. | Use the approved sharp blade, improve support and maintain the controlled feed specified by the manual. |
Change one factor at a time when troubleshooting. Otherwise you cannot tell whether the improvement came from the blade, guard, rail position or support arrangement.
Published specifications and compatibility examples
| System or component | Documented details | How to use the detail |
|---|---|---|
| DEWALT DWS5023 rail | 102-inch, dual-edged TrackSaw rail; described as a zero-clearance system for precise, straight cuts. | Its length can cover long panel cuts, but the saw must be compatible and the rail must still be secured as directed. |
| DEWALT DWS520CK kit | 6-1/2-inch saw; 59-inch and 102-inch rails; 48-tooth finishing blade; on-track depth of 2-1/8 inches at 90 degrees and 1-5/8 inches at 45 degrees. | These capacities apply to that kit, not to track saws generally. Verify depth at the selected angle before cutting. |
| Festool SP-TS 55 R/5 guard | Listed for specified TS 55 and TSC 55 models; the listing advises replacing the guard when switching between kerf blades for best results. | Check the exact saw generation, rail and kerf before ordering or installing it. |
Maintenance and replacement decisions
Keep the rail’s guide and anti-slip surfaces free of dust and resin so the saw can seat consistently. Inspect the guard before each important cut. Replace it when it is worn, torn, curled, detached or no longer lines up with the current blade. A replacement strip is not interchangeable merely because it has the same apparent width; confirm the part number and model fit.
When storing a rail, protect its edge from impact. A dent or bend can change alignment over the full cut length. Store the saw and blades so teeth cannot be struck, and recheck the guard after transporting the equipment or changing the blade.
Safety boundaries for this method
- Use the saw only as described in its current manual and keep its guards and anti-kickback features installed.
- Clamp or secure the rail as the manufacturer directs; never depend on a hand holding the rail in place.
- Check that the blade is stopped before lifting the saw from the rail or inspecting the cut.
- Keep the trimming pass on a suitable support and away from anything the blade could damage.
- Do not treat the example trimming depth as a universal setting, and do not assume a guard from another system will fit.
Manufacturer manuals and product pages are authoritative for their own equipment, but they are not independent comparative tests. There is no universal tooth count, trimming depth or splinter-free guarantee that applies to every track saw and material. Verify current parts, dimensions and compatibility before purchase or setup.
A practical pre-cut checklist
- Exact saw, rail, guard and blade models identified.
- Guard condition and kerf compatibility verified.
- Blade sharp, undamaged and suited to the material.
- Cut line measured from the required finished edge.
- Rail’s guide edge aligned to the line at both ends.
- Rail secured by the approved clamping or hold-down method.
- Saw travels freely and remains seated on the rail.
- Workpiece supported without pinching the blade or cut-off.
- Safety features installed and operating as described in the manual.
With those checks complete, the process is repeatable: the rail controls direction, the trimmed guard supports the top fibers and marks the blade path, and the correct sharp blade does the cutting. If the edge is still damaged, return to those three elements and the workpiece support instead of forcing the saw through the cut.
Quick Recap
Product prices and availability are accurate as of the date/time indicated and are subject to change. Any price and availability information displayed on Amazon at the time of purchase will apply.

