The most effective accessible renovation starts with the resident’s daily routes, not a generic product list. Walk from the entrance to the bedroom, bathroom and kitchen; identify where the person trips, reaches, transfers, turns or needs help; then fold the highest-priority changes into planned repairs. HUD guidance supports making modifications gradually during ordinary maintenance or as part of a larger remodel, ideally before a fall or injury creates an urgent need.
Use the home’s structure, the resident’s current and anticipated abilities, the project budget and the household’s expected length of stay to decide what to do now, what to prepare for later and what requires specialist advice.
As an Amazon Associate I earn from qualifying purchases.
1. Start with the person, the routes and the renovation plan
Accessibility is individual. A person who uses a wheelchair has different priorities from someone who has limited balance, reduced vision, arthritis, hearing loss or temporary mobility restrictions. The same feature can help one resident and hinder another if it is placed incorrectly or installed without considering reach, transfer direction and available maneuvering space.
Do these 3 things before closing this tab:
1Clear out junk files and repair common Windows errors2Scan for outdated or missing drivers - takes under a minute3Repair Windows errors before they cause bigger problemsHUD identifies cost, home condition and design, and long-term plans as central decision factors. Ask what the resident does every day, what is difficult now and what may change over the next several years. Someone planning to remain in the home may justify structural preparation that is unnecessary for a short stay; someone recovering from surgery may need a removable solution rather than a permanent alteration.
#1 Best Overall

- Matters need Attention: Only suitable for tiles measuring 4×4 inches or larger. For the safety of the seniors and elderly, please pay attention that the suction grab bars for shower ONLY sticks on smooth and non-porous AIRTIGHT walls which are NOT air-permeable like metal, glass, tile, marble, stainless steel and acrylic but does NOT apply on uneven tile, unfinished marble, wallpaper, dry wall, porous wall, painted wall, etc. Please don't put all the body weight on the shower grip
- Easy for Installation: Each suction cup shower handle equips 2 Strong suction cups with locking latches to provide stable protection. The bathtub hand rafully removable, reusable and causing no damage to your wall
- Safety to Users: Each shower bars safety is fabricated with an Anti-Slip Strip on top of the handrail, which creates strong friction to better keep your hands ON the grab bar. On the bottom of the grip covers the curved wave design which is suitable for fingers, giving you double protection to guarantee safety and security. The safety shower bars for elderly is able to support up to 240 LBS heavy duty EACH and also waterproof, staying sturdy and stable
- Multiple Applications: Many people in daily life need help keeping balance when standing up and walking. Yet we couldn't be there help them all the time. But this shower bar for bathroom can easily provide them safe, effective and convenient help! The grab bars for bathtub and shower is suitable to install in Bathroom, Bathtub, Shower, Toilet and Kitchen to offer assistance getting up for elderly & seniors, pregnant women, kids, injured, handicapped and the people who have trouble in mobility
- Warm-hearted Service: If any of the TAILI shower grip product did not meet your requirements, simply contact us and we will help to solve it. If problems when firstly installation, please wash the suction cup, dry it with hair dryer and test it on the smooth glass surface. If suction holds, that means initial wall might not applicable for using suction cup, please change installation location
Walk the routes before selecting products
Make the first assessment a slow walk through the actual paths the resident uses. Include the front approach, entry door, hallways, bedroom, bathroom, kitchen, laundry area, garage or parking space and any outdoor route used for bins, mail or appointments. Observe the person moving normally rather than relying only on a verbal description.
- Where are there steps, thresholds or abrupt changes in level?
- Where does the person stop to steady themselves or ask for help?
- Can the person turn, open a door and pass through without twisting or backing up?
- Are rugs, carpet edges, cords or furniture creating trip points?
- Is lighting adequate at the top and bottom of stairs and along the route at night?
- Does the person have to reach, bend, grip or carry items while balancing?
- In the bathroom, how does the person enter the tub or shower, sit down, stand up and use the toilet?
Record the barrier, the activity it interrupts and the consequence if it is not addressed. “Bathroom unsafe” is too vague; “cannot step over the tub edge without holding the towel bar” points toward a specific design decision.
Include anticipated needs without overbuilding
Planning ahead does not mean installing every possible device. It can mean reinforcing a wall while it is open, locating electrical outlets where controls will remain reachable, or choosing a floor finish that will still work if the resident later uses a walker. A phased plan lets the household complete urgent safety work now and reserve more disruptive changes for a later stage.
2. Create a barrier-and-priority schedule
Before the contractor orders fixtures, rank the work. A useful priority is immediate fall or transfer risk first, daily-route blockages second, and convenience or future-proofing third. The order can change if a planned demolition makes a later modification inexpensive to complete at the same time.
| Priority question | What to examine | Renovation response |
|---|---|---|
| Could a person fall or become trapped? | Entry steps, stairs, wet floors, loose rugs, unstable grab points and difficult transfers | Correct the hazard or provide a stable support before cosmetic work |
| Does a daily route depend on assistance? | Door operation, narrow passages, thresholds and furniture pinch points | Improve circulation, hardware or layout during the relevant repair |
| Will the resident’s abilities change? | Expected aging, rehabilitation, progressive conditions or planned caregiving | Prepare structure and services for a later adaptation where sensible |
| What work is already scheduled? | Bathroom replacement, flooring, electrical, roofing, siding or kitchen remodeling | Coordinate access features so finished surfaces are not removed twice |
| What limits the project? | Budget, structure, drainage, utilities, property rules and permits | Obtain qualified design and code advice before committing to a detail |
Separate must-have safety work from desirable convenience work. This keeps an accessible plan intact when bids exceed the initial allowance and makes it easier to phase the project without losing the highest-value changes.
3. Coordinate accessibility with ordinary repairs
HUD describes modifications as changes that can be phased into routine repairs or incorporated into major remodeling. Use that opportunity deliberately:
- Before demolition: map routes, document measurements and identify walls, floors, ceilings and utilities that may need reinforcement or relocation.
- During design: show clear routes, door swings, fixture locations, lighting controls and support points on the drawings rather than leaving them to field decisions.
- During rough work: install blocking, conduit, outlets, switches and plumbing where the final plan requires them. Photograph concealed work for future reference.
- During finish selection: verify that flooring, thresholds, handles, controls and shower surfaces support the resident’s actual movement and reach.
- At handover: test every route with the resident, adjust hardware and confirm that instructions, shutoffs and maintenance access are usable.
A small change made while a wall is open can avoid a much larger alteration later, but only if the location is based on the resident’s transfer direction and reach. Generic blocking in an arbitrary position is not a completed accessibility solution.
4. Make the entrance and circulation safer
Approach, threshold and door
The front door is the first route to evaluate. A step-free approach may require a ramp, regraded walkway or another access strategy. HUD and the National Institute on Aging (NIA) identify ramps with handrails as an option to consider where steps prevent safe entry. The slope, landing, drainage, surface and attachment method must be designed for the site and the person’s equipment; do not select a ramp solely by its advertised length.
Rank #2

- DURABLE & SUPPORTIVE CONSTRUCTION: 24-inch long stainless steel grab bar with 1.25 inch diameter; supports up to 500 lbs when installed in a stud or when using SecureMounts (not included)
- EASY INSTALLATION: SecureMount design for easy, secure installation (sold separately) delivering safety and peace of mind
- STYLISH STAINLESS FINISH: Stainless finish delivers a lightly brushed warm gray metallic look and coordinates with other Moen bathroom accessories and hardware
- ADA COMPLIANT: Complies with Americans with Disabilities Act (ADA) specifications
- BUILT TO LAST: Corrosion-resistant, sturdy handicap grab bar backed by Moen’s Limited Lifetime Warranty
Check the threshold for a lip that catches wheels or toes. Confirm that the door can be approached, opened and held without the resident standing on an uneven surface. Lever-handled hardware can reduce the grip and twisting required compared with a round knob. Place locks, lights and doorbell controls where the resident can reach them from the approach and, if relevant, from a seated position.
Hallways and turning space
Measure the actual route with the mobility aid the resident uses. A passage that works for walking may fail when a walker, wheelchair, oxygen equipment or caregiver is present. Remove furniture pinch points, relocate shelves that protrude into the path and avoid creating a new bottleneck with a radiator, island or open door. If walls are moving, show the route and turning areas on the plan before framing begins.
Stairs, floors and lighting
NIA recommends good lighting at the top and bottom of stairs. Extend that principle to landings, corridors and the bathroom route, with controls placed where the resident enters the area. Reduce glare and shadows, and provide a night-lighting strategy that does not require crossing a dark room to reach a switch.
Remove loose area rugs or secure them firmly; NIA specifically identifies rugs and poorly fixed carpet as fall hazards. During flooring work, choose a surface that remains stable when wet, has transitions that do not catch feet or wheels and can be maintained without creating a slippery residue. A nonslip strip may help on stairs or wet surfaces, but it must be compatible with the material and installed without raised edges.
5. Design the bathroom around transfers and wet conditions
Bathrooms combine water, hard surfaces, tight turns and repeated transfers, so they often deserve the earliest detailed design work. Ask the resident to demonstrate the sequence from the doorway to the toilet, sink and bathing area. A fixture can be technically accessible yet unusable if the approach is blocked or the support is on the wrong side.
Toilet and sink area
Grab bars near the toilet can provide support during sitting and standing when their position, height and direction match the user’s movement. The wall must be capable of taking the loads, or it must be reinforced before finishes are installed. A raised toilet seat may reduce the effort of standing for some users, but it changes transfer height and can affect the relationship with nearby grab bars. Treat it as an option to assess, not an automatic requirement.
Choose faucets and controls that the resident can operate without tight pinching or twisting. Lever handles are one HUD-listed option. Keep the clear approach free of bins, towel baskets and cabinet doors that swing into the transfer area. A sink design should be evaluated for knee clearance only when the resident needs a seated approach; exposed pipes also need protection where contact could cause injury.
The Tool Desk
Outbyte Driver Updater FREEScan for outdated or missing drivers - takes under a minuteDriver Scan →Outbyte PC Repair FREERepair Windows errors before they cause bigger problemsFix Now →Tub or shower
Stepping over a tub wall is a common barrier. Depending on the resident and the structure, options may include a level-entry shower, a transfer bench, a handheld shower head, grab bars or a combination. HUD lists tub or shower transfer benches and handheld shower heads among possible modifications. NIA recommends grab bars in tubs or showers and nonslip strips on wet surfaces.
Rank #3

- Enhance Bathroom Safety: Shower grab bars for seniors enhance bathroom safety. For the elderly and those suffering with mobility issues, a grab bar makes bathing a safer experience
- Non-slip Design: Bathroom grab bars have a unique non-slip knurled surface. It provides good traction especially when gripping is difficult, or when hands are wet
- Suitable for All: This shower bar is 1 inches in diameter and fits all hand sizes. It comes in 7 lengths (12", 16", 18", 20", 24", 32" and 36") for all needs
- Sturdy and Long-lasting: Made from stainless steel, this shower bar is incredibly robust and will not rust over time. Its high load-bearing capacity ensures a safe bathroom experience for your family
- Multipurpose: The hand rails wall mounted can not only be used as bathtubs and showers to protect your safety, but also put your towels, clothes, etc
Plan support locations with the resident’s entry and exit direction. A bar used to enter is not automatically in the right place for standing, turning or adjusting clothing. A transfer bench requires enough side clearance and a stable surface; a fold-down seat needs structural attachment and a clear path when folded. A handheld shower head needs a reachable control and a holder that does not force the user to stand on a wet floor to retrieve it.
Use a slip-resistant wet-area finish and provide drainage that does not leave standing water. Confirm that the shower door, curtain, controls and shelves do not obstruct transfers. Any waterproofing, plumbing relocation or structural alteration should be detailed by an appropriately qualified professional.
6. Improve kitchen, bedroom and household controls
Kitchen
Accessibility in a kitchen is about reach, carrying and turning as much as counter height. Place frequently used items between the resident’s comfortable reach limits and avoid requiring a person to carry hot pans across a travel path. Pull-out shelves, drawers instead of low cabinets and a clear work area can reduce bending and reaching, but each feature must suit the user’s strength and mobility aid.
What’s actually slowing this PC down?
Pick the symptom - the matching free tool is one click away.
Keep controls readable and reachable. A person with limited dexterity may find lever or touch controls easier than small knobs; a person with low vision may need strong contrast and even lighting. Appliance doors and refrigerator drawers should not block the only route when open. Review the layout with the resident before cabinets are ordered because a few inches can determine whether a turn is possible.
Bedroom and nighttime route
Provide a clear path between the bed, bathroom and exit. Place switches, charging points, telephone or alert equipment and personal items where they can be reached without leaning across the bed or walking in darkness. Avoid loose mats beside the bed. If a future change in bed height or mobility aid is likely, leave enough adaptable space rather than filling the room with fixed furniture.
Handles, switches and controls
Lever-handled doorknobs and faucets are examples HUD gives for reducing grip and twisting demands. Select controls consistently throughout the home so the resident does not have to relearn each door. Mount switches, thermostats and outlets at usable heights for the resident, and check that furniture will not cover them after installation.
7. Compare modification options by fit, not by appearance
There is rarely one universally correct product. Use the following questions when comparing options during a remodel.
| Option | Barrier addressed | Questions before choosing | Coordination needed |
|---|---|---|---|
| Ramp with handrails | Steps at an entry | Can the site provide a safe route, landing, drainage and turning space? | Structure, surface, attachment and local approval |
| Grab bars | Unstable transfers near the toilet or bathing area | Where does the resident push, pull and turn, and can the wall support the load? | Blocking, waterproofing and precise installation |
| Transfer bench | Stepping into or out of a tub or shower | Is there enough side clearance and is the bench compatible with the user’s transfer? | Wet-area layout and stable, level support |
| Handheld shower head | Need to direct water while seated or standing | Can the resident reach the control and return the head without stepping on a wet surface? | Plumbing location, hose management and holder attachment |
| Lever handles | Difficulty gripping or twisting | Can the resident operate the lever with the available hand strength and reach? | Door, faucet and latch compatibility |
| Nonslip strips or flooring | Sliding on stairs or wet surfaces | Will the treatment remain secure, cleanable and flush with adjacent surfaces? | Substrate preparation and maintenance |
| Raised toilet seat | Difficulty standing from a low toilet | Does the new height improve transfer without creating a mismatch with support bars? | Toilet stability, seat attachment and surrounding clearance |
These are options to assess, not a mandatory shopping list. Fit, installation quality, compatibility and the resident’s goals matter more than the number of devices installed. No specific product model or performance result is established here.
Rank #4

- SUPERB MATERIAL: The shower grab bars for seniors is made of stainless steel which is waterproof, rustproof and Sturdy. Up to 500 pounds of pulling force, offer a stability and balance for people with trouble standing for long periods of time, and create a safe bathroom experience for your family.
- NON-SLIP AND RELIABLE: The bathroom grab bars considering that the smooth surface of stainless steel is not conducive to power assist, unique non-slip surface with a knurled surface, the anti-slip function works well even with wet hands or in a wet bathroom.
- EASY INSTALLATION: Grab bars for wall allows for easy, secure installation at any angle with our assembly instructions, concealed screw design to allows you to cover any unsightly screw holes to keep your bathtubs and showers clean and beauty.
- WIDE USAGE APPLICATIONS: The hand rails can not only be used for bathtubs and showers to protect your safety, but also can be used along stairways, or in the kitchen, living room, bedroom, laundry room for additional fall prevention. Especially for the handicap, elderly, pregnant women, and children.
- Full CUSTOMER SATISFACTION: If you have any questions about product quality, installation issues or other issues, please contact us as soon as possible. We will reply within 24 hours and provide you with a satisfactory solution or otherwise.
8. Understand laws, codes and permits without overclaiming
The 2010 ADA Standards apply to covered government facilities and public accommodations and address accessibility in applicable alterations. They do not automatically require every feature in an ordinary privately owned home simply because the home is being renovated. The Standards also distinguish residential units that are subject to accessibility requirements from residential dwelling units that are not required to comply under the ADA or Section 504 rules.
The legal analysis can change when a property is used for public or government purposes, receives federal funding, is part of covered housing, or is governed by another federal, state or local requirement. A private homeowner should not assume that ADA language settles the design of the house, and should not assume that no rule applies.
Ask the local building department which permits and inspections apply to structural work, electrical changes, plumbing, ramps, drainage, additions and alterations to load-bearing walls. Have a qualified local professional verify attachment details, waterproofing, egress, fire safety and any property or accessibility program requirements. Official HUD, DOJ and local guidance should control project-specific decisions.
Free tools Windows power users keep installed
One-click scans. No signup required.
9. Bring the right professionals into the plan
For a complex or highly individualized project, an occupational therapist can evaluate how the resident performs transfers, reaches controls and uses mobility equipment in the actual home. HUD program materials also discuss Certified Aging-in-Place Specialists in home-modification work. Verify credentials, insurance, references and familiarity with local permitting rather than relying on a title alone.
Give the contractor a written scope that identifies the resident’s route, the intended use of each support and any required reinforcement. Ask who is responsible for structural calculations, waterproofing, electrical work, finish transitions, permits and final adjustments. The person installing a grab bar, ramp or shower should understand the loads and conditions involved, not merely attach a product to the nearest surface.
10. Avoid common renovation failures
Installing a support where it looks convenient
A bar beside the shower may be useless if the resident enters from the opposite side. Demonstrate the transfer first, then locate support points and reinforce the wall accordingly.
Making a route technically wider but practically blocked
A wider doorway does not solve access if the door swing, furniture or threshold removes the turning space. Test the complete route with the resident’s equipment.
PC Slower Than It Used to Be?
A free scan shows the junk files, broken settings and background clutter dragging Windows down - then fixes them in one click.Free scan · Windows 10 & 11Outdated Drivers Are Slowing You Down
One free scan finds every outdated or missing driver and matches the right update for your exact hardware.Free scan · exact hardware matchChoosing a slippery or hard-to-maintain finish
Glossy tile, loose mats and residue-prone treatments can reintroduce risk. Evaluate wet performance, cleaning and edge transitions together.
Best Value
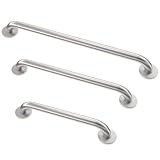
- Complete ADA Compliance Set: This 3-pack includes all essential grab bars for shower and restroom use (18”, 36”, 42”). Crafted from heavy-duty premium stainless steel with a reinforced 2MM flange, it surpasses standards, supports 600 lbs, and guarantees long-term safety for high-traffic commercial environments. ⚠️ CRITICAL: Please measure your wall space BEFORE ordering—42" bar requires approx. 44" of clear wall length.
- Maximum Durability & Lifetime Warranty: Engineered from heavy-duty premium stainless steel (1.5” OD, 18-gauge), these reliable grab bars are built for a lifetime of use. Backed by our limited lifetime warranty, they are a cost-effective investment that drastically reduces replacement needs in any setting
- Superior Support for Accessibility: Our handicap grab bars are engineered to exceed ADA and ANSI standards, offering secure 600-lb support. The versatile 12-hole mounting design ensures compliant and flexible installation on virtually any wall surface for public venues and stalls
- Professional, Hassle-Free Installation: Achieve a clean, modern look with concealed flanges and snap-on covers that hide all screws. The complete hardware kit allows for quick and easy installation of our grab bars for bathroom, making safety upgrades simple and aesthetically pleasing
- Critical Fall Prevention for Seniors: Provide dependable stability with our shower safety bars for seniors. The optimal 1.5” diameter and secure grip inspire confidence, effectively preventing slips and falls in wet bathroom conditions for aging adults and those with mobility needs
Waiting until after finishes are complete
Late decisions often lead to surface-mounted compromises, visible patching or features that cannot be securely attached. Put structural and service requirements on the drawings before walls and floors close.
Assuming a product solves a layout problem
A transfer bench cannot compensate for an obstructed approach, and a raised toilet seat cannot compensate for missing support or insufficient clearance. Fix the route first, then select equipment.
Treating code compliance as a usability test
Meeting a code requirement does not prove that the resident can use the room safely. Compliance, functional fit and personal preference are separate checks.
Quick wins for a faster PC:
Repair Windows errors before they cause bigger problemsFix Now →Scan for outdated or missing drivers - takes under a minuteDriver Scan →11. A practical renovation checklist
- Ask the resident to identify difficult activities and future concerns.
- Walk and measure every daily route, including nighttime travel and outdoor access.
- Photograph or mark steps, thresholds, rugs, poor lighting, transfer points and obstructions.
- Rank hazards, route barriers and future preparations separately.
- Coordinate the priorities with planned repairs so walls, floors and services are opened only once where possible.
- Confirm the structural attachment, drainage, electrical, plumbing and finish requirements for each proposed feature.
- Obtain local permit and code guidance before construction starts.
- Use qualified professionals for individualized assessment and specialized installation.
- Keep a record of concealed blocking, conduit and pipe locations for future adaptations.
- At completion, have the resident use every route and adjust hardware, lighting and storage before the project is closed.
12. When to phase work instead of doing everything at once
Phase the project when immediate hazards can be removed without committing to a larger layout change, when the resident’s needs are still evolving, or when budget and disruption make a single remodel impractical. Complete entry safety, lighting, loose-rug removal, stable supports and urgent bathroom risks first. During that work, prepare walls, routes and services for later changes if the preparation is justified by the home’s design and the resident’s likely needs.
Do the larger package at once when demolition already exposes the relevant structure, when the existing layout prevents safe transfers, or when postponing the work would require removing newly installed finishes. The best sequence is the one that protects the resident now while avoiding needless duplication.
Frequently Asked Questions
Do I have to make a private house ADA compliant during a renovation?
Not automatically. The ADA Standards apply to covered government facilities and public accommodations, while other housing laws and funding rules may apply to particular properties. Ask the local building department and a qualified professional about the home’s actual legal requirements.
What should I change first if my budget is limited?
Start with hazards and routes the resident uses every day: unsafe steps, poor stair lighting, loose rugs, difficult bathroom transfers, unstable supports and obstructed doorways. Coordinate later improvements with planned repairs.
Recommended Free Tools
Can I install grab bars after the bathroom renovation is finished?
Sometimes, but secure attachment depends on the wall structure and waterproofing. Locating and reinforcing support points before finishes are installed usually gives the installer more reliable options.
Should I hire an occupational therapist for a home renovation?
An occupational therapist can be useful when the resident has complex mobility, balance, strength or transfer needs. HUD materials also discuss Certified Aging-in-Place Specialists; verify credentials and local experience for the specific project.
Quick Recap
Product prices and availability are accurate as of the date/time indicated and are subject to change. Any price and availability information displayed on Amazon at the time of purchase will apply.

