Shred the leaves before you spread them, apply a loose and even layer, and water the mulch after installation. Whole leaves are light enough to move in dry wind, yet they can lock together into a wet sheet that slows water and air movement. Shredded leaves interlock less dramatically, settle better, and decompose faster. A lawn mower is usually sufficient; a dedicated leaf shredder is optional. The right depth depends on the planting, the leaf texture, and local conditions, so avoid treating one number as a rule for every bed.
Why leaf mulch blows away or mats down
Dry, whole leaves are easy for wind to lift
Intact leaves have broad surfaces and little weight. When they are spread loosely over bare soil, gusts can slide or lift them, leaving thin spots and exposed ground. The problem is most noticeable in open beds, newly cleared areas, and locations that receive steady wind from a driveway, field, or building gap.
As an Amazon Associate I earn from qualifying purchases.
Oregon State University Extension and the University of Maine Cooperative Extension both identify shredding as a way to make leaf mulch less likely to blow away. Shredded pieces are smaller, settle into the surface, and are less easily caught as individual “sails.” (Oregon State University Extension Service, October 2026; University of Maine Cooperative Extension, November 15, 2021)
Recommended Free Tools
Wet whole leaves can form a continuous mat
Rain and irrigation make intact leaves cling to one another. As the layer settles, overlapping leaves can create a dense sheet instead of a porous mulch. Virginia Cooperative Extension warns that this type of mulch mat can interfere with water movement; the practical concern is that water may run across or pool above the layer rather than moving evenly into the soil. (Virginia Cooperative Extension, 2025)
#1 Best Overall

- Powerful AC electric 13 Amp - 8000 RPM motor with adjustable settings for dry and wet leaves
- Shred 12 bags of leaves to 1, reduce the number of bags you have to haul to the curb or recycling center saving you time, energy, and money
- No-tools quick-change line replacement gets the job done faster, uses standard . 095-in trimmer line
- Individually adjustable legs allow leveling on all terrain for safe and stable operation
- Attached bungee cord bag clamp adapts to both paper and plastic waste bags
Shredding reduces the size and continuity of the pieces, which helps prevent a single wet layer from forming. It also speeds decomposition compared with leaving large, whole leaves in place, according to Oregon State and Maine Extension.
Shred leaves before they reach the bed
Use a mower when you already have one
A lawn mower can process fallen leaves into mulch, so buying a separate machine is not required. Oregon State Extension specifically lists mowing as a practical way to shred leaves, and Maine Extension likewise recommends shredding with a mower or leaf shredder. (Oregon State University Extension Service; University of Maine Cooperative Extension)
Collect the shredded material or direct it into the intended bed, depending on your mower and layout. The objective is a consistently chopped material rather than a mixture dominated by large, intact leaves. If some large leaves remain, run them through the mower again or remove them from the finished layer.
When a dedicated leaf shredder makes sense
A leaf shredder is an optional tool for people who process large volumes away from the lawn, do not want to use a mower, or need a repeatable shredding station. The extension guidance supports the category, not a particular brand, model, capacity, or performance claim. Choose one only for a workflow that a mower cannot handle conveniently.
Whether you use a mower or a shredder, inspect the output before spreading. A uniform texture is easier to distribute evenly and less likely to leave large pieces that bridge over the soil and start a wet sheet. Do not buy a machine solely because a product listing promises a particular reduction ratio; the important result for this job is a loose, consistently chopped material.
Choose a layer depth without creating a dense mat
There is no single depth that applies to every leaf bed. Recommendations differ by material, plant setting, and the purpose of the application. The common instruction is to cover and protect the soil while keeping the layer loose enough for water and air to move.
| Source | Setting or material | Published guidance | How to use it |
|---|---|---|---|
| Iowa State University Extension and Outreach | General garden mulch | 2–4 inches | General context, not a universal leaf-only rule. |
| Penn State Extension | Shredded leaves around trees, shrubs, or perennial beds | 2–4 inches | Applies specifically to shredded leaf mulch in these plantings. |
| University of California Agriculture and Natural Resources | Grass clippings or shredded leaves | Do not exceed 2 inches | Its warning focuses on matting and restricted water and air around roots. |
| University of Maine Cooperative Extension | Leaves used in a winter garden | 3–4 inches | Seasonal guidance for winter protection; do not transfer it automatically to every bed. |
Use the recommendation that matches your bed and leaf texture, then adjust the material so it remains loose rather than compressed. A fine, damp product needs more caution than a coarse, airy one. If your local Extension office publishes a regional recommendation, give it priority because climate, rainfall, and winter conditions affect how quickly a layer stays wet and settles.
Quick wins for a faster PC:
Repair Windows errors before they cause bigger problemsFix Now →Fix the driver behind crashes, sound loss and screen glitchesFind Drivers →How to judge depth in an irregular bed
Measure in several places instead of judging the deepest spot. Pull the material aside with a hand trowel or your fingers and compare the average layer over the soil, not the height of a ridge beside a plant. A layer can look moderate at the edge while being much deeper in a hollow or around edging. Level those hollows before deciding whether more mulch is needed.
Depth is also likely to change after the first rain. Shredded leaves settle as air spaces collapse, but that does not automatically mean you should add another thick layer. Recheck for bare patches and compacted areas, then redistribute what is already present. Adding material to a wet, compressed surface can create the very sheet you are trying to prevent.
Rank #2
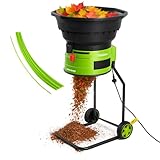
- BRILLIANTLY BLADELESS: No dangerous blades here, shred and mulch leaves using the extra strong 10 gauge nylon cutting lines. Easily change cutting lines without tools for super simple maintenance, with 20 additional lines included.
- INCREDIBLE SIZE REDUCTION: With an 18:1 reduction ratio, the bladeless shredder significantly reduces the size of your garden waste to be more manageable and useful. Spread the nutrient rich mulch on flower beds and lawns for ultimate convenience.
- POWER & PERFORMANCE: The 15Amp motor delivers a market leading 9,000RPM for superior cutting performance. Process 55 gallons of debris per minute to make your garden work fast and efficient.
- CUSTOM CONTROLS: Toggle through the cutting modes for different types of debris and mulch requirements. From Pine Needles, to Wet Leaves and Grass, there’s a setting perfect for the job.
- LIGHT & PORTABLE: The sturdy frame features 2 robust wheels for easy transportation and storage. Don’t be fooled by the 18lbs lightweight design, the bladeless shredder is made from durable ABS plastic – the same stuff as football pads!
Apply leaf mulch so it stays put
1. Prepare the area
Clear obvious whole leaves, trash, and material that could prevent the mulch from contacting the soil. You do not need a perfectly bare surface, but the bed should be free of thick piles that would become a second, unshredded layer beneath the processed mulch.
2. Spread a loose, even layer
Distribute the shredded leaves across the bed rather than making a deep ridge in one location. Oregon State Extension advises using enough material to cover and protect the soil without creating a dense mat. Check the surface from several angles: bare patches invite wind to expose soil, while compressed piles are more likely to stay wet and restrict movement of water and air.
Outdated Drivers Are Slowing You Down
One free scan finds every outdated or missing driver and matches the right update for your exact hardware.Free scan · exact hardware matchWindows Errors? Fix Them Before They Spread
Repair common Windows errors and clear accumulated junk for a smoother, more stable PC - no reinstall needed.Free scan · no reinstall3. Keep the layer continuous but not packed
Fill gaps around plants, but do not tamp the mulch down. A light, even surface is more stable than scattered handfuls and less prone to developing a thick wet seam where material has been pushed together. If a rake creates ridges, brush them flat before watering.
4. Water after application
Penn State Extension recommends watering leaf mulch after it is applied to help it settle and stay in place. Use enough water to settle the pieces without washing them into a pile or exposing the soil. This step is particularly useful when the material is very dry or the bed is in a windy location. (Penn State Extension)
5. Inspect after the first wind or heavy rain
Look for bare areas, windrows, and places where leaves have fused into a sheet. Move material from piles to thin spots, break apart any compacted surface, and repeat the settling step if necessary. Treat the first inspection as an adjustment to your site rather than proof that one depth works everywhere.
6. Work in manageable sections
On a large bed, process and spread one section at a time. A staged approach keeps shredded leaves from sitting in a loose heap where wind can scatter them before they are placed. It also lets you compare how the material behaves in a sheltered corner versus an exposed edge and adjust the application before finishing the whole area.
What’s actually slowing this PC down?
Pick the symptom - the matching free tool is one click away.
What to do when leaves still move
If the surface scatters in dry weather
- Check whether the layer contains many whole leaves. Process those leaves before adding more material.
- Look for uneven distribution. Wind concentrates loose material at bed edges and behind plants, so redistribute those accumulations instead of adding another thick layer.
- Confirm that the mulch was watered after installation, as Penn State recommends for helping it settle.
- For a persistently exposed site, make a site-specific adjustment only after correcting shredding, coverage, and settling. A heavier cover may seem practical, but the extension sources reviewed here do not validate a universal “add more weight” prescription for leaf mulch.
If leaves form a wet sheet
- Lift or rake apart the matted section so water can reach the soil.
- Remove large intact leaves and replace them with shredded material.
- Reduce any area that is visibly dense, using the matching depth guidance in the table rather than adding more on top.
- Check whether water is pooling because the mulch was pushed against a slope, edging, or plant crown; redistribute it into a level, loose layer.
If rain exposes soil in channels
Rain can move loose material even when ordinary wind does not. Re-level the mulch after the storm and address the cause of the channel. Do not solve a washout by building a deep berm of leaves, because a concentrated pile is more likely to mat than a thin, even cover.
If only one part of the bed fails
A localized problem usually points to a localized condition: a wind tunnel between structures, a low place that stays wet, or an edge where runoff enters. Correct that section rather than changing the depth everywhere. Break up the pile, move it back onto thin areas, and check whether the surface is level enough for water to spread rather than collect.
Keep mulch away from stems and trunks
Do not pile leaf mulch directly against tree trunks, shrub stems, or the crowns of perennials. Virginia Cooperative Extension cautions that mulch touching stems or trunks can contribute to rot and fungal problems. Leave a visible gap around each plant base and keep the material spread over the surrounding soil instead. (Virginia Cooperative Extension, 2025)
Rank #3

- 【POWERFUL】: Leaf shredder with a 15 amp motor that spins at 8,200 rpm can shred up to 55 gallons of leaves per minute, making your garden work fast and efficient.
- 【BLADE-FREE DESIGN】: The leaf shredder uses a nylon cutting line to shred leaves and weed control. Maintenance is super simple as the cutting line can be easily replaced without tools. Comes with 20 extra cutting lines.Line diameter is: 0.098"x 12.59" (0.25 cm x 32cm)
- 【MORE EFFICIENT DISPOSAL】: With a 17:1 mulching ratio, the bladeless Leaf Crusher dramatically reduces the size of your garden waste, making it easier to manage and use.
- 【ADJUSTABLE CONTROL DIAL】: The control dial switches cutting modes for different types of debris and mulch requirements. From pine needles to wet leaves and grass, there is a setting that is best suited. Note: This product is not suitable for use with highly resilient objects such as melons, fruits, or grass roots.
- 【LIGHTWEIGHT AND PORTABLE】: The leaf crusher can be disassembled and is not heavy itself, making it easy to store, and the product is equipped with two sturdy wheels for easy transportation.
This separation also makes inspection easier: you can see whether moisture is collecting at the plant base and remove stray leaves before they become a compact collar. When raking after a storm, pull leaves away from crowns and bark rather than scraping them into the gap.
How to decide between a mower and a leaf shredder
| Situation | Practical choice | Reason |
|---|---|---|
| You already own a suitable mower and leaves are on or near the lawn | Shred with the mower | Extension guidance identifies mowing as an effective way to process leaves without buying another machine. |
| You process leaves in a separate collection area | Consider a leaf shredder | It can provide a dedicated workflow, but no particular model or performance level is established here. |
| You have only a small amount of leaf material | Use the simplest available method | The equipment should match the volume; a dedicated tool is optional, not a requirement. |
| You are choosing a tool solely to prevent wind loss | Prioritize shredding and application technique | Tool ownership alone does not prevent blowing or matting; the finished mulch must still be evenly spread and settled. |
Search terms such as leaf shredder, mulching lawn mower, and shred leaves with a mower describe the relevant equipment categories. Treat manufacturer claims about capacity or reduction ratios as separate product information; the extension recommendations establish the value of shredding, not a tested specification for any particular machine.
If you are comparing equipment, first estimate where the leaves will be collected and how often you will process them. A mower is the straightforward choice when the leaves are already on mowable ground. A dedicated shredder may be convenient when leaves arrive in bags or a remote pile, but convenience is the justification—not a guarantee that the resulting mulch will stay put without proper spreading and watering.
Adjust the method for the season and planting
Perennial beds and mixed borders
Use shredded material and keep it loose around perennial crowns. The Penn State range for shredded leaves in perennial beds is one context-specific reference, while the University of California guidance is more conservative for shredded leaves because of matting concerns. Select the approach that fits your local conditions and the texture of your material.
Trees and shrubs
Shredded leaves can be used around trees and shrubs within the Penn State context, but maintain the stem and trunk gap described above. Avoid creating a volcano-shaped pile that directs moisture toward bark.
Do these 3 things before closing this tab:
1Repair Windows errors before they cause bigger problems2Fix the driver behind crashes, sound loss and screen glitches3Clear out junk files and repair common Windows errorsWinter protection
Maine Extension describes a 3–4-inch leaf layer for a winter garden. That is seasonal guidance, not a blanket instruction for every bed or climate. Before winter, focus on shredded texture, even coverage, and a loose surface; then check the bed after storms for displacement or matting.
Areas with frequent rain or irrigation
Because wet leaves are more likely to bind together, use extra care with density in consistently damp beds. The UC Agriculture and Natural Resources warning about restricting water and air is especially relevant when the surface remains wet, so avoid exceeding its stated limit for shredded leaves or grass clippings.
Exposed versus sheltered sites
A sheltered bed may hold a properly shredded layer with little follow-up, while an open bed may need inspection after every major weather event. Do not compensate for exposure by automatically creating a thicker layer. Start with correct shredding, even coverage, and post-application watering, then make only a site-specific adjustment if the bed continues to lose material.
Independent reader supportYour contribution helps us test, update, and keep practical guides available for everyone.Common mistakes that cause blowing or matting
- Spreading whole leaves: Large, intact leaves behave like separate lightweight panels in wind and overlap into a continuous wet sheet.
- Creating a deep ridge: A pile beside edging or a plant base is denser than the surrounding mulch and dries or wets unevenly.
- Adding new material to a wet mat: The extra layer hides the problem and increases the amount of material that can restrict water and air.
- Skipping the settling water: Very dry shredded leaves can remain loose on the surface until watering helps them settle.
- Using a universal depth: The published recommendations range from no more than 2 inches in one UC context to 3–4 inches for Maine winter protection, so the setting matters.
- Covering stems or trunks: Contact with plant tissue can contribute to rot and fungal problems, according to Virginia Cooperative Extension.
A quick inspection checklist
- Texture: Are most pieces shredded rather than whole?
- Coverage: Is the soil protected without bare islands or deep ridges?
- Density: Can you see that the layer remains loose instead of forming a sheet?
- Settling: Was the mulch watered after spreading?
- Plant bases: Are stems, trunks, and perennial crowns free of piled material?
- After weather: Have you redistributed windrows and broken apart wet patches?
If all six checks pass, the main causes of blowing and matting have been addressed without relying on an unsupported universal depth or a particular piece of equipment. Continue checking after unusually strong wind or prolonged rain, since those conditions can move even well-prepared mulch.
Rank #4

- High Performance: Equipped with three 11-inch blades rotating at 4,100 RPM, this electric mulcher delivers powerful, quiet, and eco-friendly operation, ideal for efficiently shredding leaves, grass, and clippings.
- Heavy-Duty Construction: Built with a robust 15-AMP, 1800 Watt motor and durable steel housing, this mulcher easily handles branches and twigs up to 0.5 inches in diameter, ensuring long-lasting performance.
- Eco-Friendly Design: Designed with the environment in mind, featuring a powder-coated steel body, instant start switch, and overload protection, all while producing zero emissions.
- Portable and Convenient: Includes two 6-inch wheels for easy transport and is engineered for outdoor use with specific extension cord requirements; plug into a GFCI outlet for safe operation.
- Safety First: Meets rigorous safety standards; always consult the owner’s manual for proper use and extension cord guidelines to ensure safe and effective mulching.
Frequently Asked Questions
What is the best way to keep leaf mulch from blowing away?
Shred the leaves with a lawn mower or leaf shredder, spread them in a loose and even layer, and water the mulch after application to help it settle. Recheck exposed edges after strong wind and redistribute windrows rather than piling on more material.
Why does leaf mulch mat down?
Whole leaves overlap and cling together when wet, forming a dense sheet that can slow water and air movement. Shredding reduces the size and continuity of the pieces and helps the mulch decompose faster.
How deep should shredded leaf mulch be?
Use the guidance that matches the setting. Iowa State gives 2–4 inches as a general mulch range, Penn State gives 2–4 inches for shredded leaves around trees, shrubs, and perennial beds, UC Agriculture and Natural Resources says shredded leaves or grass clippings should not exceed 2 inches in its guidance, and Maine suggests 3–4 inches for a winter garden. These are context-specific recommendations, not one universal depth.
Can I use a lawn mower instead of buying a leaf shredder?
Yes. Oregon State and Maine Extension identify a mower as a practical way to shred leaves. A dedicated shredder is optional for people who process large volumes away from the lawn or prefer a separate collection workflow; no particular model is required.
The Tool Desk
Outbyte Driver Updater FREEFix the driver behind crashes, sound loss and screen glitchesFind Drivers →Outbyte PC Repair FREEClear out junk files and repair common Windows errorsFree Scan →Should I water leaf mulch after spreading it?
Yes. Penn State Extension specifically recommends watering applied leaf mulch to help it settle and stay in place. Water enough to settle the pieces without washing them into piles or exposing the soil.
Can leaf mulch touch a tree trunk or plant stem?
No. Leave a visible gap around trunks, stems, and perennial crowns. Virginia Cooperative Extension cautions that mulch touching stems or trunks can contribute to rot and fungal problems.
What should I do if leaf mulch has already formed a wet mat?
Lift or rake apart the matted section, remove large intact leaves, and redistribute the material into a thinner, loose layer using the depth guidance for your planting. Do not simply add more leaves on top of the compacted sheet.
Is a heavier layer always better for a windy location?
No universal heavier-layer remedy is established here. First correct shredding, even coverage, and post-application watering. If the site still loses material, make a cautious, site-specific adjustment and inspect it after weather rather than assuming more depth will solve the problem.
The Bottom Line
To keep leaf mulch from blowing away or matting down, shred it first, spread it evenly without packing it, and water it after installation so it settles. Match depth to the planting and local guidance—published recommendations range from no more than 2 inches in some situations to 3–4 inches for winter protection. Break up mats, redistribute windrows, and keep mulch away from stems, trunks, and perennial crowns. A mower is usually enough; a dedicated leaf shredder is optional.
Quick Recap
Product prices and availability are accurate as of the date/time indicated and are subject to change. Any price and availability information displayed on Amazon at the time of purchase will apply.

