Short answer: Choose a pumpkin variety that fits your space, plant viable seeds in full sun after frost danger has passed and the soil has warmed to about 65°F (18°C), then provide ample room, even moisture, and regular pest checks. Direct sowing is usually easiest; start indoors only when your growing season is short.
1. Choose the right pumpkin before you plant
The best pumpkin for your garden is not necessarily the largest or most impressive one on the seed rack. Choose a variety by its mature size, growth habit, days to maturity, and intended use.
As an Amazon Associate I earn from qualifying purchases.
- Vining pumpkins produce long runners and can require approximately 50–100 square feet per hill, depending on the variety and growing conditions.
- Bush or compact pumpkins are easier to fit into a smaller garden, although they still need more room than many upright vegetables.
- Miniature pumpkins generally produce smaller fruit and may be suitable for containers, small beds, or trellising only when the specific variety and support are appropriate.
- Giant pumpkins need a very large growing area and intensive management. They are not a practical choice for a small garden.
- Cooking pumpkins are bred for flavor and texture, while many jack-o’-lantern varieties are better for decoration than eating.
When buying pumpkin seeds for planting, read the packet rather than treating all pumpkins alike. Check the expected days to maturity, mature fruit size, vine length or growth habit, recommended spacing, and whether the variety is intended for carving, cooking, or both.
What’s actually slowing this PC down?
Pick the symptom - the matching free tool is one click away.
2. Pick a sunny, well-drained site
Pumpkins need full sun—ideally at least six hours of direct light daily—and fertile soil that drains well. Choose a location where the vines can spread without covering paths, climbing unwanted plants, or smothering neighboring crops.
If space is limited, start with the packet’s spacing recommendation and the variety’s growth habit. A compact pumpkin may fit in a small bed, whereas a standard vining type can quickly occupy a large part of a yard.
#1 Best Overall

- Contents: This mixture of seeds includes more than 7 varieties of Pumpkins. A blend of Jack O' Lantern, Blue Jarrahdale, Atlantic Giant, Fairytale, Small Sugar, Jack Be Little, Cumshaw Green Striped, Connecticut Fields, Cinderella, Howden & more!
- Harvest: The different varieties of pumpkins grown from this seed mixture will be ready for harvesting from 90 days to 125 days. Placing straw underneath the fruits as they mature can prevent rot.
- Note: Take note that larger seeds grow larger varieties of Pumpkins and smaller grow medium to miniature sized pumpkins. Smaller seeds produce shorter harvesting dates and vice versa.
- Quality: All seeds packaged by Seed Needs are intended for the current and the following growing seasons. All seeds are stored in a temperature controlled facility that is free of significant amounts of moisture.
- Quantity: Seed Needs offers generous quantities. You can share with friends and family, or you can save the extra seeds until the following season, if properly stored.
Improve poor soil with suitable organic matter, but do not create a soggy planting pocket. A soil test is better than guessing how much fertilizer is needed. If the test calls for fertilizer, follow its recommendation. Too much nitrogen commonly produces vigorous leaves and vines at the expense of flowers and fruit.
3. Plant only when the soil is warm
Pumpkins are warm-season crops. Wait until the danger of frost has passed and the soil has warmed to approximately 65°F (18°C) at a depth of about 2 inches. The exact planting window depends on your climate, the selected variety, and whether you want an early, autumn, or Halloween harvest.
Local frost dates are useful for planning, but they are not a universal planting rule. Check your seed packet and your local extension service, particularly if you are growing a long-season or giant variety. Cold soil can slow or prevent germination, while even a light frost can injure young pumpkin plants.
4. Direct-sow pumpkin seeds step by step
Direct sowing is usually the simplest and least disruptive method. Pumpkin roots dislike repeated disturbance, so sowing directly in the garden avoids transplant shock.
Step 1: Prepare a planting station
Clear weeds and large stones from the site. Work in suitable organic matter if the soil needs improvement, then form a small mound or planting station if that suits your soil and drainage. In heavy soil, a raised mound can help keep the seed and young roots from sitting in water.
Step 2: Sow several seeds
Plant several seeds at the spacing and depth printed on the packet. A general depth is about 1 inch, although published recommendations range roughly from 3⁄4 inch to 2 inches depending on the variety and planting system. The packet takes priority when it differs.
Seeds can be planted in a hill or station, or in a row if your garden layout allows the required vine spacing. Do not interpret “hill” as a requirement to use a tall mound; in many gardening recommendations it simply identifies a group of plants sharing a planting area.
Step 3: Keep the seedbed evenly moist
Water gently after sowing and keep the soil consistently moist while the seeds germinate. It should not remain saturated. Overwatering can deprive seeds of oxygen and encourage decay, while dry soil can interrupt germination.
Rank #2

- FOUR HEIRLOOM VARIETIES – Small Sugar, Jack O’ Lantern, Fairytale & Casper pumpkins for sweet pies, carving traditions, and fall decorating
- COOKING & STORAGE – Bake pies, roast seeds, or can pumpkin puree; dependable harvests for family meals and long-term food storage
- CARVING & hOLIDAY FUN – Grow classic orange Jack O’ Lanterns and ghost white Caspers for halloween, autumn décor, and seasonal traditions
- GROW ANYWHERE – Reliable germination in garden beds, raised planters, or containers; suitable for spring planting or fall gardening projects
- FAMILY OWNED USA SMALL BUSINESS – heirloom non-GMO seeds from Survival Garden Seeds, a trusted American brand; always open-pollinated, untreated, and quality tested for garden success
Step 4: Thin the seedlings
Once the seedlings are established, thin them to the number recommended for the variety and your spacing plan—often the strongest one or two plants per station. Cut unwanted seedlings at soil level instead of pulling them if pulling might disturb the remaining roots.
Leaving every seedling in place creates overcrowding. Dense plants compete for water and nutrients, receive less light, have poorer airflow, and are more difficult to inspect for pests and disease.
Free tools Windows power users keep installed
One-click scans. No signup required.
5. Start pumpkin seeds indoors when the season is short
Starting indoors can help when your outdoor growing season is too short for the variety to mature. It is optional in a sufficiently long, warm season and is not automatically better than direct sowing.
Sow each seed in its own pot or cell large enough to support the seedling until planting time. Use a clean container and a suitable seed-starting medium. A seed-starting tray, small pots for seedlings, sterile seed-starting mix, and a grow light for seedlings can be useful, but none is necessary if direct sowing is practical.
Indoor-starting method
- Fill individual pots or cells with moist, well-drained seed-starting medium.
- Sow the seed at the packet’s recommended depth, usually around 1 inch.
- Place the containers in a warm location with strong light. A sunny window may work, but a grow light can provide more consistent illumination.
- Keep the medium evenly moist rather than constantly wet.
- Give each seedling enough room and light so it does not become thin, stretched, or tangled with neighboring plants.
- Plan to transplant after roughly three to four weeks, when the seedlings have several true leaves and a sound root system.
Pumpkin seedlings are sensitive to root disturbance. Do not repeatedly pot them up, tease apart tangled roots, or hold them indoors far beyond their useful transplanting stage.
Harden seedlings before transplanting
Before planting outside, gradually expose indoor-grown seedlings to outdoor conditions over several days. Begin with a short period in a sheltered, shaded location, then increase outdoor exposure and light as they adjust. Protect them from strong wind and cold at first.
Quick wins for a faster PC:
Repair Windows errors before they cause bigger problemsFix Now →Scan for outdated or missing drivers - takes under a minuteDriver Scan →Transplant only after frost danger has passed and the outdoor soil is warm. Set the seedling at approximately the same depth it grew in its container, disturb the roots as little as possible, and water it in.
6. Give the vines enough room
Follow the spacing printed on the seed packet. Vining pumpkins may run many feet across the ground and can spread over paths or lawn. Compact varieties require less space, but they still need room for leaves, flowers, and airflow.
You can allow most pumpkin vines to grow along the ground. Do not assume that every pumpkin can safely grow on a trellis. Large-fruited and giant pumpkins are generally too heavy for ordinary trellises. A small-fruited variety may be trained vertically only if the support is exceptionally strong and the developing fruit is safely supported.
Rank #3

- Fruit Size: Varied seed blend produces pumpkins ranging widely from two to twenty pounds in diverse, whimsical proportions.
- Appearance: Eclectic combination of bright orange, white, and bicolored rinds in smooth, warty, round, or flattened forms.
- Best Uses: Ideal for diverse doorstep displays, colorful carving selections, festive autumn decor, and school gardens.
- Growing Tips: Plant in fertile mounds with full sun, watering evenly to support diverse growth rates across mixed plants.
- Quality - All Primrose seeds packaged by Seed Needs are intended for the current and the following growing seasons. All seeds are stored in a temperature controlled facility that is free of significant amounts of moisture.
Guide young runners away from paths and neighboring crops while they are still flexible. Avoid repeatedly moving older vines, which can damage stems and roots.
The Tool Desk
Outbyte Driver Updater FREEScan for outdated or missing drivers - takes under a minuteDriver Scan →Outbyte PC Repair FREERepair Windows errors before they cause bigger problemsFix Now →7. Water, mulch, and fertilize carefully
Water deeply and consistently
Pumpkins need reliable moisture during establishment, flowering, and fruit enlargement. The correct schedule depends on rainfall, soil type, temperature, mulch, and plant size, so there is no single watering quantity that suits every garden.
Water the soil rather than repeatedly wetting the foliage. Check the root zone before watering and adjust for rain. Large fluctuations between very dry and very wet soil can stress plants and contribute to fruit problems.
Use mulch at the right time
Mulch helps conserve moisture and suppress weeds. Apply organic mulch after the soil has warmed; putting a thick, cool layer down too early can delay soil warming. Black plastic can help warm soil and support early production, while organic mulch is useful later for moisture conservation and weed suppression.
Keep fruit from sitting in persistently wet conditions. A clean, dry surface beneath developing fruit can reduce contact with wet soil, although mulch should not be packed tightly against the crown or stem.
Recommended Free Tools
Do not overfeed
Use a soil-test-based fertility plan when possible. Excess nitrogen can encourage leaves and vines while delaying or reducing fruit production. If additional fertilizer is appropriate, follow the product label or soil-test recommendation and avoid applying more simply because the plant is large.
8. Protect young pumpkin plants
Near the edge of the frost-free season, a floating row cover, frost-protection fabric, hotcap, or simple tunnel can protect young plants from cool air and may provide some early pest protection. Covers are not a substitute for warm soil or a safe frost window, and they can overheat plants in warm weather.
Remove covers when the plants begin flowering so bees and other pollinators can reach the blossoms. If a cover must remain over flowering plants, you will need to hand-pollinate the flowers. Check covered plants regularly for heat, moisture buildup, and pests.
9. Understand pumpkin flowers and pollination
Pumpkins produce separate male and female flowers. A female flower has a small immature fruit behind it; that fruit develops only when pollen reaches the female flower. Bees normally perform this work.
Rank #4

- Name: Big Max Pumpkin | Type: Heirloom
- Size at Maturity: 100+ Pounds | Days to Maturity: 110 Days
- Light Requirement: Full Sun | Planting Time: Warm Season
- Sowing Method: Direct Sow
- Planting Depth: 1-1 1/2" | Plant Spacing: 48"
Flowers appearing without fruit can be normal early in the season because plants often produce male flowers first. If tiny fruits turn yellow and drop, poor pollination is one possibility, but stress, pests, disease, and uneven moisture can cause similar symptoms.
How to hand-pollinate a pumpkin
- Identify a newly opened female flower by the small pumpkin-shaped swelling behind it.
- Find a freshly opened male flower, which has a straight stem and no swelling behind the blossom.
- Remove the male flower’s petals or use a clean, soft brush.
- Transfer fresh pollen to the center of the female flower, covering the stigma.
- Do this early in the day, when flowers are open and pollen is fresh.
Hand pollination is an option for covered plants, isolated gardens, or gardeners who want to influence which fruit develops. It is not normally required when healthy pollinators have access to the flowers.
10. Monitor pests and diseases
Inspect pumpkins regularly, including the undersides of leaves and the stems. Common problems include squash bugs, cucumber beetles, squash vine borers, wilt diseases, powdery mildew, downy mildew, and crown or fruit rots.
- Squash bugs and cucumber beetles: Look for insects, eggs, feeding damage, and wilting. Early detection makes nonchemical control and targeted management easier.
- Squash vine borer: Inspect stems for unusual wilting, holes, or sawdust-like material. Sudden wilting is not proof of one particular pest, so inspect before treating.
- Powdery mildew: A white coating on leaves is a common symptom. Improve airflow and use disease-management guidance appropriate to your location.
- Downy mildew and wilt: Leaf symptoms and sudden wilting can have several causes. Examine the plant and consult local extension or integrated pest-management advice before choosing a treatment.
- Fruit and crown rot: Improve drainage, avoid wounds, and keep fruit and the crown from remaining in wet conditions.
Avoid overcrowding, remove severely diseased material where appropriate, and clean up vines and crop debris after harvest. Debris can shelter future pests and disease.
Do these 3 things before closing this tab:
1Fix the driver behind crashes, sound loss and screen glitches2Clear out junk files and repair common Windows errors3Scan for outdated or missing drivers - takes under a minuteThere is no universal pesticide schedule. If chemical control is necessary, use only a product labeled for pumpkins and the specific pest or disease in your jurisdiction. Follow the label exactly, including application rate, harvest interval, protective equipment, and pollinator precautions. Avoid spraying open flowers while pollinators are active unless the label specifically permits the application under stated conditions.
Independent reader supportYour contribution helps us test, update, and keep practical guides available for everyone.11. Harvest pumpkins when they are mature
Use the variety’s days-to-maturity estimate as a planning guide, but judge the actual fruit. A mature pumpkin generally has its expected mature color and a hard rind that is not easily marked with a fingernail. The stem and nearby vine may begin to dry or harden, but stem appearance alone is not a reliable harvest test.
Harvest before a hard frost if frost threatens. Cut the fruit with a sharp knife or pruner, leaving a section of stem attached. Never carry a pumpkin by its stem, especially a large one; the stem can break and create a wound that encourages decay.
Handle pumpkins gently. Bruises, cuts, and broken stems reduce storage life and provide entry points for rot.
PC Slower Than It Used to Be?
A free scan shows the junk files, broken settings and background clutter dragging Windows down - then fixes them in one click.Free scan · Windows 10 & 11Outdated Drivers Are Slowing You Down
One free scan finds every outdated or missing driver and matches the right update for your exact hardware.Free scan · exact hardware matchBest Value
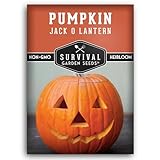
- HALLOWEEN CLASSIC – Reliable jack o'lantern pumpkin that grows 18–24 pound fruits, perfect for carving spooky faces or festive fall porch displays
- TASTY & VERSATILE – Smooth orange pumpkins that can be roasted, baked, or pureed for pies, soups, and other comforting fall recipes
- GROW WITH CONFIDENCE – Easy to cultivate in full sun with regular watering, producing uniform pumpkins ready in about 100 days
- PLANT NOW OR STORE – Seeds stay viable for multiple seasons when stored properly, so you can grow pumpkins this year or in the future
- FAMILY OWNED USA SMALL BUSINESS – Heirloom non-GMO seeds from Survival Garden Seeds, a trusted American brand; always open-pollinated, untreated, and quality tested for garden success
12. Cure and store sound pumpkins
Store only mature, healthy fruit. Do not put pumpkins with active decay, insect damage, unhealed wounds, or serious disease into storage with sound fruit.
- Brush off loose soil without damaging the rind.
- Keep the fruit in a dry, well-ventilated place protected from rain.
- Avoid piling pumpkins where trapped moisture or pressure can cause damage.
- Inspect them periodically and remove any fruit that begins to soften or rot.
Storage life varies with cultivar, maturity, temperature, humidity, and handling. Do not expect one fixed storage duration for every pumpkin.
For eating, choose a variety marketed for cooking or baking. A carving pumpkin may be attractive but have watery flesh, poor texture, or little flavor. Follow normal food-safety practices when cutting, preparing, and storing edible pumpkin.
Troubleshooting: common pumpkin-growing problems
| Symptom | Possible causes | What to check or do |
|---|---|---|
| Seeds fail to emerge | Cold soil, excess water, old or poor-quality seed, or planting too deeply | Check soil temperature, moisture, seed age, and planting depth before reseeding. |
| Seedlings collapse | Damping-off, saturated medium, poor airflow, or other water stress | Use clean containers and medium, avoid saturation, and improve airflow. |
| Many leaves but few fruits | Excess nitrogen, poor pollination, stress, or a late-maturing variety | Review fertility, observe flowers and pollinators, and maintain even moisture. |
| Tiny fruits turn yellow and drop | Poor pollination, irrigation stress, pests, or disease | Check bee access, flower timing, watering, pests, and disease; hand-pollinate if appropriate. |
| White coating appears on leaves | Powdery mildew | Improve airflow and use locally applicable disease-management guidance. |
| Vines suddenly wilt | Insect damage, wilt disease, root injury, or water stress | Inspect stems, roots, and soil before deciding how to treat the problem. |
| Fruit rots on the ground | Wet contact, wounds, poor drainage, or disease | Improve drainage, avoid injury, and keep developing and stored fruit clean and dry. |
A simple pumpkin-growing checklist
- Choose a variety that fits the available space and your intended use.
- Read the packet for mature size, days to maturity, depth, and spacing.
- Select a full-sun site with fertile, well-drained soil.
- Wait until frost danger has passed and soil is about 65°F at 2 inches deep.
- Direct-sow when conditions are suitable, or start indoors three to four weeks before transplanting.
- Thin seedlings and give vines their full recommended footprint.
- Water consistently, mulch after the soil warms, and avoid excess nitrogen.
- Protect young plants with covers when needed, but uncover them at flowering.
- Watch flowers, pollinators, leaves, stems, and fruit throughout the season.
- Harvest mature pumpkins carefully and store only sound, dry fruit.
Frequently Asked Questions
Should I start pumpkin seeds indoors or sow them directly?
Direct sowing is usually best because pumpkin roots are sensitive to disturbance. Start seeds indoors when your outdoor season may be too short for the selected variety to mature. Transplant seedlings after roughly three to four weeks, once they have several true leaves, and harden them off first.
What temperature is warm enough to plant pumpkin seeds?
Wait until frost danger has passed and the soil is approximately 65°F (18°C) at a depth of about 2 inches. The correct calendar date varies by location, cultivar, and intended harvest date.
How much space does one pumpkin plant need?
Pumpkin vines need substantially more room than many vegetables. Depending on the variety, a vining pumpkin may need approximately 50–100 square feet per hill. Compact varieties need less, so use the seed packet’s spacing recommendation.
How do I know when pumpkins are ready to harvest?
A mature pumpkin usually has its expected color and a hard rind that is not easily marked with a fingernail. The stem and nearby vine may dry or harden, but do not rely on stem appearance alone.
Do I need to hand-pollinate pumpkin flowers?
Pumpkins usually need bees or other pollinators to transfer pollen from male to female flowers. Hand-pollination is optional and is most useful when plants are covered, isolated from pollinators, or producing tiny fruits that yellow and drop.
Do these 3 things before closing this tab:
1Scan for outdated or missing drivers - takes under a minute2Repair Windows errors before they cause bigger problems3Fix the driver behind crashes, sound loss and screen glitchesThe Bottom Line
To grow pumpkins successfully from seed, match the variety to your available space, sow into warm soil after frost danger has passed, provide full sun and consistent moisture, and leave enough room for the vines. Direct sowing is usually simplest; indoor starting is useful only when a short season makes extra growing time worthwhile.
Quick Recap
Product prices and availability are accurate as of the date/time indicated and are subject to change. Any price and availability information displayed on Amazon at the time of purchase will apply.

