The safest way to drill without damage is to avoid drilling when the load and surface allow it. If a hole is necessary, inspect the area, identify the wall material, scan for likely studs and concealed services, select a compatible fastener, limit the depth, and stop whenever the material or tool behaves unexpectedly. No detector makes a wall automatically safe, and no drilling method guarantees a perfect surface. The goal is controlled, minimal damage combined with sensible electrical, plumbing, and structural precautions.
First decide whether you need a hole
For lightweight pictures, small decorations, and some organizers, a no-drill mounting method may be the best form of damage prevention. Removable picture-hanging strips, such as 3M Command-style systems, are designed to attach without tools and to come off by slowly stretching the strip downward rather than levering it away from the wall.
That does not mean adhesive hanging is universally damage-free. Check the specific product’s instructions for:
As an Amazon Associate I earn from qualifying purchases.
- the wall surface it permits, such as a sound, suitably painted interior surface;
- the maximum weight and picture size;
- the number of strip pairs required;
- whether the product is intended for indoor use;
- how long to wait after painting, repair, or installation; and
- excluded surfaces, which may include wallpaper, weak paint, textured finishes, delicate surfaces, or damp areas.
Clean the surface exactly as directed, use the prescribed number of pairs, and respect the stated waiting period. Adhesive strips are not an appropriate substitute for structural fastening for shelves, cabinets, televisions, grab bars, ceiling-mounted objects, large mirrors, or anything whose failure could injure someone or cause substantial damage.
If the object is heavy, dynamic, safety-critical, or valuable, treat a proper mechanical fixing as the starting point. A small, well-controlled hole is preferable to an adhesive failure that drops the load—or to repeatedly adding adhesive until the surface is damaged.
#1 Best Overall

- 【Power Drill Set】This power drill are perfect for DIY and home repairs
- 【20 V Electric Drill】This electric drill cordless has two Variable Speed (0-350/0-1350 rpm) and 18+1 torque settings
- 【Battery Drill Cordless】This cordless drill with battery and charger, 20 V 1.5 AH lithium-ion battery
- 【Compact Drill Design】The electric drill cordless is 2.5 pounds, power drills allow for easier protability
- 【Drill with Drill Bits】This drill set include 1*20 V Cordless Drill; 1*1.5 AH Battery; 1*Charger; 10*Bits(SL3-SL4-SL5-SL6-SL7-PHO-PH1-PH2-PH2); 1*Magneitc Bits Holder(60 mm); 10*Screwdriver Bits;
What can be hidden behind a wall?
A wall can contain electrical cables, plumbing, heating pipes, metal framing, ductwork, or protective metal plates installed to prevent fasteners from reaching a cable or pipe. The visible position of an outlet or switch is useful information, but it does not map every cable route. A stud is also not a guarantee of safety: services can pass through or alongside framing members.
Before touching the drill, examine both sides of the wall if possible. Look for:
Quick wins for a faster PC:
Scan for outdated or missing drivers - takes under a minuteDriver Scan →Repair Windows errors before they cause bigger problemsFix Now →Fix the driver behind crashes, sound loss and screen glitchesFind Drivers →- outlets, switches, thermostats, light fittings, and other electrical points;
- sinks, toilets, radiators, boilers, water heaters, and plumbing fixtures;
- vents, ducts, pipes, cable-entry points, and visible service routes;
- the same location in an adjoining room, cupboard, loft, basement, or utility space; and
- construction drawings or photographs taken before the wall was closed.
Keep the proposed hole away from obvious service routes. If you cannot establish a reasonably clear route—or if the work is in a high-risk area such as a bathroom, kitchen, utility room, or near a consumer unit—change the fixing location or ask a qualified professional to assess it.
Use a scanner as one source of evidence, not permission to drill
A basic stud finder may identify changes at the edges of timber studs and may provide a live-AC warning. A more capable wall scanner or multifunction stud finder may combine modes for wood, metal, live wiring, and, depending on the model, plastic pipes or depth estimates. Capabilities vary substantially, so read the manual for the exact tool rather than assuming that a more expensive-looking scanner detects every service.
wall scanners sense changes in density, material, or electrical fields. That means they can report objects that are not the object you expected, and they can miss difficult targets. AC detection may not reliably identify shielded, inactive, unusually positioned, very deep, or otherwise difficult wiring. Use the manufacturer’s calibration, scanning direction, and warning limitations.
A conservative scanning routine
- Choose a dry, accessible surface. Remove anything that prevents the scanner from sitting flat. Follow the tool’s instructions about wallpaper, foil-backed materials, dampness, and surface irregularities.
- Calibrate where instructed. Some tools calibrate when placed against the wall; others require a particular start position or mode. Incorrect calibration can produce misleading results.
- Keep the scanner flat and move it steadily. Do not tilt it over a textured surface or lift one edge while scanning.
- Scan from both directions. When locating a stud, mark the point where the signal begins from the left and again where it begins from the right. The approximate center between the two edges is more useful than either edge alone.
- Use the relevant modes separately. A deep scan, metal scan, stud mode, or AC-warning mode may answer different questions. Do not treat a clear result in one mode as a clear result in all modes.
- Repeat the scan around the proposed hole. Compare the result with outlets, switches, fixtures, normal stud spacing, and the opposite side of the wall.
A positive signal means investigate and choose another point if necessary; it does not mean “drill here.” Conversely, a negative result is not proof that no cable or pipe exists. If the scanner gives an AC warning, or if the result conflicts with the visible layout or building information, do not drill until the uncertainty is resolved.
The Tool Desk
Outbyte Driver Updater FREEScan for outdated or missing drivers - takes under a minuteDriver Scan →Outbyte PC Repair FREERepair Windows errors before they cause bigger problemsFix Now →Match the bit and fastener to the wall
Identify the substrate before selecting a bit or anchor. “A wall plug” or “a general-purpose drill bit” is not a complete specification.
Rank #2
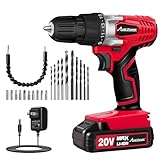
- Long-Lasting Battery for Occasional Users - AVID POWER 20V Lithium-ion battery pack comes with a real-time battery level display, which allows you to monitor charge status, so you're never caught off guard during projects. Perfect for homeowners who use a drill a few times a month. This drill can only use the battery from AVID POWER, please do not use a battery from other brand or a battery with a larger capacity
- Note: Regardless of whether you use it immediately, please fully charge the battery after receiving the product. When the machine is out of use, remove the battery from the drill and recharge it every 3 months for longer life
- 15+1 Torque Settings for Delicate Work - 15+1 torque (280 In-lbs) settings and variable speed (0-550 RPM) provide precise control for driving in/out screws to prevent stripping, and drilling into wood, drywall, plastics, and even metal with ease. Max torque for drilling into wood 13/16-Inch or steel plate 3/8-Inch. Note: this drill is Not suitable for more than 25mm drill bits and Not for Concrete/Masonry Walls
- Ergonomic & Lightweight Design: Compact, 2.5 lb lightweight build with a rubberized grip reduces fatigue during prolonged use, making it easy to handle even for first-time users. Built-in LED light illuminates dark workspaces like cabinets and tight corners for precise operation, while the 3/8” keyless chuck enables quick, tool-free bit changes to boost your home project efficiency
- Complete Ready-to-Use Kit - Includes 22 practical accessories: 10 drill bits, 10 driver bits, flexible shaft, and extension bar. Perfect for first-time owners tackling furniture assembly, wall mounting, or tight-space tasks
| Wall or fixing location | Typical approach | Important caution |
|---|---|---|
| Timber stud | Drill a correctly sized pilot hole and use a screw of suitable length and strength. | Confirm the proposed depth and service conditions; a stud alone does not rule out a cable or pipe. |
| Hollow drywall between studs | Use a hollow-wall anchor rated for the wall thickness and the complete load. | Do not use a drywall anchor as though it were a structural stud fixing. Check the manufacturer’s load figures and installation requirements. |
| Plaster over lath or another fragile assembly | Use a method designed for the actual construction, often with careful pilot drilling and an appropriate anchor. | Old or brittle plaster can chip and crumble. Avoid relying on a rating that applies only to modern drywall. |
| Brick, block, or concrete | Use a masonry bit and a masonry-compatible plug, screw, or anchor system. | Hammer action, dust, depth, and anchor type must suit the material. Concrete and block are not interchangeable in every application. |
| Ceramic or porcelain tile | Use a tile-appropriate bit and low, controlled pressure; then use a fastener system suitable for the substrate behind the tile. | Tile can crack from heat, impact, or sideways pressure. Do not assume the tile itself provides the required holding strength. |
| Metal stud or metal framing | Use hardware designed for that framing and load, or relocate to a verified alternative. | Metal detection and fastening requirements differ from timber-stud work. |
For a substantial load, fastening into a confirmed, suitable stud is generally preferable when the layout permits. Between studs, a self-drilling drywall anchor or other hollow-wall anchor may be suitable for a light or moderate load, but only when its published rating, wall thickness range, and installation method match the job. A self-drilling hollow-wall anchor is not a universal substitute for a stud fixing, masonry anchor, or heavy-duty structural support.
The person installing the fixing is responsible for choosing hardware appropriate to the wall and confirming that the wall can support the load. Include the object, brackets, stored contents, and likely movement—not just the empty item’s weight. Shelves, coat hooks, and folding or pulling loads can impose substantially more force than a static picture.
Step-by-step: make a controlled hole
1. Plan the fixing before picking up the drill
Confirm the item’s weight, bracket hole size, clearance, required screw length, and the location of studs or anchors. Mark the exact center of the bracket hole with a pencil. For a pair of fixings, use a level and recheck the spacing before drilling.
Read the fastener instructions. They should specify the pilot-hole diameter, minimum embedment, wall thickness, required screw, and any clearance from edges. Do not guess a hole size from the screw’s outside diameter.
2. Prepare the room and the tool
Wear eye protection. Remove loose objects below the work area and protect furniture. If dust could fall into an outlet, switch off the relevant circuit only if you can positively identify it and follow safe electrical practice; do not use circuit isolation as a reason to disregard concealed-service checks.
Use a sharp bit suited to the substrate: a wood bit for timber where appropriate, a masonry bit for brick, block, or concrete, and a tile-suitable bit for tile. A multipurpose bit may be acceptable for a particular manufacturer’s stated application, but it is not automatically the best choice for every material.
3. Limit the depth
Measure the required hole depth from the anchor or fastener instructions. Mark that depth on the bit with tape, or use a compatible drill depth stop or stop bit. Leave only the necessary embedment; a deeper hole is not automatically stronger and creates more opportunity to reach a concealed service.
Crashes, No Sound, or Screen Glitches?
Random freezes, missing sound and display glitches usually trace back to one bad driver. Find and replace yours safely.Free scan · under a minuteWindows Errors? Fix Them Before They Spread
Repair common Windows errors and clear accumulated junk for a smoother, more stable PC - no reinstall needed.Free scan · no reinstallDepth control is especially useful when the wall construction is known and the fastener has a defined installation depth. It cannot make an unknown or hazardous drilling location safe.
Rank #3

- High-Performance Power Drill Set: FADAKWALT cordless drill with superior motor, 180 in-lbs (19 N.m) of max torque is perfect for drilling wood, metal, plastics, and all screw driving tasks at home; Precise control settings prevent stripping
- 21+1 Position Clutch: 21+1 torque settings (0-650 RPM ) of power drill can provide more precise torque or speed adjustment as required, which helps to prevent sinking a screw too deep, stripping out the head of a screw or even breaking a screw shaft
- Ergonomic Design: Compact and lightweight, with a superior motor, minimizes fatigue in most daily screwing and drilling tasks; The rubber grip ensures comfort for one-handed operation; The LED light and electric brake ensure precise work in dark areas
- Package List: You will get, 1 x Cordless Drill ,1 x Charger,1 x Magnetic Flexible Shaft, 1 x Extension Bar for Sticking on Fastener,3 x Wood Drill Bits,3 x Masonry Drill Bits,10 x 25 mm screwdriver bits, 1 x Screw anchor set
- Customer Service: If your Cordless Power Drill has quality problems or have any questions, please feel free to contact with us, we are always here
4. Drill square to the surface
Hold the drill perpendicular to the wall. Start at low speed with steady, even pressure and let the bit cut. Increase speed only if the bit and material permit it. Do not force the tool, lean heavily on it, or angle it to enlarge the hole.
Excessive force increases the chance of wandering, breakout, a loose anchor, a stuck bit, or kickback. Occupational-safety guidance identifies stuck bits and kickback as drilling hazards; use a tool with appropriate controls, keep both hands positioned as instructed by its manufacturer, and maintain a stable stance.
5. Insert the fixing without enlarging the hole
Clear dust as directed by the anchor manufacturer. Tap a plug in gently if that is part of its installation; do not hammer a plastic plug into a hole that is too small or force a fixing that does not fit. If the anchor spins, collapses the drywall, or feels loose, stop and reassess rather than compensating with a larger screw.
Recommended Free Tools
Drive the screw until the bracket is secure, but do not overtighten. Over-tightening can crush drywall, strip the fixing, crack tile, or distort the bracket. Test the installed item progressively instead of applying a sudden heavy load.
Reduce breakout, dust, and cleanup
Preventing a ragged hole
- Use a sharp bit of the correct type and diameter.
- Start slowly and keep the drill perpendicular.
- Use a sacrificial surface or suitable tape only when compatible with the substrate and finish; do not assume tape will prevent all paint or plaster damage.
- Reduce pressure as the bit approaches the far side of a thin board or other fragile material.
- Do not wobble the bit to make an undersized hole fit.
For a small drywall hole, a clean, correctly sized opening is easier to repair than an oversized one. If the surface begins to crumble, stop and determine whether the wall needs a different anchor or professional assessment.
Control dust at the source
For a single small drywall hole, a vacuum nozzle held below the bit may collect much of the debris. A drill dust catcher or dust-collection attachment can be useful for multiple holes or overhead work. Keep the recommendation proportional: specialist hollow bits and extraction systems used for professional concrete-anchor work are not necessary for an ordinary drywall fixing.
Rank #4

- 【Efficient Drilling&Screwing】This electric drill may be used for drilling in wood and plastic(Not suitable for hard objects such as masonry and concrete), and also for tightening/loosening screws. Equiped with built-in LED light, suitable for DIY and home maintenance
- 【Variable Speed Control Trigger】Press the switch to adjust the speed of the electric drill, and the maximum no-load speed of the mini drill is 800 r/min. The harder you press, the faster the rotation speed. The chuck will stop as soon as the trigger is fully released
- 【Forward/Reverse Switch】A forward/reverse switch determines the direction of the power drill and also serves as a lock-off button. Maintenance and Cleaning Before any work on the machine as well as during storage, set the rotational direction switch to the center position
- 【Lightweight But Powerful】The net weight of the hand drill is only 1.65 pounds, and it is easy to operate with one hand. The motor is powerful and runs smoothly, providing continuous power for the electric drill.Good choice for Women,ladies and girls
- 【Accessories】Our drill kit include 8 V Cordless Drill*1, Type-C Charge Cable*1 and 42 Pcs Accessories: Torpedo Level*1, Connector*1, Expansion screw cap*10, Expansion screw*10, Drilling bits*10 and Fastening bits*10.
Masonry and concrete create more dust and may require a suitable extraction system, respiratory protection, work-area isolation, and compliance with local occupational-safety requirements. Do not dry-drill unknown or potentially hazardous materials. If the wall may contain asbestos-containing material or another hazardous substance, stop and obtain specialist advice before disturbing it.
What’s actually slowing this PC down?
Pick the symptom - the matching free tool is one click away.
Stop immediately if any of these things happen
- The scanner warns of AC voltage. Move away from the location and resolve the warning; do not test it by drilling.
- The bit strikes unexpected metal. A metal plate may be protecting a cable or pipe. Do not try to punch, grind, or drill through it.
- You see water, dampness, unusual discoloration, or an unexpected material. Stop, withdraw the tool safely, and investigate the source.
- The drill binds, kicks back, or the bit becomes stuck. Release the trigger, wait for the tool to stop, and reassess the hole and tool position.
- The hole enlarges or the wall crumbles. Stop before the anchor loses its holding capacity. The wall may need a different fixing or repair.
- The result conflicts with your plan. If the apparent stud position, scanner signal, service route, or wall construction does not make sense, do not continue on the assumption that it will be fine.
Drilling into a concealed energized conductor can cause severe injury or death. Planning for concealed circuits is a safety requirement, not an optional refinement. If you cannot confidently establish what is behind the surface, use a no-drill solution where appropriate, relocate the fixing, or call a qualified electrician, plumber, or other suitable professional.
Independent reader supportYour contribution helps us test, update, and keep practical guides available for everyone.Repairing a small abandoned drywall hole
Repair only addresses appearance; it does not make an unsafe drilling decision acceptable. For a minor hole in sound drywall:
- Remove loose paper, dust, and crumbly material without enlarging the opening unnecessarily.
- Apply a suitable patching compound in thin layers, using the product’s instructions.
- Allow it to dry fully.
- Sand lightly until the surface is level. Avoid sanding through the surrounding paper.
- Prime the repair where needed so the patch does not flash through the paint.
- Touch up with matching paint, understanding that sheen and color may still reveal the repair.
For a large hole, damaged drywall paper, repeated failed anchors, cracked plaster, water damage, or a hole near suspected wiring or plumbing, use a proper repair method or hire a professional. Do not conceal a service strike with filler or paint.
A practical product-selection checklist
| Need | What to look for | What it cannot replace |
|---|---|---|
| Avoid a hole for light decor | Removable hanging strips with a load, surface, and removal method that fit the job. | A structural fixing for heavy, high-consequence, or dynamic loads. |
| Locate likely studs and warning signals | A stud finder or multifunction wall scanner with the modes needed for the wall; clear instructions and stated limitations. | Visual inspection, building information, professional verification, or certainty that no service is present. |
| Fix between timber studs in drywall | Hollow-wall anchors rated for the wall thickness and intended load, installed with the specified screw. | A stud fixing, masonry anchor, or structural support. |
| Control penetration | A tape depth mark, compatible depth stop, or stop bit matched to the bit and fastener system. | Hazard detection or permission to drill through unexpected resistance. |
| Reduce debris | A vacuum, drill dust catcher, or suitable extraction attachment for the material and scale of work. | Controls needed for hazardous dust or professional concrete work. |
When to call a professional
Get qualified help when the wall contains or may contain concealed services and the route cannot be established; when the load is safety-critical; when the wall is damaged, unusually constructed, or made from an unknown material; when a protective plate is encountered; or when electrical, plumbing, or hazardous-material concerns arise.
For an ordinary decorative fixing, careful planning can usually reduce cosmetic damage. For an uncertain wall or consequential load, the most damage-avoiding decision may be to stop before making the hole.
Best Value
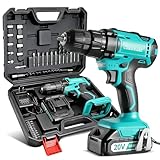
- 【20V MOTOR WITH 266 IN-LBS OF TORQUE】 This cordless drill delivers up to 266 in-lbs (30 Nm) for everyday drilling and driving—assembling furniture, hanging curtains, and drilling wood, drywall, plastic and light metal. Low speed (0-350 RPM) drives screws with control; high speed (0-1300 RPM) powers through holes. A home and DIY tool, it is not intended for concrete, masonry or heavy-duty industrial jobs
- 【25+1 Position Clutch & 266 In-lbs Max Torque】 This cordless drill's clutch provides precise control for drilling, which helps to prevent sinking a screw too deep, stripping out the head of a screw or even breaking a screw shaft. 17-Torque allows for various applications and additional 1-torque for drilling
- 【1500mAh LITHIUM-ION BATTERY & FAST CHARGER】 The 20V 1500mAh battery lasts through most household projects, and the included charger quickly refills it. Note: Regardless of whether you use it immediately, please fully charge the battery after receiving the product. When the machine is out of use, remove the battery from the drill and recharge it every 3 months for longer life
- 【LED WORK LIGHT & 3/8" KEYLESS METAL CHUCK】 A built-in LED brightens cabinets, closets and dark corners so you can work accurately in dim spaces. The 3/8-inch keyless chuck accepts a wide range of round and hex-shank bits and tightens by hand—no chuck key to keep track of. Insert bits straight and tighten firmly before use to keep them secure. The forward/reverse switch drives screws in, backs them out and helps release bits
- 【DRILL & DRIVER BIT KIT, STORAGE CASE & COMOWARE SUPPORT】Our electric cordless drill/ driver kit with 23 Pcs accessories: 3 x HSS Twist drill bits, 3 x Brad Point drill bits, 16 x Screwdriver bits, 9 x Sleeves, 1 x Extension Bar, 1 x Flexible Hex Shaft. A storage case is suitable for home Improvement & DIY Project; COMOWARE stand behind this drill. If anything falls short of your expectations, we'll make it right
Frequently Asked Questions
Can a stud finder guarantee that it is safe to drill?
No. A scanner can provide useful information about likely studs, metal, or electrical warning zones, but capabilities vary and difficult wiring or pipes may be missed. Use it with visual inspection, normal framing clues, construction information, and professional help when uncertainty remains.
Is drilling into a stud always safe?
No. Wiring or plumbing may pass through or alongside framing, and protective metal plates may indicate a concealed service. A confirmed stud improves the fastening decision, but it does not by itself prove that the drilling point is safe.
What is the least damaging way to hang a picture?
For a lightweight picture on a compatible, sound interior surface, a correctly installed removable picture-hanging strip may avoid a hole. Follow the product’s load, size, surface, indoor-use, waiting-period, and removal instructions. Use mechanical fastening for heavy or high-consequence loads.
Free tools Windows power users keep installed
One-click scans. No signup required.
Why did my drywall anchor make a larger hole?
The hole may have been oversized, the anchor may not suit the wall thickness or load, or it may have been overtightened. Stop using the damaged point, repair it if appropriate, and select a fixing designed for the actual wall rather than simply fitting a larger screw.
What should I do if the drill hits metal?
Stop immediately. Do not try to drill through the metal. It may be a protective plate over a cable or pipe. Move the fixing only after investigating the location, or obtain professional advice.
The Bottom Line
Drill without damage by treating the hole as the final option: use a suitable removable system for genuinely light loads, inspect and scan before drilling, match the bit and anchor to the substrate, limit depth, work slowly, and stop at any unexpected signal or resistance. A small cosmetic repair is manageable; a concealed-service strike is not.
Quick Recap
Product prices and availability are accurate as of the date/time indicated and are subject to change. Any price and availability information displayed on Amazon at the time of purchase will apply.
Do these 3 things before closing this tab:
1Scan for outdated or missing drivers - takes under a minute2Clear out junk files and repair common Windows errors3Fix the driver behind crashes, sound loss and screen glitches
