The Tool Desk
Outbyte PC Repair FREEClear out junk files and repair common Windows errorsFree Scan →Outbyte Driver Updater FREEFix the driver behind crashes, sound loss and screen glitchesFind Drivers →Small, stable plaster damage is often a realistic DIY repair: diagnose the cause, remove everything loose, clean back to sound edges, use a material compatible with the existing wall, and build the patch in thin stages. A recurring crack, damp area, moving wall, or plaster detached from its lath needs investigation before cosmetic filling. Modern gypsum repairs and historic lime-plaster repairs are not interchangeable, so identify the wall before choosing a mix.
Is this plaster patch suitable for DIY?
Start with the condition of the wall, not the size of the hole. A tiny crack can be a symptom of movement, while a larger but stable missing area may be straightforward to rebuild. Press gently around the damage and inspect in good light.
As an Amazon Associate I earn from qualifying purchases.
- Minor, stable surface crack: usually suitable for filler and careful smoothing.
- Wider or recurring crack: may need mesh or another bridging treatment, but first check for movement or separation.
- Hole through several coats: usually requires a basecoat followed by finish coats.
- Loose, drummy or bulging plaster: filling the visible crack will not restore its attachment to lath.
- Damp, stained or salt-damaged area: find and stop the moisture source before closing the surface.
- Historic or uncertain plaster: identify the material, support and condition before selecting a repair compound.
The Wisconsin Historical Society advises correcting structural movement before repairing cracks caused by it. Its guidance also explains that surface patching cannot reattach plaster that has detached from its lath. A Northern Ireland government technical note similarly recommends addressing the cause before repairing historic plaster. If the wall is moving, wet, extensively detached or historically significant, arrange an assessment before opening a large area.
Quick wins for a faster PC:
Repair Windows errors before they cause bigger problemsFix Now →Scan for outdated or missing drivers - takes under a minuteDriver Scan →Choose the repair path before buying materials
| Repair situation | General path | Important caution |
|---|---|---|
| Minor, stable crack | Fill with a suitable filler, smooth, then finish to match the wall | Reassess if it widens or returns; historic plaster may require a lime-compatible material |
| Larger or recurring crack | Remove loose material, bridge the repair with fiberglass mesh tape or similar material where appropriate, and apply multiple coats | Determine whether movement or detached plaster is causing the crack before patching |
| Hole or missing plaster | Remove unsound edges, use a base-and-finish approach suited to the depth, and contour the surface to the wall | Do not overfill or leave a conspicuously flat patch on a wavy wall |
| Loose plaster over lath | Repair or restore attachment to the lath, then patch the surface | A skim of filler does not recreate plaster keys or mechanical support |
| Historic or uncertain plaster | Identify plaster type, support, condition and cause, then select a compatible repair | Conservative repair and professional advice may be appropriate for extensive or significant work |
Modern gypsum and traditional lime plaster behave differently. The New Hampshire Preservation Alliance’s June 5, 2023 guide demonstrates a modern gypsum-plaster method developed with master plasterer Emmett O’Carroll. It specifically warns that traditional lime-plaster repairs are more complicated. Historic guidance from the Wisconsin Historical Society, Northern Ireland’s Department for Communities, the Royal Institution of Chartered Surveyors (RICS), and the International Masonry Institute emphasizes identifying the existing composition before choosing a new material.
#1 Best Overall

- Complete Repair Kit: Contains 1 pieces repair putty(8.5oz), 2 inch wall repair patches(2pcs), 4 inch wall repair patches(1pcs), 2 pieces of sandpaper, and 4 plastic scrapers.
- Waterproof Formula: The drywall repair kit contains a waterproof wall mending agent that dries quickly and leaves no residue.
- Strong Adhesion: Drywall repair patches are made from quality aluminum, making them lightweight yet strong and durable for long-lasting performance.
- Multipurpose: Wall repair patch is suitable for repairing most damaged surfaces around the home, kitchen, or office building, as well as factories and other industrial facilities.
- Ideal for DIY home renovations: Whether you're an experienced pro or a beginner, our wall patch repair kit makes wall repair a breeze, enhancing the beauty of your home.
Tools and materials for a small modern gypsum patch
Use the following as a task-based kit, not as a universal product list:
- Utility knife for opening a crack and trimming mesh or ragged edges.
- Paintbrush for applying a bonding agent where the chosen plaster system calls for one.
- Putty knife for pressing mesh into wet material and handling small amounts of filler.
- A plastering trowel for spreading basecoat and compressing finish coats.
- Compatible gypsum basecoat and finish material for a modern gypsum wall.
- Fiberglass mesh or mesh tape for suitable larger cracks or patches; it is not required for every thin crack.
- Dust-control and personal-protection equipment appropriate to the work area, including eye protection and a suitable respirator when creating dust.
Check the label for substrate compatibility, mixing instructions, coat thickness and drying requirements. A bonding agent used in the New Hampshire method is part of that particular system; do not assume every plaster, filler or historic substrate needs the same treatment.
How do I repair a plaster wall? A modern gypsum sequence
1. Assess the damage before opening it
Map the visible damage with a pencil and look beyond the obvious line. Check whether the crack is stable, whether the surrounding plaster sounds hollow when lightly tapped, and whether there is staining or active dampness. Examine corners, ceiling junctions and nearby openings for signs of movement. If the defect is recurring, widening, accompanied by a bulge, or connected with a wet area, stop at diagnosis and address the underlying problem first.
2. Open the crack and remove unsound material
For a modern gypsum repair, use a utility knife to open a narrow crack slightly so the repair material can reach sound edges. Remove loose flakes and crumbly plaster back to material that is firmly attached. Do not leave a thin shell over a hollow area simply because it is easier to fill. Brush or vacuum away dirt, dust and debris. The New Hampshire guide applies a bonding agent to surfaces receiving plaster; follow the instructions for the specific system you selected.
3. Prepare the substrate and decide whether mesh is needed
Thin, stable cracks can usually be filled without mesh. A larger crack or opening benefits from a bridge such as fiberglass mesh tape when the surrounding plaster is sound and the selected system permits it. Bed the mesh into wet base material with a putty knife so it is fully supported and does not sit proud of the finished plane. Mesh cannot correct movement or reattach detached plaster; those conditions require a different repair.
Rank #2

- Package includes 12 pieces of drywall repair patch in three different sizes (8 pieces of 4-inch, 2 pieces of 6-inch and 2 pieces of 8-inch), 2 pieces of sandpaper (240 grit), and 2 plastic scrapers.
- Bates drywall repair patches are made from quality aluminum, making them lightweight yet strong and durable for long-lasting performance.
- The self-adhesive backing makes it easy to apply the patch to the wall, ensuring good adhesion to nearly any kind of surface.
- Bates wall repair patch is suitable for repairing most damaged surfaces around the home, kitchen, or office building, as well as factories and other industrial facilities.
- To use this product effectively, first clean and dry out the hole you want to patch before peeling back the backing and applying the drywall patch. Evenly spread out plaster with a scraper afterwards for a more seamless look.
4. Build a deep patch in stages
For a hole that extends through more than the surface coat, apply a compatible basecoat rather than trying to fill the full depth with finish material. Press the basecoat firmly into the prepared edges and any mesh, leaving room for later coats. On an appropriate larger repair, the New Hampshire method embeds mesh in wet plaster, allows the coat to dry, trims excess mesh, and adds another coat to bring the patch nearly flush. Follow the product’s maximum coat thickness instead of copying a thickness from another material.
5. Respect drying intervals
In the New Hampshire Preservation Alliance sequence, the next specified coat is applied after at least a day, and the finish-coat step follows more than 24 hours later. Those are timings for that described gypsum method, not a universal cure time. Temperature, humidity, ventilation, substrate porosity and coat thickness all affect drying. Use the manufacturer’s directions and make sure the layer is firm and dry enough for the next operation.
6. Apply and compress the finish
Spread several thin finish layers rather than one thick application. Use a plastering trowel to apply the material, then compress it as it begins to dry, closing pinholes and reducing ridges. Keep the repair slightly proud until you have enough material to shape it accurately; avoid a hollow that will telegraph through paint. If the chosen material is sheetrock mud, the New Hampshire guide notes that sanding is needed. Protect adjacent surfaces and remove dust before decorating.
How do I repair a shallow crack?
A shallow crack is the simplest case only when it is stable and the surrounding plaster is sound. Open the line just enough to remove loose edges, clean it, and work a compatible filler into the full depth. Keep the filler within the prepared channel, allow it to dry as directed, and apply a second thin pass if shrinkage leaves a depression. Feather the edges several inches into the surrounding finish so the transition is gradual. Recheck the area after decorating; a crack that reappears is evidence that the cause, not just the surface, needs attention.
How do I repair deep or large cracks?
Large cracks need two decisions: whether the plaster is still attached, and whether the crack reflects movement. If the wall is stable and the edges are sound after cleaning, bridge the opening with fiberglass mesh tape or a comparable material approved for the plaster system. Cover the bridge with base material, let it dry, then apply additional coats until the repair is ready for finish work. The Wisconsin Historical Society describes filler and mesh tape for larger or recurring cracks and distinguishes this work from treatment of detached plaster.
Rank #3

- The drywall repair kit includes 2x Wall mending agent (100g), 2x Nozzle Extender, 1x Scrapers, and 2x Sandpaper.
- This drywall patch repair kit Easily and quickly repair the damaged wall.Just gently squeeze out and use a spatula to smooth. spackle wall repair kit can be reused, Meet your various repair needs.
- The new upgrade wall patch repair kit is very safe, it does not contain formaldehyde. It is highly resistant to breakage, streak-free and waterproof.And the mending will be virtually invisible, then giving you professional-looking results.
- BONCART wall repair kit can solve all kinds of wall damage.Drywall cracks,wall stains,nail holes,wall peeling,wall stains,wall graffiti.Let your walls a new look.
- Best Service:Fast pre-sale and after-sale response, any questions about the product are welcome to contact us at any time.
If the crack follows a structural joint, grows over time, or is accompanied by a bulge or hollow sound, do not conceal it with mesh. Investigate settlement, framing movement, vibration or moisture and correct the cause first. A cosmetic patch can remain intact only as long as the substrate stays stable.
Do these 3 things before closing this tab:
1Scan for outdated or missing drivers - takes under a minute2Clear out junk files and repair common Windows errors3Fix the driver behind crashes, sound loss and screen glitchesHow do I patch a hole without making a flat spot?
Cut or scrape back only to sound plaster, keeping the perimeter as compact as practical. Clean the cavity, apply any required bonding treatment, and fill the depth with a suitable base material in controlled stages. Leave the final layer slightly proud, then shape it to the surrounding wall with thin finish coats. Old walls are often subtly wavy. The Wisconsin Historical Society advises contouring a patch to that existing shape; a perfectly flat island can be more visible than a gently irregular surface.
Use a straightedge only as a checking tool, not as a command to flatten the whole wall. View the repair from several angles under the room’s normal lighting. Stop sanding or troweling when the edge disappears visually, because removing too much material can recreate a hollow.
What changes for historic lime or traditional plaster?
Do not assume a modern gypsum mix is safe for every old wall. Historic plaster may be lime-based, gypsum-based, or a layered combination, and its attachment may depend on lath keys, fibrous reinforcement or earlier repairs. The Northern Ireland technical notes and International Masonry Institute guidance call for assessment of composition, layers, properties and condition before selecting materials. RICS recommends identifying the plaster type, fixing or support method, and condition while prioritizing retention of original fabric where practical.
Before mixing anything
- Identify whether the finish is historic and whether decorative details or original tooling are present.
- Inspect the lath and the plaster’s attachment, not just the visible crack.
- Determine whether damp, salts, movement or previous incompatible repairs are contributing to failure.
- Select a repair material compatible with the existing plaster and its moisture movement.
Traditional lime-plaster work may involve different preparation, curing and finish techniques from a modern gypsum patch. For extensive damage, a significant historic interior, or uncertain composition, a preservation professional can help avoid loss of original material and an incompatible repair that fails prematurely.
Recommended Free Tools
Rank #4
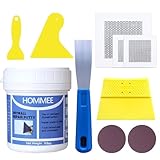
- UPGRADE PACKAGE WITH TOOLS NEEDED - This wall hole patch kit includes: 1 Repair Putty(9.8oz), 2pcs 2"+1pcs 4" aluminum repair patch and 4pcs scrapers+2pcs sandpaper , all tools needed have been ready for you.
- SAVE YOUR DAMAGED WALL - No shrinking or cracking, stick on the wall firmly, not easy to fall off from the wall. The paste is High density which will prevent the wall from being alkalized, giving your wall a long time of protection. Permanently stops and prevents water leaks in concrete cracks.
- EASY TO APPLY AND SAND - Half Fluid paste, pre-mixed, and simply apply to anywhere needed. You can handle the repair job with the wall repair patch kit. Please gently shake the bottle before use to better mix the content inside and wear gloves when using it.
- FREE OF FORMALDEHYDE - Free of harmful substances such as formaldehyde, harmless to your family. Smart Choice for a Small Repair Project.
- SERVICE & WARRANTY - HOMMEE is always dedicated to providing you with quality products and services. If you have any problems with the products, please contact us for a FREE Replacement.
Blending texture, sheen and the wall’s shape
A structurally sound patch can still look wrong if its surface does not match. Compare the surrounding texture before the finish dries: it may be smooth, lightly troweled, brushed or subtly uneven. Reproduce the existing profile with thin material and controlled trowel pressure rather than creating a new texture over the entire wall. Keep the transition broad and thin, with no abrupt ridge at the perimeter.
Use side lighting to reveal ridges while the finish is workable. Compressing the surface as it dries can reduce visible pores. Sand only when the material’s instructions call for it; sanding a soft or historic finish can damage adjacent original plaster. Remove dust before primer and paint, and use the same sheen across the repaired section so differences in reflection do not outline the patch.
Common failure modes and fixes
The crack returns soon after painting
Recheck for movement, moisture or a detached substrate. Remove the failed cosmetic fill and repair the cause before rebuilding. A second layer of filler alone is not a structural solution.
The patch sounds hollow or flexes
The surrounding plaster may have lost its attachment to lath. Surface filling will not recreate that support. Stop enlarging the patch and obtain advice on reattachment or carefully limited removal and rebuilding.
The repair is visibly proud
Do not grind aggressively into adjacent plaster. Feather the perimeter with a thin finish layer, compress the surface, and make the final contour follow the wall’s existing waviness.
Best Value

- Drywall repair kit can be used for repairing interior or exterior surfaces like drywall, plaster, wood, brick and stone
- Color indicator spackle goes on pink and dries white providing confirmation the product is dry within 1 to 5 hours
- Wall patch dries within 1 hour for repairs 1/8" in depth; for repairs deeper than 1/8" apply two or more layers and allow spackle to dry between applications
- Durable spackling will not crack, crumble, flake or shrink and creates professional looking wall repairs that last
- No priming required when used indoors, kit contains: spackle, 5x5 fiber tough patch, 4x3 100 grit sandpaper and putty knife
The repair sinks or shows a ring
The cavity may have been filled in one thick application, or the material may have shrunk while drying. Remove loose material, rebuild in thinner compatible coats, and observe the specified drying interval between them.
Paint highlights every edge
Uneven texture, different porosity or a sharp transition can telegraph through paint. Refine the contour, remove dust, prime as appropriate for the finish system, and use the same final sheen as the surrounding wall.
When should you stop and call a professional?
- The plaster is extensively loose, bulging or detached from lath.
- Cracks are widening, recurring, diagonal across openings, or associated with visible movement.
- There is active dampness, staining or salt contamination.
- The wall contains significant historic, decorative or otherwise irreplaceable plaster.
- You cannot identify the existing plaster or determine which repair material is compatible.
- The damaged area extends beyond a controlled patch and would require broad removal.
Professional help is especially valuable when the correct intervention is attachment repair rather than filling. A qualified surveyor or plaster specialist can identify the plaster type, support method and condition, then recommend the least destructive repair that preserves sound original work.
Crashes, No Sound, or Screen Glitches?
Random freezes, missing sound and display glitches usually trace back to one bad driver. Find and replace yours safely.Free scan · under a minutePC Slower Than It Used to Be?
A free scan shows the junk files, broken settings and background clutter dragging Windows down - then fixes them in one click.Free scan · Windows 10 & 11A practical final inspection checklist
- Confirm that movement and moisture have been investigated and addressed where relevant.
- Check that every edge is sound, clean and free of dust.
- Verify that the repair material suits the existing plaster and the depth of the patch.
- Use mesh only where the crack or opening and the chosen system call for it.
- Allow each coat to dry according to the product directions and site conditions.
- Contour the finish to the wall instead of forcing an old, uneven surface flat.
- Inspect under normal room lighting before priming and painting.
The durable DIY plaster repair is the one that matches the wall’s material, support and shape. Treat a stable modern gypsum patch as a layered process, and treat historic plaster as a conservation decision as well as a cosmetic one.
Quick Recap
Product prices and availability are accurate as of the date/time indicated and are subject to change. Any price and availability information displayed on Amazon at the time of purchase will apply.

