Free tools Windows power users keep installed
One-click scans. No signup required.
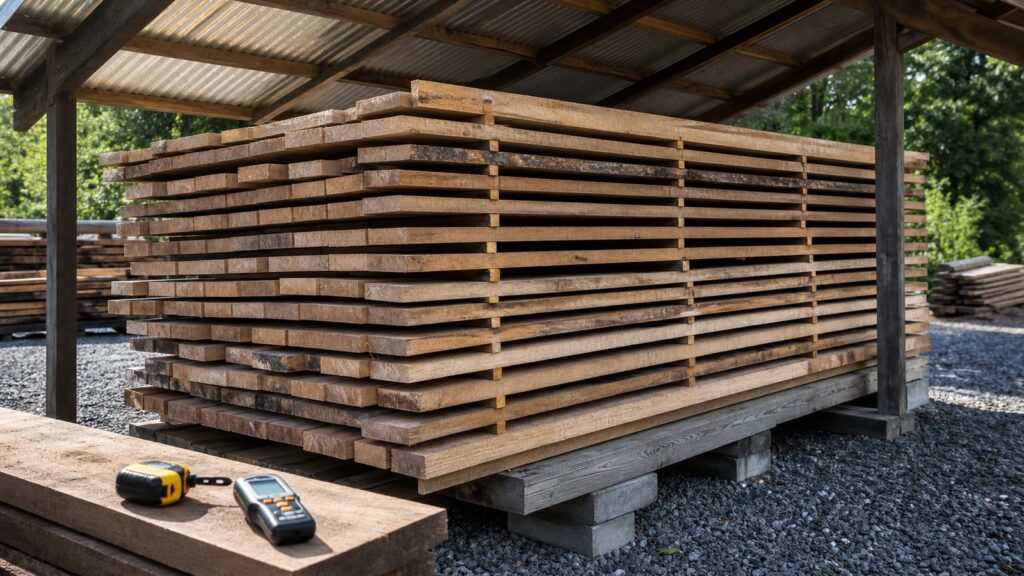
Air-drying lumber is simple in concept: keep boards off the ground, separate each layer with stickers, cover the top, leave the sides open, and wait. The hard part is doing those basics with enough precision that the boards stay flat, dry evenly, and end up suitable for the project you have in mind.
On our job sites, we treat lumber as a moisture-management material, not just a stack of boards. Fresh-sawn wood can start around 40% to 50% moisture content. The major shrinkage and many drying defects begin as the wood drops below the fiber saturation point, commonly about 28% to 30% for many North American species. That is where poor stacking, direct sun, crooked stickers, and rushed drying start showing up as cup, bow, twist, checks, mold, and wasted material.
As an Amazon Associate I earn from qualifying purchases.
The practical answer: air-dry lumber only when you can control the setup. Build a dead-flat raised base, sort boards by species and thickness, use dry uniform stickers at 16 to 24 inches apart for typical 4/4 stock, seal the ends the same day the lumber is milled, cover only the top, and measure moisture content before use. For interior trim, cabinets, flooring, and furniture, air drying alone often is not enough. For structural work, moisture is only one issue. Code acceptance, grading, and inspection matter just as much.
Quick wins for a faster PC:
Clear out junk files and repair common Windows errorsFree Scan →Fix the driver behind crashes, sound loss and screen glitchesFind Drivers →What Air-Drying Can and Cannot Do
Air-drying lowers wood moisture by exposing boards to moving outdoor air while protecting them from direct rain and severe sun. It is low-equipment and cost-effective, but it is not magic. The lumber will usually dry only to the local equilibrium moisture content, meaning the moisture level the wood reaches in your climate under covered outdoor storage.
#1 Best Overall

- HUMIDITY SENSOR: Our handy meter tool can quickly determine what level of remediation is needed to keep your family safe from black mold. High levels of dampness that go untreated are the leading cause of harmful fungus growth in the home.
- WATER LEAK DETECTOR: Finding the moisture content in your wood or drywall is the first step in early prevention. Continuously check and test suspicious water stains around the house so you can determine whether the area is wet or has already dried. Low, medium and high moisture tones and on-screen icons, Reading HOLD button
- MOISTURE READER: The mold test features large 0.3" high digits in a backlit LCD for quick and easy detecting. Our mildew scanner includes extra 8mm stainless steel pins, a protective cap that doubles as a calibration checker, and a “9V” battery.
- MOLD TESTER: For an accurate test read, stick the stainless steel pins into the surface of what you're measuring. The gauge has a broad range of 5 - 50% for wood and 1.5 - 33% for building materials such as concrete and drywall.
- GENERAL TOOLS: We're a recognized leader in designing and developing specialized precision tools dedicated to delivering exceptional customer service. We encourage artisans and DIYers to work smarter, measure better, and repair more productively.
In many parts of the United States, well air-seasoned lumber commonly settles around 15% to 20% moisture content. In drier inland climates, covered outdoor storage can get lower. Oregon State Extension reports that covered outdoor storage may reach roughly 12% to 14% in western Oregon and 8% to 10% in eastern Oregon. That range shows why location matters. A board drying in humid summer air in the Southeast is living in a different world than one drying under a shed roof in a dry high-desert climate.
For outdoor projects, barns, sheds, blocking, shop projects, farm structures, and some nonstructural uses, air-dried lumber may be perfectly useful once it has stabilized. For interior finish work, most wood needs to be drier. A common target for interior wood is about 6% to 8% moisture content. Exterior and building-envelope wood often falls in a broader 9% to 14% range, depending on product, climate, and assembly. If you install 16% lumber inside a heated house and expect cabinet-grade results, the house will keep drying that wood after installation. That is when gaps open, trim shrinks, tabletops split, and doors quit behaving.
The other limit is code. Air-dried rough-sawn lumber is not automatically approved for framing a house, deck, or load-bearing structure. Most structural lumber used in conventional construction needs to be grade-stamped or accepted through a local inspection, grading, or engineering path. The International Residential Code and International Building Code include wood construction requirements, and local building officials decide what documentation they will accept. The American Wood Council notes that rough-sawn lumber may be used only when it meets applicable grading and code requirements. Before you build anything structural with your own sawn boards, confirm the approval path with the building department.
Plan the Drying Yard Before the First Cut
The drying yard is where most success or failure is decided. Do not wait until the sawyer has a pile of green boards on the ground. Green lumber sitting in a heap can stain, mold, twist, and begin checking fast, especially in hot, dry, windy weather. The base, stickers, cover, and handling plan should be ready before milling starts.
Choose a site that is shaded, breezy, well drained, and accessible. You want air movement through the pile, not standing water under it. Avoid low spots, lawn areas, bare soil, and places where roof runoff will splash the stack. A gravel pad is better than dirt. A shed bay with open sides is better than a tight garage corner. Direct sun can dry the shell too fast, so shade is helpful, but stagnant air is not. A good location feels like a covered porch, not a sealed storage room.
Build the base straight and strong. For a small stack, use concrete blocks, treated timbers, steel rails, or other stable supports to raise the first course at least 12 inches off the ground. More height is better where ground moisture and weeds are a problem. Set supports on firm bearing points so they will not sink. Check the base with a long level or laser. If the foundation is twisted, every board above it is being trained to follow that twist.
Support spacing depends on lumber thickness and length, but for typical 4/4 boards, plan supports roughly every 16 to 24 inches, matching the sticker spacing above. Wider spacing can work for thicker stock, but do not push it. Clemson Extension recommends stickers 12 to 24 inches apart for 4/4 material and less than 48 inches apart for thicker lumber. In field terms, tighter spacing is cheap insurance. A bowed 10-foot walnut board is a lot more expensive than a few extra stickers.
Sort the Lumber Before Stacking
Mixed stacks are harder to manage. Different species, thicknesses, widths, and grain patterns dry at different rates. Oak, maple, walnut, pine, cedar, poplar, and ash do not all behave the same. A 1-inch pine board and a 3-inch oak slab do not belong in the same drying schedule if quality matters.
Sort by species first, then thickness, then intended use. Keep 4/4 stock together, 8/4 stock together, and slabs separate. If you have boards for interior trim, keep those together so they can be monitored and moved to a kiln, solar kiln, or conditioned indoor space later. If you have rough utility boards for a shed or outdoor rack, they can usually tolerate a wider moisture range and more visual character.
Trim obvious defects and remove bark where practical. Bark edges can harbor insects and slow drying at the edge. If you are keeping live-edge slabs, understand that they are a higher-risk drying project. They need more end sealing, more weight, more time, and more patience than straight 4/4 boards.
Label the stack. A pencil mark, lumber crayon, or tag showing species, thickness, milling date, and intended use saves guessing later. When you check moisture content six months from now, the date matters. So does knowing whether that 10-foot stack is soft maple milled in April or white oak milled in August.
What’s actually slowing this PC down?
Pick the symptom - the matching free tool is one click away.
Rank #2

- 🌲【Accurate and fast measurements reveal hidden water leaks】: It has 2 high-precision pins that can penetrate the surface to be tested and quickly measure moisture content to estimate potential moisture increase throughout the home. COCZOW moisture meter is the ideal tool for measuring moisture.
- 🌲【Professional Wood Moisture Meter】: 6 calibrated scales. Our moisture meter is a great tool for manufacturers, floorers, inspectors and wood suppliers to quickly and easily measure moisture content (% Mc). You can quickly determine if the moisture content is low (5-12%), medium (12-17%) or high (17-60%). Checking moisture content prevents wood from cracking and warping.
- 🌲【Widely Used】: PM6811A moisture meter is ideal for carpentry, building construction, agricultural restoration and floor laying. Measure moisture content of wood products such as hardwood floors, cabinets, furniture, lumber, lath, beams, plywood, panels, composite boards, window frames, forestry wood, coils, building materials, etc.
- 🌲【User-friendly】: With LCD backlight, the backlight color is divided into three types of green, yellow and red, or display the moisture content of different measurement types. Hold function, maximum/minimum moisture measurement function and 5-minute automatic shutdown function (no power supply required).
- 🌲【Why choose COCZOW Wood Moisture Meter】: LED display function, large measuring range (wood: 2.0%-75.0%. Building materials: 1.5-30%), durable stainless steel needle, heat insulation, light weight and easy to carry. Get professional and accurate results with Peakmeter Wood Moisture Tester.
Use the Right Stickers and Keep Them Aligned
Stickers are the spacer strips between layers of lumber. They create the air channels that let moisture leave the boards. Bad stickers cause bad lumber. Use dry, uniform, stain-free stickers. Common sizes are about 3/4 inch by 1 inch, 1 inch by 1 inch, or 1 inch by 2 inches. The exact size matters less than consistency, dryness, and clean contact.
Do not use green, moldy, wet, oily, or uneven scrap. Wet stickers can cause sticker stain and slow the drying right where they touch the board. Uneven stickers create pressure points. If one sticker is 5/8 inch thick and the next is 1 inch thick, the lumber is no longer supported in a flat plane.
Place stickers directly above the base supports and keep every sticker column vertically aligned from bottom to top. This is one of the most common details homeowners miss. If the sticker columns wander, the weight of the pile creates point loads and bends boards between supports. On a construction site, we would never frame a load path that randomly shifts from floor to floor. Treat your lumber stack the same way.
For 4/4 lumber, a practical spacing is 16 to 24 inches. Use 12 to 16 inches for thin, wide, high-value, or warp-prone boards. For thicker material, you may stretch spacing, but stay conservative. Clemson’s guidance of less than 48 inches for thicker material should be treated as an upper limit, not a goal for every stack.
Stacking Method That Keeps Boards Straighter
Start with your flattest, strongest boards on the bottom course. Lay boards with small gaps between them so air can move up and around the edges. Keep courses the same thickness whenever possible. If board widths vary, try to distribute wide and narrow boards evenly across the layer.
Every layer gets stickers in the same locations. Ends should be supported close enough that the boards do not droop. For 8-foot boards, four to six sticker rows are common. For 10-foot and 12-foot boards, add more. The top of the stack should look organized, with sticker lines straight across like framing layout marks.
Keep the stack narrow enough for air to move. A very wide pile with poor interior airflow can dry unevenly. If you have enough lumber for multiple stacks, build multiple clean stacks instead of one massive pile. Leave room between stacks for walking, measuring, and air circulation.
Weight the top. Use concrete blocks, timbers, ratchet straps with care, or a weighted roof system. The top layer sees the harshest drying cycle because it is closest to sun, wind, and cover heat. Sacrificial boards on top are a good idea for high-value lumber. If a course is going to take abuse, let it be the cheapest course.
Do not stack directly against a wall. Air should move around the pile and through the sticker spaces. A stack shoved tight against the back of a garage can trap moisture on one side and dry faster on the other. That uneven drying is an invitation for warp.
Cover the Top, Not the Sides
The stack needs a roof, not a wrapper. Rain on the top course is a problem, but so is trapped humidity. Cover the top with a rigid panel, metal roofing, plywood, or a tarp arranged like a roof with slope and overhang. Leave the sides open.
A 10-foot by 20-foot heavy-duty polyethylene tarp often costs around $45 to $70 in 2026, depending on thickness and brand. It can work for a temporary cover, but it should not be draped tightly down the sides. Wrapped stacks sweat. Condensation builds. Mold follows. If you use a tarp, pitch it so water drains, weight it securely, and keep it off the lumber surface where possible.
A rigid cover usually performs better. Old roofing metal, exterior plywood, or sacrificial sheet goods can create a cleaner air space above the top course. Give the cover an overhang, but avoid creating a wind sail. In storm-prone areas, fasten the cover so it cannot shift and expose the pile.
Do these 3 things before closing this tab:
1Clear out junk files and repair common Windows errors2Fix the driver behind crashes, sound loss and screen glitches3Repair Windows errors before they cause bigger problemsEnd grain needs separate protection. Apply end-grain sealer the same day the lumber is milled, especially on thick slabs, oak, walnut, maple, and other checking-prone wood. Wax-emulsion sealers such as Anchorseal commonly run about $45 to $50 per gallon in current online pricing. That is cheap compared with cutting 6 to 12 inches of split material off every board later.
How Long Air-Drying Takes
The familiar rule is one year per inch of thickness. It is useful for rough planning, but it is too blunt to manage real lumber. Species, board thickness, season, humidity, airflow, starting moisture content, and stack quality all change the timeline.
Rank #3

- ✅【Accurate & Trusted Measures, Identify Moisture Level】With accurate & trusted performance, Mecurate moisture meter can detect moisture content from wood to building material. A reliable must-have tool for home owners, woodworkers, painters & architects to detect moisture level and spot hidden damage, which would save potential expensive repairs.
- ✅【2 Mode 8 Scale,Guaranteed Accuracy】With 0.1% resolution, the moisture meter has 2 mode : wood and building material. Wood mode has 8 calibrated scales for different wood types with full list on manual. Integrated with "Self-Testing" Aid on protective cap, users can calibrate the tool before use.
- ✅【3 Colored Indicators, Fast Spot Problem】Integrated with 3 colored indicators, together with intuitive on-screen icons for low/medium/high moisture content. Fast and accurately identify the dampness.
- ✅【Multi Function Easy Use】Integrated with temperature detection in °C/°F, one button click to know ambient temperature. Hold button to freeze the reading plus low battery icon to remind battery replacement. Comes with a jumbo smart backlit display, gives extended visibility suited to any ambient brightness. Side covered with anti-slip material, provides comfort firm grip.
- ✅【Packed for Convenience】Comes with a water resistant carry pouch. A "Wood Type Quick-Search Index Table" printed on back of the device, help adjust setup quick-and-easy.A full wood list on user manual to help quick identify correct scale.
Some 1-inch stock can air-dry in several months under good conditions. Other 1-inch hardwood may take close to a year. Dense species and 2-inch material take longer. Thick slabs can take multiple years before they are ready for final drying or use. A 3-inch walnut slab is not just a wider board. It is a different drying problem.
Air drying also slows as the wood approaches local equilibrium. The first drop from green to below 30% moisture can happen much faster than the final approach to 12%, 10%, or 8%. That is why a calendar is not enough. You need moisture readings and an understanding of final service conditions.
Windows Errors? Fix Them Before They Spread
Repair common Windows errors and clear accumulated junk for a smoother, more stable PC - no reinstall needed.Free scan · no reinstallCrashes, No Sound, or Screen Glitches?
Random freezes, missing sound and display glitches usually trace back to one bad driver. Find and replace yours safely.Free scan · under a minute| Material | Typical air-drying planning range | Notes |
|---|---|---|
| 4/4 softwood or fast-drying hardwood | Several months to about 1 year | Depends heavily on season, airflow, and climate |
| 4/4 dense hardwood | About 6 to 12+ months | Oak and similar species need slower, controlled drying |
| 8/4 lumber | About 1 to 2+ years | Often benefits from kiln finishing after air drying |
| Thick slabs | 2+ years is common | High risk of checking, cupping, and uneven core moisture |
Use those ranges as planning numbers, not promises. The stack is ready only when the moisture content and stability fit the project.
Moisture Content Targets by Use
The right moisture content depends on where the wood will live. Outdoor lumber does not need to be dried to the same level as interior flooring. Interior wood that will be installed in a heated, air-conditioned home needs to be close to the moisture level it will experience in service.
| Use | Practical moisture target | Builder’s note |
|---|---|---|
| Outdoor utility use | Local equilibrium, often 12% to 20% | Match local climate and allow for movement |
| Exterior trim or building-envelope components | Often 9% to 14% | Confirm product requirements and finish system |
| Interior trim, cabinets, furniture, flooring | Usually 6% to 8% | Often requires kiln drying or indoor conditioning |
| Structural framing | Moisture target plus code acceptance | Grade stamp, inspection, or engineered approval may be required |
A moisture meter is worth owning if you are drying lumber. Reliable woodworking and construction meters commonly run about $89 to $209 or more in 2026. Pin meters are often less expensive and can read below the surface depending on pin length. Pinless meters are faster and avoid pin holes, which helps when checking many boards or finished faces. Either way, use the meter as a trend tool. Record readings every few weeks, check multiple boards, compare the outside boards to interior boards, and avoid making decisions from one optimistic reading.
For thicker material, surface readings can lie. The shell may be much drier than the core. That is where professional kiln operators, insulated conditioning rooms, or careful sample testing can save expensive stock. If a slab is destined for a dining table, do not assume the outside tells the full story.
Recommended Free Tools
2026 Cost Reality: Milling, Drying, and Buying Lumber
Air-drying can save money, but it is not automatically cheaper once milling, handling, storage, stickers, sealer, covers, losses, and finishing are counted. In 2026, commodity lumber benchmarks remain volatile. Trading Economics reported lumber around $614.52 per 1,000 board feet on July 31, 2026, down about 11.6% year over year. NAHB reported framing lumber prices up 1.4% week over week as of July 24, 2026, 3.1% higher than one month earlier, and 0.3% lower than one year earlier. A 2026 market article citing Gordian RSMeans put January 2026 framing lumber at $872.03 per 1,000 board feet.
Those numbers are useful construction benchmarks, but they are not the same as custom rough lumber. Local rough-sawn material commonly lands around $2.50 to $5.50 per board foot, with examples such as green rough hardwood around $2.65 to $3.25 per board foot and air-dried ash around $3.00 per board foot. Premium species, wide slabs, clear grades, and urban-salvage character can cost far more.
Portable sawmill rates commonly run about $150 to $155 per hour for band-saw milling, with minimums around $150 to $620. Slab or large-log milling can be about $250 per hour or carry $1,000-plus minimums. Costs rise with metal in logs, poor site access, large diameters, sorting labor, moving equipment, and custom thicknesses.
Kiln drying after air drying is another line item. Posted 2026 service rates vary widely, but small-shop references commonly show about $0.40 to $0.75 per board foot for conventional or solar kiln drying. Vacuum kiln rates can be much higher, such as $1.50 per board foot for lumber under 2 inches and $3.00 per board foot for 2 inches and thicker, with some jobs ranging from $1.80 to $3.50 per board foot depending on space and time.
| Item | 2026 working range | What it means |
|---|---|---|
| Rough-sawn lumber | $2.50 to $5.50/BF common | Species, width, grade, and local supply drive price |
| Portable milling | $150 to $155/hour common | Minimums and site conditions matter |
| Vacuum kiln drying | $1.50 to $3.50/BF common | Useful for slabs and interior-grade material |
| Moisture meter | $89 to $209+ | A necessary tool, not a luxury, for serious drying |
| End sealer | $45 to $50/gallon | Low cost compared with losing length to checking |
| 10 ft x 20 ft tarp | $45 to $70 | Use as a top cover only, with airflow maintained |
The best savings usually come when you already have logs, can stack properly, and have a realistic use for the lumber. The worst economics come from paying premium milling rates, losing boards to poor drying, then still needing to buy kiln-dried material for the final project.
When to Follow Air-Drying With Kiln Drying
A strong workflow is to air-dry first, then finish the lumber in a kiln or controlled indoor environment. Air drying from green down to about 20% to 25% moisture content removes a lot of water at low cost. Kiln drying can then finish the job faster and more predictably, especially for interior use.
Rank #4

- FIND HIDDEN WALL MOISTURE EARLY — Check suspicious drywall and building surfaces after a leak, water stain, or other moisture concern. Detect abnormal moisture before a small issue develops into more extensive damage and costly repairs
- CHECK BEFORE YOU REPAIR — Don't rely on a wall looking or feeling dry. Use the moisture meter to check questionable areas before painting, repairing, or covering the surface, helping you make decisions based on actual moisture readings.
- CHECK FIREWOOD BEFORE YOU BURN — Test firewood before placing it in your fireplace or wood stove. Knowing the moisture level of your firewood helps you choose wood that is ready for burning and avoid relying on appearance alone.
- PIN-TYPE TESTING FOR DIRECT MEASUREMENTS — The contact pins penetrate the material to measure moisture inside wood and building materials. This makes it useful for checking areas where surface conditions may not tell the whole story.
- ONE TOOL FOR TWO IMPORTANT HOME CHECKS — Keep it ready for two practical jobs: checking walls for hidden moisture and checking firewood before burning. A simple way to make informed decisions before a moisture problem becomes expensive or wood goes into the fireplace.
Kiln drying also helps with insect sterilization. Air drying does not reliably kill insects, larvae, or eggs inside lumber. If the wood is going into a home, furniture shop, or finished living space, ask the kiln operator about sterilization temperature and schedule. This is especially relevant for urban logs, slabs with bark inclusions, and wood stored outdoors for a long time.
For slabs, professional finishing is often the difference between a usable tabletop and an expensive disappointment. Slabs dry slowly and unevenly. They check at the ends, cup across the width, and hold core moisture long after the surface feels dry. Budget for extra end sealer, extra top weight, slower drying, and possible kiln finishing from the start.
The Tool Desk
Outbyte Driver Updater FREEScan for outdated or missing drivers - takes under a minuteDriver Scan →Outbyte PC Repair FREEClear out junk files and repair common Windows errorsFree Scan →Structural Use, Permits, and Inspection
This is the line we do not blur for clients: drying your own lumber does not make it construction-grade. A straight, dry board can still be unacceptable for structural use if it has not been graded or approved. Framing lumber, deck joists, beams, rafters, wall studs, and other load-bearing members typically require grade-stamped lumber or another accepted route.
For a permitted project, talk with the building official before milling. Ask whether locally sawn lumber can be used, what grading agency or inspector is accepted, whether engineering is required, and what documentation must be on site. Some jurisdictions may accept lumber graded by a certified grader. Others may require an engineer. Some may not allow it for the intended use.
For nonstructural uses, the path is easier, but moisture still matters. Porch trim, siding accents, shelving, barn boards, shop fixtures, blocking, garden structures, and furniture blanks may be good candidates when dried to the right range. Decking, guardrails, stair framing, beams, and house framing deserve more scrutiny because failure has safety consequences.
Common Problems and How to Prevent Them
End checking
End checks happen because end grain loses moisture faster than the face of the board. Seal ends immediately after milling. Keep stacks out of harsh sun and hot wind. For slabs, use a heavy coat of sealer and expect to trim some length after drying.
Cupping and bowing
Cupping and bowing usually trace back to uneven drying, poor support, board grain, or sticker layout. Keep sticker columns aligned, use a flat base, weight the top, and avoid exposing one face to direct sun while the other face stays shaded and damp.
Mold and sticker stain
Mold needs moisture and limited airflow. Sticker stain often comes from wet or contaminated stickers. Use dry stickers, keep the pile raised, keep sides open, and avoid stacking in still, damp locations. If mold starts early, increase airflow and correct drainage before the problem moves deeper into the pile.
Casehardening and surface checks
Drying too fast can leave the outer shell stressed while the core remains wet. Direct sun and hot wind are common causes. Shade, top cover, proper airflow, and slower drying schedules help. Dense hardwoods need patience.
When to DIY and When to Hire a Pro
DIY air-drying makes sense when the lumber is nonstructural, the species is not unusually difficult, the stack can sit undisturbed for months or years, and you have room to build a proper drying setup. It is also a good fit for shop lumber, barn boards, rustic shelving, outdoor projects, and rough stock that will later be kiln-dried or milled to final size.
Hire a pro when the lumber is expensive, thick, wide, destined for interior finish work, or intended for a permitted structural project. Also hire help when logs are large, site access is complicated, or metal detection is needed before milling. A sawyer or kiln operator who charges a few hundred dollars can prevent thousands of dollars in wasted slabs and unusable boards.
Best Value

- Quick moisture detection: This moisture tester can detect hidden moisture in wood. The probe reaches a measurement depth of 10mm, leaving only two tiny pinholes on the surface.
- For accurate readings, fully insert the pins into materials. The full-length electrodes detect true moisture content even if the surface is wet while the interior stays dry.
- Large screen, easy to read: MT19C is equipped with a color LCD display screen, which will automatically sound and light an alarm when the humidity measurement range is exceeded. The HOLD key function enables easy capture of readings even in difficult to measure areas.
- Built in flashlight, suitable for dark areas: The wood hygrometer has a built-in flashlight that allows you to accurately measure humidity even in basements, behind walls, or other dark enclosed spaces.
- Replaceable probe: The electrode length of the moisture meter is 12 millimeters, equipped with a pair of spare needles to ensure long-term stable use and reduce usage costs.
For homeowners, the cleanest decision tree is this: if the wood will hold up a structure, solve grading and code approval first. If the wood will live inside a conditioned house, plan for 6% to 8% moisture content and likely kiln drying or indoor acclimation. If the wood will be used outdoors or in an open outbuilding, air drying to local equilibrium may be enough, provided the design allows for seasonal movement.
Builder’s Checklist for a Successful Stack
Before milling, prepare a shaded, breezy, well-drained location. Build a level base at least 12 inches off the ground. Cut or buy enough dry, uniform stickers for 16 to 24 inch spacing. Have end sealer, a brush or roller, cover material, weights, labels, and a moisture meter ready.
During stacking, sort by species and thickness. Seal end grain the same day. Keep stickers directly over supports and aligned vertically. Leave gaps between boards. Keep the sides open. Cover only the top with slope and overhang. Weight the top course.
Outdated Drivers Are Slowing You Down
One free scan finds every outdated or missing driver and matches the right update for your exact hardware.Free scan · exact hardware matchPC Slower Than It Used to Be?
A free scan shows the junk files, broken settings and background clutter dragging Windows down - then fixes them in one click.Free scan · Windows 10 & 11During drying, inspect every few weeks at first. Look for mold, shifted stickers, standing water, tarp condensation, insect activity, and early checking. Record moisture readings instead of relying on memory. When readings stop changing much, compare them with the intended use rather than assuming the lumber is done.
After drying, mill in stages when quality matters. Rough-flatten or joint one face, let the boards rest, then finish mill. Wood can move after stress is relieved. That extra step is normal in a professional shop and can save you from installing trim or building furniture with boards that move after the final cut.
The Bottom Line
Air-drying lumber succeeds when the process is planned before the log is cut. The essentials are not complicated: a flat raised base, clean dry stickers, aligned support, protected end grain, top cover, open sides, steady airflow, and moisture readings tied to the final use.
The bigger professional lesson is knowing what air-dried lumber is for. It can be excellent material for many outdoor, shop, rustic, trim-prep, and furniture-prep uses. It is not automatically ready for interior finish work, and it is not automatically code-compliant structural lumber. Match the drying method to the project, budget for the real costs, and verify moisture and approval before the board becomes part of the building.
Frequently Asked Questions
How long does it take to air-dry lumber in the United States?
Plan on several months to about a year for many 1-inch boards, longer for dense hardwoods, and multiple years for thick slabs. The one-year-per-inch rule is only a rough planning shortcut.
What moisture content should air-dried lumber reach before use?
Outdoor or utility lumber may be usable near local equilibrium, often about 12% to 20%. Interior trim, cabinets, flooring, and furniture usually need about 6% to 8%, which often requires kiln drying or indoor conditioning.
Can air-dried rough-sawn lumber be used for framing?
Only if it meets local code requirements. Structural lumber usually needs a grade stamp or an accepted inspection or engineering path approved by the building official.
How far apart should stickers be when drying lumber?
For typical 4/4 stock, use stickers about 16 to 24 inches apart, with 12 to 16 inches for high-value or warp-prone boards. Keep every sticker column vertically aligned over the supports.
Free tools Windows power users keep installed
One-click scans. No signup required.
Should I wrap the whole stack with a tarp?
No. Cover the top like a roof, but leave the sides open for airflow. A tight tarp traps humidity and can cause mold, stain, and uneven drying.
Do I still need kiln drying after air drying?
Often, yes, especially for interior wood, slabs, furniture, flooring, and insect sterilization. A common workflow is to air-dry to about 20% to 25% moisture content, then kiln-dry or condition the wood for final use.
Quick Recap
Product prices and availability are accurate as of the date/time indicated and are subject to change. Any price and availability information displayed on Amazon at the time of purchase will apply.

