Quick wins for a faster PC:
Clear out junk files and repair common Windows errorsFree Scan →Fix the driver behind crashes, sound loss and screen glitchesFind Drivers →Yes, you can add dissolved-oxygen (DO) monitoring without replacing the Atlas Wi‐Fi Hydroponics Kit. The current kit provides an AUX sensor slot for an additional electrically isolated EZO circuit. The compatible expansion is an Atlas Scientific EZO Dissolved Oxygen circuit paired with a compatible DO probe.
The complete integration requires more than inserting a sensor: the circuit must be in I2C mode, the firmware must support DO, ThingSpeak needs a fourth field, and the probe must be calibrated and maintained. The instructions below distinguish the current kit, which uses an Adafruit ESP32-S3 TFT Feather, from Atlas’s useful but older 2021 tutorial.
As an Amazon Associate I earn from qualifying purchases.
What dissolved oxygen tells you
Dissolved oxygen is the concentration of oxygen dissolved in nutrient solution, normally reported in mg/L. A DO probe measures the water condition at its own location. It does not measure air-pump output, water movement, room oxygen, plant oxygen uptake, or the total amount of oxygen injected into a reservoir.
Recommended Free Tools
That distinction matters. A probe beside an air stone may report highly oxygenated water while another part of a poorly mixed reservoir is oxygen-depleted. Conversely, a probe in a stagnant pocket may under-report the condition of the main reservoir.
#1 Best Overall

- Test dissolved oxygen level in water
- For freshwater and marine aquarium and aquaculture, pond water, ground water, drinking water
- Measurable range from 0 – 15 part per million (ppm) with the resolution of dissolved oxygen at 0.5 ppm
- Can measure 60 tests
- Easy to use, accurate, fast test, economic
DO monitoring is most useful when you will act on the data—for example, checking an air pump, alerting on sustained low readings, comparing aeration methods, or correlating oxygen with water temperature and root performance.
Is DO monitoring worthwhile?
It is a strong addition for deep-water culture, recirculating systems, large reservoirs, warm nutrient solution, heavy root mass, automated aeration, and troubleshooting involving root stress or poor circulation. It is also valuable for controlled experiments in which temperature, aeration, and plant performance are being compared.
It is not mandatory for every small home garden. DO and ORP sensors are generally optional instruments for specific systems rather than universal starter requirements, as DFRobot’s hydroponics guidance also notes. If your system is small, well-aerated, stable, and you have no plan to respond to the readings, periodic manual checks may be more practical.
PC Slower Than It Used to Be?
A free scan shows the junk files, broken settings and background clutter dragging Windows down - then fixes them in one click.Free scan · Windows 10 & 11Outdated Drivers Are Slowing You Down
One free scan finds every outdated or missing driver and matches the right update for your exact hardware.Free scan · exact hardware matchDo not adopt a universal “ideal DO” number without considering crop, water temperature, salinity, circulation, and measurement method. Establish a baseline for your own system and respond to sustained changes rather than one transient value.
What the current Atlas kit includes
The current Atlas Wi‐Fi Hydroponics Kit includes:
- EZO pH circuit and pH probe
- EZO conductivity circuit and conductivity probe
- EZO RTD temperature circuit and PT-1000 temperature probe
- Calibration solutions, enclosure, and assembled electronics
- An Adafruit ESP32-S3 TFT Feather controller
- Three electrically isolated sensor slots: pH, conductivity, and AUX
- Screen display and ThingSpeak uploads for remote access from a phone, tablet, or computer
DO hardware is not included. The kit supports the addition through AUX; it is not a complete DO system out of the box.
The product page showed a listed price of $644.99 on August 18, 2026. Atlas’s hydroponics listing has shown an inconsistent earlier figure, so verify the live product page before purchasing.
Parts and tools required
| Item | Purpose |
|---|---|
| Atlas EZO Dissolved Oxygen circuit | Converts the probe signal and communicates with the controller over I2C |
| Compatible Atlas DO probe | Measures oxygen in the nutrient solution |
| I2C Toggler | Needed if the EZO circuit is supplied in UART mode |
| Zero-DO calibration solution | Provides the low calibration point |
| Electrolyte and membrane supplies | Required by the particular electrochemical probe |
| Probe mount, flow cell, or inline fitting | Keeps the probe submerged and positioned correctly |
| Computer, USB cable, and Arduino IDE | Configures and uploads the firmware |
| ThingSpeak account and channel | Stores and displays the readings remotely |
The EZO DO circuit was listed at $53.99, but that is the circuit only. The probe, calibration materials, mounting hardware, and maintenance parts may cost substantially more. Atlas’s EZO Complete DO Kit was listed at $337.99 and includes a complete DO module, a choice of probe, zero-DO calibration pouches, electrolyte, and a syringe. Atlas’s separate Dissolved Oxygen Kit was listed at $354.99. Confirm current prices and contents before ordering.
Choose the probe carefully
Atlas offers different probe configurations, including lab-grade and mini lab-grade options. Galvanic, polarographic, and optical DO probes have different electrical, maintenance, and response characteristics. Do not assume that every DO probe can connect directly to the Wi‐Fi kit. Compatibility depends on the conditioning circuit, connector, protocol, electrical isolation, and firmware support.
Rank #2
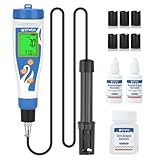
- Digital Dissolved Oxygen Meter: Has two measurement units: mg/L (dissolved oxygen content per liter of water) and % (percentage of saturated dissolved oxygen). Test Range is 0.0-40.0 mg/L and 0.0-300.0%. Do Meter comes with a 3.6-ft (1.1-meter) electrode cable, making it easy to measure dissolved oxygen levels in small fish pond and also includes one bottle of zero-oxygen water calibration solution, two bottles of electrolyte solution, and six membranes, making it very convenient to use
- Digital Dissolved Oxygen Meter for Pond: For most aquatic life, oxygen levels must be at least 6 mg/L. Use a pond oxygen meter to monitor oxygen levels in aquariums, ponds, fish tank, koi pond, and goldfish ponds to ensure your ponds has enough dissolved oxygen to keep aerobic lifeforms happy
- Portable Do Meter for Hydroponic: In hydroponic systems, especially deep water hydroponic systems such as NFT, RDWC, drip irrigation system, and aquaponics, it is very important to use the dissolved oxygen meter to monitor the dissolved oxygen content in the hydroponic nutrient solution for the health of the plant roots. Most hydroponic plants require a dissolved oxygen content between 5-10 mg/L. The EZTOCH dissolved oxygen tester helps you build a healthy hydroponic system
- Widely Used Dissolved Oxygen Test Kit: Use EZTOCH Oxygen Analyzer can easily Measure the oxygen in water, homemade Meads, Beers, Ciders and Wine beering, water treatment, environmental monitoring, lake, rivers, aquaculture, hydroponics, and aquariums etc, It's a crucial tool for assessing water quality, monitoring aquatic life, aquaculture, research, education, Food Processing
- Simple Pond Oxygen Tester: 2-point calibration (0% and 100%) ensures high accuracy; backlit display allows for readings even in dimly lit environments; 5-minute auto shutoff extends battery life
Confirm which kit you have
This is the most important version warning. The current retail kit uses an Adafruit ESP32-S3 TFT Feather, USB-C, and an I2C-only architecture. Atlas’s original DO-addition tutorial, published October 18, 2021, refers to older Wi‐Fi meter hardware and the board label Adafruit Esp32Feather.
The older tutorial remains useful for the physical AUX-slot procedure and calibration commands, but do not blindly select its old board target. Use the current board package and the board entry matching the ESP32-S3 TFT Feather shown in the current Atlas setup guide. The guide itself is a transition-era document and may contain older labels, so the board name in your installed Adafruit package may differ slightly.
What’s actually slowing this PC down?
Pick the symptom - the matching free tool is one click away.
1. Add a DO field to ThingSpeak
- Open the existing ThingSpeak channel.
- Open Channel Settings.
- Enable Field 4.
- Name it
DO (mg/L), or use an equally clear label such asDissolved Oxygen (mg/L). - Save the channel.
- Keep the channel ID and Write API Key available for the firmware configuration.
The legacy Atlas workflow writes DO to field 4. If your modified sketch uses another field, make the firmware and ThingSpeak channel agree. Treat the Write API Key as a secret; do not publish it in screenshots or source code shared publicly.
Atlas documents a 15-second upload workflow for a free ThingSpeak account. Service limits and plan names can change, so check current ThingSpeak limits before relying on a faster interval.
2. Put the EZO DO circuit in I2C mode
The current kit is I2C-only. A circuit left in UART mode will not communicate through the kit’s carrier connection.
- Select the DO circuit type on the Atlas I2C Toggler.
- Insert the EZO DO circuit into the toggler.
- Connect the toggler to USB power.
- Hold the toggler button for approximately one second.
- Release it when the indicator changes.
Atlas’s legacy tutorial identifies blue as I2C mode and green as UART mode. Confirm the LED behavior against the current toggler documentation, because accessory behavior can change. If the circuit is already in I2C mode, do not toggle it unnecessarily.
Do these 3 things before closing this tab:
1Clear out junk files and repair common Windows errors2Scan for outdated or missing drivers - takes under a minute3Repair Windows errors before they cause bigger problemsA serial-interface method may exist for changing modes, but use the current Atlas documentation for that procedure rather than relying on an unverified command sequence. A UART-only circuit cannot be used as a drop-in device in this I2C-only kit.
3. Install the circuit and probe
- Disconnect USB power and power down the hydroponics kit completely.
- Insert the EZO DO circuit into the kit’s AUX slot.
- Connect the DO probe to the circuit’s corresponding probe connector.
- Confirm that the cable and connector are fully seated.
- Mount the probe in representative, circulating water.
- Power the kit back on.
Never insert or remove an EZO circuit while the system is powered. Confirm that the AUX slot is connected on your particular kit revision, and do not assume that an analog DO board is electrically interchangeable with an EZO I2C circuit.
Preserve the kit’s electrical isolation. Avoid improvised wiring that joins sensor grounds or power rails in a way the Atlas carrier was not designed to handle. Also check for an I2C address conflict if you add any non-Atlas device.
Rank #3

- Dissolved oxygen meter for Hydroponics: This oxygen meter is an essential tool for monitoring the oxygen content in various indoor gardening setup, such as DWC, hydroponic reservoir, aquaponics, hydroponic towers. Maintaining this level at a healthy 6-8 mg/L is crucial for ensuring plant roots receive sufficient oxygen to absorb nutrients from the nutrient solution. Especially for aquaponics, where it's necessary to monitor the oxygen in both the aquatic water and the plant's growing water
- Pond Water oxygen meter for Fish Tank: Monitors the aquatic environment for various fish species, including freshwater fish, koi ponds, aquariums, saltwater fish, and coral tanks; suitable for aquaculture; helps maintain the health of your oxygen-demanding aquatic organisms
- 3.6ft Probe & Backlight: EZTOCH DO meter is equipped with a 3.6-foot/1.1-meter electrode line. The long probe can reach deeper water, which is especially useful when testing deeper tanks (DWC tanks) or outdoor installations (tank/ponds); the backlit screen allows you to easily read the values outdoors and in both bright and dim lighting conditions
- APP Connection: Connects to the YINMIK app to store data, up to 1000 values, eliminating the need for note-taking; maximum and minimum values can be set in the app; when measured values exceed these ranges, they will be displayed in red to remind you to adjust the oxygen content
- Equipped with ATC, Salinity, and Altitude Compensation: Simply enter the corresponding altitude and salinity values in the app during testing to obtain accurate mg/L and % values, Simply enter the corresponding altitude and salinity values in the application during the test to obtain accurate mg/L and % values, which is crucial for measuring dissolved oxygen content in saltwater fish and in beer wort before yeast inoculation
4. Update the firmware
- Install or update the ESP32 board package in Arduino IDE.
- Install the ThingSpeak Arduino library.
- Install Atlas Scientific’s EZO I2C library.
- Install the display dependencies required by the current controller, including Adafruit GFX, Adafruit BusIO, and Adafruit ST7735 where required by the current setup.
- Open the current hydroponics-kit example with DO support, if the installed library exposes one.
- Enter your Wi‐Fi SSID and password, ThingSpeak channel ID, and Write API Key.
- Select the current Adafruit ESP32-S3 TFT Feather board entry.
- Select the correct USB serial port.
- Compile, then upload the sketch.
- Open Serial Monitor and verify that pH, conductivity, temperature, and DO values are being read.
The 2021 tutorial names the example hydroponics_kit_with_DO and the old board target Adafruit Esp32Feather. Treat that exact example name as a legacy reference. If it is absent from your current library, use the current example or code supplied from the Atlas product documentation rather than forcing an old sketch onto the new controller.
5. Calibrate the DO probe
Calibration is not a one-time installation step. Probe condition, temperature, salinity, fouling, membranes, electrolyte, bubbles, and placement can all change the result.
Prepare the probe
- Follow the current instructions for removing or preparing the probe cap.
- Inspect the membrane and electrolyte.
- Make sure there are no bubbles attached to the membrane.
- Stop normal logging before calibration.
- Open Serial Monitor and confirm the correct port and communication settings.
High-point calibration
- Send
pollto stop the normal logging workflow and read repeatedly. - Expose the prepared DO probe to air as directed by the probe documentation.
- Allow the reading to stabilize.
- Send:
do:calLow-point calibration
- Place the probe in zero-DO calibration solution.
- Stir gently enough to remove trapped air without splashing or artificially aerating the solution.
- Wait for a stable reading.
- Send:
do:cal,0Resume logging
When calibration is complete, send:
datalogThe legacy Atlas workflow uses this command to resume normal readings and ThingSpeak uploads. Record the calibration date, probe identity, water temperature, solution condition, and any compensation settings.
Do not calibrate with bubbles on the membrane, in a heavily aerated sample, or while the firmware applies unintended temperature or salinity corrections. If the current probe manual differs from the older tutorial, follow the current probe instructions.
Temperature, salinity, pressure, and flow matter
DO is not a fixed value independent of conditions. Cooler water generally holds more oxygen than warmer water. Salinity, atmospheric pressure, altitude, turbulence, aeration, and local circulation also affect the reading.
Temperature compensation is particularly important. DFRobot’s DO documentation explains that saturation voltage changes with temperature and that accurate measurement requires appropriate calibration data or compensation. The same general measurement principle applies here, although the exact implementation depends on the Atlas probe and circuit.
A probe beside an air stone, waterfall, pump outlet, or return jet may read artificially high. A probe in a dead leg or stagnant corner may read artificially low. Aeration cycles can also produce genuine local changes. Interpret the DO value alongside water temperature, system state, and probe location.
Place the probe where it represents the system
- Use a well-mixed section of the reservoir.
- Keep the membrane away from direct bubbles and the immediate air-stone plume.
- Avoid placing it directly in a return jet or waterfall.
- Provide consistent circulation around the sensing area.
- Keep it submerged through normal reservoir-level changes.
- Install it where inspection, cleaning, and removal are practical.
For inline plumbing, use a suitable flow cell or fitting that prevents air pockets and provides continuous water exchange. Atlas provides probe-in-pipe guidance and related mounting accessories, including a probe pipe fitting.
Independent reader supportYour contribution helps us test, update, and keep practical guides available for everyone.Validate before trusting the trend
- Let the probe stabilize after installation.
- Compare with a calibrated handheld meter or another known reference if available.
- Watch the reading while monitoring water temperature.
- Observe whether aeration changes produce a plausible, repeatable response.
- Check the reservoir at more than one location if mixing is in doubt.
- Look for sustained changes rather than reacting to one noisy sample.
Installing the sensor does not add oxygen. The useful control loop is:
Rank #4

- Dissolved oxygen refers to the concentration of molecular oxygen dissolved in water, generally expressed in mg/L (ppm) and saturation percentage (%), which is the percentage of dissolved oxygen in 1L of water. Dissolved oxygen meter can quickly and accurately check the oxygen level in aquariums, pond, aquaculture setups,and more,help in keeping a healthy environment for aquatic life.
- User-Friendly Design: Measure and calibrate effortlessly without needing to remove the electrode’s protective cover. Simply immerse the electrode for quick, hassle-free usage. The Automatic Temperature Compensation (ATC) function ensures precise results within a temperature range of 0-50℃, adapting to changing conditions with ease.
- Clear Digital Display: The easy-to-read LCD screen provides clear readings at a glance. Plus, the device features auto power-off after 8 minutes of inactivity and a low battery indicator to ensure uninterrupted usage.
- Convenient Functions:Dissolved oxygen meter adopts the digital screen display with backlight, which is more clear and convenient to read data. Auto power-off in 8 minutes if not using it. Low battery indication. Our instruments have temperature compensation function, which can meet normal use and avoid the influence of unstable temperature, air pressure and other factors on oxygen solubility.
- Wide Range of Applications: Our Dissolved Oxygen Meter is well-suited for measuring dissolved oxygen levels and temperature in various settings, including aquariums, swimming pools, ponds, aquaculture, research, and more. It consistently delivers precise results across diverse environments.
Measure DO → compare with an evidence-based threshold → alert or control aeration → verify responseStart with monitoring and alerts. Automate an air pump only after you have validated probe placement, calibration, response time, and the behavior of your particular system.
Maintenance you should plan for
- Inspect the membrane regularly for tears, deposits, or trapped bubbles.
- Clean biofilm and fouling according to the probe manufacturer’s instructions.
- Replace electrolyte and membrane components at the required intervals.
- Check cable glands, connectors, and exposed metal for corrosion.
- Recalibrate after maintenance, long downtime, unusual readings, or significant changes in water conditions.
- Follow the probe’s storage instructions; do not leave an electrochemical probe dry for an extended period unless its documentation permits it.
- Keep replacement membranes, electrolyte, and calibration materials available if downtime matters.
Maintenance intervals are probe-specific. For comparison only, DFRobot lists approximately one year of electrode life for its SEN0237-A, monthly filling-solution replacement, and membrane-cap replacement roughly every one to five months depending on water cleanliness. Those figures do not automatically apply to Atlas probes.
Troubleshooting
| Symptom | Likely causes | What to check |
|---|---|---|
| No DO reading | UART mode, wrong slot, loose connector, wrong sketch, board or port error, address conflict | Power down, confirm I2C mode, reseat the circuit and probe, select the current board and DO-enabled example, then inspect serial output |
| ThingSpeak field is blank | Field 4 disabled, firmware writes elsewhere, incorrect credentials, Wi‐Fi failure, upload limit | Enable field 4, verify channel ID and Write API Key, confirm Wi‐Fi, and check current ThingSpeak limits |
| Reading is too high | Bubble, direct aeration, incorrect low calibration, excess turbulence, wrong compensation | Remove bubbles, move the probe, repeat calibration carefully, and allow stabilization |
| Reading is too low | Fouled or damaged membrane, depleted electrolyte, stagnant water, calibration error, genuine oxygen depletion | Inspect and service the probe, improve circulation, recalibrate, and compare with a reference |
| Reading oscillates | Turbulence, intermittent bubbles, aeration cycling, poor mixing, overly rapid polling | Relocate the probe, eliminate bubbles, observe the aeration cycle, and allow the sensor to stabilize |
| Calibration fails | Unstable sample, bubbles, unsuitable solution, damaged probe, incorrect command workflow | Stop logging, prepare fresh solution, remove bubbles, verify the probe condition, and follow the current probe manual |
Atlas EZO versus a lower-cost alternative
The Atlas route is the least ambiguous choice for an existing Atlas kit: it uses the AUX slot, preserves the I2C architecture, and fits the ecosystem’s isolation and firmware model. Its disadvantages are cost, calibration, probe maintenance, and the possibility of expensive replacement parts.
The DFRobot SEN0237-A is a credible option for a custom ESP32, Arduino, or Raspberry Pi build. It has an analog output, a galvanic probe, and a listed 0–20 mg/L range, with up to 98% response within 90 seconds at 25 °C. It is not a direct AUX/I2C replacement: you would need an ADC input, wiring, temperature compensation, and custom firmware.
The Tool Desk
Outbyte PC Repair FREEClear out junk files and repair common Windows errorsFree Scan →Outbyte Driver Updater FREEFix the driver behind crashes, sound loss and screen glitchesFind Drivers →DFRobot specifies a 0.5 mol/L sodium hydroxide filling solution for its probe. Sodium hydroxide is corrosive; wear appropriate gloves and follow the manufacturer’s handling instructions. The filling solution is not included because of shipping restrictions. Do not treat electrochemical filling solutions or calibration solutions as harmless additions to a nutrient reservoir.
Other reasonable choices include a handheld DO meter for periodic measurements or an optical DO system when lower routine maintenance justifies a higher budget. Neither should be assumed compatible with the Atlas kit without verifying its interface and software path.
Final recommendation
For an existing Atlas Wi‐Fi Hydroponics Kit, use the Atlas EZO DO circuit with a compatible probe, configure it for I2C, install it in AUX, add ThingSpeak field 4, and use current ESP32-S3 firmware rather than copying the 2021 board-selection instructions unchanged. Calibrate at both points, position the probe in representative mixed water, and maintain it as carefully as the pH and conductivity sensors.
The upgrade is worth its cost when DO data will help you diagnose, alert on, or control a meaningful system condition. For a small, stable, well-aerated garden with no plan to act on the data, it is an optional instrumentation upgrade—not a prerequisite for growing.
Quick Recap
Product prices and availability are accurate as of the date/time indicated and are subject to change. Any price and availability information displayed on Amazon at the time of purchase will apply.

