Home-center wood warps because it is still reacting to moisture. A board may look straight in the aisle, then cup, bow, crook, or twist after it rides home in the sun, sits on a garage floor, or dries faster on one face than the other. The best prevention is simple but disciplined: buy better boards, keep them flat, keep air moving around them, protect them from uneven wetting and drying, and install or finish them at the right moisture condition for the project.
On our job sites, we treat lumber movement as moisture management, not bad luck. Wood shrinks as it loses moisture and swells as it gains moisture. If one face, edge, or growth-ring zone changes faster than another, the board moves. You cannot make construction lumber behave like steel, but you can dramatically reduce waste by controlling the few things that matter.
For a homeowner building shelves, trim, a bench, a fence panel, or a small deck, the practical answer is this: inspect every board, reject twist first, buy 10% to 20% extra for visible work, sticker-stack the lumber off the ground, add weight or straps, let interior boards acclimate several days to two weeks, and use the right lumber and fasteners for the exposure.
First, Know What Kind of Warp You Are Fighting
“Warped” is a broad word. Builders usually separate movement into four basic shapes because each one has a different cause and a different chance of being corrected.
Do these 3 things before closing this tab:
1Repair Windows errors before they cause bigger problems2Scan for outdated or missing drivers - takes under a minute3Clear out junk files and repair common Windows errors#1 Best Overall

- HUMIDITY SENSOR: Our handy meter tool can quickly determine what level of remediation is needed to keep your family safe from black mold. High levels of dampness that go untreated are the leading cause of harmful fungus growth in the home.
- WATER LEAK DETECTOR: Finding the moisture content in your wood or drywall is the first step in early prevention. Continuously check and test suspicious water stains around the house so you can determine whether the area is wet or has already dried. Low, medium and high moisture tones and on-screen icons, Reading HOLD button
- MOISTURE READER: The mold test features large 0.3" high digits in a backlit LCD for quick and easy detecting. Our mildew scanner includes extra 8mm stainless steel pins, a protective cap that doubles as a calibration checker, and a “9V” battery.
- MOLD TESTER: For an accurate test read, stick the stainless steel pins into the surface of what you're measuring. The gauge has a broad range of 5 - 50% for wood and 1.5 - 33% for building materials such as concrete and drywall.
- GENERAL TOOLS: We're a recognized leader in designing and developing specialized precision tools dedicated to delivering exceptional customer service. We encourage artisans and DIYers to work smarter, measure better, and repair more productively.
- Cup: The board curls across its width, like a shallow trough. This is common when one face dries faster than the other or when flat-sawn growth rings shrink unevenly.
- Bow: The board bends along its length on the wide face. Lay it flat and the middle rises or drops.
- Crook: The board bends along its length on the narrow edge. This is the banana shape you see when sighting down an edge.
- Twist: The board spirals so the corners no longer sit in the same plane. Twist is usually the hardest defect to correct in a small project.
If you only remember one buying rule, remember this: reject twist first. A slightly bowed 2×4 can often be used for blocking, short pieces, or framing where it can be crowned consistently. A twisted board fights you at every fastener and looks wrong in finish work.
Why Home-Center Wood Warps After You Bring It Home
Most home-center lumber is sold for speed and volume. It may be stacked outdoors, moved through different humidity conditions, bundled tightly, or sold while still wetter than your project needs. That does not mean it is bad lumber. It means you have to match the material to the job.
The core problem is uneven moisture change. Wood does not shrink much along its length, but it does shrink across the grain. Flat-sawn boards tend to cup more than rift-sawn or quarter-sawn boards because the growth rings move differently across the board. Pith-centered boards, heavy knots, juvenile wood, and wild grain all increase the odds of twist, checking, splitting, and cup.
Grade stamps can help. Softwood lumber marked S-DRY is generally surfaced at 19% moisture content or less. MC-15 or some kiln-dried markings indicate a lower maximum moisture content, commonly 15% in grade-mark terminology. That still may be too wet for interior trim, shelves, cabinet parts, or built-ins. In a conditioned home, a practical target is often about 6% to 9% moisture content, depending on region and season.
Pressure-treated lumber deserves special attention. It is often wet when sold, especially standard ground-contact treated material. As it dries, it can shrink, split, cup, and twist. Lower-grade boards with large knots, pith, and uneven grain are more likely to move. If you are building a deck, stair, railing, pergola, or exterior platform, you need to plan for that drying movement instead of assuming the board will stay exactly as purchased.
Buy Straighter Lumber Before You Try to Store Straighter Lumber
Storage cannot rescue a terrible board. The best anti-warping work happens before checkout.
Inspect every board from both ends
Pull the board out far enough to sight down it from one end, then flip and check from the other end. Look down the face for bow, down the edge for crook, and across the corners for twist. Also check the ends for cracks, called checks, and scan the length for large knots, missing corners, bark edges, and crushed forklift damage.
For structural framing, a small amount of crown is normal. Our crews mark crowns and install joists or rafters consistently so the load and fastening system work with the material. For shelves, benches, door trim, wall caps, and painted built-ins, we are much pickier because the eye catches movement immediately.
Quick wins for a faster PC:
Scan for outdated or missing drivers - takes under a minuteDriver Scan →Repair Windows errors before they cause bigger problemsFix Now →Fix the driver behind crashes, sound loss and screen glitchesFind Drivers →Choose better grain when appearance matters
Look at the end of the board. Growth rings that run closer to vertical usually mean the board is closer to rift-sawn or quarter-sawn orientation, which cups less. Growth rings that arc broadly across the width usually mean flat-sawn stock, which is more likely to cup as moisture changes.
Avoid pith-centered 2x material for finish projects. The pith is the center of the tree. Boards containing it are less stable and more likely to twist, check, or split. You will often see pith as a small bullseye or tight center in the end grain.
Buy extra for visible projects
For a rough garage shelf, you may be able to use almost every board. For a stained bench, slat wall, open shelving, or porch detail, buy 10% to 20% extra. That lets you cull unstable pieces, cut around knots and checks, and reserve the straightest stock for the most visible locations.
Rank #2

- FIND HIDDEN WALL MOISTURE EARLY — Check suspicious drywall and building surfaces after a leak, water stain, or other moisture concern. Detect abnormal moisture before a small issue develops into more extensive damage and costly repairs
- CHECK BEFORE YOU REPAIR — Don't rely on a wall looking or feeling dry. Use the moisture meter to check questionable areas before painting, repairing, or covering the surface, helping you make decisions based on actual moisture readings.
- CHECK FIREWOOD BEFORE YOU BURN — Test firewood before placing it in your fireplace or wood stove. Knowing the moisture level of your firewood helps you choose wood that is ready for burning and avoid relying on appearance alone.
- PIN-TYPE TESTING FOR DIRECT MEASUREMENTS — The contact pins penetrate the material to measure moisture inside wood and building materials. This makes it useful for checking areas where surface conditions may not tell the whole story.
- ONE TOOL FOR TWO IMPORTANT HOME CHECKS — Keep it ready for two practical jobs: checking walls for hidden moisture and checking firewood before burning. A simple way to make informed decisions before a moisture problem becomes expensive or wood goes into the fireplace.
Another good tactic is buying a wider board and ripping straighter pieces from it. For example, a decent 2×10 may yield better straight strips than a pile of narrow 2x4s. Wider stock gives you more control over grain, knots, and layout, although it costs more upfront and creates offcuts.
What the Numbers Mean: Cost, Moisture, and Waste
Lumber price headlines can be misleading for homeowners because commodity prices are not the same as retail shelf prices. In late July 2026, a commodity lumber benchmark was around $613.50 per 1,000 board feet, down about 11.79% year over year. Around the same time, builder-market framing lumber data showed the framing lumber index up 1.4% week over week, up 3.1% month over month, and down 0.3% from one year earlier.
That tells you the market direction, not what your local store will charge for a straight 2×6. Retail prices vary by region, species, grade, length, treatment rating, store inventory, demand, and delivery distance. In 2026, pressure-treated retail examples commonly landed in the low-teens for a 2x6x8, with one home-center example around $13.48. Broad pressure-treated category pricing ranged from a few dollars for small pieces to well over $100 for larger or specialty products.
| Item or choice | Typical 2026 cost range | Why it matters for warping |
|---|---|---|
| Basic pin moisture meter | $25-$60 | Helps confirm when interior boards are close enough to room conditions before milling or installation. |
| Better pinless or dual-depth moisture meter | $80-$200+ | Useful for repeated projects, thicker stock, flooring, trim packages, and higher-value material. |
| Scrap stickers or 1×2 spacers | Often free to low cost | Creates airflow between layers so boards dry more evenly. |
| Straps or clamps | $10-$30 each | Helps keep a stack flat while it acclimates. |
| Breathable tarp | $15-$60 | Protects the top from rain and sun while leaving sides open for ventilation. |
| Primer, paint, or end-grain sealer | $10-$40+ per container | Slows uneven moisture exchange after cutting, milling, or installation. |
A $40 moisture meter can be cheaper than replacing three warped boards. Premium stock, kiln-dried-after-treatment lumber, cedar, redwood, hardwood, engineered wood, straight-line-ripped material, and lumberyard delivery may cost more per board, but they can reduce cull waste and callbacks. For high-visibility exterior work, the cheapest board on the rack is often not the cheapest installed board.
Transport Lumber Flat, Supported, and Out of Harsh Sun
A board can start moving before you get home. Long boards hanging out of a short vehicle bed, strapped too hard at one point, or left in direct sun on one face can pick up a bend or begin drying unevenly.
The Tool Desk
Outbyte Driver Updater FREEScan for outdated or missing drivers - takes under a minuteDriver Scan →Outbyte PC Repair FREEClear out junk files and repair common Windows errorsFree Scan →For 8-foot material, support the board along as much length as possible. In a pickup, lay boards flat, align the ends, and strap the bundle so it cannot bounce. For 10-foot, 12-foot, or longer boards, use proper overhang flagging and support. If you are hauling on a roof rack, place the boards on straight supports, strap at multiple points, and avoid crushing edges with a single tight strap.
Do not leave lumber in a hot vehicle, on asphalt, or on a driveway in full sun while you unload the rest of the project. One face can heat and dry faster than the other. That is exactly how a straight board becomes cupped or bowed before you make the first cut.
Store Lumber the Way Crews Store It on a Job Site
Good storage is controlled airflow. Bad storage is one wet side, one dry side, and a board trapped in between.
Keep boards off concrete, soil, and wet floors
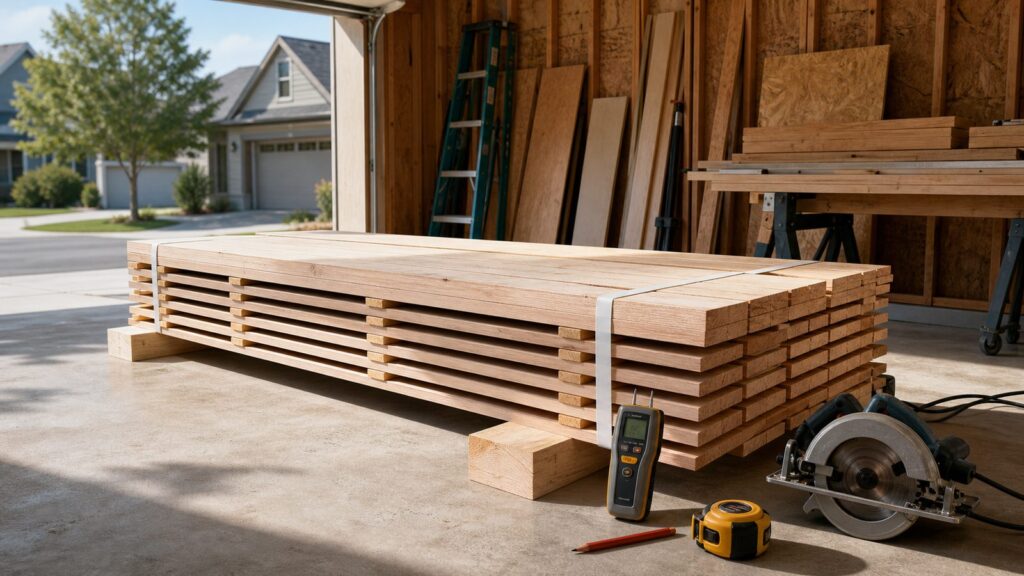
Concrete slabs and garage floors can pass moisture into the bottom face of a board, especially when the slab is cool. Soil is worse. Store lumber on sleepers, sawhorses, shelving arms, or scrap blocking. Even 3 to 4 inches of clearance is better than direct contact, but more clearance and better airflow are preferred.
PC Slower Than It Used to Be?
A free scan shows the junk files, broken settings and background clutter dragging Windows down - then fixes them in one click.Free scan · Windows 10 & 11Crashes, No Sound, or Screen Glitches?
Random freezes, missing sound and display glitches usually trace back to one bad driver. Find and replace yours safely.Free scan · under a minuteSticker-stack the pile
Stickers are narrow spacers placed between layers. Scrap 1x2s work well. Place stickers every 16 to 24 inches for common 1x and 2x boards, closer for thin or flexible stock. Align stickers vertically from layer to layer so the load transfers straight down. Misaligned stickers can create new bends while the wood dries.
Keep the stack flat, square, and supported at the ends. Add weight on top or use straps to keep the pile from moving. The goal is not to crush the boards into submission. The goal is to keep them restrained while moisture equalizes.
Rank #3

- WATER LEAK DETECTOR detects relative moisture content from leaks and flooding
- PINLESS MOISTURE METER measures relative moisture content in building materials
- NONDESRUCTIVE DETECTION up to 3/4-Inch deep using Electromagnetic field (EMF) technology
- USE ON DRYWALL, MASONRY, HARDWOOD, AND SOFTWOOD; calibrated for these materials only
- REVERSE-CONTRAST DISPLAY for easy viewing of reading and nine LED bars to indicate moisture range
Cover the top, leave the sides open
For outdoor storage, protect the top from rain and direct sun. Leave the sides open so air can move. Do not tightly wrap damp lumber in plastic. Plastic traps moisture, slows drying, and can encourage mold or uneven drying.
If lumber must sit outside for more than a few days, raise it well off the ground, slope the cover so water drains, and keep sunlight from baking one side. For finish work, avoid outdoor storage altogether if you can.
Acclimate Interior Lumber Before Cutting and Installing
Interior trim, shelving, built-ins, and furniture-like projects need more stable moisture content than framing lumber. A stud that is acceptable inside a wall may be too wet and unstable for a painted bookcase or floating shelf.
Bring boards into the conditioned space before final milling or installation. For thin trim and common 1x material, allow at least several days. For thicker boards, stair treads, built-in parts, or material that came from a humid store or outdoor rack, allow one to two weeks when the schedule permits. Use a moisture meter if the project matters. A practical target for many conditioned homes is roughly 6% to 9%, but regional and seasonal conditions vary.
Acclimation does not mean leaning boards against a wall in a tight bundle. Sticker them with airflow in the room where they will be used. If you are building in a basement, garage, sunroom, or seasonal cabin, acclimate to that actual environment, not a different room with different humidity.
Mill in Stages for Shelves, Built-Ins, and Finish Work
If you are using home-center boards for woodworking, do not final-cut everything the minute you unload. Rough cut parts slightly oversized first. Let them rest. Then final mill after the board shows what it wants to do.
Recommended Free Tools
A practical sequence for shelves or built-ins is:
- Buy the straightest boards you can find, preferably with stable grain.
- Bring them into the conditioned space and sticker-stack them.
- Rough cut parts 1 to 2 inches long and slightly wide.
- Let the rough parts sit at least overnight, longer for thicker or wetter material.
- Joint, plane, rip, or sand to final size.
- Install or finish promptly after final milling.
Freshly exposed faces exchange moisture faster. If you plane one side of a board and leave it overnight with the other side untouched, you can create imbalance. For high-visibility pieces, mill both faces in stages and finish all sides as evenly as the project allows.
Pressure-Treated Lumber Needs a Different Plan
Pressure-treated wood is often the right material for exterior framing, ground-contact conditions, deck framing, and other damp locations. It is also one of the materials homeowners most often complain about after it dries.
Check whether the boards are wet, kiln-dried, or kiln-dried after treatment. Wet treated lumber will shrink as it dries. Kiln-dried-after-treatment material usually costs more, but it is more stable and often worth considering for high-visibility deck surfaces, porch details, gates, screens, and furniture-like exterior work.
Deck board spacing depends on the moisture condition of the boards. Wet boards may be installed with smaller gaps because they will shrink as they dry. Drier boards need a more deliberate gap at installation. There is no universal gap that fits every species, treatment, board width, and job-site condition. For common 5/4 or 2x deck boards, follow the board supplier’s guidance and local practice, then keep the spacing consistent.
What’s actually slowing this PC down?
Pick the symptom - the matching free tool is one click away.
Use fasteners rated for the treatment chemistry and exposure. Many treated-wood applications require hot-dipped galvanized, stainless steel, or otherwise approved connectors and fasteners. Interior screws, bright nails, and mismatched metal connectors can corrode prematurely in treated lumber. Where a deck, stair, guardrail, ledger, or structural member is involved, fastener choice is not cosmetic. It is part of the assembly’s safety.
Rank #4

- 🌲【Accurate and fast measurements reveal hidden water leaks】: It has 2 high-precision pins that can penetrate the surface to be tested and quickly measure moisture content to estimate potential moisture increase throughout the home. COCZOW moisture meter is the ideal tool for measuring moisture.
- 🌲【Professional Wood Moisture Meter】: 6 calibrated scales. Our moisture meter is a great tool for manufacturers, floorers, inspectors and wood suppliers to quickly and easily measure moisture content (% Mc). You can quickly determine if the moisture content is low (5-12%), medium (12-17%) or high (17-60%). Checking moisture content prevents wood from cracking and warping.
- 🌲【Widely Used】: PM6811A moisture meter is ideal for carpentry, building construction, agricultural restoration and floor laying. Measure moisture content of wood products such as hardwood floors, cabinets, furniture, lumber, lath, beams, plywood, panels, composite boards, window frames, forestry wood, coils, building materials, etc.
- 🌲【User-friendly】: With LCD backlight, the backlight color is divided into three types of green, yellow and red, or display the moisture content of different measurement types. Hold function, maximum/minimum moisture measurement function and 5-minute automatic shutdown function (no power supply required).
- 🌲【Why choose COCZOW Wood Moisture Meter】: LED display function, large measuring range (wood: 2.0%-75.0%. Building materials: 1.5-30%), durable stainless steel needle, heat insulation, light weight and easy to carry. Get professional and accurate results with Peakmeter Wood Moisture Tester.
Install Promptly, But Do Not Force Bad Boards Into Place
Once boards are acclimated, cut, and ready, install them promptly. Lumber sitting loose after final milling has more opportunity to move. Fastening the board into a properly designed assembly helps hold it in service, but fasteners are not a cure for bad stock.
Do not rely on screws to twist a badly warped board into compliance. You may split the board, strip the fastener, distort the assembly, or create stored tension that shows up later. Use badly twisted boards for short blocking, temporary bracing, or hidden cuts if they are still structurally acceptable. For visible work, cull them.
For framing, orient crowns consistently. For decking, place boards based on the best face, grain, crown, and drainage behavior. For trim, prefinish when practical and fasten with the right pattern so the piece is held flat without overdriving nails. For shelving, use proper support spacing. A straight board can still sag if it is asked to span too far under load.
Free tools Windows power users keep installed
One-click scans. No signup required.
Seal and Finish All Faces When Appearance Matters
Paint, stain, primer, and clear finish do not make wood waterproof, but they slow moisture exchange. The key is evenness. A board finished on the top but left raw underneath can still take on and release moisture unevenly.
For painted trim and built-ins, prime cut ends and back-prime pieces where practical, especially in humid rooms, exterior-adjacent locations, and older homes with seasonal humidity swings. For exterior boards, seal end cuts according to the treatment or coating manufacturer’s instructions. End grain absorbs moisture much faster than face grain.
If you are staining visible boards, test the finish on offcuts. Some home-center softwoods absorb stain unevenly around knots and grain changes. Conditioner, sanding sequence, and finish choice affect appearance, but they do not cancel out poor board selection or wet storage.
Common Mistakes That Make Lumber Warp
Most warped-board problems we see come from a short list of preventable mistakes.
- Buying the top board from a wet outdoor stack without checking the full length.
- Assuming a straight board in the aisle will stay straight after a hot drive home.
- Leaving lumber on a driveway, in a truck bed, or in direct sun with one face exposed.
- Stacking boards directly on concrete or soil.
- Using stickers that are spaced too far apart or not aligned vertically.
- Wrapping damp lumber tightly in plastic.
- Using wet pressure-treated boards for tight-gap decking or furniture-like details.
- Skipping the moisture meter on a trim, shelving, or built-in project where replacement would cost more than the tool.
The pattern is consistent: one side gets wetter or drier than the other, or the board had unstable grain from the start.
Independent reader supportYour contribution helps us test, update, and keep practical guides available for everyone.When to DIY and When to Hire a Pro
Preventing lumber warp is well within reach for many homeowners. DIY is reasonable for garage shelves, basic trim repairs, planter boxes, fence pickets, simple benches, and small non-structural projects. Buy extra, inspect carefully, store properly, and use a moisture meter if the finished look matters.
Consider hiring a pro when the work affects structure, water management, safety, or code compliance. Deck ledgers, deck framing, stairs, guardrails, balconies, porch columns, structural beams, load-bearing walls, exterior doors, and large built-ins deserve more scrutiny. Warped lumber in those assemblies is not just frustrating; it can create drainage problems, fastening problems, unsafe connections, or failed inspections.
A professional crew also has better sorting habits. On our jobs, the straightest material gets saved for long visible runs, rails, fascia, and trim. Lesser boards are cut into blocking or short concealed pieces. That kind of material triage reduces waste without pretending every board is equal.
Do these 3 things before closing this tab:
1Fix the driver behind crashes, sound loss and screen glitches2Repair Windows errors before they cause bigger problems3Scan for outdated or missing drivers - takes under a minuteBest Value

- Easy to Read with Large LCD Screen: This wood moisture meter is easy to get an accurate reading from the surface of materials and displays accurate moisture readings on the 2.25" big screen. Use this handheld meter to check the moisture content in firewood or drywall, it can stand up on the table, the moisture content is displayed with a bar graph and percentage (_%RH) on the screen. Date Hold and Max/Min function is used to freezes readings, useful for writing down data
- Tricolor Backlight Display, Easy to Use: TopTes Moisture Meter TS-630 features an HD tri-color backlight to easily know if the wood/wall humidity is Dry, Moist, or Wet. Green backlight for Low moisture, orange backlight for middle moisture, and red moisture for high moisture. After selecting the mode, and putting pins into the firewood, easy and quick to get a visible alert from the clear screen
- Seven Calibration Scales, Two Material Mode: It is designed with built-in characteristic parameters of 7 calibration scales for wood and building material, ranging from 0.0% to 57%. This humidity meter is perfect for woodworking, water damage restoration, building construction, and home renovation. Easily Check and test suspicious water leaks around the wall/floor so you can quickly determine what level of remediation is needed
- Pin Type & Battery Operated: TopTes TS-630 moisture meter is a pin-type moisture meter and operates on batteries. With a high precision multi-material sensor, DON’T need calibration. It’ll support an accurate reading after inserting the stainless steel pins into the surface of the wood or building materials. It will auto shut off after 10 minutes of non-use to help save energy. A low-battery indicator will appear on the screen when the battery is running out
- What's in the Box: One TS-630 Moisture Meter, three AAA Batteries, one User Manual, one Carry Pouch, one Pair of Test Pins, one Mini Wrench
Safety, Code, and Permit Notes
Warped wood becomes a code or permit concern when it is part of a structural or life-safety assembly. A cupped fence picket is mostly cosmetic. A twisted deck joist, split stair stringer, distorted guard post, or improperly fastened treated ledger is a different matter.
Use code-rated lumber for the exposure. Ground-contact treated lumber is required in many damp or near-soil conditions. Above-ground treated lumber is not automatically acceptable everywhere. Follow local code, the project drawings if you have them, and the treatment label or end tag.
Wear eye protection when cutting, drilling, or fastening. Use a dust mask or respirator when cutting treated lumber, engineered wood, or dusty material. Do not burn treated offcuts. Wash hands before eating, and collect sawdust instead of spreading it into garden soil or play areas.
For decks, stairs, guards, and structural exterior work, check permit requirements before starting. Many jurisdictions require permits for new decks, major deck repairs, structural changes, and guardrail modifications. The inspector will care about spans, ledgers, flashing, connectors, fasteners, footing size, guard height, stair geometry, and material rating. Straight lumber is only one part of a compliant assembly.
What’s actually slowing this PC down?
Pick the symptom - the matching free tool is one click away.
A Practical Anti-Warp Checklist
Use this sequence for most home-center lumber projects:
- Match the material to the job: framing, finish, exterior, ground contact, or appearance-grade.
- Read the stamp or tag. Look for moisture marks such as S-DRY, KD, or MC-15 where applicable.
- Sight every board from both ends. Reject twist first.
- Choose stable grain when possible. Avoid pith-centered boards for finish work.
- Buy 10% to 20% extra for visible projects.
- Transport boards flat, supported, strapped, and shaded from harsh one-sided sun.
- Store boards off concrete and soil.
- Sticker-stack with spacers every 16 to 24 inches and align stickers vertically.
- Add top weight or straps while allowing airflow.
- Cover the top from rain and sun, but keep sides ventilated.
- Acclimate interior boards several days to two weeks before final milling or installation.
- Use a moisture meter for trim, shelving, flooring-adjacent work, and built-ins.
- Mill in stages when precision matters.
- Seal end grain and finish faces evenly.
- Install promptly with correct spacing, fasteners, and code-rated material.
The short version: control moisture, select better grain, and do not ask fasteners to fix lumber that should have been culled. That approach costs a little more time at the rack and a little more care in storage, but it saves boards, frustration, and rework.
Frequently Asked Questions
Why does home-center wood warp after I bring it home?
It usually warps because its moisture content changes unevenly. One face, edge, or growth-ring area dries or absorbs moisture faster than the rest, causing cup, bow, crook, or twist.
How long should lumber acclimate before I build with it?
For interior trim, shelves, and built-ins, allow several days to two weeks depending on thickness and starting moisture. A practical target in many conditioned homes is about 6% to 9% moisture content.
Should I store lumber flat or standing up?
Store it flat whenever possible, off the ground, with stickers between layers every 16 to 24 inches. Align the stickers vertically and add top weight or straps while leaving airflow around the stack.
Does pressure-treated wood warp more than kiln-dried lumber?
Pressure-treated lumber is often wetter when sold, so it can shrink, split, cup, or twist as it dries. Kiln-dried or kiln-dried-after-treatment lumber generally costs more but is usually more stable.
What does S-DRY, KD, or MC-15 mean on a lumber stamp?
S-DRY generally means the lumber was surfaced at 19% moisture content or less. KD means kiln dried. MC-15 indicates a common maximum moisture content of 15%, which is drier than standard S-DRY.
Can I straighten a warped board after it twists or cups?
Minor bow or cup can sometimes be managed by cutting shorter pieces, fastening correctly, or milling the board. Bad twist is difficult to fix reliably and is usually better culled or used for blocking.
Free tools Windows power users keep installed
One-click scans. No signup required.
Quick Recap
Product prices and availability are accurate as of the date/time indicated and are subject to change. Any price and availability information displayed on Amazon at the time of purchase will apply.