What’s actually slowing this PC down?
Pick the symptom - the matching free tool is one click away.
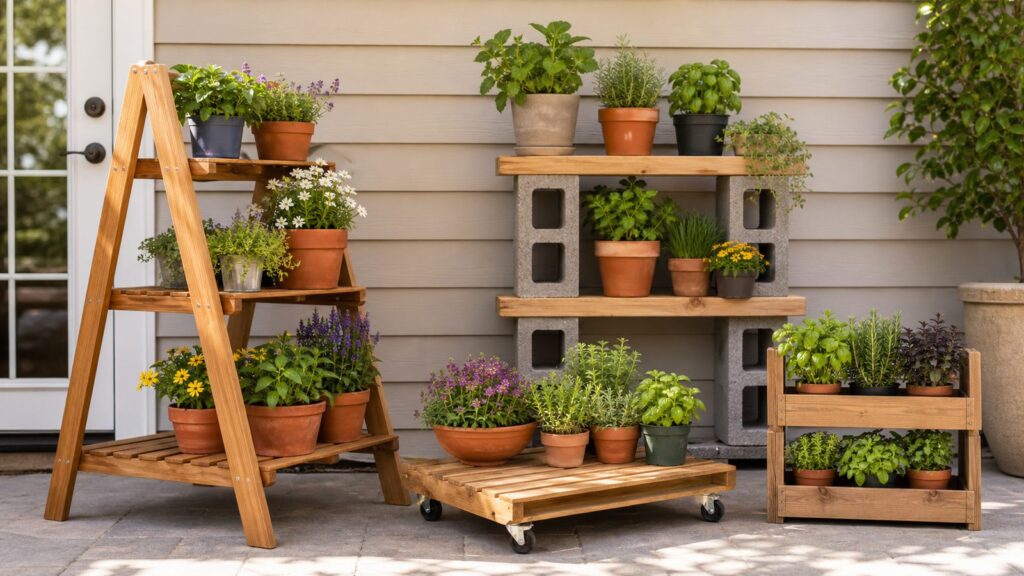
A good outdoor plant stand does three things: it shows off the plants, drains water instead of trapping it, and stays stable after rain, wind, and a few seasons of use. The cheapest version can be as simple as two boards and several cinder blocks. A more finished cedar ladder stand or rolling patio bench can look built-in and still be a weekend project.
For 2026, most homeowners can build a useful outdoor plant stand for about $25 to $200, depending on the material. Small crate or pallet projects can run $15 to $50 if you already have usable wood. A cinder-block-and-board stand usually lands around $25 to $90. A wood ladder or tiered stand is commonly $40 to $125 in pine or pressure-treated lumber, and $75 to $200 in cedar or redwood. A rolling patio plant bench typically costs $90 to $250, with outdoor locking casters alone adding about $25 to $80.
On our job sites, the plant displays that last are not the most complicated ones. They are the ones built around the actual pots, the wet weight of the soil, and the exposure. Before you cut a board, measure your pots, count how many you want to display, and assume every container will be heavier after a storm than it is when you carry it home from the garden center.
Start With Weight, Drainage, and Location
Most failed DIY plant stands have the same causes: too much weight on the top shelf, indoor fasteners used outside, standing water trapped against wood, or a narrow base sitting on uneven pavers. A 20-inch ceramic pot with wet soil and a mature plant can weigh well over 100 pounds. Three of those on a high shelf can turn a decorative project into a structural problem.
Do these 3 things before closing this tab:
1Scan for outdated or missing drivers - takes under a minute2Repair Windows errors before they cause bigger problems3Fix the driver behind crashes, sound loss and screen glitchesUse this quick planning process before choosing one of the four builds below:
- List the pots first. Note each pot diameter, height, and likely wet weight. Small 6- to 8-inch nursery pots are easy. Large ceramic, concrete, and self-watering planters are not.
- Keep heavy containers low. Put large pots on the bottom tier or directly on the ground. Use upper shelves for herbs, annuals, starts, and lightweight plastic nursery pots.
- Build in drainage. Slatted shelves with 1/4- to 1/2-inch gaps let water escape and allow air under pots. Avoid flat plywood shelves unless they are well sealed, sloped, or protected with removable trays.
- Use exterior-rated hardware. Choose galvanized or exterior-coated screws as a baseline. In coastal areas, stainless fasteners are worth the upgrade.
- Raise wood off wet surfaces. Use plastic glides, paver feet, composite scraps, or treated blocks so end grain does not sit directly on concrete, soil, or mulch.
If the stand is going on a deck or balcony, slow down. Residential decks are commonly designed around a 40 pounds per square foot live-load baseline, but large wet planters create concentrated loads. Older decks, cantilevered balconies, questionable railings, and clustered heavy pots deserve extra caution. When in doubt, place heavy planters near bearing points, keep the stand low, and ask a qualified pro to look at the structure.
#1 Best Overall

- Compact Size: Standing at 46 in tall and 8.8 in wide at the base, this corner plant stand fits perfectly in tight spaces; enhances any living space with its sleek design; a great addition for a plant stand indoor tall setup
- Spiral Structure: This tiered plant stand uses four staggered levels to give each plant its own space, creating an open, organized display.
- Drainage Design: Features perforated trays that prevent water accumulation; ensures your plants are well-drained and healthy; ideal as an outdoor plant stand or flower stand for your garden
- Adjustable Feet: Equipped with adjustable feet to level the plant holder on any surface; maintains balance and stability for a worry-free display; perfect for an indoor plant stand or uneven floors
- Easy Assembly: Simple construction allows for quick and hassle-free assembly; set up your metal plant stand in no time and enjoy its stylish presence; designed for convenience and elegance
Cost and Build Comparison
| Plant stand idea | Typical 2026 DIY cost | Best location | Skill level | Time estimate |
|---|---|---|---|---|
| Tiered cedar ladder plant stand | $75-$200 in cedar or redwood; $40-$125 in pine or pressure-treated lumber | Patio, porch, sunny wall, garden edge | Moderate | 4-7 hours plus finish drying |
| Cinder-block-and-board modular stand | $25-$90 | Ground-level patios, gravel pads, garden beds | Beginner | 1-2 hours |
| Rolling patio plant bench | $90-$250 | Smooth concrete patios, covered porches, garages | Moderate | 4-8 hours plus finish drying |
| Repurposed crate or pallet herb stand | $15-$50 with reclaimed material | Fence line, shed wall, porch wall, compact patios | Beginner to moderate | 2-5 hours |
Tool costs change the math if you are starting from nothing. A basic drill/driver may run $40 to $150, a circular saw or miter saw $50 to $250, a sander $30 to $100, clamps $10 to $40, and a tape, level, and square another $15 to $60. If you already own the tools, the projects below stay inexpensive. If you are buying every tool for one stand, a ready-made stand or a handyman-built version may be cheaper.
Idea 1: Tiered Cedar Ladder Plant Stand
A tiered ladder stand is the best all-around DIY outdoor plant stand for homeowners who want a finished look without building cabinetry. It leans visually like a ladder but should be freestanding, braced, and wide enough that it does not depend on a wall for stability.
Recommended Size
A practical patio version is about 36 inches wide, 18 to 22 inches deep at the base, and 42 to 48 inches tall. Use three shelves: a bottom shelf around 12 inches deep, a middle shelf around 9 to 10 inches deep, and a top shelf around 6 to 8 inches deep. That gives you room for watering while encouraging the heavier pots to stay low.
Materials
- Two 1×4 or 2×4 cedar boards for side rails, depending on height and load
- 1×4 cedar slats for shelves, spaced 1/4 to 1/2 inch apart
- exterior-rated screws, typically 1-5/8 inch for 1x material and 2-1/2 inch for heavier framing
- waterproof exterior wood glue where joints benefit from it
- exterior stain, penetrating oil, or water-repellent sealer
- small angle brackets or diagonal wood braces to reduce racking
Cedar is a strong choice because it looks good outdoors and has natural decay resistance. Redwood offers similar benefits at a higher cost in many markets. Pressure-treated pine is more economical and durable, but it usually looks more utilitarian. For painted stands, pressure-treated lumber can make sense, but let wet treated boards dry before finishing.
Build Notes
Cut the two side frames first, then dry-fit the shelves before fastening. Pre-drill near board ends to prevent splitting. Set the back legs nearly vertical and angle the front legs outward slightly for a wider footprint. If the stand is 48 inches tall, keep the base at least 20 inches deep and avoid placing anything heavier than small herb pots on the top shelf.
Use slatted shelves instead of solid panels. We typically leave 3/8-inch gaps on outdoor shelf surfaces because they drain quickly but still support common pots. Seal the cut ends before assembly if possible, then coat the full stand after sanding. Pay attention to screw holes and end grain; those are common water-entry points.
Recommended Free Tools
Best Use
This is the stand for herbs, annuals, succulents, and decorative porch containers. Keep 10- to 12-inch pots on the bottom shelf, 6- to 8-inch pots in the middle, and small containers on top. If the stand will sit where wind funnels between houses, add a discreet wall strap or ground anchor rather than trusting weight alone.
Idea 2: Cinder-Block-and-Board Modular Stand
The cinder-block-and-board stand is the fastest, most forgiving build on this list. It is also one of the best options for renters because it can be taken apart without saw cuts or permanent anchors, assuming local rules allow it.
Recommended Size
For a basic two-tier stand, use four to six concrete blocks and two exterior boards. A common setup is two 8x8x16-inch blocks at each end with 2×8 or 2×10 boards spanning across them. Keep spans conservative. For typical potted plants, a 36- to 48-inch board span is easier to keep stiff than a 6-foot span.
Materials
- Four to eight concrete blocks
- One to three exterior-rated boards, such as pressure-treated 2x8s, cedar 2x8s, or composite deck boards
- Paver base, compacted gravel, or patio stones for uneven ground
- Exterior paint or masonry sealer if you want a finished look
- construction adhesive rated for masonry if you want a semi-permanent assembly
This build commonly costs $25 to $90. The wide range comes from block style, board species, board length, delivery fees, and whether you paint or seal the components.
Build Notes
Level the base first. Blocks sitting on soft soil will settle after rain and freeze-thaw cycles. On soil, scrape away organic material and use compacted gravel or pavers under the blocks. On a patio, use a level and outdoor shims where needed.
Rank #2

- >7-Pots Plant Stand: Featuring a ladder design that allows unobstructed sunlight, this plant rack accommodates more than 7 pots, making it an ideal decorative piece for organizing your plant collection. Suitable for both indoor and outdoor use.
- Multifunctional Application: Natural Living Space: Transform any space - living room, bedroom, office, or balcony - into a vibrant paradise. This versatile plant stand not only serves as a decorative and storage shelf but also showcases your precious plants.
- Durable and Sturdy:This plant stand requires no screws, making it perfect for DIY enthusiasts. Utilizing the clever application of the triangular stability principle, it enhances stability. Additionally, plastic joints reinforce the structure of the plant stand, ensuring its durability.
- Carbonized Natural Wood: The eucalyptus wood, treated at 570°F for carbonization, enhances waterproof performance and extends the lifespan (though outdoor lifespan may be slightly shorter).
- Easy Installation, Detailed Instructions:Simple setup with clear instructions. Enjoy the beautiful decoration and functionality of this plant stand right away - perfect for beginners!
Orient blocks so the stand cannot easily roll or rock. Keep the lower tier low and heavy. The mass of the blocks helps in wind, but that does not mean the upper shelf can carry oversized pots. For a 48-inch span, use thick boards and avoid loading the middle with a single very heavy container.
If children regularly use the area, consider bonding blocks and boards with construction adhesive or choosing a different design. Dry-stacked stands are convenient, but any movable masonry piece can shift if climbed on or hit.
Best Use
This is the right stand for vegetable starts, nursery pots, mixed patio containers, and utility garden storage. It works especially well along a fence, beside a shed, or on a ground-level patio where weight is not a deck concern. It is less appropriate for balconies because the blocks add dead load before you add a single plant.
Idea 3: Rolling Patio Plant Bench With Locking Casters
A rolling plant bench is useful when you need to chase sun, move plants under cover before storms, or clear a patio for cleaning. The key is restraint: rolling stands should be broad and low, not tall and narrow. Casters make a stand more convenient, but they also raise the center of gravity and introduce movement.
Recommended Size
A stable home version is about 42 to 48 inches long, 18 to 24 inches deep, and 18 to 24 inches tall. Think of it as a low bench, not a shelving tower. Use four locking outdoor casters rated for more than your expected load. If your finished stand plus plants may weigh 250 pounds, do not use four tiny 50-pound casters and assume you are fine. Build in a margin.
Materials
- 2×4 framing lumber for the base
- 5/4 deck boards, cedar boards, or 1x slats for the top
- Four outdoor-rated locking casters
- Exterior structural screws or bolts for caster plates
- Corner braces if the frame needs extra stiffness
- Exterior stain, sealer, or paint
Plan on $90 to $250. Locking outdoor casters commonly add $25 to $80 by themselves, and costs rise with cedar, thicker boards, better fasteners, and finish.
Build Notes
Build the frame square and stiff. A basic layout uses a 2×4 rectangle with intermediate cross supports every 16 inches or so, then slatted deck boards across the top. Leave drainage gaps between top boards. Through-bolt the casters where possible, or use stout exterior screws sized for the caster plate and frame thickness.
Quick wins for a faster PC:
Scan for outdated or missing drivers - takes under a minuteDriver Scan →Repair Windows errors before they cause bigger problemsFix Now →Use locking casters on all four corners, not just two. Set the brakes whenever the bench is parked. Rolling benches belong on smooth concrete, garage slabs, and level covered porches. They are a poor match for uneven paver patios, gravel, sloped walks, or tall narrow layouts.
If the bench sits outside year-round, raise the wood frame above splashback as much as the caster design allows. Recoat the top surface as wear appears. Rolling stands get dragged, washed, and exposed at the bottom edges, so inspect the fasteners and caster plates at least twice a year.
Best Use
This is ideal for citrus in lightweight pots, seedling trays, seasonal flowers, and plants that move between shade and sun. Avoid using it for several large ceramic containers unless you have verified caster ratings, frame strength, and the surface it rolls on.
Rank #3

- SIMPLE STYLE PLANT SHELF: Package includes 5 metal plant stands for indoor and outdoor use. Each metal plant stand has different size to fit different sizes of flowerpots. Decorative iron art plants stand with aesthetic design adds a stylish and nature touch to your home.
- 5-SIZE PACK METAL PLANT STAND: These plant stands are made of high-strength metal, not easily deformed, can carry loads of up to 130 pounds. Perfect for heavy plants pots or other planter.
- UPGRADE DESIGN: The top of these planter stand designed with guard rails which can prevent the pots from slipping. Very sturdy and stable, without tilting and tripping. flower pot placed on the potted plant stand as steady as they are on the ground.
- RUSTPROOF DURABLE & FLOOR PROTECTING: The surface of the planter stand is coated with an anti-rust coating, which will not rust in a humid environment. And the bottom of the stand is designed with a protective pad to prevent any scratches and wear on the floor.
- HOME DECOR: Place the plant stand for your home, condo, cabin, office, apartment, coffee shop, business, or anywhere else you can think of! made it attractive and eye-catching in these places.
Idea 4: Repurposed Crate or Pallet Vertical Herb Stand
Reclaimed wood can make a compact herb stand with character, but it is the project where material judgment matters most. Unknown pallets, flaking paint, chemical residue, and embedded fasteners are not minor details when edible herbs or vegetables are involved.
Outdated Drivers Are Slowing You Down
One free scan finds every outdated or missing driver and matches the right update for your exact hardware.Free scan · exact hardware matchWindows Errors? Fix Them Before They Spread
Repair common Windows errors and clear accumulated junk for a smoother, more stable PC - no reinstall needed.Free scan · no reinstallRecommended Size
For a crate stand, stack or fasten three to four sturdy wood crates in a stepped layout no taller than about 48 inches. For a pallet herb stand, keep it vertical against a wall or fence and add planter boxes or fabric pockets. A common finished size is roughly 36 to 40 inches wide and 48 inches tall.
Material Safety
For edible plants, use new known-safe lumber when possible. If you use pallets, look for heat-treated markings and avoid wood with unknown spills, oily stains, strong odors, rot, or old paint. Do not use flaking painted boards unless you can verify the coating is safe; older paint can create lead exposure risks. Line planter boxes so soil does not directly contact questionable salvaged surfaces.
Build Notes
Remove or set all protruding nails and staples. A careful visual inspection is not enough; run a magnet or metal detector over cut lines before sawing reclaimed boards. Sand rough surfaces, ease sharp corners, and use exterior screws instead of brad nails.
For a crate tower, fasten crates to each other and add a wider base board if the layout is narrow. For a pallet stand, secure it to a wall, fence post, or freestanding frame. Add drainage holes to planter boxes and use landscape fabric or liners where soil would otherwise wash out. Leave enough vertical clearance for watering and pruning; herbs become frustrating fast when shelves are too tight for your hand and watering can spout.
Expect $15 to $50 if the wood is free or already on hand. The real cost is usually screws, sanding supplies, stain or sealer, liners, and the time required to make reclaimed material safe and clean.
Best Use
This is a strong choice for basil, thyme, parsley, mint in contained pots, small flowers, and porch greenery. It is not the right structure for heavy ceramic planters or tall tomato plants unless you rebuild it as a properly framed support.
Materials That Survive Outdoors
Outdoor plant stands live a harder life than indoor furniture. They get wet from above, wick moisture from below, and stay shaded under pots. Choose materials with that exposure in mind.
Cedar and redwood are the best-looking natural wood choices for many homeowners. They cost more than pine but hold up well when detailed correctly. Use them for ladder stands, porch displays, and visible patio pieces.
The Tool Desk
Outbyte Driver Updater FREEFix the driver behind crashes, sound loss and screen glitchesFind Drivers →Outbyte PC Repair FREERepair Windows errors before they cause bigger problemsFix Now →Pressure-treated lumber is economical and durable for outdoor use. It is a practical choice for utility stands, lower frames, and painted projects. Use appropriate fasteners rated for treated lumber.
Rank #4

- Outdoor Indoor Metal Plant Stand - This plant holder can be used outdoor and indoor and makes a seamless addition to most modern, contemporary and farmhouse-style homes.A great decoration for flower shops, home, gardens, balconies, or patios.
- Safety And Stability - The pedestal 3-leg integrated structure design makes the flower stand more sturdy and maintains balance for a long time, we have verified that the plant stand can bear 100Lb and work continuously.
- Rustproof and Lightweight - This plant shelf has black powder-coated finish to help resist rust and corrosion. The wrought iron plant stand is lightweight enough to easily move around your garden or home without sacrificing strength.
- Space Saving Versatile Stands - The plant rack can be used as a storage rack for planter, flowers, toiletries, towels, sundries or other household items.
- Specifications and Installation - 2-tier tall plant holder total dimensions: 12.7in W x 12.7in D x 27.1in H, Weight: 3.8 lbs. The bottom and top frame hold pots or planters up to 10-in and 11.8-in. Easy to assemble, just Just need to tighten the screws and takes few minutes.
Composite deck boards resist rot and work well as shelf surfaces, though they need adequate framing because they can flex. They are useful for wet areas and low-maintenance benches.
Concrete blocks and metal pipe bring mass and weather resistance. They are good for ground-level stands where weight is not a problem.
Exterior plywood can work for protected panels, but it is not my first choice for open shelf surfaces. If used, seal all faces and edges carefully and keep water from sitting on it.
Free tools Windows power users keep installed
One-click scans. No signup required.
Waterproofing, Drainage, and Maintenance
No finish turns a plant stand into a no-maintenance object. Treat finish as a service item, not decoration only.
For wood stands, sand exposed surfaces, seal cut ends, and apply an exterior-rated stain, penetrating oil, paint, spar urethane, or water-repellent sealer. Follow the product label for drying time and recoating. In practical terms, inspect the stand at the start and end of the growing season. Tighten loose fasteners, clean algae or soil buildup, and recoat worn horizontal surfaces before bare wood is exposed for long.
Drainage details matter more than the brand of stain. Use slatted shelves with 1/4- to 1/2-inch gaps. Put pots on feet. Avoid leaving saucers directly on wood shelves because they trap water. If you need saucers to protect a porch or pavers, empty them after watering and give the shelf a chance to dry.
On concrete and pavers, use pot feet or trays to reduce staining. On soil, avoid setting wood legs directly into mulch or dirt. Use pavers, glides, or masonry feet so the stand stays level and the wood does not wick moisture.
Safety, Codes, and Permits
Most small freestanding plant stands do not require a building permit. That changes when the project becomes attached to a building, tied into a guardrail, built as part of a deck, wired for lighting or irrigation controls, or large enough to affect access and structural loading.
Do not fasten a heavy plant stand to a deck railing and assume the railing can carry it. Guardrails are built for specific safety loads, not for hanging rows of wet planters. Do not place heavy masonry stands on elevated balconies without checking the rules and load capacity. If you are clustering large planters on a deck, especially near the middle of a span, ask a qualified contractor or structural professional to evaluate the situation.
For outdoor electrical accessories, use equipment rated for outdoor use, keep cords out of standing water, and use GFCI-protected outlets. Grow lights, pumps, heated mats, and timer-controlled irrigation should be treated as exterior electrical work, not casual indoor extension-cord use.
Wind is another safety issue. Tall stands should have a broad base, diagonal bracing, and, where needed, discreet anchoring. Lightweight plastic pots can blow off upper shelves. In storm-prone areas, design the stand so upper pots can be moved quickly or secured.
Best Value

- >10 Pots Large Plant Table: The wooden plant shelf includes 10 shelves, which can hold 11-25 pots of regular size. it can hold a high plant pot plant; Bearing up to 150 pounds, it is recommended to place a heavier flower pot below and a lighter flower pot on the upper layer.
- Hanging Flower Stand: Bamworld Plant Table's unique hanging functionality. With a spacious 30-inch center and 30”*11.8”*42.5 dimensions, this versatile shelf accommodates tall plants and offers the option to hang it, adding a dynamic dimension to your indoor or outdoor space. Perfect as a gift for a plant lover.
- Carbonized Natural Wood: Eucalyptus wood is carbonized at 300°C to enhance waterproof performance and extend service life for both indoor and outdoor use, though outdoor durability may be slightly shorter.
- Multi-Functional Application: This versatile Flower stand can not only be used as a decoration and storage rack but also as a display for your precious plants. Transform any space - living room, bedroom, office, or balcony - into a vibrant paradise.
- Easy Installation, Detailed Instructions: Simple setup with clear instructions. Enjoy the beautiful decoration and functionality of this plant stand right away - perfect for beginners!
When to DIY vs. When to Hire a Pro
DIY makes sense when the stand is freestanding, under about 4 feet tall, built from standard lumber or blocks, and loaded with small to medium containers. If you can measure accurately, cut square, pre-drill, and use exterior screws, these projects are well within weekend range.
Hire a carpenter, handyman, or contractor when the stand is large, attached to a structure, integrated with a deck or railing, built for very heavy planters, or located on an elevated balcony. Professional help is also sensible when you want built-in irrigation, lighting, custom metalwork, or a finished piece that needs to match an existing porch or patio.
A hired custom outdoor plant stand commonly runs $150 to $600 or more depending on design time, lumber, finish, site anchoring, and local labor rates. That is more than a basic DIY build, but it can be the right call when the project affects safety, drainage against the house, or an expensive outdoor living area.
Common Mistakes to Avoid
- Building too tall and narrow. A plant stand should be harder to tip than it looks. Widen the base before adding height.
- Forgetting wet soil weight. A pot that feels manageable at planting time can become much heavier after rain.
- Using indoor hardware. Interior screws, brad nails, and non-exterior glue do not belong in weather-exposed assemblies.
- Trapping water under pots. Flat shelves and saucers left full of water lead to decay, mosquitoes, root problems, and stained hardscape.
- Ignoring salvaged wood risks. Unknown pallets, chemical stains, rot, embedded nails, and old paint are all reasons to reject material.
- Skipping bracing. Diagonal bracing or corner brackets are cheap insurance against wobble.
- Putting too much weight on decks or balconies. Large grouped planters can become structural loads, not simple decor.
Final Builder Recommendations
If you want the best-looking all-purpose project, build the tiered cedar ladder stand and keep the heavy pots low. If you want the cheapest strong stand, use cinder blocks and exterior boards on a level ground surface. If you need flexibility on a smooth patio, build the rolling bench low and wide with properly rated locking casters. If you want a compact herb display, use crates or a carefully selected heat-treated pallet, but be strict about material safety for edible plants.
The best DIY outdoor plant stand is not just the one that looks good on day one. It is the one that still sits level after rain, drains cleanly after watering, keeps heavy pots where they belong, and can be inspected and tightened before small problems become failures.
Frequently Asked Questions
What is the cheapest way to build an outdoor plant stand?
A cinder-block-and-board stand or a reclaimed crate stand is usually cheapest. In 2026, expect about $25-$90 for blocks and boards or $15-$50 for a crate or pallet project if the reclaimed wood is usable.
What wood is best for an outdoor plant stand?
Cedar and redwood are strong choices for appearance and natural decay resistance. Pressure-treated pine is a budget-friendly outdoor option, and composite deck boards work well for low-maintenance shelf surfaces.
How much weight can a DIY plant stand hold?
It depends on the design, lumber size, fasteners, span, and bracing. Plan from the actual pot list, assume soil will be wet, and keep large containers on the lowest shelf. A single 20-inch ceramic pot with wet soil can weigh well over 100 pounds.
Do these 3 things before closing this tab:
1Clear out junk files and repair common Windows errors2Scan for outdated or missing drivers - takes under a minute3Repair Windows errors before they cause bigger problemsDo I need a permit to build an outdoor plant stand?
Most small freestanding plant stands do not need a permit. Check local rules if the stand attaches to a house, deck, balcony, railing, or includes electrical work, plumbing, lighting, or built-in irrigation.
Can I put a heavy plant stand on a deck or balcony?
Use caution. Decks are commonly designed around a 40 psf live-load baseline, but large wet planters create concentrated loads. Older decks and balconies should be checked before adding grouped heavy pots or masonry stands.
Are pallets safe to use for an herb or vegetable plant stand?
Only use pallets you can verify as clean and heat-treated, with no chemical stains, odors, rot, or flaking paint. For edible plants, new known-safe lumber or lined planter boxes are the safer choice.
Quick Recap
Product prices and availability are accurate as of the date/time indicated and are subject to change. Any price and availability information displayed on Amazon at the time of purchase will apply.