PC Slower Than It Used to Be?
A free scan shows the junk files, broken settings and background clutter dragging Windows down - then fixes them in one click.Free scan · Windows 10 & 11Outdated Drivers Are Slowing You Down
One free scan finds every outdated or missing driver and matches the right update for your exact hardware.Free scan · exact hardware matchIf your garage door will not close, first clear the photo-eye beam path and gently clean both sensor lenses. Then use your opener’s manual to identify the sender and receiver, aim them at one another, and adjust until the receiving sensor shows the aligned state specified for your model. Secure the bracket without shifting it, then perform the manufacturer’s safety test before relying on the door.
Before adjusting the sensors
- Keep people, pets, and objects clear of the door and the beam path.
- Remove anything blocking the sensors, including stored items, cobwebs, or dirt, and clean the lenses gently.
- Find the opener’s make and model and consult its manual. Sensor roles, indicator colors, and adjustment procedures vary by system; do not assume a particular color means alignment across all brands.
How to align the sensors
- Locate the photo-eye pair near the bottom of the door opening. Identify the sender and receiver using the labels or instructions for your opener.
- If the opener is a Chamberlain or LiftMaster model, disconnect power before installing or adjusting the sensors, as the manufacturer directs. For other makes, follow the specific manual’s safety instructions.
- Loosen the relevant bracket only enough to move the sensor. Aim the lenses directly toward one another while keeping the beam path clear.
- Follow the model’s indicator guidance. On Chamberlain/LiftMaster systems, adjust the receiving sensor until its LED glows steadily, then tighten the wing nut. Other systems may use a different light color or alignment method.
- Check that the indicator remains in its model-specific aligned state after tightening. If it changes, reposition the sensor carefully and secure it again without twisting the bracket.
Check sensor height and placement
Mounting-height guidance differs by manufacturer. Chamberlain/LiftMaster says its sensors should be no higher than 6 inches above the floor; Genie specifies 5 to 6 inches for its Safe-T-Beam system. These are system-specific instructions, not a universal measurement. Consult your opener’s manual for the correct placement.
For Genie Safe-T-Beam sensors, the manufacturer notes that its green sensor may be positioned farther from the opening to avoid direct sunlight, provided it retains a clear view of the other sensor. Do not move a sensor in a way that compromises the beam path.
Troubleshoot by symptom
The beam is blocked or the lenses are dirty
Clear the obstruction and clean the lenses before moving brackets. Chamberlain/LiftMaster lists obstructions among common causes of sensor problems.
Do these 3 things before closing this tab:
1Fix the driver behind crashes, sound loss and screen glitches2Clear out junk files and repair common Windows errors3Scan for outdated or missing drivers - takes under a minute#1 Best Overall

- Universal Compatibility: Replacement for craftsman/Chamberlain/Liftmaster garage door sensor, Compatible with all garage door openers manufactured by Liftmaster/Sears/Chamberlain/Craftsman after 1997, Incompatible with MYQ.
- Easy to Install and Program: 41a5034 Garage Door Opener Safety Beam Kit with Brackets can replace: 820CB , G801CB-P, 2610459, 012381050345, 041A5034, 801CB, 41A5266-1, 041-0136. A detailed user manual is included to help you get set up and install in minutes. TIPS: Be sure power is NOT connected to the garage door opener BEFORE installing the safety reversing sensor.
- Updated Design: 041A5034 Safety sensor emits an invisible beam of light on the inside of the garage door, whenever there is an obstacle, the garage door automatically reverses before causing any damage to prevent accidents.
- Package Includes: Detailed installation instructions*1, Sending sensor *1(with an amber LED), Receiving sensor *1 (with a green LED), Wire connectors *7, Wingnut *3 and 1/4-20" round head bolt *3.
- High-quality After-sales Service: Our products provide a one-year warranty service, no matter for any reason you are not satisfied, please write to us, we will provide you with timely service. Note: Accessories are compatible spares (non-original), the above brand names and any related model names are only used to demonstrate compatibility.
The receiving indicator flickers or does not show alignment
Re-aim the receiving sensor according to the opener’s procedure. Once its indicator stabilizes, secure the bracket and confirm the light stays in the aligned state.
An indicator stays off
An unlit indicator does not by itself prove that misalignment is the cause. Check sensor installation and wiring as directed by the manual. Chamberlain/LiftMaster troubleshooting guidance also identifies wiring as something to check.
Rank #2
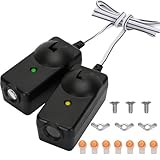
- What will you get? 41A5034 Garage Safety Sensors Kit Includes 2 Safety Sensors (Receiving&Sending) (with attached wires), 3 Mounting Screws, 3 Wing Nuts, 1 installation Instructions and 7 Wire Crimps. The line length is 19.68 inch.
- Universal Compatibility: Our 41A5034 garage door sensor Compatible with all garage door openers manufactured by Liftmaster/Sears/Chamberlain/Craftsman after 1997. Replaces 041-0136, G801CB-P, 2610459, 012381050345, 041A5034.
- Quality & Durability Assurance: The 41A5304 safety sensor is constructed from high‑quality ABS material, manufactured on automated production lines under strict ISO 9001 quality control. Each unit undergoes intelligent automated testing and manual sampling to ensure flawless performance and superior durability—outlasting even original sensors.
- Easy to Install: A comprehensive user manual is provided to assist you in the quick and efficient setup and installation process. TIPS: Prior to installing the safety reversing sensor, please ensure that the power is not connected to the garage door opener.
- Security: Elevate your garage door system with the installation of the Liftmaster 41A5034 Garage Door Safety Sensor Kit, and indulge in an elevated level of safety, security, and convenience each time you access your garage.
The problem remains after clearing, aligning, and checking wiring
Genie lists beam obstruction, misalignment, and a defective sensor as possible Safe-T-Beam fault causes. Use the opener’s model-specific diagnostics; replace a sensor only when the diagnosis supports it, and confirm that the replacement is compatible with the opener. Genie lists Safe-T-Beam replacement sensors through its official store, but they are not established as compatible with every opener.
Independent reader supportYour contribution helps us test, update, and keep practical guides available for everyone.Test the safety system before using the door
A steady indicator does not replace the opener manufacturer’s safety test. Follow the test procedure in the manual before relying on the door. If the system remains unreliable, stop relying on it and consult the manual or a qualified garage-door technician.
Quick Recap
Best Value

- Compatibility: GSTB-R STB-BL Replacement for genie garage door sensors, Compatible with all garage door openers manufactured by genie after 1993
- Easy to Install and Program: garage door sensor replacement genie Garage Door Opener sensor. A detailed user manual is included to help you get set up and install in minutes. TIPS: Be sure power is NOT connected to the garage door opener BEFORE installing the safety reversing sensor.
- Updated Design: GSTB-R STB-BL Garage Door Opener Safety Beam Kit with Brackets .GSTB-R STB-BL safety sensors beam eyes emits an invisible beam of light on the inside of the garage door, whenever there is an obstacle, the garage door automatically reverses before causing any damage to prevent accidents.
- Package Includes: Detailed installation manual *1, Sending sensor *1(with a red LED), Receiving sensor *1 (with a green LED), Wingnut *4 and round head bolt *4.
- High-quality After-sales Service: Our products provide a one-year warranty service, no matter for any reason you are not satisfied, please write to us, we will provide you with timely service. Note: Accessories are compatible spares (non-original), the above brand names and any related model names are only used to demonstrate compatibility.
Rank #4
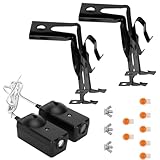
- Universal Compatibility: Replacement for craftsman garage door sensor/Chamberlain garage door sensor/Liftmaster garage door sensor, Compatible with all garage door openers manufactured by Liftmaster/Sears/Chamberlain/Craftsman after 1997.
- Easy to Install and Program: 41a5034 Garage Door Opener Safety Beam Kit with Brackets can replace: 820CB , G801CB-P, 2610459, 012381050345, 041A5034, 801CB, 41A5266-1, 041-0136. A detailed user manual is included to help you get set up and install in minutes. TIPS: Be sure power is NOT connected to the garage door opener BEFORE installing the safety reversing sensor.
- High-density material: The garage door sensor bracket is made of high-density materials, ensuring a high level of corrosion resistance for the garage door sensors and an extended service life. The design of the garage sensor allows for compatibility with a variety of standard garage doors, demonstrating exceptional versatility.
- Package Includes: Detailed installation instructions*1, Sending sensor *1(with an amber LED), Receiving sensor *1 (with a green LED), Wire connectors *7, Wingnut *3 and 1/4-20" round head bolt *3, bracket*2 and The sensor circuit has been extended to 50cm.
- After-sales Service: Our product chamberlain garage door sensors provide a one-year warranty service, no matter for any reason you are not satisfied, please write to us, we will provide you with timely service. Note: Accessories are compatible spares (non-original), the above brand names and any related model names are only used to demonstrate compatibility.
Rank #3

- Perfect Compatibility – Fits Genie/Overhead garage door openers manufactured after 1993; replaces GSTB‑R, STB‑BL, 37220R safety sensors.
- Why choose our garage door sensor? When your family members or pets accidentally approach the garage door as it is descending, ordinary sensors may react slowly. However, our patented safety beam can trigger the "emergency stop + reverse ascent" action within 0.1 seconds, completely preventing injuries or damage to items, and completely eliminating safety hazards. The garage door sensor itself does not include an installation bracket. We also sell installation brackets separately.
- High-quality materials: The garage door safety sensor is made of high-strength ABS engineering plastic, which possesses shock resistance and anti-aging properties. Each sensor has undergone strict waterproof, dustproof and weather resistance tests, and can operate stably in extreme environments ranging from -40℃ to 60℃. Even in the case of heavy rain or intense sunlight, the garage door sensor replacement can work reliably.
- Installation and inspection steps for garage doors: First, the power supply needs to be cut off. Determine the installation position of the sensor and ensure that the sensor height is uniform. The probe must be directly aligned. 2. When connecting the sensor wires to the corresponding interface of the garage door controller, distinguish the positive and negative poles and do not connect them in reverse. When the sensor indicator light is on, it indicates that everything is normal.
- Shopping with no worries: Please note that this product does not come with an installation bracket. If you need a matching bracket, please purchase the "Sensor + Bracket Set". Avoid the situation where the product cannot be installed upon arrival. The garage door sensor offers a 3-year warranty. Even if it exceeds the official Amazon return period, return and exchange services are still available. Any usage or installation issues will be responded to and resolved within 12 hours.
Manufacturer guidance
- Chamberlain Group / LiftMaster: How to align safety-reversing sensors
- Genie: Safe-T-Beam troubleshooting
- Genie: Safe-T-Beam replacement sensors
- Clopay: How to Align Garage Door Sensors
Product prices and availability are accurate as of the date/time indicated and are subject to change. Any price and availability information displayed on Amazon at the time of purchase will apply.