How do I grow mushrooms at home? For a first attempt, start with a ready-to-grow edible oyster mushroom kit: it supplies a colonized growing block and species-specific directions, so you can focus on moisture, fresh air and a clean harvest. Follow the kit’s instructions over any general guide because opening, soaking and fruiting needs vary by product and species.
Choose a growing method that fits your space and patience
Mushrooms grow from mycelium—the network that develops through a food-bearing substrate—not from soil like garden plants. They do not need sunlight in the way plants do, and the right substrate depends on the species. For an indoor beginner, an oyster kit is a practical starting point: University of Vermont Extension calls oyster mushrooms a reliable choice for first-time growers, while UF/IFAS describes a ready-made kit as the easiest way to begin. Shiitake and lion’s mane kits are also options, though they may take longer.
| Method | Preparation and space | Time and conditions | Best fit |
|---|---|---|---|
| Ready-to-grow kit | Lowest preparation; typically an indoor growing block with directions supplied by the maker. | Timing and care depend on the species and kit; follow its instructions. | Beginners who want the simplest setup. |
| DIY oyster straw bag | Requires straw preparation, pasteurization, spawn, bags and a clean work area; can be done indoors with room for incubation and fruiting. | UF/IFAS gives two to three weeks for colonization in its oyster protocol, followed by fruiting under suitable air and moisture conditions. | Growers who want to learn the process and are willing to handle more preparation. |
| Shiitake log | Outdoor log setup with plug spawn; tree choice and conditions depend on location. | UF/IFAS Florida guidance says fruiting may start in six to 18 months, with inoculated logs potentially producing for three to five years. | Those who want a longer-term outdoor project, not a quick indoor crop. |
UF/IFAS states, “For home cultivation, short of buying a ready-made kit, the fastest and simplest approach to growing oyster mushrooms is to purchase spawn rather than produce it.” For a kit, however, the manufacturer’s instructions remain the guide for that particular block.
Grow a kit in eight steps
1. Choose an edible beginner species and kit
Look for a kit clearly identified as an edible species and with care instructions you can follow. Oyster is a sound first choice for many beginners. Consider where the kit will sit and whether you can provide the conditions its instructions call for. Outdoor log growing is more dependent on local trees and climate than an indoor kit.
#1 Best Overall

- HARVEST POUNDS, NOT OUNCES: Our 4LB nutrient-dense grain and substrate blend is engineered for heavy, multi-flush yields — more mushrooms per bag than any standard kit. One bag. Maximum output.
- FASTEST COLONIZATION — SEE GROWTH IN DAYS: Our proprietary grain blend accelerates the natural growth cycle. Watch active mycelium establish in days and reach the harvest stage weeks ahead of standard grow kits.
- TRUE SET & FORGET — NO EQUIPMENT NEEDED: No tubs, no tents, no humidifiers. This bag creates its own self-regulating micro-climate from colonization to fruiting. Just add your culture, seal, and let it work.
- 0.2-MICRON FILTER — PROFESSIONAL AIR EXCHANGE: Our precision breathable filter patch delivers optimized gas exchange at every stage of the grow cycle — the same standard used by professional cultivation facilities.
- UNBOX & START IN 5 MINUTES: No tutorials. No extra tools. Self-healing cultivation port is ready immediately. Add your culture and you're growing — five minutes from delivery to first grow cycle.
2. Read the directions and pick a suitable spot
Before opening anything, read the full instructions and choose a place that can stay reasonably clean and meet the kit’s stated conditions. Kits differ: some need packaging cut in a particular way, and some call for soaking the block. Do not assume another kit’s cut pattern, soak time or schedule applies to yours.
3. Prepare a clean growing area
Keep the block away from avoidable dirt and pets, and wash your hands before handling it. Clean handling reduces opportunities for unwanted organisms to reach the growing substrate. Keep a clean surface and tools ready for harvesting as well.
Rank #2

- 100% ORGANIC AND NON-GMO: There's no need to worry about intoxicants that may hinder your plant's growth because the Back to the Roots Mushroom Growing Kit is completely organic and not genetically modified; You can cook them however you want or add them to your favorite dishes
- GROW YOUR PLANT ALL YEAR-ROUND: This organic mushroom indoor kit allows you to grow your own crop all-year round; Just place the box near a window with indirect light, mist twice a day, and you'll see delicious, beautiful mushrooms growing within a week; Included in this kit is an organic plant-based soil infused with mushroom spawn and a booklet with instructions
- CONVENIENT AND EASY: Mushrooms are one of the easiest to grow indoors; All you need to do is open, spray daily with the included mister, and in 10 days you'll be harvesting your own mushrooms right out of the box; Each crop produces three to four servings of mushrooms, and each box can grow up two crops
- THE PERFECT GIFT: The perfect holiday gift, it comes in a beautiful packaging so that it's ready to be given to foodie, garden-loving and eco-conscious friends and family; This kit is also part of our Grow One Give One campaign, simpy share a picture on social media, tag us and use the campaign hashtag, and we'll donate a kit to a classroom of your choice
- GUARANTEED TO GROW: Made in the USA and 100% Guaranteed to grow. If you are not satisfied, simply message us and we will send you a Back To The Roots replacement
4. Open or soak the block as directed
Follow the maker’s specified opening and preparation steps. University of Vermont Extension describes kits as typically opened according to their directions and soaked, but the exact procedure is kit-specific. Avoid leaving the block submerged or altering the packaging unless the instructions say to do so.
5. Maintain moisture without waterlogging
Check the block as instructed and provide moisture at the frequency the kit recommends. The growing medium should remain consistently moist, not saturated. There is no single watering schedule that applies to every species, room or kit.
Rank #3
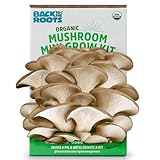
- 100% ORGANIC AND NON-GMO: There's no need to worry about intoxicants that may hinder your plant's growth because the Back to the Roots Mushroom Growing Kit is completely organic and not genetically modified; You can cook them however you want or add them to your favorite dishes
- GROW YOUR PLANT ALL YEAR-ROUND: This organic mushroom indoor kit allows you to grow your own crop all-year round; Just place the box near a window with indirect light, mist twice a day, and you'll see delicious, beautiful mushrooms growing within a week; Included in this kit is an organic plant-based soil infused with mushroom spawn and a booklet with instructions
- CONVENIENT AND EASY: Mushrooms are one of the easiest to grow indoors; All you need to do is open, spray daily with the included mister, and in 10 days you'll be harvesting your own mushrooms right out of the box; Each crop produces three to four servings of mushrooms, and each box can grow up two crops
- THE PERFECT GIFT: The perfect holiday gift, it comes in a beautiful packaging so that it's ready to be given to foodie, garden-loving and eco-conscious friends and family; This kit is also part of our Grow One Give One campaign, simpy share a picture on social media, tag us and use the campaign hashtag, and we'll donate a kit to a classroom of your choice
- GUARANTEED TO GROW: Made in the USA and 100% Guaranteed to grow. If you are not satisfied, simply message us and we will send you a Back To The Roots replacement
6. Watch for pins and provide appropriate air and humidity
Pinning is the appearance of small mushroom clusters that develop into fruiting bodies. Keep the kit in the conditions specified for its species and allow the fresh-air exchange its directions call for. Moisture, humidity, temperature and airflow all matter, but their targets vary; a universal temperature or humidity setting would be misleading.
7. Harvest at the kit’s maturity cues
Use the cap size and shape or other maturity cues given in the kit directions. Different mushrooms are harvested at different stages. If the instructions describe cutting or twisting, use that method rather than assuming one technique suits every variety.
Rank #4

- GROW DUNG-LOVING MUSHROOMS INDOORS: Start growing your own dung-loving edible or medicinal mushrooms indoors! Kit includes everything you need to grow -- just add your own spore syringe or liquid culture!
- INCLUDES MONOTUB, 2 GRAIN SPAWN BAGS, BULK SUBSTRATE & CASING LAYER: The monotub is designed with airflow and humidity controls and requires no high-tech additions. And the manure-loving sterile substrate, injection port bag, and vermiculite provide mediums for colonization, incubation, and growth.
- ALSO INCLUDES FILTERS & INCUBATION PLUGS: We've also included self-adhesive filters and black HOLE PLUGS that fit into the holes on the monotub lid. These are designed to keep out foreign spores and other contaminants while maintaining proper humidity, airflow, and gas exchange.
- PERFECT SPAWN TO BULK RATIO: Simply inoculate the two 2.25lb grain bags with your favorite spores, once colonized break it up and mix in the 10 lbs of bulk substrate. This will make a perfect 3" layer
- KIT CONTENTS: (1) Large 66Q Grower's Select Monotub bin (2) 5lb Bags of Manure loving Bulk Substrate (2) Organic Sterilized 2.25lb Multi-Grain Bags with Injection Ports (1) Quart of Vermiculite casing layer (6) 2.5” self-adhesive Monotub filter disks (6) Monotub Incubating Plugs (1) 8oz Ultra Fine Spray Mister (1) Monotub Liner
8. Keep the harvest clean and follow the kit’s next-flush instructions
Wash your hands, use a clean tool or surface, and place harvested mushrooms in a clean container. Refrigerate them as part of good food handling. If the kit explains how to rest, rehydrate or otherwise prepare the block for another flush, follow that procedure. Do not assume every kit will produce again or expect a particular yield.
Independent reader supportYour contribution helps us test, update, and keep practical guides available for everyone.Optional DIY route: oyster mushrooms on straw
This is a UF/IFAS oyster-mushroom protocol, not a universal recipe for all mushrooms or a substitute for the instructions supplied with a kit. It uses healthy spawn, a pasteurized lignocellulose substrate and containers such as bags. UF/IFAS says wheat straw works well and lists other possible materials. Keep the work area clean, particularly when handling spawn and inoculating the substrate.
The Tool Desk
Outbyte PC Repair FREEClear out junk files and repair common Windows errorsFree Scan →Outbyte Driver Updater FREEScan for outdated or missing drivers - takes under a minuteDriver Scan →Best Value

- 【 Magical All In One Bag】 Includes injection port, breathable .2 micron filter, fully hydrated, sterile, ready to use!
- 【Wide range of use】Ideal for whatever gourmet or medicinal manure/dungloving genetics you provide (not included!).
- 【Great size】2.5lbs of hydrated and sterilized grain and 2.5lbs of sterilized coir and vermiculite substrate fortified with gypsum and Azomite! Ideal for manure/dung loving varieties! In our testing we found 5lb bags were ideal for speed and yield.
- 【Easy to Use】 The kits arrive pre-sterilized ready for inoculation. We include grow instructions in the box. They are easy to use and require no special skills or equipment.
- 【Yield you'll LOVE】After months of testing, we found that new and experienced growers alike grew 3 ounces or more from EACH BAG! Amount grown depends on variety and environment for the bag.
- Cut and soak: Cut straw into 4–5 inch pieces and soak it overnight.
- Pasteurize: Drain the straw and heat it in a 165°F water bath for 1–2 hours. This step is pasteurization; it should not be described as sterilization.
- Cool and inoculate promptly: Drain and cool the straw in a clean area, then mix in spawn without unnecessary delay, reducing the opportunity for undesirable fungi to colonize it.
- Pack the bags: UF/IFAS specifies spawn at 5–10% by volume or weight. Pack the mixture into suitable plastic bags and make small, clean openings.
- Incubate: Keep the bags in a clean, dark place. For this oyster protocol, UF/IFAS gives 24–25°C (75–77°F) and 80–90% relative humidity during spawn run. It says colonization generally takes two to three weeks; white mycelium throughout the bag is the sign of colonization described for this method.
- Move to fruiting conditions: UF/IFAS says light and lower temperatures trigger fruiting for this method. Emerging pins need suitable humidity and air exchange; do not carry these figures over to other species or kits.
- Harvest: Gently twist or pull developed oyster clusters, or cut them flush with the substrate. UF/IFAS says its straw bags may produce two to four additional flushes, depending on strain and environment; that is not a promise for every grow.
See the full UF/IFAS oyster mushroom home-growing guide for the protocol and substrate details.
Shiitake logs are a longer outdoor project
UF/IFAS describes shiitake as an option for logs rather than a quick kit-style grow. Its Florida guidance recommends oak and also lists sweetgum, red maple and poplar; it describes fresh logs 2–7 inches in diameter and 3–4 feet long. The process is to drill holes, insert plug spawn, seal the holes with hot wax and incubate the log in a cool, moist, aerated area.
The same source gives 50–70°F as a regional range, says fruiting may begin in six to 18 months, and notes inoculated logs can produce for three to five years. Treat its tree and temperature advice as Florida guidance, not a prescription for every region. Check local species and climate suitability before choosing logs.
Know when to discard a suspect grow
Unusual colors, unpleasant odors or fuzzy mold can signal contamination. Texas A&M AgriLife Extension advises discarding affected substrates rather than trying to salvage them. Do not eat mushrooms from a contaminated block. Buy a kit or spawn for a known edible species from a reputable supplier; the warning about toxic wild mushrooms concerns foraging and is not a reason to treat a properly sourced edible kit as unsafe.
Free tools Windows power users keep installed
One-click scans. No signup required.
Keep harvest handling simple and clean
- Wash hands before harvesting and use clean tools, surfaces and containers.
- Refrigerate harvested mushrooms as part of good handling practice.
- Keep animals and avoidable dirt away from the block and harvest area.
- Discard a block that shows suspicious colors, off odors or fuzzy mold rather than eating from it.
University of New Hampshire Extension’s food-safety guidance is available in its specialty mushroom quality and safety fact sheet.
Quick Recap
Sources and further guidance
- UF/IFAS: Growing Mushrooms at Home
- University of Vermont Extension: Grow Gourmet Mushrooms At Home
- Texas A&M AgriLife Extension: Growing and Cooking Mushrooms: A Texas Guide
- North American Mycological Association: Growing Mushrooms at Home: A Beginner’s Introduction
Product prices and availability are accurate as of the date/time indicated and are subject to change. Any price and availability information displayed on Amazon at the time of purchase will apply.