Most worn veneer tabletops can be improved, but the right fix depends on whether the damage is in the finish, the veneer itself, or the bond beneath it. Start by identifying the finish and inspecting the damage; then choose the least invasive repair. A small, intact lift may be glued and clamped, while missing veneer, deep scratches, widespread damage, or an uncertain finish match may call for a furniture restorer.
What kind of damage does your veneer tabletop have?
Veneer is a thin layer of real wood attached to a core. On Carl Hansen & Søn veneered tabletops, the core is wood fiberboard with veneer on both sides; the maker describes veneer as typically about 0.5 mm thick. That is a product-specific figure, not a universal specification, but it illustrates why aggressive sanding can cut through the surface quickly. Carl Hansen & Søn’s veneer care guidance and This Old House’s blister repair guide both caution against treating veneer like a thick solid-wood top.
Inspect the table in good light before sanding, stripping, or applying a product. Look for raised bubbles, hollow-sounding spots, peeling edges, cracks, missing wood, cloudiness, warping, and deep scratches. Bubbles, separation, and lifting suggest a veneer bond problem; a flat scratch may affect only the clear finish. After water exposure, let the table dry fully and check for warping or delamination before attempting a repair, as Laura James’s water-damage guidance advises.
- Flat, superficial mark: It may be limited to the finish. Avoid removing more material until you know what finish is present.
- Small intact bubble or lifted edge: It may be possible to reattach the existing veneer with glue and even clamping pressure.
- Chip or missing veneer: A fitted wood-veneer patch may be needed; filler alone will not recreate the grain.
- Broad lifting, severe water damage, structural movement, or a valuable antique: Stop and seek a qualified furniture restorer.
Identify the finish before cleaning or refinishing
Check the maker’s care instructions if available, and establish whether the top is oiled, lacquered, or finished another way. The distinction matters: treatments suitable for an oil-treated surface may not work on lacquer. Carl Hansen & Søn says its oiled veneer tops can be retreated similarly to solid wood, but lacquered tops cannot be retreated or repaired in the same way; it recommends professional carpentry repair for larger scratches or scuffs on its lacquered tops. Do not assume those instructions apply to every table.
Free tools Windows power users keep installed
One-click scans. No signup required.
#1 Best Overall
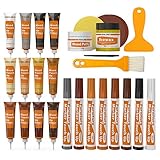
- KIT INCLUDES our most powerful wood repair compounds, so you can repair all levels of damage to wood furniture by yourself. Includes 12 touch up fillers, 8 touch up markers, 1 wood putty, 1 beewax, 2 brushes, 2 sandpaper, 1 sponge and 1 scraper
- RESTORE ALL KINDS OF DAMAGES such as scratches, chips, cracks, holes and discoloration on wooden floors, doors and furniture like desks, chairs, beds, wardrobes, bookcases, cabinets, wooden crafts and many more
- EASY TO USE: Apply the filler into the cracks, and then smooth the surface with scraper. The markers can be used to touch up the superficial scratches or to draw wood grain
- UNIQUE COLORS: The touch up fillers are available in 12 colors: White, Black, Light Gray, White Maple, Yellow Maple, Deep Pine, Earthy Yellow, Yellow Teak, Red Cherry, Cedar, Dalbergia, Walnut. The touch up markers come in 8 colors: White, Gray, Oak, Maple, Cherry, Walnut, Mahogany, Black
- Tips for mixing colors: You can mix the desired wood filler color according to the color chart. When mixing colors, first add the lighter repair filler, then gradually add the darker wood repair filler, observing the color changes until you achieve the desired shade
For routine cleaning, use a soft, slightly damp cloth and dry the surface promptly. Avoid soaking the veneer. Carl Hansen & Søn advises against detergents and chemicals on its oiled and lacquered veneer tables, while Herman Miller’s August 2020 wood and veneer care guide recommends dusting with a slightly damp soft cloth and wiping spills immediately. Follow the instructions for your specific product where they are available.
Reattach a small, intact lift
This method is for a limited lifted area where the veneer is still present and can be brought back into position without force. If the veneer is brittle, cracked, extensively loose, or difficult to align, leave the repair to a professional.
Rank #2
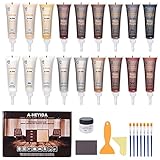
- Wood Vinyl Floor Repair Kit: 31 piece laminate floor repair kit includes 18 unique colors of resin wood repair fillers, 1 sandpaper, 1 wood putty, 7 brushes, 2 plastic scrapers and 1 disposable glove. According to the instructions provided, you can repair floors and furniture by yourself, no need to hire a professional, saving you time and money. This is an easy solution to repair scratches and stains on wooden furniture and floors in your home
- Ideal for Wood Floor Scratch Remover Repair: The wood furniture repair kit was designed to improve the scratches, stains or cracks on your furniture, floor, laminate floor, hardwood floor, vinyl floor repair kit, restores scratches, nicks, scuffs, discoloration on wood, veneer, desk, wood floor, cabinet, table, bed, frame, door, musical instruments and so on. (Waiting for 48 hours to dry completely after repairing, and keep away from water)
- 18 Unique Colors Furniture Repair Kit: The hardwood floor repair kit comes with 18 distinctive colors* 0.7 OZ / 20 ml: White, Black, Maple, Walnut, Cherry, White Maple, Ivory, Bamboo Yellow, Teak, Cedar, Dark Walnut, Auspicious Wood, Red Sandalwood, Red Walnuts, Light Gray, and French Gray. You can also mix colors to achieve the perfect match. You don't need to worry about can’t find the right color to match your furniture with this wood floor filler
- Easy to Use and Perfect Touch up: Take off the lid, squeeze the wood filler into the repaired area and then smooth the filler with tube tail or the plastic scraper, wipe off the excess and let it dry. For large holes or cracks, please apply wood putty first, dry it and then apply wood filler to repair. The furniture scratch repair paste no glue, pens, markers, waxes, crayons, paints, etc. and are more reliable and durable than furniture pens for scratches
- Warm Tips: You can make the color you want according to the color chart. When mixing colors, add lighter colors first, then add dark colors intermittently, and watch the color change to match the color you want. If you find that the color is too dark, please do not apply too much force, gently apply and wipe off
- Let the area dry and assess the lift. Do not trap moisture under the veneer. Check that the surrounding top is stable and that the lifted piece can lie flat in its original position.
- Open access only if needed. For an intact blister that cannot be reached at an edge, This Old House describes making a small incision along the grain. Avoid enlarging a split or cutting through sound veneer.
- Clear loose old adhesive. Remove only debris or adhesive that prevents the veneer from seating; do not scrape away wood unnecessarily.
- Apply wood glue beneath the veneer. Use a fine-tip glue syringe or a toothpick to place yellow carpenter’s glue under the lift, following the adhesive maker’s directions.
- Press and clamp evenly. Cover the repair with wax paper, place a flat block or caul over it, and clamp with protective pads. Keep the veneer aligned and use even pressure; overtightening can force out too much glue or damage the surface.
- Allow the adhesive to cure as directed. Remove the clamps only when the glue instructions permit. Blend the surface afterward only if necessary, using minimal abrasion.
The method and tool suggestions are described in This Old House’s blistered-veneer repair and Laura James’s veneer repair guidance. A glue syringe, suitable wood glue, wax paper, a flat caul, protective pads, and small furniture clamps are useful for this narrow repair; a repair kit cannot solve an uncertain finish match or structural damage.
Patch missing veneer or repair a damaged finish
When veneer is missing, a carefully fitted patch of matching-grain veneer can restore the wood surface more convincingly than filler alone. Laura James describes cutting out the damaged section, fitting matching-grain veneer, gluing and clamping it flush, then trimming and leveling it after curing. This demands accurate cutting and a close grain match; a prominent or large patch is often best handled by a restorer.
Rank #3

- J-B WELD KWIKWOOD: A hand mixable two part epoxy putty stick that is formulated to repair and rebuild wood. J-B Weld KwikWood is designed for all wood household DIY repairs!
- CURE AND SET TIME: After kneading the two part formula together by hand, KwikWood takes 15-25 minutes to set and cures in 1 hour. J-B Weld KwikWood set and cure color is a light tan.
- PRODUCT FEATURES AND STRENGTH: J-B Weld KwikWood has lap shear strength of 900 PSI. KwikWood will not shrink or rot and can be stained, molded, tapped, drilled, sanded and shaped.
- APPLICATIONS: Window/Door Hinge Repairs, Dry Rot Repairs, Gouges and cracks in furniture, knot hole repairs, gap fillers and more!
- DO IT YOURSELF: Big or small, you can DIY it with J-B Weld. Our heavy duty epoxy and adhesives repair & restore it right the first time. J-B Weld delivers superior performance, quality, and results for the World’s Strongest Bond.
Test color and finish on an inconspicuous area or scrap before treating the visible top. Match the original sheen as well as the color: lacquer and oil do not produce interchangeable results. If the finish is unknown, the table is valuable, or the damaged area is deep or conspicuous, avoid stripping or sanding the whole top in an attempt to make the repair disappear. Herman Miller recommends consulting a professional furniture refinisher for deep scratches in its wood and veneer care guide.
Independent reader supportYour contribution helps us test, update, and keep practical guides available for everyone.When to call a furniture restorer
Choose professional assessment rather than a DIY repair when the damage is extensive, the veneer is brittle or broadly detached, the top has warped or moved structurally, or the table has significant value. Professional help is also prudent when matching grain, color, or lacquer sheen matters and you cannot test the finish safely. These are cases where a small error can enlarge the damaged area or leave a more visible repair than the original blemish.
Quick Recap
Best Value
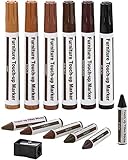
- PRODUCT DETAILS - This 13 piece kit includes 6 Repair Markers, 6 paper wrapped wax sticks and 1 wax stick sharpener packaged in a blister card.
- 6 UNIQUE COLORS - Maple, Oak, Cherry, Walnut, Mahogany and Black to match the color of your furniture. Now there's no need for you to call a professional to retouch your scuffed furniture. Become the pro yourself!
- PREMIUM QUALITY - Top quality markers and wax sticks that cover scratches, nicks, scuffs, and discoloration on furniture, cabinets, tables, beds and more. 100% effective and permanent.
- EASY TO USE - Simply draw over the scratch, allow it to quickly dry, and watch the scratches disappear right before your eyes! These are safe to use on all types of wooden furniture. Use the included sharpener to sharpen the wax sticks.
Rank #4

- All-in-One Wood Repair Solution: This professional wood furniture repair kit includes wood putty (3oz), 2-part epoxy putty (Total 3.52oz, 1.76oz each), 10-color wood repair pastes, 8-color touch-up markers and beeswax (2.82oz). It also comes with practical tools: 2 scrapers, 2 sandpapers, 1 sponge, 1 cleaning cloth, 1 spatula, 1 palette and 2 brushes.
- Multi-Color Matching: Our wood repair kit comes with 10-color wood repair pastes (white, yellow maple, oak, natural, ivory, black, walnut, red oak, mahogany, and tan) and 8-color touch-up markers (white, gray, oak, maple, cherry, walnut, mahogany, black). You can also freely blend the wood repair pastes to create custom shades for natural, seamless repairs.
- Wide Application: This wood filler kit efficiently repairs all kinds of wood damage, including scratches, holes, dents, chips, cracks, wear and tear, and stains. This wood scratch repair kit is suitable for various wooden surfaces, such as furniture, floors, doors and windows, cabinets, tables, chairs, beds, bookshelves, handicrafts, and other wooden items.
- Wood Touch-up Filler Color Mixing Tips: When mixing colors with the color chart, use a light repair paste as the base, then gradually add dark paste in small increments. Adjust until you get your ideal wood tone. (Note: The color chart is for reference only. Colors may vary slightly due to monitor and printing differences. The final color will be confirmed after the wood repair paste fully dries.)
- High-Quality Customer Service: Our wood putty filler kit is crafted from premium safe, non-toxic materials and designed for easy application. A detailed instruction manual is included for your convenience. Should you have any questions or issues during or after use, please feel free to contact us—we will always offer professional solutions.
Protect the repaired tabletop
- Keep hot and damp objects off the surface; use coasters and wipe spills promptly.
- Do not use steel wool, abrasive cleaners, or polish unless the furniture maker’s instructions specifically permit them. Carl Hansen & Søn warns against abrasives and polish for its veneer tables.
- Limit prolonged direct sunlight. Herman Miller advises moving objects periodically so the surface can age more evenly.
- Herman Miller’s 2020 guidance suggests 35–65 percent relative humidity for its wood and veneer care context; treat that as the maker’s guidance, not a universal requirement for every table.
- Use the care and maintenance instructions for the table’s actual maker and finish rather than applying one brand’s treatment to another surface.
Product prices and availability are accurate as of the date/time indicated and are subject to change. Any price and availability information displayed on Amazon at the time of purchase will apply.




