Quick wins for a faster PC:
Scan for outdated or missing drivers - takes under a minuteDriver Scan →Clear out junk files and repair common Windows errorsFree Scan →To straighten a rough-sawn board edge for glue-up, clamp a straight piece of quality plywood beside it and use a flush-trim router bit whose cutting edge is at least 1 inch long. Set the plywood’s factory edge about 1/16 inch from the board’s edge; the bit’s bearing follows the plywood while the cutter trims the board flush to it.
How to rout a straight, glue-ready edge
- Start with a nearly straight edge. Leave only a small amount of material to remove. WOOD Magazine’s example places the guide about 1/16 inch from the rough-sawn edge; treat that as an approximate setup dimension, not a guaranteed tolerance.
- Choose and check the guide. Use quality plywood and inspect its factory edge to confirm it is straight. Position that edge parallel to the workpiece edge you want to trim.
- Clamp the guide securely. Arrange the clamps so the plywood cannot shift during routing. The method depends on the guide staying fixed; follow the router and bit manufacturers’ instructions for safe setup and use.
- Fit the bit. Install a flush-trim bit with a cutting edge at least 1 inch long. Check that its shank fits your router collet. The bit’s bearing rides along the plywood edge, while the cutter removes material from the workpiece.
- Route the edge flush. Keep the bearing against the guide as you rout. The intended result is a smooth, straight edge suitable for glue-up—not a published accuracy tolerance or guarantee of joint strength.
Why the plywood edge guides the cut
The guide provides the straight reference; the router bit’s bearing transfers that reference to the workpiece. As WOOD Magazine puts it, “Good glue joints require dead-straight surfaces.” The technique is useful when a tablesaw cut leaves an edge that is not straight enough for the intended glue joint. The source describes the result as glue-ready, but reports no measured accuracy, test results, or comparative joint-strength figures.
How this differs from other router guides
| Approach | What follows the guide | Typical task described by WOOD Magazine | When it may fit |
|---|---|---|---|
| Plywood edge with a flush-trim bit | The bit’s bearing | Trimming a workpiece edge to match a straight reference | Preparing an edge for glue-up with a one-off guide setup |
| Router edge guide | A guide attached to or indexed from the router base | Guiding the router from a set distance | When the cut needs to be positioned from the router base rather than copied from a bearing-followed edge |
| Clamped straightedge | The router base | Guiding cuts such as grooves or dadoes | When the task is a channel or other routed feature rather than straightening a board edge |
| Shop-made MDF guide | A guide used with the router or circular saw, depending on the cut | A reusable guide for straight cuts with basic tools | When you want to make a repeatable guide that can also support circular-saw cuts |
These approaches guide the tool in different ways; WOOD Magazine’s sources do not provide a quantitative head-to-head performance comparison. For more on router guiding methods, see WOOD Magazine’s Router 101. For the shop-made guide approach, see Precision Cuts With Basic Tools.
What to check before you start
- Confirm that the plywood reference edge is straight and that the guide is clamped against movement.
- Verify the bit has at least a 1-inch cutting edge and is compatible with your router collet.
- Keep the amount to be removed modest; the approximately 1/16-inch guide offset is the source’s example, not a universal setting for every board or bit.
- Use the router and bit according to their manufacturers’ safety and operating instructions.
WOOD Magazine’s technique and setup details are described in Get dead-on straight edges with a router, updated January 2, 2025.
What’s actually slowing this PC down?
Pick the symptom - the matching free tool is one click away.
Quick Recap
Best Value

- Precision fine adjustment control
- Guides cut along the workpiece or up to 8 In. in from edge
- Easily converts into circle guide for making arcs and circles up to 32 In. in diameter
- Includes pivot plate, dust extraction hood, vacuum hose adapter and attachment hardware
- Works with 1617, 1617EVS, 1617EVSPK, 1618, 1618EVS, 1619EVS, MRF23EVS, MRP23EVS, MRC23EVSK, PR011, 1611, 1611EVS, 1613EVS, 1613AEVS, 1615, 1615EVS, RA1160, RA1161, RA1162, RA1166, MRF01, MRP01, PR01
Rank #4

- 【Router Auxiliary Tool】 Are you still worried about not being able to use compact router for getting quickly a straight line on the wooden board? Please use our auxiliary tool ——DNP618 Router Edge Guide, so you will easily get a straight line on the board! This tool is made of all iron, electrophoresis process anti-rust, hard enough not to bend, reliable and has a smooth surface, which will not damage your wood board.
- 【Multiple Adaptations】 This DNP618 straight edge guide works perfect for DCW600B 20V Max XR CORDLESS ROUTER, DWP611 COMPACT ROUTER, DWP611PK, DNP612 Plunge Base, DW6913 Router Edge Guide, PORTER-CABLE 450 and 451, it will be a perfect addition. Attention: This tool does not work with other brands of routers other than those mentioned above.
- 【Easy to Install】 The length of Edge Guide is 10 inch, use the included two screws to install the edge guide on the base compact router, and then you can get precise positioning of inlays, dadoes, and more.
- 【Two Usages】 Like the picture instructions, you can get two usage methods. Extend from the edge of the material to 3 inches or more, If you use the second way to increase the length of the guide, this is very helpful when routing out past the end of your material to help keep the router from dipping into the wood and cutting too deep.
- 【Precise Positioning】 Features an easy slide and lock positioning adjustment. Easy disassemble, at the bolt built-in silicone ring, fixed tighter, making opera error-free. Two scale units are designed for easy measurement.
Rank #3
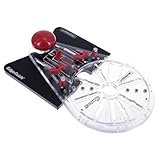
- Compatible with plunge and fixed base routers
- Straight edge has a maximum Travel of approximately 5-1/2″
- Plate Opening Sized to 1-3/16” for PC Style Bushings
- Depending on router, base may only connect with 2 or 3 opposing slots.
- Router guide has a large surface area for straight and curved edges for radial cuts
Rank #2
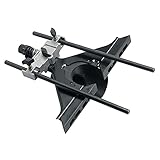
- ROUTER EDGE GUIDE
- ROUTER EDGE GUIDE
- ROUTER EDGE GUIDE
- ROUTER EDGE GUIDE
- ROUTER EDGE GUIDE
#1 Best Overall

- STRAIGHT EDGE GUIDE DESIGNED FOR PALM ROUTERS: Mounts to bosch gkf125ce, pr10e and pr20evs palm routers pr001 and the pr101 fixed bases using the included mounting hardware
- GUIDES PALM ROUTER ALONG THE EDGE OF A WORKPIECE: For edge-forming operations that use bits without bearings or for creating slots and grooves
- ADJUSTABLE: Allows adjustment up to 3-5/8 in. in from the edge of the workpiece
- DURABLE BUILD: Features steel construction
Product prices and availability are accurate as of the date/time indicated and are subject to change. Any price and availability information displayed on Amazon at the time of purchase will apply.
Independent reader supportYour contribution helps us test, update, and keep practical guides available for everyone.



