For a door’s broad, flat faces, start with a random orbital sander; for rebates, narrow edges and awkward details, switch to a smaller orbital sander or sand by hand. The right setup depends on the work stage, the door’s shape, compatible abrasives and dust extraction—not on one sander being best for every job.
Which sander suits each part of a door?
| Tool | Best suited to | What to consider |
|---|---|---|
| Random orbital sander | Broad, flat door faces | A door-painting guide from Festool uses a 150 mm example and recommends a random orbital sander for large areas. Check disc size and availability of the grit you need. |
| Smaller orbital or detail sander | Rebates, edges and smaller areas a larger sander cannot reach easily | Festool’s door-preparation procedure uses a smaller orbital sander for rebates and edges. Confirm that its abrasive format and dust-extraction connection suit the tool. |
| Hand sanding | Hard-to-reach spots and delicate details | Useful where a powered pad cannot sit flat or reach safely. Festool’s painted-door procedure sands rebates by hand. |
| Quarter-sheet orbital finishing sander | Finishing work where sheet abrasives suit the task | A distinct format from a 5- or 6-inch random-orbit tool. Both formats are used to smooth wood for finishing; compare access, abrasive availability and extraction compatibility. |
Tool guidance supports matching the sander to the surface rather than using one machine everywhere. A larger pad covers a broad face efficiently, while narrow profiles and corners need a smaller pad or hand sanding. Follow the tool maker’s instructions for safe use and compatible extraction.
Choose grit for the coating and sanding stage
There is no universal grit sequence for every door. The existing coating, surface condition, filler or undercoat, and finish maker’s directions all affect the choice. Treat the grades below as examples from specific manufacturer procedures, not a prescription for every project.
Removing paint and preparing a painted door
Festool’s guide for sanding painted wooden doors begins with removing old paint only if the door’s condition requires it, then preparing and filling the surface. For paint removal, it gives P80 or coarser as an example where required, followed by P120 for subsequent sanding. For intermediate leveling it gives P240 and P320 examples, and describes P400 before the final coating when aiming for a uniform surface without sanding patterns. The guide recommends connecting the geared eccentric sander to mobile dust extraction and sanding rebates manually. Read Festool’s door-painting procedure, and check the coating maker’s technical data sheet before choosing grades.
What’s actually slowing this PC down?
Pick the symptom - the matching free tool is one click away.
#1 Best Overall
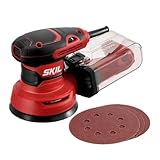
- POWERFUL - With a 2.8 amp motor and 13,000 orbits per minute, it's able to deliver a smooth performance over a variety of sanding applications.
- EASY TO CLEAN DUST CONTAINER - The X-flow dust collector uses cyclone force to collect dust in it's easy-to-empty transparent container.
- SPEED CONTROL - Variable speed control provides the right amount of power and control across different materials.
- LOW VIBRATION - Through its ergonomic design and a soft rubber grip your hand stays comfortable while counterweight balance reduces hand fatigue from vibration. All so that you can work longer.
- SAND IN TIGHT PLACES - With a compact size and ergonomic design This sander can get into tight spaces easily and maximizes user control.
Preparing natural wood for paint
In a separate procedure for preparing natural wood doors, Festool uses P180 with a random orbital sander on the door face and P180 with a smaller orbital sander on rebates and edges. It uses hand sanding for hard-to-reach areas, then recommends vacuuming dust. For intermediate sanding after undercoat, it gives P400 as an example and cautions that a coarser grit may remove too much undercoat. These steps are specific to that procedure; the coating maker’s technical data sheet should guide the sequence for your materials. See Festool’s natural-wood door preparation guide.
Control dust before recoating
Match the sander, abrasive and extraction connection, and use a compatible extractor or vacuum according to the tool instructions. After sanding, remove dust before applying the next coating: the door procedures describe vacuuming or extraction followed by cleaning the surface. Dust left behind can interfere with the next coat’s finish.
Rank #2
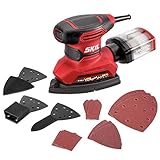
- POWERFUL - With a 1. 2 amp motor and 13,500 orbits per minute, it's able to deliver a smooth performance over a variety of sanding applications.
- VERSATILITY ON THE QUICK - This 4-in-1 detail sander comes with an additional 3 detail attachments for fine finishing large surfaces corners/edges and any surface contour. These attachments are easy to change with no tool needed.
- TOUGH ON DUST - Between its micro-filtration system and the 1-1/4" dust port for vacuum attachment you can choose your preferred way to keep dust away.
- EASY SANDING SHEET CHANGE - Hook and loop system for simple and quick sanding sheet changes.
- LOW VIBRATION - Ergonomic design and a soft rubber grip your hand stays comfortable while counterweight balance reduces hand fatigue from vibration. All so that you can work longer.
3M describes its Xtract clean-sanding system as achieving “up to 99%” dust extraction. That is 3M’s stated figure for its system, not a general result for every sander, abrasive, extractor or setup. See 3M’s Xtract clean-sanding overview.
A practical way to choose your setup
- Identify the surface and stage. Decide whether you are removing failing paint, preparing bare wood, sanding filler or undercoat, or smoothing between coats.
- Match the tool to the area. Use a random orbital sander for broad faces; move to a smaller orbital sander or hand sanding for rebates, edges and tight spots.
- Check the abrasive and extraction fit. Confirm the disc or sheet format, required grit and extractor connection are compatible with the tool.
- Follow the coating directions. Use the paint or finish maker’s technical data sheet to select grits and determine when the surface is ready for the next coat.
- Remove sanding dust. Vacuum or extract it, then clean the surface as directed before recoating.
What “best” means for a door
For most broad door faces, a random orbital sander is the sensible starting category; it is not a complete solution for every profile or sanding stage. Pair it with a smaller orbital tool or hand sanding where access is limited, choose abrasives for the coating and task, and control dust before recoating. The cited procedures establish useful methods, but they do not compare current consumer models, prices or availability, so they do not identify a tested model winner.
Do these 3 things before closing this tab:
1Fix the driver behind crashes, sound loss and screen glitches2Clear out junk files and repair common Windows errors3Scan for outdated or missing drivers - takes under a minuteQuick Recap
Best Value

- All-in-One Sanding Kit for Every Detail: Includes a compact sanding block and 54 sandpapers in 9 grit types (80/100/120/150/180/220/240/400/800) – perfect for detail sanding, micro finishing, and hard-to-reach areas.
- Smart 3-Color Grit System: Identify coarse, medium, or fine grit in seconds with the intuitive 3-color-coded system – no more sanding errors.
- Quick-Swap Hook & Loop Backing: Tool-free hook & loop backing lets you change sandpapers instantly – for faster, uninterrupted sanding.
- Compact Micro Sander for Tight Spots: At just 3.5 x 1 inches, this micro sander block fits corners, curves, and grooves with ease.
- Ergonomic Grip for Precision Control: Designed for creators and DIYers, this ergonomic hand sander gives you comfort and precise control on every detail job.
Rank #4
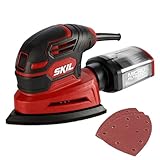
- Powerful– With a 1 amp motor and 12, 000 orbits per minute, it’s able to deliver a smooth performance over a variety of sanding applications.
- Tough on dust– Between its micro-filtration system and the 1-1 by4” dust port for vacuum attachment, you can choose your preferred way to keep dust away.
- EASY SANDING SHEET CHANGE– A hook and loop system allows for simple and quick sanding sheet changes. Adding sheet changes. Balance reduces vibration for improved comfort
- Low vibration– Through its ergonomic design and a soft rubber grip your hand stays comfortable while counterweight balance reduces hand fatigue from vibration. All so that you can work longer.
- Easy on and off– The dust sealed on and off switch makes a hassle-free, flip-of-the-switch during application.
Rank #3

- Comfortable To Hold: POLIWELL detail mini sander sanding fits snugly under your index finger, tough polyurethane foam (PU) made, soft, light weight and good feels on hand. This little sander can flexibly get into tight spaces and do larger areas quickly.
- 5 Different Grit: Made by premium aluminum oxide, 80, 120, 180, 240 and 400 grit sandpaper from coarse to fine, for rough sanding, medium polishing and smoothly finishing. Have grit marked on the sanding sheets, easy to distinguish the grit
- Simple & Easy: It's the excellent size for any project, in small and hard to reach spaces, and it's always within reach on every project. Great for detail sanding, smaller crevices and sanding in tight spots and corners
- Hook and Loop: H&L design for quick place and switch. 100 pcs Refill packs available (sold separately)
- What You Get: 1pack of detail sander kit, 10pcs each of 80/ 120/ 180/ 240/ 400 grit sandpaper
Product prices and availability are accurate as of the date/time indicated and are subject to change. Any price and availability information displayed on Amazon at the time of purchase will apply.




