Start with a crosscut sled for controlled crosscuts, then build jigs for the cuts you actually make: tapering, tenoning, box joints, and stock control with a featherboard. These five are a practical selection, not a definitive list. Their dimensions depend on your saw, so measure its slots, fence, blade, and guarding before building or using any fixture.
Which table saw jigs should you build first?
Choose by the operation you need to control. A crosscut sled is a useful first build for repeatable crosscuts; a box-joint jig or tenoning jig makes sense when those joinery cuts are part of your work. A tapering jig guides angled-width cuts, while a featherboard helps press stock against the fence during suitable operations.
| Jig | What it controls | Support or reference | Best reason to build it |
|---|---|---|---|
| Crosscut sled | Crosscuts, including repeatable cuts to a stop | Work rides on a sled through the miter slots | Support and control work that may be awkward against a basic miter gauge |
| Tapering jig | Angled-width cuts, such as tapered legs | Stock is secured to a guide that travels along the saw’s reference | Make consistent tapers while guiding the work |
| Tenoning jig | Tenon cheeks and shoulders | Work is held vertically or on a carriage; designs may use the rip fence and a crosscut sled | Control stock orientation and alignment for joinery cuts |
| Box-joint jig | Interlocking fingers with consistent spacing | A sled and fence carry the work; an indexing key spaces cuts | Repeat finger spacing and adjust the fit with test cuts |
| Featherboard | Stock movement against a fence during feeding | Flexible fingers press stock toward the fence while allowing forward feed | Improve stock control during appropriate operations; it is not a shaped-cut jig |
Fine Woodworking’s course description calls a well-made, accurate crosscut sled “the most valuable table saw accessory.” That is the publisher’s description, not the result of a comparative test. Its Essential Table Saw Jigs course covers a crosscut sled, multi-use rip-fence attachment, L-fence, and tenoning jig.
How do you make a crosscut sled?
A crosscut sled rides in the miter slots and carries the work past the blade. It can help stabilize larger or smaller workpieces, but accuracy depends on a sound fit and a square fence. No universal dimensions are established for all saws: size the base and runners to your machine and the work you expect to support.
Crashes, No Sound, or Screen Glitches?
Random freezes, missing sound and display glitches usually trace back to one bad driver. Find and replace yours safely.Free scan · under a minuteWindows Errors? Fix Them Before They Spread
Repair common Windows errors and clear accumulated junk for a smoother, more stable PC - no reinstall needed.Free scan · no reinstall#1 Best Overall

- Table Saw Sled Kit: You will receive 2 UHMW miter bars for table saw (17 in), 2 universal T-tracks (12 in), 1 star knob and bolt, 1 round washer, and 15 screws, fitting most standard table saw slots( Note: wooden sled not include).
- Well made: T-tracks are made of solid extruded aluminum and the table saw runners are made of UHMW linear polyethylene, durability, and smooth, surface burrs-free.
- Safe and Efficient: The crosscut sled for table saw aids in precise cutting, meeting various cutting needs, prevents measurement and cutting errors, and enhances safety and efficiency.
- Low Friction: UHMW miter bars for table saw are ideal for use as crosscut sled guide rails, and have low friction and stability without expansion or contraction due to environmental changes.
- Function: Table saw sled kit is perfect for crosscutting, repeat length cutting, and small cuts, stabilizing workpieces, included knobs and bolts can be used as simple stop blocks for consistent cuts without frequent adjustments to measure fence distance.
- Measure the saw. Check the miter slots, table, blade path, fence, and guard arrangement against your saw manual and the machine itself. Plan a sled that travels without colliding with the fence or interfering with required safety equipment.
- Fit the runners. Make runners that slide freely in the slots without looseness. A poor fit can spoil repeatability.
- Attach the base and fence. Position the base on the runners and set the fence square to the blade path. Verify the relationship with test cuts rather than relying on a visual check alone.
- Add stops only with offcut clearance in mind. A stop can help repeat cut lengths, but do not create a setup that traps the offcut between the blade and stop.
- Test before cutting project stock. Make a test cut and check the result; adjust the fence if needed before using the sled for precise work.
Support the work and keep hands clear of the blade path. Do not clear offcuts while the saw is running. A sled improves guidance, but it does not make an otherwise unsafe setup safe.
How do you build and use a tapering jig?
A tapering jig guides a board at an angle so the cut narrows its width, as when tapering a leg. Festool’s table-saw jig overview lists taper jigs among common jig types. A detailed, dimensioned build plan is not established here, so treat the following as design requirements rather than a tested plan.
Rank #2
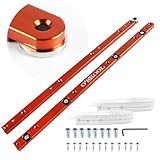
- Expansion collars help reduce sled play: Fine-tune each expansion collar from above with the included hex key to reduce side-to-side movement without removing the bars, helping crosscut and table saw sleds track more smoothly through the miter slot
- Rounded Entry for Smoother Setup: The rounded leading end helps each runner enter the miter slot with less catching during setup, making repeated test fits easier when building crosscut sleds, taper sleds, and woodworking jigs
- Two Mounting Methods with Top Access: Attach the bars from above with 1/4"-20 machine screws or from underneath with wood screws; top access holes let you reach the collar adjustments after the sled is assembled
- Check Your Miter Slot Before Ordering: Made for standard 3/4" x 3/8" T-shaped and U-style slots and not for 5/8" slots; remove the retaining discs for a non-T-shaped straight slot as shown in the instructions
- Two 430mm Bars for Sled and Jig Builds: Use the pair for crosscut sleds, table saw sled runners, taper or jointer sleds, and compatible router-table jigs; includes mounting hardware, hex key, templates, and instructions
- Lay out the desired taper on the workpiece and design the jig around that layout; do not assume a standard jig length or angle will suit every saw or board.
- Provide a straight reference that travels consistently along the saw’s guide, and a way to secure the stock so it cannot shift during the cut.
- Check that the jig, workpiece, blade, fence, and guard arrangement are compatible with your saw before cutting.
- Make a test cut on scrap and confirm the taper and stock restraint before cutting the project piece.
How do you cut tenons safely on a table saw?
A tenoning jig holds a board vertically or on a carriage to guide cuts for tenon cheeks and shoulders. Designs vary: Fine Woodworking describes a laminated-plywood bridge over the rip fence for narrow, wide, and angled tenons; Popular Woodworking describes a shop-made arrangement combining a crosscut sled with an adjustable carriage. These are different approaches, not interchangeable universal plans.
- Choose a design suited to the cut. Decide how the work will be supported and whether the arrangement uses the rip fence, a crosscut sled, or both.
- Align the jig. Check its relationship to the miter slots, fence, and blade path. Squareness and alignment affect the cut.
- Secure the stock as the design requires. Clamp the work for cheek cuts where the jig calls for it; do not rely on hand pressure to restrain a vertical workpiece.
- Separate cheeks and shoulders as planned. In the cited sled-and-carriage approach, the carriage guides cheek cuts and the sled is used for shoulders.
- Make test cuts. Verify fit and alignment on scrap before cutting the actual joint.
How do you cut box joints on a table saw?
A box-joint jig uses an indexing key to space successive cuts. A sled base and adjustable fence support the work and can help tune the fit. The cutter width and indexing relationship must stay consistent; a small setup error can accumulate across a wide joint.
Free tools Windows power users keep installed
One-click scans. No signup required.
Rank #3

- 【EASY TO USE】GOINGMAKE thin rip jig is easy to use. Just slide the guide into T-track miter slot of your table saw and lock it in front of the saw blade. Fits for 3/8" x 3/4" T slot and U shape slot and 1/4" x 3/8" T slot. The thin rip jig can extend to 8 inch from the center of miter slot to blade. Thin rip table saw accessories makes thin strips cut consistent and easily.
- 【SAFE AND FAST】GOINGMAKE table saw jig thin ripping guide provides safe and fast thin strips cutting. The one way roller bearing ensures the workpiece moves forwards and does not kickback, making safe and fast repetitive narrow strip cutting with ease. You can keep the same thickness thin strips cutting consistent with this table saw thin rip jig.
- 【PRECISE THIN RIPPING】GOINGMAKE table saw thin rip jig guide is precise and adjustale. Including mm and inch laser engraving scales. The zero clearance design is easy for set the right distance. Repeat with each strip the same size as the first for precison cutting. Set up the scale to the saw is easy. First take the bearing close to the saw blade and adjust the scale indicator to the nearest mark, then set the dimension of your strips.
- 【HIGH QUALITY】GOINGMAKE thin rip guide is made of high quality metal for durable, long lasting use. You can cut the thin strips as thin as 1/32" accurately. GOINGMAKE thin rip jig table saw jig guide is a must have table saw accessories for cutting repeat thin strips.
- 【WIDE APPLICATION】GOINGMAKE thin ripping guide is compatible with standard band saw, table saw and router table. Extended range of GOINGMAKE table saw guide is from 2-5/8 inch to 8 inch. GOINGMAKE thin rip table saw jig is easy to setup and use. GOINGMAKE thin rip gauge is a must have table saw accessories for safer and accurate cutting thin strips.
- Fit the runners. Woodcraft recommends runners that fit snugly but move freely in the miter slots.
- Square the fence to the kerf. Align the fence to the actual blade kerf, then check with test cuts.
- Set the indexing relationship. Match the key spacing to the cutter width and make test joints. Adjust the fence to refine the fit instead of assuming the first setup is exact.
- Use a sacrificial backer. It supports the fibers at the exit side and helps limit tear-out.
- Keep each cut consistent. Register the work against the indexing key each time and avoid changing the cutter or setup partway through a joint.
Woodcraft says a table-saw box-joint cutter set can produce 1/4-inch and 3/8-inch fingers and emphasizes precise, repeatable width. A dedicated set is not essential: the source also describes using a standard blade. Check arbor compatibility and current product details before buying any cutter set.
What does a featherboard do—and what does it not do?
A featherboard presses stock against the fence with flexible fingers angled to allow forward feeding while resisting rearward movement. It can improve control for suitable operations, but it is not a substitute for a properly aligned splitter or riving knife, blade guard, or safe technique. Use it only in a setup compatible with the cut and your saw’s manual.
Rank #4
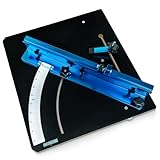
- COMPLETE TABLE SAW SLED KIT – Includes MDF base (23-13/16”), MDF fence face, extruded aluminum fence, miter bar (3/8" D x 3/4" W), flip stop, hold-down clamp, installation hardware, wear strips, Allen key, screwdriver & instructions.
- PRECISION CROSSCUT SLED – Features easy-to-read 1/2° graduations, hairline indicator & adjustable 90° stop for mistake-free setups. Ideal crosscut sled for table saw projects.
- ZERO CLEARANCE CUT – Base is cut to fit the individual saw and blade, delivering cleaner edges, reduced tear-out, and accurate results every time.
- SAFE TABLE SAW ACCESSORY – Large base supports workpieces while flip stop & clamp hold stock steady, keeping hands away from the blade and reducing kickback risk.
- SMOOTH SLIDING ACTION – Equipped with wear-resistant low-friction tape for seamless table saw jig movement across your saw surface.
Safety and fit checks before using a jig
Woodcraft identifies laceration and kickback as principal table-saw hazards. A jig is an aid to control, not a safety device that cancels those hazards. Before cutting, check the machine, stock, work support, and operation together.
- Use guards when possible, and use a properly aligned riving knife or splitter for ripping.
- Use straight, flat stock; support the work so it remains controlled through the cut.
- Use a push stick for ripping operations where appropriate, and keep hands out of the blade path.
- For crosscuts, do not trap an offcut between the blade and a stop, and do not remove offcuts while the blade is running.
- Confirm that runners, fences, clamps, blade, guard, and saw layout work together before making a cut.
Woodcraft’s table-saw safety guide provides further practical guidance. For workplace requirements, OSHA’s woodworking eTool on table saws links to 29 CFR 1910.213 and notes that the eTool does not cover every requirement. Consult the standard and applicable rules rather than treating a general shop guide as regulatory advice.
Do these 3 things before closing this tab:
1Fix the driver behind crashes, sound loss and screen glitches2Repair Windows errors before they cause bigger problems3Scan for outdated or missing drivers - takes under a minuteQuick Recap
Best Value

- 【High Quality Material】Thin rip jig table saw jig guide is crafted from CNC-machined Anodized Aluminum alloy, anodized surface, metal rigid structure, strong and stable, hold the workpiece firmly and eliminate wood chattering, ensure cutting quality and avoid your fingers being damaged.
- ⭕【Confirm The Compatible Size】Saker thin rip jig equipped with sliders and T-bolts, ONLY FIT 3/8 x 3/4 inch T-slot and 1/4 x 3/8 inch T-slot track, can work with most standard table saw, router table and band saw. NOT FIT U SLOT !
- 【Wide Range,Secure Positioning】Saker thin rip jig guide upgraded with an extended telescopic range to 2inches to 8-1/2 inches, equipped with imperial and metric scale markings, and a T-shaped structure for more secure positioning.
- 【Precise Positioning】The Saker Thin Rip Jig Table Saw Jig Guide allows you to position yourself quickly and better safely to help you make cuts with your table saw.The table saw jig is meticulously designed with a measurement precision of 1/32". Ideal for woodworkers who require consistent and precise cuts, this tool ensures each cut meets the desired size and accuracy, reducing material waste and enhancing overall project efficiency and quality.
- 【Easy Adjustment】Thin rip table saw jig Equipped with a simple adjustment mechanism, it allows for quick setup and adjustment of cutting width, enhancing work efficiency significantly, suitable for various cutting needs.
Product prices and availability are accurate as of the date/time indicated and are subject to change. Any price and availability information displayed on Amazon at the time of purchase will apply.