For most standalone pictures, the correct height is simple: hang the center of the artwork about 57 to 60 inches above the finished floor. If you want one default number, use 57 inches on center. That puts the art at a natural human eye level instead of floating too high on the wall.
That rule is only the starting point. On our residential job sites, the pictures that look wrong are rarely off by 1 inch. They are usually off because someone centered the frame on the wall instead of the sofa, ignored wire sag, used the wrong anchor, or pushed art upward just because the ceiling was tall. A 10-foot ceiling does not make a person 10 feet tall.
This guide covers the design height, the measuring formula, furniture spacing, gallery walls, stairs, heavy mirrors, wall hardware, costs, and the code issues that matter in public-facing spaces. The goal is not just to make the picture look right. It is to make it stay right.
The Short Answer: Use 57 Inches on Center
The cleanest rule for hanging a single picture is this: measure from the finished floor to the center of the frame or artwork, and place that center at 57 to 60 inches. Museums and galleries often use 57 inches because it creates a consistent eye-level line across rooms and hallways.
Windows Errors? Fix Them Before They Spread
Repair common Windows errors and clear accumulated junk for a smoother, more stable PC - no reinstall needed.Free scan · no reinstallOutdated Drivers Are Slowing You Down
One free scan finds every outdated or missing driver and matches the right update for your exact hardware.Free scan · exact hardware matchFor a typical framed piece that is 24 inches tall, the center is 12 inches down from the top. If you want the center at 57 inches, the top of the frame will land around 69 inches high before accounting for the hanger position. For a 36-inch-tall piece, the top lands around 75 inches. The bigger the art, the higher the top edge will be, even though the center stays human-scale.
#1 Best Overall

- EFFORTLESS ORGANIZATION: Our 303pcs Heavy Duty Picture Hanging Kit boasts an exceptional design with categorized compartments, saving you precious time that would otherwise be spent searching for the right hardware. Plus, when you're done using it, everything neatly tucks away, eliminating any post-project mess. Can replace picture hanging strips.
- TAILORED WEIGHT OPTIONS: Say goodbye to one-size-fits-all solutions! Our Heavy Duty Picture Hangers come with a variety of weight options (10LB, 20LB, 30LB, 45LB, 75LB), ensuring that whatever the size of your frame, we've got the perfect match to tackle your hanging needs. Various accessories help you decor your walls in bathroom, living room, bedroom.
- UNCOMPROMISING DURABILITY: Crafted from high-strength steel, our Heavy Duty Picture Hanging Kit guarantees not only longevity but also exceptional stability and security once your artwork is on the wall. Your frames will stay right where you want them, worry-free.
- VERSATILE HARDWARE ASSORTMENT: Experience the convenience of choice with our Wall Hanging Kit. Packed with a rich assortment of hardware, including Heavy Duty Wall Hooks, Sawtooth hangers, Picture Wire, D Rings, Hardware Nails, and Eye Hooks, you'll have all the options you need for various hanging projects, tailored to your preferences. Can replace picture hanging strips.
- NEATLY PACKAGED DELIGHT: When you choose us, you're not just getting hardware; you're getting an elegantly organized experience. Every Heavy Duty Wall Hook, Sawtooth, Picture Wire, D Ring, Hardware Nail, and Eye Hook is neatly arranged in a stylish plastic container. It's not just about hanging art; it's about adding a touch of sophistication to your entire hanging process.
Use 57 inches in hallways, entries, dining rooms, bedrooms, and most open wall areas. Use 60 inches if the household is tall, the room is more formal, or the piece is viewed mostly while standing. Avoid going much higher unless the architecture clearly demands it.
The Exact Formula for Where to Put the Hook
The biggest measuring mistake is marking the wall at 57 inches and putting the nail there. That only works if the hanger is exactly at the center of the artwork, which it usually is not. picture wire, D-rings, sawtooth hangers, and cleats all land above the visual center.
Use this formula:
Wall mark height = desired center height + half the frame height – distance from top of frame to the stretched wire or hanger.
Here is a real example. Say the frame is 30 inches tall. Half of that is 15 inches. You want the center at 57 inches. Pull the picture wire upward as if it is hanging, then measure from the top of the frame down to the peak of the stretched wire. If that distance is 5 inches, your wall mark is:
57 + 15 – 5 = 67 inches
That means the hook or nail goes at 67 inches above the floor. Once the wire settles on the hook, the picture center should land at 57 inches.
For two D-rings with no wire, measure from the top of the frame to the D-ring holes. For a French cleat, measure from the top of the frame to the receiving cleat location. For a sawtooth hanger, measure to the tooth that will actually sit on the nail.
How High to Hang Pictures Above Furniture
When art hangs above furniture, the furniture matters more than the 57-inch rule. A picture above a sofa, headboard, console, sideboard, or mantel should feel visually connected to the object below it.
Use this rule: keep the bottom edge of the art about 6 to 8 inches above the furniture. That distance is close enough to feel intentional and high enough to avoid looking cramped. Above a sofa, 6 inches often looks best. Above a console or sideboard, 6 to 8 inches usually works. Above a bed, 6 to 10 inches can work depending on pillow height and headboard height.
Scale matters as much as height. Art above furniture should commonly span about two-thirds of the furniture width. For an 84-inch sofa, the art or grouping should be roughly 56 inches wide. It does not need to be exact, but a 24-inch print over a large sofa will look undersized no matter how carefully it is hung.
Above a Sofa
For sofas, keep the bottom of the frame 6 to 8 inches above the back cushion or sofa frame. If the sofa is 34 inches high and the art is 30 inches tall, placing the bottom at 42 inches puts the center at 57 inches. That is perfect. If the sofa back is unusually high, you may need to let the center rise above 57 inches so the art does not crowd the furniture.
Above a Bed
Above a bed, measure from the top of the headboard or pillows, not from the mattress. Keep the bottom of the art about 6 to 10 inches above the highest visual point. In rooms where people sit up against the headboard, avoid heavy glass-framed pieces directly over the sleeping area unless they are anchored into framing or a properly rated system.
The Tool Desk
Outbyte Driver Updater FREEScan for outdated or missing drivers - takes under a minuteDriver Scan →Outbyte PC Repair FREEClear out junk files and repair common Windows errorsFree Scan →Rank #2

- Wide Assortment: 220-piece picture hanging kit includes 24 sets of 10lb picture hangers, 14 sets of 30lb picture hangers, 4 sets of 50lb picture hangers, 3 sets of 100lb picture hangers, 2 sets of 80lb, and 2 sets of 120lb picture hangers, 8 sets of D-rings, steel wire, screw eye hooks, and sawtooth hangers
- Durable Construction: Crafted from high-quality steel
- Convenience: Organizational storage case included
- Complete picture hanging kit with galvanized wire and sawtooth hangers, supports 10lb-120lb of wall décor and art
Above a Mantel
Mantels are architectural features, so the art should relate to the mantel first. A common range is 4 to 8 inches above the mantel, depending on mantel depth, ceiling height, and the size of the artwork. If the mantel is tall, forcing the center of the art down to 57 inches may be impossible. In that case, keep the gap tight and make sure the art is not too small for the fireplace.
Gallery Walls: Treat the Whole Layout as One Piece
A gallery wall should not be hung one frame at a time by instinct. Treat the full arrangement as one large object. Lay it out on the floor first, measure the total height and width of the composition, then place the center of the entire grouping around 57 to 60 inches above the floor.
For tight modern layouts, keep frames about 2 to 3 inches apart. For a looser collected look, 3 to 6 inches can work. The spacing does not have to be identical in every direction, but it needs a clear rhythm. Random 1-inch, 4-inch, and 7-inch gaps usually look accidental.
When we lay out a gallery wall, we mark the outside boundary first with painter’s tape. Then we mark a horizontal centerline at 57 inches and build around that line. This keeps the finished wall from climbing upward as more frames are added.
Free tools Windows power users keep installed
One-click scans. No signup required.
For mixed frame sizes, put the strongest piece near the center or slightly off center. Avoid placing all heavy dark frames on one side unless the furniture below balances it. Take a phone photo before drilling. A quick photo often reveals a crooked visual weight faster than standing in the room.
Stairs, Hallways, and Tall Ceilings
Staircase walls need a different approach because the floor line changes with every tread. The practical rule is to follow the stair pitch. Keep the center of each picture roughly 57 to 60 inches above the stair tread directly below it, or create a consistent line parallel to the railing.
Do not measure every frame from the lower landing. That makes the arrangement collapse visually as the stairs rise. Instead, establish a sloped centerline. If the railing has a clean angle, use it as a reference. A laser level with slope capability helps, but painter’s tape and a tape measure can get you close for a small grouping.
Hallways are where the 57-inch rule works especially well. People view art while walking and standing, so consistent center height matters more than filling wall space. In narrow hallways, avoid deep frames that stick out into the path.
For tall ceilings, resist the urge to move art up just to occupy blank drywall. Keep the art at human scale, then use larger pieces, vertical groupings, millwork, sconces, or furniture to address the wall height. A picture hung with its center at 72 inches usually feels disconnected unless it is part of a larger architectural composition.
Choosing the Right Hardware by Wall Type
Height gets the eye right. Hardware keeps the piece on the wall. Before choosing a hook, identify three things: the wall material, the item weight, and the hanger type on the back of the frame.
For light art under about 10 pounds on drywall, a properly rated picture hook is often enough. For medium pieces, use two hooks, drywall anchors, or locate studs where the layout allows. For heavy mirrors, oversized frames, or valuable pieces, use two-point hanging, structural blocking, studs, masonry anchors, or a French cleat.
Never assume a nail in drywall is acceptable because the picture “doesn’t feel that heavy.” Glass, wide frames, and mirrors can load the fastener differently, especially if the wire pulls outward. A 35-pound mirror above a console deserves a better load path than a small print in a hallway.
Recommended Free Tools
Rank #3
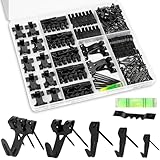
- EFFORTLESS ORGANIZATION: Our 385pcs Heavy Duty Picture Hanging Kit boasts an exceptional design with categorized compartments, saving you precious time that would otherwise be spent searching for the right hardware. Plus, when you're done using it, everything neatly tucks away, eliminating any post-project mess. Can replace picture hanging strips.
- TAILORED WEIGHT OPTIONS: Say goodbye to one-size-fits-all solutions! Our Heavy Duty Picture Hangers come with a variety of weight options (10LB, 20LB, 30LB, 45LB, 75LB), ensuring that whatever the size of your frame, we've got the perfect match to tackle your hanging needs. Various accessories help you decor your walls in bathroom, living room, bedroom.
- UNCOMPROMISING DURABILITY: Crafted from high-strength steel, our Heavy Duty Picture Hanging Kit guarantees not only longevity but also exceptional stability and security once your artwork is on the wall. Your frames will stay right where you want them, worry-free.
- VERSATILE HARDWARE ASSORTMENT: Experience the convenience of choice with our Wall Hanging Kit. Packed with a rich assortment of hardware, including heavy duty picture hangers, Sawtooth hangers, Hardware Nails, you'll have all the options you need for various hanging projects, tailored to your preferences.
- NEATLY PACKAGED DELIGHT: When you choose us, you're not just getting hardware; you're getting an elegantly organized experience. Every Heavy Duty Wall Hook, Sawtooth, Hardware Nail, is neatly arranged in a stylish plastic container. It's not just about hanging art; it's about adding a touch of sophistication to your entire hanging process.
| Wall or Surface | Typical Approach | Best Use | Watch For |
|---|---|---|---|
| Drywall | Rated picture hooks, drywall anchors, studs, or cleats | Most framed art and mirrors | Anchor rating, stud location, wire sag |
| Plaster | Pre-drill carefully; use plaster-compatible anchors or hit framing | Older homes and renovations | Cracking, brittle keys, hidden lath |
| Brick or masonry | Masonry bit with masonry anchors or screws | Fireplace walls, exposed brick, exterior-grade walls | Dust, bit wandering, mortar strength |
| Tile or stone | Specialty bit, slow drilling, correct anchor | Bathrooms, stone fireplaces, backsplashes | Cracked tile, waterproofing, costly repairs |
| Wood paneling | Fasten into paneling if thick enough or into studs behind | Libraries, dens, accent walls | Panel thickness and finish damage |
For heavy work, a French cleat is one of the cleanest solutions. It spreads load across a wider area, keeps the piece level, and works well for large mirrors or wide framed art. Two D-rings on two hooks are also better than one wire on one hook because the frame is less likely to tilt over time.
Add rubber or felt bumpers to the lower back corners of frames. They protect paint, reduce shifting, and allow a small amount of airflow behind the frame.
What Professional Picture Hanging Costs in 2026
For a basic DIY job, materials can be under $20 if you already own a tape measure, level, pencil, and hammer. A better DIY setup with a stud finder, laser level, anchors, D-rings, wire, French cleat, bumpers, and patch supplies commonly runs $40 to $150+.
Professional installation costs vary by city, wall type, weight, and complexity. For 2026, national marketplace data puts many art and picture installation jobs around $98 to $213, with many customers paying about $143. Broader picture-hanging jobs often run $120 to $350, while complex or premium work can reach $400 to $1,000+.
Quick wins for a faster PC:
Repair Windows errors before they cause bigger problemsFix Now →Fix the driver behind crashes, sound loss and screen glitchesFind Drivers →| Project Type | Typical 2026 Cost | What Changes the Price |
|---|---|---|
| Simple single picture | $60 to $150 | Travel minimums, drywall vs masonry, size |
| Mirror or medium-heavy art | $120 to $350 | Weight, studs, anchors, two-person handling |
| Gallery wall | $250 to $600+ | Layout time, number of frames, spacing precision |
| Stone, tile, or plaster install | $100 to $400+ | Special drilling, repair risk, slower work |
| Oversized or valuable art | $300 to $1,000+ | Insurance, security hardware, lifts, conservation handling |
Handyman rates commonly fall around $40 to $140 per hour, with small picture or mirror tasks sometimes listed around $60 to $120. In some cities, single-piece residential art installation starts closer to $200, with additional pieces at about $40 to $75 each. Heavy or oversized pieces may add $100 to $300.
The main cost drivers are the number of pieces, frame size, weight, wall material, ceiling height, ladder or scaffold access, whether layout design is included, whether two installers are needed, and whether the artwork is fragile or high value.
When to DIY and When to Hire a Pro
DIY is reasonable for lightweight framed art, standard drywall, simple layouts, and pieces you can comfortably hold with one hand while marking. If the frame weighs under 10 to 15 pounds and the wall is ordinary drywall, a careful homeowner can usually handle it in 20 to 45 minutes.
Hire a pro when the piece is heavy, expensive, oversized, fragile, or going into plaster, brick, tile, stone, or a high stairwell. Also hire help when the layout matters enough that extra holes would be a problem. Repairing a cracked tile, damaged plaster wall, or torn drywall anchor can cost more than the original installation.
Do these 3 things before closing this tab:
1Clear out junk files and repair common Windows errors2Scan for outdated or missing drivers - takes under a minute3Repair Windows errors before they cause bigger problemsFor large mirrors, we prefer two-person handling and two-point support. A mirror is not just a picture with reflective glass. It is heavy, brittle, and often installed where people stand or sleep below it. The fastener rating, wall structure, and hanger hardware all need to agree.
If you are renting, check the lease before drilling. Adhesive strips can be useful for small lightweight frames, but they are not a universal substitute for hardware. Avoid relying on adhesive strips for heavy, valuable, textured, humid, or sun-warmed locations. Bathrooms, masonry, rough plaster, and direct sun can all reduce bond performance.
Safety, Permits, and Code Notes
Most normal picture hanging in a private home does not require a building permit. There are exceptions. If you are installing blocking, altering a fire-rated wall, drilling into tile assemblies with waterproofing, mounting art in a commercial space, or integrating electrical picture lighting, the work may fall into a broader construction or electrical scope.
Rank #4

- THE ORIGINAL GO HANG IT! Easy picture hanging with zero measuring required. Our patented positioning system marks your nail holes accurately on the first try, so you're not guessing, patching drywall, or rehanging crooked frames. Works with sawtooth, wire, and D-ring picture hangers.
- INNOVATIVE MAGNETIC KEY SYSTEM. Our patented MagneKeys stay securely in the tool until you need them. When you're ready to hang, insert a key into the hanger on the back of your frame, hold the frame where you want it on the wall, and press. The key marks exactly where your nail goes. Works with our single-notch precision hangers, sawtooth hangers, and D-hooks. For wire hanger frames, built-in positioning hooks let you mark your nail placement just as easily.
- BUILT-IN LEVEL FOR A STRAIGHT HANG. No need to dig through your toolbox for a separate level. The detachable level is built right in, so you can make sure every frame is perfectly straight before a single nail goes in the wall. It's especially helpful for frames with multiple hanging points and for getting that perfect gallery wall where every piece lines up.
- COMPLETE 85-PIECE HARDWARE KIT. Includes 2 Single-Notch Precision Hangers, 24 self-tapping screws, picture hooks rated at 10, 20, and 30 lbs, 6 D-hooks, 8 ft of hanging wire, 20 nails, and a storage case to keep it all together. Invented in the USA.
- PERFECT GIFT FOR EVERY OCCASION. Whether it's weddings, housewarmings, graduations, or for the DIY enthusiast in your life, Go Hang It! is the must-have tool and gift for anyone who hangs pictures. It extends to fit everything from small photo frames to large wall art, so one kit handles a whole house worth of hanging.
For public-facing and commercial spaces, accessibility rules can matter. Wall-mounted objects with leading edges more than 27 inches and not more than 80 inches above the floor generally cannot project more than 4 inches into a circulation path. A picture can be hung at the right design height and still create a protruding-object issue if the frame or display case is too deep.
What’s actually slowing this PC down?
Pick the symptom - the matching free tool is one click away.
In offices, restaurants, retail spaces, clubhouses, corridors, and multifamily common areas, review projection, egress paths, fire ratings, and mounting security. A heavy framed piece in a public corridor should not depend on the same hardware you would use for a 12-by-16 family photo in a bedroom.
Valuable artwork also deserves preservation planning. Avoid direct sun on paper art and photographs unless the glazing and materials are selected for UV exposure. Keep sensitive pieces away from damp bathrooms, garages, laundry rooms, fireplace heat, and HVAC supply blasts. The best height is not helpful if the location damages the work.
Independent reader supportYour contribution helps us test, update, and keep practical guides available for everyone.A Builder’s Step-by-Step Method
Start by choosing the visual relationship. Is the picture connected to furniture, centered on an architectural feature, or standing alone on a wall? If it is above furniture, mark the bottom edge 6 to 8 inches above the furniture and check the center height. If it is standalone, start with a 57-inch center.
Next, mark the centerline with painter’s tape. Hold the picture or tape out its size on the wall. Step back to the main viewing position. In a living room, that may be from the sofa. In a hallway, it may be from the entry end. In a dining room, check both standing and seated views.
Then calculate the hook height. Measure the frame height, divide by two, and measure from the top of the frame to the actual loaded hanger point. Do not skip the loaded measurement for wire. Pull the wire tight as it will sit on the hook. Wire sag is one of the most common reasons pictures end up lower than expected.
After that, choose hardware based on the wall and weight. Find studs if needed. Pre-drill where appropriate. Use two hooks or a cleat for wide or heavy pieces. Install the hardware level, hang the piece, then check the final height and side-to-side level.
Finally, add bumpers and clean up the marks. If the piece is in a high-traffic area, give it a gentle movement test. It should not wobble loosely, tilt easily, or pull away from the wall.
Common Picture Hanging Mistakes
The most common mistake is hanging art too high. This happens above sofas, beds, mantels, and in rooms with tall ceilings. The fix is simple: relate the art to the people and furniture in the room, not to the ceiling.
Best Value

- Perfect Picture Hanging Kits: 310Pcs Accessories Including Wire, Hooks, Nails, etc. In A Hardware Box
- Essential Hardware Kit Picture Hanging Kit, Ideal For Home Projects And Decorative Items
- Helpful For You To Hang Up Pictures, Photos, Posters, Framed Maps, Framed Postcards, Paintings In Home, Office, Workplace, Or Anywhere You Need To Hang Artwork
- Heavy Duty Picture Hanger Hooks Are Rated At 10lb, 20lb, 30lb, 50lb, 100lbs. They Are Matched Perfectly With The Nails In The Box, Making It Easy To Hang Pictures Of Different Sizes On The Wall.
- Packaged In A Safe, And Hard Box For Easy Storage
The second mistake is measuring to the top of the frame instead of the center or the actual hanger point. Two frames of the same size can need different nail heights if one has tight D-rings and the other has loose wire.
The third mistake is using the wrong hardware. A generic nail may hold for a while, but vibration, door slams, humidity, and frame movement can work against it. Match the fastener to the wall material and the real weight of the item.
The fourth mistake is centering art on the wall when it should be centered over the furniture. If a sofa is not centered on the wall, the art usually needs to follow the sofa. The room reads the furniture grouping first.
The fifth mistake is ignoring the environment. Sunlight, heat, humidity, and air movement affect art and frames. Placement is both a design decision and a durability decision.
Recommended Free Tools
The Practical Rule to Remember
If you remember one rule, make it this: hang pictures at 57 inches on center unless furniture, stairs, seated viewing, or the wall assembly gives you a clear reason to adjust. Above furniture, keep the bottom edge about 6 to 8 inches up. For gallery walls, center the entire composition at 57 to 60 inches. For heavy or valuable pieces, solve the structure before worrying about the last inch of height.
Good picture hanging is measured, but it is not mechanical. The best result comes from combining the eye-level rule with the actual room: the sofa height, the mantel, the stair pitch, the wall material, the frame weight, and the way people move through the space.
Frequently Asked Questions
What is the 57-inch rule for hanging pictures?
The 57-inch rule means the center of the picture or artwork should sit 57 inches above the finished floor. It is a common gallery-style eye-level height and works well for most standalone art in halls, bedrooms, dining rooms, and living spaces.
Should pictures be centered on the wall or over the furniture?
In most furnished rooms, center the picture over the furniture or architectural feature below it, not necessarily on the wall. A sofa, bed, console, fireplace, or sideboard usually defines the visual grouping.
How high should art hang above a sofa or bed?
Keep the bottom edge of the art about 6 to 8 inches above a sofa, console, or headboard. Over a bed, 6 to 10 inches can work depending on pillow and headboard height.
How do I calculate where to put the nail for picture wire?
Use this formula: desired center height plus half the frame height minus the distance from the top of the frame to the stretched wire. For example, 57 inches + 15 inches – 5 inches = a hook mark at 67 inches.
How far apart should frames be in a gallery wall?
Use 2 to 3 inches between frames for a tight modern gallery wall, or 3 to 6 inches for a looser collected layout. Treat the whole arrangement as one piece and center the full composition around 57 to 60 inches from the floor.
How much does professional picture hanging cost in 2026?
Many professional picture installation jobs run about $98 to $213 nationally, with broader picture-hanging jobs often around $120 to $350. Complex gallery walls, heavy mirrors, stone or tile walls, and valuable artwork can reach $400 to $1,000 or more.
Quick Recap
Product prices and availability are accurate as of the date/time indicated and are subject to change. Any price and availability information displayed on Amazon at the time of purchase will apply.