Most closet organization advice starts with bins, hangers, and color-coded labels. Those things help, but they do not fix the real problems we see in homes: shelves pulling out of drywall, rods mounted too low, deep corners nobody can reach, unsafe lighting, mildew behind overpacked storage, and expensive closet systems that still do not match the way the homeowner actually gets dressed.
The best way to organize your closet is to treat it like a small construction project. Empty it, measure it, reduce what needs to live there, design clear zones, install the right supports, then maintain open space so the system keeps working. For a typical reach-in closet, plan on a half day to a full weekend for a DIY reset. A walk-in closet may take 2 to 4 days if you are patching walls, painting, assembling a modular system, or adding lighting.
In 2026, a simple DIY closet organization project can cost $0 to $400 if you reuse bins and add basic products. A professionally organized closet often lands around $227 to $843 for labor, with organizers commonly charging $50 to $150 per hour. Installed closet systems can range from about $400 to $2,500 for many prefab reach-ins, while custom closets commonly start around $1,046 to $3,210 and can climb to $8,000, $20,000, or more for high-end walk-ins with drawers, lighting, glass, islands, and furniture-grade finishes.
Here is the builder-smart sequence we recommend when a homeowner wants a closet that is easier to use and built to last.
Recommended Free Tools
#1 Best Overall

- Designed for Maximum Hanging Capacity: This closet system is ideal if you need more hanging space. With 5 reinforced hanging rods, it keeps shirts, pants, dresses, and coats organized, visible, and wrinkle-free—perfect for clothing-heavy wardrobes.
- Fits Most Closet Sizes from 5'8" to 7'6": Timate P3 heavy duty clothes rack adjusts to fit a wide range of closet sizes. The expandable frame is designed to adapt seamlessly to small closets, apartments, and walk-in spaces without the need for custom installation.
- Maximizes Vertical Space in Small Areas: Timate P3 works well in small spaces by using vertical storage. Engineered to make full use of wall height, it increases storage capacity without crowding your floor—ideal for compact living environments.
- Stable and Secure for Everyday Use: Timate P3 Sturdy enough for heavy clothing like coats and jackets. Built with reinforced materials and equipped with anti-tip hardware, it delivers long-term stability you can rely on daily.
- Easy to Assemble even for first-time users: Thoughtfully designed components and step-by-step instructions ensure a smooth setup process without requiring professional tools.
Step 1: Empty the Closet and Audit What Is Actually There
Start by taking everything out of the closet. Not most of it. Everything. Clothes, shoes, luggage, boxes, hooks, loose hardware, old shelf liners, laundry, and the items that ended up there because nobody knew where else to put them.
Once the closet is empty, clean it like a room, not like a cabinet. Vacuum the floor and corners, wipe shelves, dust the top of door trim, check baseboards, and look at the walls behind stored items. On our job sites, an empty closet often reveals the real reason the space never worked: a bowed shelf, a rod pulling loose, a blocked outlet, baseboards that interfere with a built-in, or moisture staining behind overpacked storage.
Use this first pass to sort items into broad groups:
- Keep in this closet
- Move to another room
- Donate or sell
- Repair or tailor
- Trash or recycle
- Seasonal storage
Do not design the new closet yet. This first step is only about seeing what you own and clearing enough space to make accurate decisions.
Use a Two-Pass Purge
Most homeowners make one purge, then buy organizers for everything left. A better approach is a two-pass purge.
First, remove the obvious items: worn-out shoes, stretched hangers, empty boxes, expired garment bags, clothes that do not fit, and anything you have already decided not to wear. Then pause. After you measure the closet in Step 2, come back for a second edit based on real capacity. This prevents you from designing around items you do not use.
A practical closet should not be filled to 100 percent. Leave about 15 to 20 percent open space. That means if your rod holds 100 hangers when packed tight, the usable target is closer to 80 to 85 hangers. That empty space is not wasted; it is what allows hangers to slide, drawers to close, shoes to stay paired, and laundry to return without starting a new pile on the floor.
Contractor Callout: Inspect Before You Cover Problems Back Up
With the closet empty, check for wall damage, loose brackets, cracked shelf cleats, musty odor, water staining, and signs of poor ventilation. If the closet backs up to a bathroom, laundry room, exterior wall, garage wall, or mechanical chase, pay extra attention. Damp shoes, gym clothes, packed plastic bins, and poor air movement can create odor or mildew. Fix those conditions before installing new cabinetry or shelves.
If you see recurring moisture, soft drywall, staining near the ceiling, or a musty smell that returns after cleaning, treat that as a building issue first. A closet organizer will not solve a leak, condensation problem, or ventilation gap.
Step 2: Measure the Closet Like a Builder
Before you buy a single shelf, rod, or basket, measure the closet. This is where many organization projects go wrong. Homeowners often measure the back wall and assume that number is the closet width. In real houses, baseboards, door trim, return walls, uneven drywall, sliding door overlap, outlet locations, and sloped floors all affect what will actually fit.
Use a tape measure, pencil, notepad, and level. For larger closets, a laser measure helps, but a standard 25-foot tape is enough for most homes.
Record these dimensions:
- Overall interior width at the back wall
- Width at the front opening
- Interior depth from back wall to door plane
- Ceiling height
- Left and right return wall depth
- Door type and clear opening width
- Baseboard height and thickness
- Existing rod height and shelf height
- Outlet, switch, vent, access panel, and light locations
- Floor slope or wall out-of-plumb conditions
A standard reach-in closet is often about 24 inches deep. That depth works because standard hangers need roughly 22 to 24 inches of clearance so clothing does not rub the doors. If the closet is only 20 inches deep, full-width front-to-back hanging may not work well. If it is deeper than 26 inches, the back of shelves can become a dead zone unless you use pull-outs, shallow bins, or a layout that keeps daily items visible.
Free tools Windows power users keep installed
One-click scans. No signup required.
Measure the Door Access, Not Just the Closet Box
The door is often the limiting factor. A 72-inch-wide reach-in closet with sliding doors may only expose about half the closet at a time. Deep drawers behind a sliding panel can be frustrating because the door blocks the drawer path. Bifold doors improve access, but they need space to fold. Swing doors may interfere with nearby furniture, bathroom doors, or bedroom circulation.
For sliding-door closets, keep the most-used items in the center zones that are easiest to reach. Avoid deep shelves behind narrow side returns. Shallow bins, open shoe shelves, and adjustable rods usually perform better than a cabinet-style system that looks good on paper but hides half the storage behind the door overlap.
Measure Your Inventory by Storage Type
Do not count garments only by category. Count them by how they need to be stored. A closet layout changes quickly when you separate short-hang shirts from long dresses, folded denim, shoes, bags, and accessories.
Use these practical targets:
- Single-hang rod height: about 66 inches above the floor
- Double-hang lower rod: about 40 inches above the floor
- Double-hang upper rod: about 80 inches above the floor
- Folded clothing shelf depth: about 12 to 16 inches
- Standard reach-in closet depth: about 24 inches
- Open capacity target: leave about 15 to 20 percent unused
If you have 6 feet of shirts and only 2 feet of long garments, double-hang storage may be the best upgrade. If shoes are the daily failure point, dedicate lower shelves before adding more hanging space. If sweaters are stacked 18 inches high and falling over, add more shelves with shorter vertical spacing rather than deeper shelves.
What’s actually slowing this PC down?
Pick the symptom - the matching free tool is one click away.
Contractor Callout: Find Studs and Understand the Load Path
Closet storage fails when weight is carried by the wrong parts of the wall. A shelf full of denim, shoes, tools, files, or storage bins can be much heavier than it looks. Long unsupported spans sag. Rod flanges can pull out. Wall clips can crack drywall.
Before installation, locate studs and mark them lightly. When a shelf or rod will carry meaningful weight, fasten into studs where possible or use hardware rated for the wall type and load. Do not assume a plastic drywall anchor can support a loaded closet rod over time. If the closet has plaster, masonry, metal studs, or unusually thin drywall, choose fasteners accordingly.
Step 3: Declutter by Use, Season, and Storage Value
After measuring, return to the items you removed. This is the second purge. The question is no longer whether you like an item in theory. The question is whether it deserves space in the closet you actually have.
Sort the keep pile by frequency of use:
- Daily items: eye-to-waist height
- Weekly items: easy reach, but not necessarily prime space
- Occasional items: higher shelves or labeled bins
- Seasonal items: upper shelves, under-bed storage, attic-rated storage, or another closet
- Sentimental items: limited, protected storage outside daily zones
Prime closet space is roughly from shoulder height down to mid-thigh height. That is where you should place the items you touch most often: work clothes, school clothes, uniforms, frequently worn shoes, belts, bags, and laundry return zones. High shelves should hold lightweight seasonal items, not heavy bins that are awkward to lift over your head.
Quick wins for a faster PC:
Repair Windows errors before they cause bigger problemsFix Now →Fix the driver behind crashes, sound loss and screen glitchesFind Drivers →Stop Designing Around Aspirational Clutter
A closet is a working storage area, not a museum for every version of your past and future self. If clothes do not fit, shoes hurt, bags are never used, or formalwear has not left the hanger in years, decide whether the item is worth the space. If it is valuable, protect it properly. If not, remove it from the closet.
For many households, the most effective rule is simple: keep the best, most-used version of each category. Five black sweaters may not be a problem if you wear them all. Five almost-right black sweaters that block the one you like is a problem.
Use Broad Categories Instead of Overbuilt Labels
Labels help, but overly specific labels create friction. Use categories that match real behavior: work shirts, workout gear, winter accessories, travel, school uniforms, guest linens, shoe care, or off-season. A system with fewer decisions is easier to maintain.
For kids closets, broad labels are even more important. Use low rods, open bins, and categories children can understand. Adjustable rods and shelves are worth the small extra cost because clothing sizes and storage needs change quickly.
Contractor Callout: Protect Materials From Moisture and Pests
Do not put damp shoes, wet umbrellas, sweaty gym clothes, or unwashed seasonal clothing into a closed closet. Moisture and organic residue create odor and can attract pests. Woolens should be clean before storage and protected in sealed bins or garment bags. Cedar blocks can help with odor and moth deterrence, but they are not a substitute for clean, dry storage.
If the closet has poor airflow, avoid packing plastic bins tight against exterior walls. Leave a small air gap where possible, and do not block vents or access panels. In humid areas of the United States, a moisture absorber may help in a small closet, but repeated dampness calls for a building diagnosis, not just a product.
Rank #2

- [LARGER & HIGHER]: We upgraded the 5 tier shelves length from 14 to 23.6 inches for placing more belongings, and the total height of this version is upgraded to 5.9 feet. The 4 expandable hanger rods provide more space and choices to hang clothes
- [EXTENDABLE & ADJUSTABLE]: Each hanger rod can be extend from 23.6 to 40 inches. The garment rack will suit your reserved size flexibly, therefore, it is simple to custom the assembly method. Meanwhile, the height of the shelves and the installation position of the hanger rods can be adjusted according to your needs
- [MULTIFUNCTIONAL]: The garment rack used for hanging dresses, suits, coats, T-shirts, pants, and so on. Assemble the first shelf little higher from the ground if you need to store items under the shelf. Take advantage of the top shelf can help you add the extra storage space
- [STURDY, STABLE & DURABLE]: Made with carbon steel material to make the garment rack sturdy and durable. The leveling feet and anti-tip device can make it more stable and prevent falling down
- [QUICK ASSEMBLE]: Detailed installation guide is included in the package. This product need to mount onto the wall. A rubber hammer is recommended to use when you assemble the wire shelves onto the plastic clip sleeves, it makes the shelf fit snugly to the poles(The rubber hammer is not included.)
Step 4: Design Storage Zones Before You Buy Organizers
Now that you know the closet dimensions and the true keep pile, sketch a simple zone plan. This does not need to be a professional drawing. A front-view sketch with widths, heights, and categories is enough for most DIY projects.
Start with the closet’s most annoying failure point. If shoes pile on the floor, solve shoes first. If folded clothes collapse, solve shelf spacing. If there is no place for long garments, create one full-height bay. If accessories vanish, add shallow drawers, hooks, or divided bins. Good closet design is not about filling every inch. It is about removing the daily friction that causes the closet to fail.
The Tool Desk
Outbyte PC Repair FREEClear out junk files and repair common Windows errorsFree Scan →Outbyte Driver Updater FREEFix the driver behind crashes, sound loss and screen glitchesFind Drivers →Common Closet Zones That Work
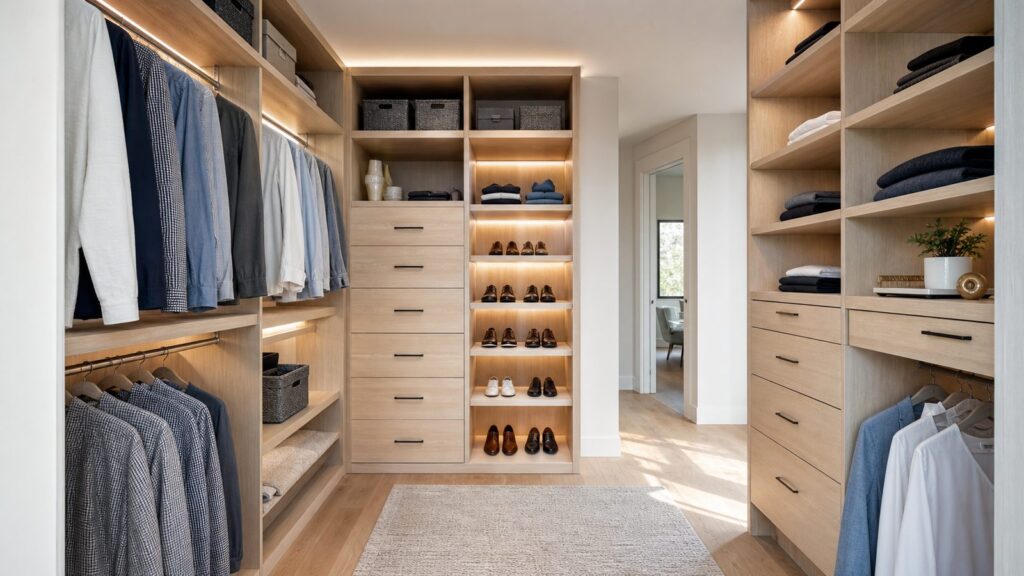
A well-organized closet usually combines several storage types:
- Short hang for shirts, jackets, blouses, folded pants, and kids clothes
- Long hang for dresses, coats, robes, jumpsuits, or formalwear
- Open shelves for sweaters, jeans, handbags, and bins
- Drawers or baskets for socks, undergarments, accessories, and small items
- Shoe shelves or racks near the floor
- Hooks for belts, hats, bags, robes, or next-day outfits
- High shelves for seasonal and bulky storage
- A hamper or laundry return zone if space allows
For folded clothing, shelves around 12 to 16 inches deep are usually easier to use than very deep shelves. Deep shelves invite double-stacking, and double-stacking means the back row disappears. In a 24-inch-deep reach-in closet, a 14-inch shelf can be more functional than a full-depth shelf because you can see and reach what is stored there.
Choose Adjustable Components Where Possible
Adjustability is one of the best values in closet design. A fixed custom closet can look beautiful, but if every opening is sized for today’s wardrobe, it may not adapt well. Adjustable shelves, movable rods, and modular drawers let the closet change with seasons, kids, workwear, hobbies, and aging-in-place needs.
For accessibility-friendly planning, keep frequently used items within comfortable reach. Many adults use the 15-inch to 48-inch range as a practical accessible zone, though the right height depends on the user, mobility, and whether the closet must meet a formal accessibility standard. Pull-down rods, lower drawers, D-shaped pulls, and open shelves can make a closet easier to use for seated users or anyone with limited reach.
Outdated Drivers Are Slowing You Down
One free scan finds every outdated or missing driver and matches the right update for your exact hardware.Free scan · exact hardware matchWindows Errors? Fix Them Before They Spread
Repair common Windows errors and clear accumulated junk for a smoother, more stable PC - no reinstall needed.Free scan · no reinstallMaterial Comparison: Wire, Laminate, Plywood, and Wood
Closet material choice affects cost, appearance, durability, ventilation, and how the closet handles weight. The right answer depends on the room, budget, and storage load.
| Material | Best Use | Typical Strengths | Watchouts | Budget Fit |
|---|---|---|---|---|
| Wire shelving | Budget reach-ins, linens, kids closets, utility storage | Low cost, good airflow, easy to find, works well for shoes and folded bins | Small items can tip, clips must be properly fastened, long spans need support | Lowest cost |
| Melamine or laminate | Clean built-in look without full custom pricing | Smooth surface, easy to wipe, consistent finish, good for shelves and towers | Edges and screw points need care; cheaper boards can sag if spans are too long | Budget to midrange |
| Plywood | Durable built-ins, painted systems, heavier storage | Strong, stable, takes fasteners well, good for custom carpentry | Needs finishing, edge treatment, and skilled cutting for a polished result | Midrange to high |
| Solid wood | Furniture-grade closets, luxury dressing rooms, visible trim details | High-end appearance, repairable, long service life when built well | Higher cost, movement with humidity, requires quality finishing | High |
For many homeowners, the best value is a hybrid: durable wall-mounted standards, laminate or plywood shelving where it shows, wire or ventilated shoe storage where airflow matters, and drawers only where drawers solve a real problem. Drawers add cost quickly, so use them for small items that genuinely need containment.
Contractor Callout: Do Not Block Access Panels, Vents, or Electrical
Closets often hide attic hatches, plumbing access, low-voltage panels, outlets, HVAC returns, or alarm components. Do not bury those behind permanent cabinetry without a plan. Future service access matters. If a panel must remain reachable, design removable shelves, a hinged section, or a clear service zone.
Also check door swing and drawer clearance. A drawer that hits a sliding door, bedroom door, or closet return wall will become a daily irritation. Measure the full pull-out depth before buying drawer towers.
Do these 3 things before closing this tab:
1Fix the driver behind crashes, sound loss and screen glitches2Repair Windows errors before they cause bigger problems3Scan for outdated or missing drivers - takes under a minuteStep 5: Install Shelves, Rods, Lighting, and Hardware Safely
Installation is where a closet organization project becomes construction work. A simple freestanding shoe rack is one thing. Wall-mounted rods, shelves, towers, lighting, and built-ins need layout, fastening, leveling, and sometimes electrical work.
If you are installing a basic system yourself, lay everything out before drilling. Mark level lines, stud locations, bracket spacing, rod heights, shelf heights, and door clearances. Dry-fit components where possible. If the closet has bowed walls or an out-of-square corner, split the difference visually and keep shelves functional rather than forcing a perfect measurement from one bad corner.
Rod and Shelf Heights That Work in Real Closets
Use these common starting points:
- Single rod: about 66 inches above the finished floor
- Double-hang lower rod: about 40 inches above the finished floor
- Double-hang upper rod: about 80 inches above the finished floor
- Top shelf above single rod: often around 68 to 72 inches high
- Shoe shelves: low zone, commonly 7 to 10 inches of vertical clearance per shelf for many shoes
- Boot storage: often 12 to 18 inches of vertical clearance, depending on boot height
- Folded clothing shelves: 10 to 14 inches of vertical spacing for neat stacks
These are guidelines, not laws. Measure your own clothes. Long coats, maxi dresses, tall boots, handbags, and luggage can change the plan. In a child’s closet, rods may need to be much lower. In a primary suite, a mix of double-hang, long-hang, drawers, and open shelves usually works better than one continuous rod.
Fastening and Sag Prevention
For wall-mounted systems, use the manufacturer’s fastener schedule and respect the load rating. Fasten standards, cleats, and brackets into studs wherever possible. Add intermediate supports for long shelves. For rods, use center supports on longer runs so the rod does not bow under weight.
Do not overload high shelves with heavy bins. Even if the shelf can technically carry the load, lifting a 40-pound bin over shoulder height is a safety issue. Put heavy items low. Put light seasonal items high.
Closet Lighting and Electrical Safety
Closet lighting has special safety concerns because stored clothing can get close to fixtures. Electrical code rules are based on fixture type, enclosure, clearance from storage space, and local adoption of the National Electrical Code. Many jurisdictions adopt the NEC with amendments, and enforcement varies by state and municipality.
As a practical homeowner rule, do not install bare bulbs in closets, do not let clothing touch or crowd a fixture, and do not add hardwired lighting casually. Use listed fixtures intended for closet use, maintain required clearances, and hire a licensed electrician when adding or relocating wiring, switches, outlets, recessed lights, or LED systems that tie into household wiring.
Battery puck lights and plug-in lights may be acceptable for some storage needs, but they still need common sense placement. Avoid heat buildup, crushed cords, overloaded outlets, and fixtures hidden behind clothes. If you are remodeling the closet, adding a new light, moving a switch, or opening walls, check local permit requirements before work begins.
Permit Notes for Closet Work
Many simple closet organization projects do not require a permit. Painting, swapping hangers, adding freestanding racks, and installing light-duty shelves often fall into ordinary homeowner work. Permit requirements can change when you add electrical wiring, alter framing, move walls, change structural elements, relocate HVAC, or modify fire-rated assemblies such as garage-adjacent walls.
Local rules control the final answer. Before adding hardwired lighting, removing walls, expanding a closet, converting part of a room, or changing mechanical systems, call your local building department or ask your contractor to verify requirements. On our projects, we would rather resolve that question before opening drywall than discover it during inspection or resale.
Contractor Callout: Patch and Paint Before Final Installation
If old shelving left holes, dents, anchors, or scuffed paint, repair those before the new system goes in. Patch holes, sand smooth, caulk trim gaps, and paint the closet while it is empty. A quart of paint is usually enough for many reach-in closets, while a walk-in may need a gallon depending on size and coverage. Use a durable interior finish that can handle scuffs from hangers, bins, and luggage.
This is also the time to replace damaged baseboards, tighten door hardware, adjust bifold tracks, or repair a sticking sliding door. A closet that looks organized but has a door that jams every morning still needs work.
Quick wins for a faster PC:
Repair Windows errors before they cause bigger problemsFix Now →Fix the driver behind crashes, sound loss and screen glitchesFind Drivers →Step 6: Reset the Closet and Maintain the 80 Percent Rule
Once the shelves, rods, lighting, and hardware are ready, put items back by zone. Start with daily-use categories, then weekly items, then seasonal storage. Use matching slim hangers if you want a cleaner look and more consistent spacing. Use clear bins where visibility matters and opaque bins where visual calm matters. Label broad categories, not every individual item.
Keep the floor as clear as possible. A closet floor becomes cluttered when storage above it is too hard to use. If shoes keep landing in a pile, the shoe system is wrong. If laundry never makes it into drawers, the drawers may be too full, too far away, or too divided. If bags live on the doorknob, add hooks or a dedicated shelf.
The 80 Percent Full Rule
A closet that works on day one can fail by day thirty if it is packed tight. Keep the closet roughly 80 to 85 percent full and leave 15 to 20 percent open. This applies to rods, drawers, shelves, and bins.
When a category exceeds its space, do not automatically add another bin. Edit first. The size of the zone is a decision. If workout clothes get one drawer, the drawer sets the limit. If shoes get four shelves, the shelves set the limit. This is how the closet stays organized without a major reset every month.
Rank #3

- CLOSET ORGANIZER SYSTEM: All in one wire closet shelves kit that creates up to 96 in. of hanging space and 144 in. of shelf space; Kit includes hang track, standards, shelf brackets, closet rods, closet rod support and SuperSlide shelves
- FITS CLOSETS 4 – 6 FEET WIDE: Multiple closet design configurations for spaces 4 – 6 feet wide with 12 in. deep shelves; Some shelf, hang track and/or rod cutting may be required to fit your space
- ADJUSTABLE SHELVES: The ShelfTrack system offers design configuration and adjustable shelves that can be easily moved up or down depending on your needs, or for changes over time; Ideal for kids closets, entryway closets or hall closets
- SUPERSLIDE HANG ROD: Includes SuperSlide hang rod system with support hardware that allows for continuous slide of hangers
- DURABLE WIRE SHELVES: Vinyl coated steel shelving resists rusting and chipping; All shelving SCS Certified for minimum of 90% recycled content; HARDWARE INCLUDED: Installation hardware included with easy-to-follow instructions
Quarterly Maintenance Takes Less Than an Hour
Schedule a 30- to 60-minute closet review every season. Remove donations, rotate seasonal items, wipe shelves, check for loose brackets, inspect for moisture, and return misplaced items to their proper room. A family closet, kids closet, or shared primary closet may need a monthly 15-minute reset, especially during school changes, sports seasons, or weather transitions.
Keep a donation bag or small bin nearby, but do not let it live full in the closet for months. When it fills, remove it from the house. Organization only works when the exit path is as clear as the storage plan.
Contractor Callout: Watch for Early Failure Signs
After installation, look for early signs that the system is overloaded or poorly supported: shelf bowing, brackets pulling away, rods dipping, drawer slides rubbing, wall anchors loosening, or doors scraping. Fix small issues early. A sagging shelf is cheaper to reinforce than a torn-out wall repair.
If the closet includes lighting, check that stored items have not shifted into the fixture’s clearance area. Clothing, bags, and boxes move over time. Safe installation is not a one-day concern.
What Does Closet Organization Cost in 2026?
Closet costs vary because the word organization can mean anything from a Saturday declutter to a fully built dressing room. The main cost drivers are closet size, material grade, number of drawers, hardware quality, demolition, drywall repair, paint, lighting, local labor rates, and whether the system is DIY, modular, semi-custom, or fully built-in.
| Project Type | Typical 2026 Cost | What It Usually Includes | Best For |
|---|---|---|---|
| DIY declutter only | $0 to $100 | Trash bags, donation boxes, labels, basic cleaning supplies, reused bins | Closets with decent existing shelves and too much clutter |
| Basic organizing products | $75 to $400 for many small closets | Bins, baskets, shoe racks, shelf dividers, drawer dividers, labels, garment bags | Renters, kids closets, linen closets, quick weekend resets |
| Professional organizer | $50 to $150 per hour; many small projects around $227 to $843 total | Sorting, decluttering, category planning, product recommendations, labeling | Homeowners who need decisions, not construction |
| Prefab or modular installed system | About $400 to $2,500+ | Manufactured shelves, rods, towers, and basic installation | Reach-in closets and moderate upgrades |
| Closet organizer installation | About $500 to $5,000; roughly $2,000 average | Installed storage components, layout labor, fastening, adjustments | Homeowners who want a built result without full custom cabinetry |
| Custom closet | Often $1,046 to $3,210; wider installed ranges from $1,500 to $20,000 | Custom layout, built-ins, finish selections, drawers, specialty hardware | Primary closets, awkward spaces, resale-focused improvements |
| Luxury walk-in or dressing room | $6,000 to $20,000+ | Furniture-grade finishes, lighting, glass, islands, seating, premium hardware | High-end primary suites and major remodels |
Homewyse’s May 2026 estimates show closet organizer installation starting around $79 to $110 per square foot. Angi’s 2026 custom closet figures report a typical range of $1,046 to $3,210 and an average around $2,128, with many custom installations around $30 to $50 per square foot. Home Depot’s custom closet range is much wider, from about $1,500 to $20,000 installed, because it includes larger and higher-finish projects.
For budgeting, separate product cost from construction cost. A $600 closet kit can become a $1,500 project if you add wall repair, painting, upgraded hardware, delivery, and installation. A $2,500 built-in can become a $4,500 project if the closet needs electrical work, drywall changes, premium drawers, or custom finish carpentry.
When to DIY and When to Hire a Pro
A closet reset is a good DIY project when the structure is sound, the scope is light, and you are not touching electrical, framing, or complicated built-ins. Many homeowners can handle decluttering, measuring, painting, adding freestanding racks, swapping hangers, installing light-duty organizers, and assembling modular components.
Outdated Drivers Are Slowing You Down
One free scan finds every outdated or missing driver and matches the right update for your exact hardware.Free scan · exact hardware matchWindows Errors? Fix Them Before They Spread
Repair common Windows errors and clear accumulated junk for a smoother, more stable PC - no reinstall needed.Free scan · no reinstallDIY makes sense when:
- The closet is a standard reach-in or small walk-in
- You are using freestanding products or a simple kit
- Existing walls are sound and dry
- You can locate studs and follow the manufacturer’s instructions
- No wiring, switches, outlets, or hardwired lighting are being changed
- The project can be completed in a weekend
Hire a professional when the closet needs built-ins, finish carpentry, drywall repair, structural changes, custom doors, hardwired lighting, or a layout that must make the most of a small or awkward space. A professional is also worth considering when the closet has uneven walls, old plaster, moisture damage, failed anchors, poor ventilation, or a layout tied to a larger bedroom or bathroom remodel.
At Bettesworth Construction, we look at closet projects through the same lens as other interior work: What is the wall condition? Where is the load going? Does the layout clear the doors? Will the lighting be safe? Can the system adapt? Is the finish level appropriate for the rest of the home? Those questions matter more than the number of baskets in the cart.
Good Pro Projects for a Construction Company
Professional help is especially valuable for:
- Custom reach-in closets with drawers, shoe towers, and long-hang bays
- Primary walk-in closets tied to bathroom or bedroom remodeling
- Closet expansions that move walls or change door openings
- Built-in mudroom, pantry, linen, or laundry storage
- Closets with damaged drywall, failed shelving, or uneven framing
- Lighting upgrades that require an electrician
- Accessibility-focused storage changes
- High-end finishes where trim, paint, and alignment need to match the home
A good contractor will not just install shelves. They will verify the substrate, protect adjacent finishes, manage dust, coordinate electrical work when needed, and leave the closet ready for daily use.
Small Reach-In Closet Tips That Make a Big Difference
Small reach-in closets need discipline. The goal is not to cram in the largest possible system. The goal is to make every accessible inch useful.
Recommended Free Tools
For a 24-inch-deep reach-in with sliding doors, avoid full-depth shelves at both ends where the door overlap blocks access. Use the center for daily hanging and open shelves. Put less-used seasonal bins on the high shelf. Keep shoes low and visible. If the closet is shared, divide it vertically so each person has a clear side rather than mixing categories across the whole rod.
Use double-hang where clothing length allows it. Moving from one 66-inch rod to a double-hang layout with rods around 40 and 80 inches can nearly double hanging capacity for shirts, folded pants, jackets, and kids clothes. Keep one long-hang bay if you own dresses, coats, robes, or formalwear.
Do not use oversized bins in a small closet. Smaller bins are easier to remove, label, and keep sorted. Shallow bins also prevent the common problem of items disappearing at the back. Hooks on the inside wall or door can help with belts, hats, bags, or the next day’s outfit, but do not overload the door if the hinges or track are already weak.
Common Closet Organization Mistakes to Avoid
The most common mistake is buying bins before decluttering. That usually preserves clutter in nicer containers. Measure first, edit hard, then buy only what the plan requires.
Do these 3 things before closing this tab:
1Clear out junk files and repair common Windows errors2Scan for outdated or missing drivers - takes under a minute3Repair Windows errors before they cause bigger problemsThe second mistake is ignoring the building conditions. A closet system is only as good as the wall and fastening behind it. If you miss studs, overload clips, or stretch a shelf span too far, the failure may not show up immediately. It may show up months later when the rod is full and the shelf is loaded with winter storage.
Other mistakes to avoid include:
- Skipping measurements for baseboards, return walls, vents, outlets, and door clearance
- Using deep shelves where shallow shelves would keep items more visible
- Putting heavy bins on high shelves
- Designing for appearance instead of laundry habits and daily workflow
- Leaving no long-hang space for coats, dresses, or formalwear
- Adding hardwired lighting without checking code and permit requirements
- Blocking attic, plumbing, electrical, or mechanical access panels
- Filling the closet to 100 percent immediately after organizing
- Ignoring moisture, odor, or mildew before installing new materials
A closet should make the room easier to live in. If the new system looks good but makes everyday tasks harder, the design missed the point.
The Bottom Line
To organize your closet in six easy steps, empty it, measure it, purge it twice, design storage zones, install the system safely, and maintain open space. That sequence works because it addresses both sides of the problem: the belongings and the built environment.
For a low-cost reset, expect to spend $0 to $400 and a weekend of focused work. For professional organizing, plan around $50 to $150 per hour. For installed systems, many homeowners spend $400 to $2,500 for prefab or modular solutions, while custom closets commonly start in the low thousands and can climb sharply with drawers, lighting, premium finishes, and walk-in layouts.
The Tool Desk
Outbyte PC Repair FREEClear out junk files and repair common Windows errorsFree Scan →Outbyte Driver Updater FREEScan for outdated or missing drivers - takes under a minuteDriver Scan →The best closet is not the most complicated one. It is the one that fits the opening, carries the load, keeps daily items within reach, leaves 15 to 20 percent breathing room, and can adapt as your household changes. Build it that way once, and the organizing part becomes much easier to maintain.
Frequently Asked Questions
What is the best order for organizing a closet?
Empty the closet, clean and inspect it, measure the space, purge items by use and season, design storage zones, install shelves and rods safely, then reload the closet while leaving about 15 to 20 percent open space.
How much does it cost to organize or remodel a closet in 2026?
A DIY declutter can cost $0 to $100. Basic bins and organizers often run $75 to $400 for a small closet. Professional organizers commonly charge $50 to $150 per hour, while installed closet systems can range from about $400 to $2,500 or more. Custom closets often start around $1,046 to $3,210 and can exceed $20,000 for luxury walk-ins.
What height should closet rods be?
A common single closet rod height is about 66 inches above the floor. For double-hang closets, a lower rod around 40 inches and an upper rod around 80 inches usually works well for shirts, jackets, folded pants, and kids clothing.
Do I need a permit to install closet shelves?
Simple shelves, freestanding racks, painting, and basic organizers usually do not require a permit. Permits may be required if you add or move electrical wiring, alter framing, move walls, change HVAC, or modify fire-rated assemblies. Local rules control, so verify before opening walls or adding hardwired lighting.
Is a custom closet worth it compared with a DIY kit?
A DIY kit is often the better value for a standard reach-in closet with simple storage needs. A custom closet is more worthwhile for awkward dimensions, walk-ins, primary suites, built-in drawers, lighting, resale-focused finishes, accessibility needs, or closets with wall damage and uneven conditions.
What closet lighting is safest?
Use listed fixtures intended for closet locations, keep stored items away from fixtures, and avoid bare bulbs. Hardwired lighting should be installed by a qualified electrician and checked against local code requirements, especially when adding switches, outlets, recessed fixtures, or LED systems.
Quick Recap
Product prices and availability are accurate as of the date/time indicated and are subject to change. Any price and availability information displayed on Amazon at the time of purchase will apply.
What’s actually slowing this PC down?
Pick the symptom - the matching free tool is one click away.