Free tools Windows power users keep installed
One-click scans. No signup required.
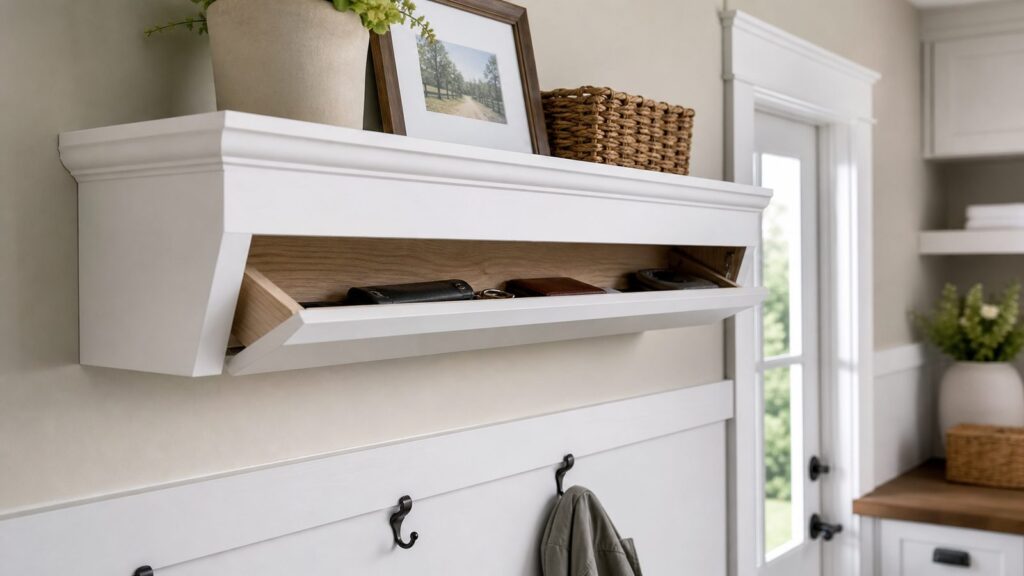
A hidden-compartment wall shelf is a small project with two jobs: it has to look like a normal, well-built shelf, and it has to open cleanly without sagging, binding, or pulling out of the wall. The secret compartment is the easy part. The carpentry, wall anchoring, proportions, and finish are what decide whether the finished piece belongs in a kitchen, bath, mudroom, bedroom, or living room.
For most homes, a practical hidden shelf is 24 to 36 inches wide, 5 to 8 inches tall, and 5 to 8 inches deep. That gives you an internal cavity roughly 1.5 to 3.5 inches high, depending on the hinge, false-bottom design, and lumber thickness. That is enough for passports, spare keys, emergency cash, small documents, a router password card, jewelry pouches, or everyday clutter you do not want sitting on the counter. It is not a substitute for a safe, a rated lockbox, or compliant storage for firearms, medication, or hazardous items.
On our job sites, we treat this like finish carpentry first and concealment second. A shelf that matches the room’s cabinet color, trim profile, wall proportions, and finish quality disappears better than an oversized box with a clever latch. The goal is not drama. The goal is a shelf that looks like it has a normal reason to be there.
Recommended Shelf Size and Layout
A good all-purpose size is 30 inches wide, 6 inches tall, and 6 inches deep. That proportion works over a mudroom drop zone, beside a vanity, in a kitchen command center, near a laundry room door, or as part of a gallery wall. It is large enough to be useful but not so bulky that it advertises itself.
#1 Best Overall

- Push to Open: Built-in spring-loaded plunger, you can just simply press the door to latch or unlatch. Eliminates the need for handles or knobs. Create the clean, seamless look of no knobs. Suitable for using with hinges without self-closing feature.
- Long Stroke With Magnetic: Long stroke with built-in 1.18x0.4x0.15 inch magnet, more powerful magnetic force ensure a secure close point that make the door more tightly united and no more 'drifting open' doors. Make this push latch more suitable for medium size doors.
- Powerful Piston/Spring: Larger and thicker heavy-duty spring mechanism has a strong enough tension make this push opener an exceptionally durable and timeless choice. Ensure lifetime up to 20000 times.
- Easy to Install: Mounting the two elliptical holes firstly, in order to adjust place to suit closing. Then fix the plate with screw or adhesive at the inside of cabinet door. So you don't worry about whether it could be difficult to locate the mount exactly. Push to open door catch can be used in cabinet, drawer, cupboard, wardrobe, chipboard, sideboard, cooking utensils and another furniture.
- What You Get: 2 x Push Open Latch; 8 x Base Mounting Screws; 4 x Round Head Screws for Strike(Warm Tip: For external door, 3 mm compression stroke must be reserved during installation.)
For a first build, use these outside dimensions:
- Width: 30 inches
- Height: 6 inches
- Depth: 6 inches
- Top and bottom: 3/4-inch plywood
- Sides: 3/4-inch plywood
- Back rail: 3/4-inch plywood or hardwood, at least 3 inches tall
- Hidden cavity: about 2 to 3 inches clear height after hardware
- Door reveal: 1/16 to 1/8 inch, kept consistent on visible edges
Keep the shelf depth conservative. A 6-inch-deep shelf is much easier to anchor safely than a 10-inch-deep shelf because the load has less leverage against the wall fasteners. If you need a deeper shelf for decor, build it as open display storage and use a smaller hidden compartment inside rather than making the entire unit deep and heavy.
The hidden door can be a hinged bottom panel, a hinged front apron, or a false bottom accessed from below. For most homeowners, the hinged bottom panel is the cleanest option. It keeps the shelf face simple, hides the seam in shadow, and allows the top surface to function like a regular shelf.
Materials and Hardware
Use stable sheet goods for the structure and hardwood or poplar for the face trim. Budget pine boards can work, but they are more likely to cup, twist, or telegraph movement through the reveal around the hidden panel. Plywood is more predictable, especially in kitchens and bathrooms where humidity changes are normal.
For a paint-grade shelf, we typically use 3/4-inch birch plywood or cabinet-grade plywood for the box, poplar for the front lip, and a quality primer and enamel trim paint. For a stain-grade shelf, use birch, maple, oak, or walnut plywood with matching solid edge trim. MDF can produce a smooth painted surface, but it is not our first choice for damp rooms or high-load installations unless every edge is sealed carefully.
A dependable hardware list looks like this:
- One 2-by-4-foot or partial sheet of 3/4-inch plywood, or equivalent project panels
- Poplar or hardwood face trim, usually 1×2 or ripped to match the design
- Small concealed hinges, piano hinge, or quality narrow butt hinges
- Magnetic catch, rare-earth magnet latch, or RFID lock for higher-end builds
- Friction lid support or soft-close support if the bottom door swings down
- Wood glue rated for interior woodworking
- 1-1/4-inch brad nails or pin nails for trim
- 1-1/4-inch wood screws for assembly where needed
- Structural or cabinet screws long enough to reach studs through the back rail
- Sandpaper in 120, 180, and 220 grit
- Primer, paint, stain, or clear topcoat
For anchoring, do not rely on drywall anchors as the primary support. A hidden shelf creates leverage, especially when the compartment is opened. Fasteners should land in studs, blocking, or a full-width cleat system that is itself fastened into framing.
2026 Cost Guide
A hidden-compartment wall shelf can be inexpensive as a DIY project, but the cost climbs quickly when you move from utility-grade lumber to stain-grade materials, concealed hardware, shop finishing, and professional installation. In 2026, a basic DIY build usually lands around $35 to $125 in materials. A better-grade shelf with cabinet plywood, hardwood trim, concealed hinges, magnets or RFID hardware, and premium finish is more often $90 to $250.
Professional fabrication and installation for a single shelf commonly runs about $250 to $750, depending on site conditions, local labor, finish quality, and whether patching or painting is included. Finish-carpenter billing rates commonly fall around $70 to $150 per hour in many markets, with high-demand areas sometimes exceeding $200 per hour. Full built-in shelving is a different price category: many custom built-in projects land around $2,500 to $6,000, while full-wall or high-end bookcase work can reach $3,300 to $14,500 or more.
| Option | Typical 2026 Cost | Best For |
|---|---|---|
| Basic DIY pine or common-board shelf | $35-$125 | Painted utility shelf, first-time build, low-risk location |
| Better-grade DIY plywood and hardwood shelf | $90-$250 | Kitchen, bath, bedroom, or visible living space |
| Retail concealment shelf | $100-$300+ | Fast installation when size and finish options fit the room |
| Professional custom shelf | $250-$750 | Clean finish, difficult wall conditions, exact cabinet or trim match |
| Integrated built-in shelving | $2,500-$6,000+ | Room remodels, alcoves, fireplace walls, pantry or mudroom systems |
Material prices vary by store and region, but current retail anchors are useful for budgeting. A 3/4-inch 4-by-8 sheet of birch plywood is commonly around $70 to $75. A 3/4-inch 4-by-8 sheet of MDF is commonly around $50. Smaller project panels cost more per square foot but reduce waste if you are building only one shelf.
Cut List for a 30-Inch Shelf
This cut list assumes 3/4-inch plywood and a hinged bottom compartment. Adjust final dimensions to match your wall, trim, and the objects you plan to store.
- Top: 30 inches by 6 inches
- Fixed internal deck: 28-1/2 inches by 5-1/4 inches
- Left side: 5-1/4 inches by 5-1/4 inches
- Right side: 5-1/4 inches by 5-1/4 inches
- Back rail: 28-1/2 inches by 3 inches
- Front apron: 30 inches by 3 to 4 inches, sized to hide the cavity
- Hinged bottom panel: about 28-3/8 inches by 5-1/8 inches, trimmed for a clean reveal
- Face trim: 30-inch front trim and two 6-inch side returns, sized to suit the room
Do not cut the hinged panel to final size until the box is assembled and square. Dry-fit it, mark the reveal, then plane or sand carefully until it opens without rubbing. A 1/16-inch reveal can work on a very square painted piece. A 1/8-inch reveal is more forgiving when stain, clear coat, seasonal movement, or slight wall irregularity is involved.
Rank #2

- Easy to Install White Magnetic Catch
- Mounting Hardware Included
- Works with a Variety of Cabinet and Furniture Doors
Step-by-Step Build Plan
1. Choose the Location Before You Build
Find the studs first. Use a stud finder, confirm with a small finish nail if needed, and mark the stud centers with painter’s tape. A 30-inch shelf can usually catch two studs at 16 inches on center. If the room layout forces the shelf between studs, install blocking during a remodel or use a properly designed cleat that reaches framing. Drywall anchors alone are not enough for a shelf that may be opened, loaded, and pulled on over time.
Pick a location where the shelf belongs visually. Good spots include above a mudroom bench, near a kitchen message station, beside a bathroom vanity, in a pantry, over a laundry folding counter, or among framed art. A single thick shelf in the middle of an empty wall looks suspicious and unfinished.
2. Build a Square Box
Cut the top, sides, back rail, and internal deck from 3/4-inch plywood. Use a table saw or track saw for straight cuts. Dry-fit the box before gluing. Check both diagonals; if the measurements match, the assembly is square.
Glue and clamp the sides to the top and internal deck. Use brad nails or screws only to hold alignment while the glue cures. Install the back rail tight and square because it carries the wall fasteners. If you are using a French cleat, rip the cleat at 45 degrees and attach one half to the shelf and one half to the wall framing.
3. Fit the Hidden Door
The hinged bottom panel should sit flush or slightly recessed depending on the design. A slight recess hides shadows better than a proud edge. Install the hinge with the shelf upside down on a flat bench. Open and close the panel at least 20 times before finishing. If it rubs now, paint or clear coat will make it worse.
Keep the reveal consistent. Random gaps are what make a hidden compartment look like a hidden compartment. On painted shelves, caulk fixed trim joints but do not caulk the moving reveal. On stained shelves, avoid filler at the door edge unless it is compatible with your stain schedule.
Quick wins for a faster PC:
Repair Windows errors before they cause bigger problemsFix Now →Scan for outdated or missing drivers - takes under a minuteDriver Scan →4. Add the Latch and Backup Access
A magnetic catch is the simplest option. Rare-earth magnets give a cleaner feel, but they need careful alignment. RFID locks are available for higher-end builds, though they add cost and complexity. Whatever you choose, plan a repeatable activation point. Do not place metal decor directly over the magnet location if it will interfere with the key or latch.
Before the shelf goes on the wall, decide how you will open it if the magnet shifts, a battery dies, or the latch fails. That may mean a removable trim cap, a discreet mechanical release, or a planned way to access the hinge screws. A hidden shelf with no backup access can become a repair project later.
5. Pre-Finish the Interior
Sand the interior pieces before final assembly when possible. Dark interiors should be pre-finished because they are difficult to coat cleanly after the compartment is built. Seal all plywood edges, including hidden edges. In kitchens and bathrooms, unfinished plywood and MDF edges absorb moisture quickly, which can cause swelling, paint failure, and binding at the hidden panel.
For paint-grade work, use primer on raw wood and end grain, sand lightly, then apply two finish coats. For stain-grade work, test stain and clear coat on scrap from the same board or plywood before applying it to the shelf.
Do these 3 things before closing this tab:
1Scan for outdated or missing drivers - takes under a minute2Repair Windows errors before they cause bigger problems3Fix the driver behind crashes, sound loss and screen glitchesRank #3

- Design Style: Push latches for cabinets embedded in the cabinet, does not take up any space, making the main body more neat and beautiful
- Magnetic Push Latches: Built-in spring-loaded plunger, you can just simply press the door to latch or unlatch. Eliminates the need for handles or knobs. Create the clean, seamless look of no knobs
- Strong Spring: The larger and thicker heavy duty spring mechanism has strong enough tension to make this actuator opener very durable and long lasting
- Wide Range of Uses: Cabinet magnet latch is suitable for cabinets, drawers, closets, cupboards, dressers and more. Creates a clean, seamless look with no knobs on cabinet doors
- What You Get: 10 x Magnetic push latches ;10 x Anchors; 12 x Ultra thin Adhesive strike,Good quality and beautiful to meet your needs
Anchoring and Load Safety
Wall attachment is the safety-critical step. A hidden shelf is not just a box on the wall; it is a lever. The deeper the shelf and the more weight placed near the front edge, the harder it pulls against the fasteners. That force increases again when someone opens the hidden panel or accidentally leans on the shelf.
Use at least two stud connections whenever the layout allows. A full-width back rail or French cleat spreads the load and makes leveling easier. For a 30-inch shelf, we typically want two structural screws into each available stud through the rail or cleat, with screw length selected so there is meaningful embedment into framing after passing through the shelf back and drywall. Pre-drill to avoid splitting, especially near plywood edges or hardwood cleats.
Do not publish or rely on one universal weight rating unless the bracket, cleat, fasteners, wall construction, and test method are all known. A shelf fastened to two studs with a solid cleat performs very differently from one installed into old plaster, metal studs, hollow tile backing, or drywall anchors. After installation, test gradually. Add 5 to 10 pounds at a time, watch for wall movement, fastener creep, hinge strain, or latch misalignment, and stop well before anything feels stressed.
As a practical homeowner rule, use this type of shelf for light decor and small stored items. If you want to hold heavy books, cookware, tools, or large objects, build a conventional bracketed shelf or a properly engineered built-in.
Kitchen and Bathroom Considerations
Kitchens and baths are harder on woodwork than bedrooms and living rooms. Steam, cleaning products, splashes, and temperature changes expose weak finishing quickly. If the shelf is near a sink, shower, coffee station, range, or exterior door, material choice and edge sealing matter.
Use plywood rather than solid pine for the main box when moisture changes are expected. Seal every edge. Use corrosion-resistant hardware, especially in bathrooms and laundry rooms. Avoid raw MDF edges in damp locations unless they are fully sealed with primer and topcoat. If the shelf aligns with tile, measure from the actual finished surface, not the framing. Tile walls can also require specialty bits and fasteners, and cracked tile is an expensive mistake for a small shelf.
In kitchens, coordinate the shelf with cabinet depth, backsplash lines, and outlet locations. Do not cover junction boxes, switches, GFCI outlets, plumbing cleanouts, or appliance clearances. In bathrooms, keep the shelf out of direct shower spray and away from spots where towels or robes will tug on it every day.
Permits, Code, and Liability
Most simple wall shelves do not require a building permit when they are surface-mounted, non-structural, and not tied into electrical, plumbing, fire-rated assemblies, or structural framing changes. That changes when the work opens walls, adds blocking in certain assemblies, moves outlets, modifies plumbing, attaches to unusual structural conditions, or becomes part of a larger remodel.
The Tool Desk
Outbyte Driver Updater FREEFix the driver behind crashes, sound loss and screen glitchesFind Drivers →Outbyte PC Repair FREEClear out junk files and repair common Windows errorsFree Scan →Permit rules vary by city. Some jurisdictions exempt minor finish work, cabinets, and shelves from building permits, while still requiring permits for electrical relocation, structural changes, or work in regulated spaces. If your shelf conflicts with an outlet, tile shower wall, fire separation wall, rental property rules, or condominium association requirements, check before cutting.
There is also a liability side. The Consumer Product Safety Commission’s Anchor It campaign has spent years warning about furniture and shelving tip-over hazards. A small hidden shelf is not a dresser, but the principle applies: anything with shelves that can be pulled, climbed, loaded, or opened needs responsible anchoring. If children are in the home, mount it high enough to discourage climbing and do not store dangerous items inside.
Rank #4

- Push to Open: Built-in spring-loaded plunger, you can just simply press the door to latch or unlatch. Eliminates the need for handles or knobs. Create the clean, seamless look of no knobs. Suitable for using with hinges without self-closing feature.
- Long Stroke With Magnetic: Long stroke with built-in 1.18x0.4x0.15 inch magnet, more powerful magnetic force ensure a secure close point that make the door more tightly united and no more 'drifting open' doors. Make this push latch more suitable for medium size doors.
- Powerful Piston/Spring: Larger and thicker heavy-duty spring mechanism has a strong enough tension make this push opener an exceptionally durable and timeless choice. Ensure to last up to 20000 times.
- Easy to Install: Mounting the two elliptical holes firstly, in order to adjust place to suit closing. Then fix the plate with screw or adhesive at the inside of cabinet door. So you don't worry about whether it could be difficult to locate the mount exactly. Push to open door catch can be used in cabinet, drawer, cupboard, wardrobe, chipboard, sideboard, cooking utensils and another furniture.
- What You Get: 2 x Black push open latch; 8 x base mounting screws; 4 x round head screws for strike(Warm Tip: For external door, 3 mm compression stroke must be reserved during installation.)
What to Store and What Not to Store
A hidden-compartment shelf is best for low-volume, low-risk items. Good uses include spare keys, passports, backup cash, small documents, USB drives, jewelry pouches, access cards, and visual clutter from a kitchen counter or entry table. It can also hold a router password card or emergency contact card in a location adults can remember.
Do not treat a concealed shelf as secure storage for firearms, prescription medicine, controlled substances, dangerous tools, or anything a child or unauthorized person must not access. Concealment is not the same as security. If the item needs legal, child-resistant, fire-rated, or burglary-rated protection, use a storage product designed and rated for that purpose.
Outdated Drivers Are Slowing You Down
One free scan finds every outdated or missing driver and matches the right update for your exact hardware.Free scan · exact hardware matchPC Slower Than It Used to Be?
A free scan shows the junk files, broken settings and background clutter dragging Windows down - then fixes them in one click.Free scan · Windows 10 & 11Also avoid storing heavy objects in the compartment. The hinge and latch are usually designed for access, not weight. Keep the hidden load modest, balanced, and away from the moving edge when possible.
Independent reader supportYour contribution helps us test, update, and keep practical guides available for everyone.When to DIY vs When to Hire a Pro
This is a reasonable DIY project if you have accurate cutting tools, a stud finder, clamps, a drill, a sander, and patience for fitting the reveal. Expect 4 to 8 hours for a basic painted shelf if you already own the tools, plus drying time for primer and paint. A stain-grade version can take 2 to 3 days because sanding, staining, and clear coating cannot be rushed.
DIY makes sense when the shelf is small, painted, mounted to standard wood studs, and not interacting with tile, electrical, plumbing, or expensive built-ins. It also makes sense for a garage, office, mudroom, or low-visibility bedroom wall where a tiny imperfection will not bother you.
Hire a finish carpenter when the shelf needs to match existing cabinetry, sit on tile, align with wainscoting, fit into an alcove, or look like original built-in millwork. A pro is also the better call if the wall is out of flat, the studs are not where you need them, the home has metal studs or plaster, or the shelf is part of a kitchen or bath remodel. The labor cost is higher, but one clean installation is cheaper than repairing torn drywall, cracked tile, or a shelf that sags after a month.
What’s actually slowing this PC down?
Pick the symptom - the matching free tool is one click away.
Common Mistakes We See
The first mistake is mounting only to drywall anchors. Even strong anchors are the wrong primary support for a shelf that opens and creates leverage. Studs, blocking, or a properly fastened cleat should carry the load.
The second mistake is making the shelf too deep. Depth looks useful on paper, but every extra inch increases leverage. For most rooms, 5 to 8 inches deep is the practical range. If you need more storage, build a cabinet, not an oversized hidden shelf.
The third mistake is ignoring wall flatness. Drywall often waves between studs. If you force a square shelf tight to an uneven wall, the box can twist and the hidden door may bind. Scribe the back edge, shim carefully behind the cleat, or choose a location with a flatter wall.
The fourth mistake is finishing only the visible faces. Hidden interiors still move with humidity. Raw edges inside the compartment can swell and cause the latch to misalign. Seal them.
Recommended Free Tools
Best Value

- Push to Open: Built-in spring-loaded plunger, you can just simply press the door to latch or unlatch. Eliminates the need for handles or knobs. Create the clean, seamless look of no knobs. Suitable for using with hinges without self-closing feature.
- Long Stroke with Magnetic: Long stroke with built- in magnet, 3N magnetic force ensure a secure close point that make the door more tightly united and no more 'drifting open' doors. Make this push latch more suitable for cabinet doors.
- Powerful Piston/25N Spring: Larger and thicker heavy-duty spring mechanism has a strong enough tension make this push opener an exceptionally durable and timeless choice. Ensure to last up to 20000 times.
- Adhesive Installation: Aluminum alloy housing, more durable and long-lasting. You can install the push cabinet latch without drilling screw holes by using the included adhesive. Also come with mounting screws. Mounting the two elliptical holes firstly, in order to adjust place to suit closing. So you don't worry about whether it could be difficult to locate the mount exactly.
- What You Get:2 x Push to open door catches; 8 x Base Mounting Screws; 2 x Flat head screws; 2 x Anchors; 2 x Adhesive; 2 x Ultra thin strike(Warm Tip: Please note size details. For external door, 1/8 inch compression stroke must be reserved during installation.)
The fifth mistake is making the secret more obvious than the shelf. A thick shelf with visible seams, odd proportions, exposed lock holes, or a lone placement in the middle of a wall attracts attention. Match the room first. Hide the mechanism second.
Final Builder Notes
A good hidden-compartment wall shelf should pass three tests. It should look normal in the room. It should open smoothly after finish is applied. It should stay firmly attached when loaded lightly and used repeatedly. If one of those tests fails, the shelf is not finished yet.
For a homeowner, the best version is usually simple: 30 inches wide, 6 inches deep, plywood box, hardwood face, hinged bottom, magnetic catch, sealed edges, and a cleat or back rail fastened into at least two studs. Keep the hidden storage modest, document the fastening locations with a few photos before painting or filling, and leave a future homeowner enough information to know where the shelf is anchored and where not to drill.
Built that way, the shelf becomes more than a novelty. It is useful finish carpentry with a concealed function, and it can belong naturally in a kitchen, bath, mudroom, bedroom, or living area without looking like a hobby project bolted to the wall.
The Tool Desk
Outbyte PC Repair FREEClear out junk files and repair common Windows errorsFree Scan →Outbyte Driver Updater FREEScan for outdated or missing drivers - takes under a minuteDriver Scan →Frequently Asked Questions
How much does it cost to build a hidden-compartment wall shelf in 2026?
Most DIY builds cost about $35-$125 for a basic painted shelf and $90-$250 for better plywood, hardwood trim, concealed hinges, magnetic or RFID hardware, and premium finish. A professionally built and installed single shelf commonly runs about $250-$750.
Do I need a permit to install a hidden-compartment shelf?
Usually not for a small surface-mounted, non-structural shelf. A permit may become relevant if you move electrical, alter plumbing, open regulated walls, modify structure, or include the shelf in a larger remodel. Local rules vary by city.
How do you safely anchor a hidden floating shelf?
Use a full-width back rail or French cleat fastened into studs or blocking. For a typical 30-inch shelf, aim to catch at least two studs where possible. Drywall anchors should not be the primary support because the shelf creates leverage when loaded or opened.
What is the best wood for a secret compartment shelf?
Cabinet-grade 3/4-inch plywood is the best structural choice for most builds because it stays flatter than solid pine. Use poplar or matching hardwood for face trim. In kitchens and bathrooms, seal all plywood or MDF edges to resist moisture.
Quick wins for a faster PC:
Scan for outdated or missing drivers - takes under a minuteDriver Scan →Repair Windows errors before they cause bigger problemsFix Now →How much weight can a hidden-compartment shelf hold?
There is no universal rating because capacity depends on wall framing, fasteners, cleat design, shelf depth, wood quality, and installation. Use it for light decor and small stored items, then test gradually after installation while watching for movement or sagging.
Is a hidden shelf safe for firearms, medicine, or valuables?
Concealment is not the same as security. Do not use a hidden shelf for firearms, medications, hazardous items, or high-value property unless it includes appropriate compliant locking storage. Use a rated safe or lockbox when legal or child-safety protection is required.
Quick Recap
Product prices and availability are accurate as of the date/time indicated and are subject to change. Any price and availability information displayed on Amazon at the time of purchase will apply.