Do these 3 things before closing this tab:
1Repair Windows errors before they cause bigger problems2Fix the driver behind crashes, sound loss and screen glitches3Clear out junk files and repair common Windows errorsSome links on this page are affiliate links: if you buy through them we may earn a commission, at no extra cost to you.
A good TV installation starts with the wall, the mount and the cable plan—not the drill. Check the television’s weight, VESA pattern and screw requirements; choose a position that works from your usual seat; and attach the mount only to support approved for that TV and mount. Then connect, configure and test the whole system before concealing cables or moving furniture back.
Choose a stand or the right kind of wall mount
Use a stand when flexibility matters
A stable cabinet is often the simplest choice in a rental, for a temporary setup, or when you want easy access to ports. Check that the cabinet is wide and deep enough for the TV’s feet, leave the ventilation clearance specified by the TV maker, and keep the stand on a level surface. Use an anti-tip strap or other anchoring method when appropriate, especially where children or pets could pull on the screen.
Choose fixed, tilting or full-motion mounting to suit the room
A fixed mount keeps the TV close to the wall and works well for straight-on viewing when you do not expect to adjust the screen. A tilt mount can help when the screen is above normal seated eye level or glare needs adjustment. A full-motion mount is useful for side seating, a corner, frequent port access or a screen that needs to swing into position. It projects farther from the wall, needs room to move and puts greater leverage on its attachment points, so choose it for a real viewing need rather than extra features alone.
Outdated Drivers Are Slowing You Down
One free scan finds every outdated or missing driver and matches the right update for your exact hardware.Free scan · exact hardware matchWindows Errors? Fix Them Before They Spread
Repair common Windows errors and clear accumulated junk for a smoother, more stable PC - no reinstall needed.Free scan · no reinstallMount features vary by model. For example, SANUS describes the VML5 as a fixed mount with side-to-side positioning adjustment and a safety connection mechanism; that does not establish compatibility with any particular TV. Check the individual mount instructions and specifications before buying: SANUS VML5 product page.
#1 Best Overall

- Important: Watch the video and learn the”Designed for" details listed below!
- Designed for concrete, brick and wood studs wall (single stud).
- Designed for TVs up to 80 lbs (36.3 KG) and display sized 26" - 55" (66 CM - 140 CM).
- Designed for VESA sized from 3.9'' x 3.9'' through 15.7'' x 15.7''.
- Comfortable View with tilt range from +10° to -5°.
Check TV, mount and hardware compatibility
Do not choose a mount by screen size alone. A large, light display and a smaller, heavy one can have different requirements. Record the exact TV model and check its manual before purchasing or drilling.
- TV: screen size, weight, VESA hole spacing, mounting screw diameter and length, port locations, rear clearance and any proprietary bracket or mounting system.
- Mount: supported weight and VESA range, wall types and attachment pattern, required number and spacing of structural supports, projection, tilt or swivel range, cable clearance and locking method.
- Hardware: use the fasteners specified by both manufacturers. Screws that are too long can damage the TV; screws that are too short may not engage securely. Do not improvise with longer screws, washers or substitute anchors when instructions conflict—pause and ask the manufacturer.
Instructions for a specific mount take precedence over generic advice. For example, SANUS warns that the referenced VML5 must not be installed into drywall alone and specifies that its wall must support five times the combined TV-and-mount weight. This is a requirement for that referenced mount, not a universal rule for every system. Read its installation documentation.
Plan the position before drilling
There is no single correct mounting height for every room. Base the position on your primary seat, how upright or reclined you sit, screen size, glare, soundbar and console clearance, outlet location, and access to ports and controls. A screen that forces you to tilt your head up can be uncomfortable even if it looks centered on the wall.
- Measure the TV’s full height and mark its proposed outline with painter’s tape or cardboard.
- Sit in your usual viewing position and check the screen from your normal posture.
- Check the lower edge against the console, soundbar and outlet, and confirm that the mount will leave room for the connectors.
- Look for reflections from windows and lamps, then check the view from secondary seats.
- Confirm that the mount can be installed at the planned position while meeting its structural requirements.
Above-fireplace placement needs more than a fit check. Consider heat exposure, soot, viewing angle, cable and outlet access, and soundbar placement. Structural strength alone does not make a location comfortable or suitable for the equipment.
Rank #2
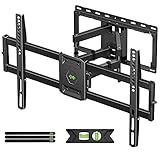
- Universal Design: This full motion TV mount fits for most of 42-90 inch TVs up to 132lbs with VESA size 200*100mm to 600*400mm available and max 16" Wood Stud space. Not perfect fit your TV? Please contact us and we'll do our best to solve the problem for you! If you need the screw M8*50, please message us to get it which be sent from USA.
- Adjustable View Comfortable : This TV bracket with dual articulating arms includes +5° /-15° tilt, ±45°swivel( maximum swivel angle depends on your TV). Want to more swivel angle? Please search for XML035 for the best options. +/-3° post-installation adjustment allows the perfect TV leveling. All these will make your TV flexibility and better view based on your seat in the room.
- Easy To Installation: Tilt mount with detailed instruction and all included hardware in pre-labeled bags. In particular, if your stud is for 16'' wood studs, please screw the bolts into the outermost edge of the holes on both side wall plates of the bracket to ensure compatibility with 16'' wood studs.
- Saving Space: This heavy duty mount can pull out to 16.49 and retract back to 2.40”, which save some valuable space for you and make your house look neat and Max weight 132lbs.
- Product Includes: The articulating mount Comes with bubble level, 3 pieces pack of cable ties and all standard mounting hardware, friendly US-based customer service. However, Concrete Anchors are not provided (If you need 10X50mm concrete anchors, please contact us to get it which be sent from USA).
Assess the wall and know when to stop
Mounting methods depend on whether the surface is wood-stud drywall, metal-stud drywall, masonry, brick, stone, tile, plaster or an uneven decorative surface. The required anchors, fasteners and drilling method are not interchangeable. LG’s general mounting guidance stresses matching the bracket and method to the TV and wall and recommends professional help where the wall or installation conditions are unsuitable: LG wall-mounting guidance.
For a typical framed drywall wall, use a stud finder, confirm the stud position by an appropriate method, and check for wires, plumbing or other obstructions before drilling. Tapping the wall is not confirmation of structural support. Use the number and positions of attachment points required by the mount; do not rely on drywall alone unless the TV and mount manufacturers specifically approve that method.
Stop and get a qualified assessment if the wall is metal-stud, masonry, tile, stone, fragile plaster or a fireplace surround; if you cannot verify structural support; if the mount cannot line up with suitable support; or if drilling could encounter concealed utilities. A stud that misses the desired TV position may call for a wider or lateral-shift mount, a revised position, properly engineered reinforcement or a different wall—not omitted fasteners or arbitrary anchors.
Recommended Free Tools
Gather tools and plan every connection
Useful tools
Gather a tape measure, stud finder, level, pencil or painter’s tape, drill and suitable bits, socket or wrench set, screwdrivers, specified fasteners, flashlight, safety glasses and a second person to lift and hang the TV. A fish tape or cable-pulling tool may help with low-voltage wiring. A laser level, inspection camera, cable labels, hook-and-loop straps or a known-good spare HDMI cable can also be useful. Tools cannot make an unknown wall structure or incorrect fasteners safe.
Rank #3
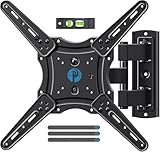
- Wide Compatibility: The Pipishell TV wall mount fits most 26"-65" LED LCD OLED Plasma Flat Curved TVs with VESA patterns 75x75mm up to 400x400mm. Compatible with wood stud, concrete, and brick wall mounting. Do not install the mount on drywall alone.
- Solid & Reliable: Featuring strong construction with articulating arms that are 33% thicker than other mounts, this TV wall mount can support up to 80 lbs. Premium heavy-duty steel, durable faceplate, and security screws provide an extra sense of security.
- Perfect Viewing Angle: The full motion TV mount can tilt +5°/-15° to reduce glare and swivels +/-90° to direct the screen toward your position for a more comfortable experience. Level the TV +/-4° after installation to perfectly fine tune the TV’s position.
- Space-Saving Design: This wall mount can extend 17" for viewing and retracts back to 2.36" for a low-profile look. The single-stud design is ideal for installing in spaces such as a corner or area where only one stud is available.
- Quick & Simple Installation: The single-stud design makes it easier to mount than dual arm models that require two studs. The full motion TV wall mount includes mounting hardware and detailed instructions for fast installation.
Make a cable and device list
Before mounting, list the devices you intend to connect: streaming box, cable or satellite receiver, game console, Blu-ray player, soundbar, AV receiver, Ethernet, antenna or USB accessories. Decide which will sit on a console, in a cabinet, behind the TV or connect wirelessly. Photograph the TV’s ports and label cables while the rear is easy to reach. Check whether connectors face downward or backward, and whether the mount leaves enough clearance to plug them in without sharp bends.
Mount the TV step by step
- Read both manuals. Confirm the TV’s VESA pattern, screw specification, clearances and orientation; then confirm the mount’s wall requirements, permitted fasteners, hole pattern, locking method and release procedure. If instructions conflict, follow the more restrictive direction and contact the manufacturer before proceeding.
- Locate and mark the support. Find the required structural support and check the drilling area for utilities. Mark the TV’s intended centerline and the wall-plate position, taking the bracket geometry and planned viewing height into account.
- Attach the TV brackets. Place the set screen-down only if its manufacturer permits that orientation, on a clean, padded surface. Use the correct VESA holes and specified screws or spacers. Align the rails and tighten evenly without over-tightening; check that brackets are not upside down and that ports and ventilation remain clear.
- Attach the wall plate. Mark all required holes, drill to the specified size and depth, and fasten the plate using the mount’s approved hardware for that wall construction. Tighten in stages and check level before final tightening. If the plate cannot use the required supports, stop rather than leaving out fasteners or substituting random anchors.
- Connect cables while access is easy. Use the intended inputs and outputs, including the TV’s specifically labeled ARC or eARC port if applicable. Leave a gentle service loop so cables are not stretched; keep them clear of the bracket’s moving parts.
- Hang and lock the set. Use two people for a TV that is awkward or heavy to lift. Follow the mount’s hanging procedure and engage every locking tab, safety screw or retaining mechanism as directed.
- Check movement and clearance. Confirm the set is secure and level, cables are not pinched, and the chassis is not pressed against the mount. Move a tilting or full-motion mount slowly through its intended range and check that cables stay slack and connectors are not strained.
- Test before finishing the room. Power up and test every source, audio path, network connection and remote before concealing cables or returning furniture to position.
Choose HDMI, audio and cable routing for the system
Match HDMI certification to the devices
Use the official HDMI cable designation rather than vague claims such as “gaming” or “8K.” HDMI’s cable guidance describes High Speed HDMI for up to 10.2 Gbps configurations, Premium High Speed HDMI for up to 18 Gbps configurations, Ultra High Speed HDMI for up to 48 Gbps, and the newer Ultra96 designation for HDMI 2.2 configurations requiring up to 96 Gbps. These are category capabilities, not a guarantee that every device in a signal chain supports a feature. See HDMI cable categories, Ultra High Speed HDMI certification and Ultra96 guidance.
- For many ordinary 4K/60 setups, a certified Premium High Speed cable is sufficient if the connected equipment requires no more.
- For 4K/120 gaming, VRR or other demanding high-bandwidth features, choose a certified Ultra High Speed cable and check the capabilities of the TV, source and any receiver or switch.
- Use Ultra96 only when the equipment’s HDMI 2.2 requirements call for it.
- Buy a length that reaches without tension, avoid sharp bends, and test long or inaccessible cables before closing a wall. HDMI guidance does not set one universal maximum cable length; performance depends on cable construction and installation. See HDMI’s specification guidance.
Connect ARC or eARC deliberately
For a soundbar or receiver using audio return, connect it to the TV’s HDMI port labeled ARC or eARC, not an arbitrary HDMI input. The other device must support the mode and audio format you want; settings such as HDMI-CEC may also matter. HDMI’s guidance describes eARC support for high-bitrate audio and notes that ARC/eARC compatibility depends on the devices: HDMI specification guidance.
The Tool Desk
Outbyte Driver Updater FREEScan for outdated or missing drivers - takes under a minuteDriver Scan →Outbyte PC Repair FREERepair Windows errors before they cause bigger problemsFix Now →Keep electrical power separate from low-voltage cabling
Do not fish an ordinary TV power cord through the wall as if it were an HDMI cable. Options include using a nearby existing outlet, an applicable listed in-wall power extension kit, having a qualified electrician install or move a receptacle, or using an on-wall raceway. Low-voltage signal cable and electrical power wiring have different requirements; follow product instructions and applicable local rules. Best Buy’s service description distinguishes in-wall-rated video cables from power and says power cables cannot be routed through the wall as part of its standard service: Best Buy TV installation service. This is not a substitute for checking local electrical requirements.
Rank #4

- [Sturdy and Safe] You can relax knowing your TV is securely mounted to the wall with this UL-certified TV wall mount, which holds up to 132 lbs without a hitch. Its solid design keeps your TV steady, no wobbling or slipping here! Plus, we’ve got you covered with 10 years of support for this product.
- [Securely Supports TVs Up To 90 Inches] The VESA compatibility of up to 600x400mm ensures a seamless fit with most standard mounting patterns. Designed for 24-inch studs, it offers enhanced flexibility in installation options. This versatility makes it ideal for accommodating various room layouts and TV configurations.
- [Low Profile Design] This design allows your TV to be positioned close to the wall, optimizing space while creating a sleek and modern aesthetic. Despite its slim profile, the mount features a quick release mechanism that facilitates effortless adjustments and connections.
- [Tilt TV to Reduce Glare] The wall mount enables you to tilt your TV forward by up to 10 degrees, effectively reducing glare and enhancing viewing quality.
- [Easy Installation] The package includes all necessary hardware along with clear instructions. A paper template for marking drill holes would have been beneficial. Tips: Do not attempt installation into drywall alone; if concrete anchors are required, please contact us.
Choose in-wall or on-wall concealment
In-wall low-voltage routing can look clean, but it requires a suitable path and can be difficult to change later; power still needs an appropriate electrical solution. On-wall raceway avoids opening the wall and is often easier to retrofit or remove, though it remains visible. Examples include SANUS’s in-wall TV and soundbar cable-management kit, in-wall media box and on-wall cable hider. Product suitability depends on the installation and local requirements.
Configure and verify the complete setup
Before calling the job finished, connect the TV to Wi-Fi or Ethernet, install available updates and label inputs. Test each source, confirm the intended resolution and refresh rate, and check HDR, game mode, VRR or ALLM if the connected equipment supports them. Set the TV’s sound output to the intended speaker system, test ARC/eARC and check for lip-sync delay. Pair or program remotes, verify antenna or cable reception, and confirm the network and apps you need work.
Check the installation again with the TV in its normal position and, for a moving mount, at the limits of its intended movement. A complete setup involves device connections, network, updates, audio, remotes and cable dressing as well as physical mounting; Best Buy’s listed service scope illustrates that broader work: Best Buy TV installation service.
Troubleshoot common problems
No picture or “no signal”
- Make sure the source device is on and select the matching TV input.
- Reseat both ends of the HDMI cable and try another TV port.
- Test with a known-good cable; temporarily bypass any AV receiver or switch.
- Check the source’s output resolution and refresh rate, then temporarily disable advanced features if needed.
- Power-cycle the TV and source, then reconnect devices one at a time.
If the cable is in a wall or will be inaccessible, test it before closing the wall.
Best Value

- [Securely supports TVs up to 70''] The full motion TV wall mount fits most 32''-70'' flat and curved TVs with VESA patterns 75x75 to 400x400mm. Designed for installation on 8”/12”/16” wood studs, concrete, and brick walls. Please make sure that the above conditions are met before using it.
- [Solid and Sturdy] This swivel TV wall mount made of heavy-duty steel and dual articulating arms that are 30% thicker. Its solid design keeps your TV steady, no wobbling or slipping here! Plus, we’ve got you covered with 10 years of support for this product.
- [Enjoy Viewing Freedom] The adjustable TV wall mount tilts +5°/-15° to reduce glare and swivels +/-45°. Level your screen +/-4° after installation to fine tune the TV’s position. All these will make you find the most comfortable and healthiest viewing position.
- [Space Saving Design] The TV mount 70 inch allows your TV to be positioned just 3.43 inches from the wall, thereby optimizing space, while the TV arm can also put out to 15.07'' for effortless adjustments and connections.
- [Easy Installation] The package includes all necessary hardware along with clear instructions. A paper template for marking drill holes would have been beneficial. Tips: Need concrete anchors, M8x50mm screws, or missing parts? Don’t run to Home Depot or Lowe’s—we’ll send them to you directly. Just reach out to our US-based support team (available daily) and we’ll get it taken care of quickly.
No sound from the soundbar or receiver
Verify that the cable is in the TV’s ARC/eARC port, the audio device is set to the corresponding input, and the TV’s sound output selects HDMI ARC/eARC. Check HDMI-CEC and device support for the intended mode. For diagnosis, try optical audio if available or temporarily select PCM audio.
Gaming features or 4K/120 are missing
Check that the source is set to the intended resolution and refresh rate, the selected TV port supports the feature, the TV’s enhanced HDMI mode is enabled, and the cable is certified for the required bandwidth. Enable game mode, VRR or ALLM where supported; bypass a receiver or switch temporarily if it may limit the signal.
The TV is crooked or cables are strained
If a level mount still looks crooked, check the wall, bracket alignment and the mount’s post-install leveling adjustment; the TV’s bezel can also appear asymmetric. Follow the manual before loosening any structural fasteners. If connectors are too close to the wall, consider approved right-angle connectors, a mount with more clearance, correct spacers or a suitable tilting mount. Never force a connector into a sharp bend or let a cable carry the TV’s weight.
A cable will not pull through the wall
Stop rather than forcing it. Fire blocking, insulation, cross-bracing, utilities or a mistaken assumption about the stud bay may block the route. Use an appropriate on-wall raceway or have a professional assess a safe path.
Decide whether to hire a professional
DIY is a reasonable option when the TV can be safely handled by two people, the wall is standard wood-stud drywall with support you can verify, the mount instructions are clear, no electrical work is needed and the cable route is straightforward. Hire a qualified installer when the screen is very large or heavy, the surface is masonry, tile, stone, plaster or metal-stud, support is uncertain, a new or relocated outlet is needed, the TV is above a fireplace, in-wall routing has unknown obstructions, or the mount’s movement creates leverage you cannot confidently account for.
As a dated U.S. price reference, Best Buy listed its TV setup and mounting service at a starting price of $249.99 when checked on August 16, 2026. The listed standard scope covers a standard frame wall with drywall; mounts may be separate, and special surfaces, fireplace work, in-wall power and other additions may cost extra. Confirm current scope and pricing for your location: service details and specialized service options.
Quick Recap
Final safety and function check
- The mount is fastened to the support and with the hardware its instructions require.
- The TV’s retaining mechanism is engaged, and the screen is secure and level.
- Ventilation is clear, and no cables are pinched, taut or sharply bent.
- Power is connected through an appropriate route, separate from improvised in-wall signal wiring.
- Every intended source, audio path, network connection and remote has been tested.
- Any moving mount travels through its intended range without pulling connectors or cables.
Product prices and availability are accurate as of the date/time indicated and are subject to change. Any price and availability information displayed on Amazon at the time of purchase will apply.


Leave a Reply