Recommended Free Tools
Some links on this page are affiliate links: if you buy through them we may earn a commission, at no extra cost to you.
Build and square the plywood cabinet box first, then measure it and make a solid-wood frame to fit. This beginner-friendly sequence produces a simple cabinet: the box provides the storage, while the frame’s vertical stiles and horizontal rails cover the front edges and create the visible openings.
What makes a cabinet face-frame style?
A face-frame cabinet combines a plywood carcase—the box—with a solid-wood frame attached across its front. The frame consists of vertical stiles and horizontal rails; additional members divide openings for doors and drawers. Besides providing a finished appearance, the frame covers plywood edges and contributes some rigidity.
A straightforward starting specification is 3/4-inch cabinet-grade plywood for the carcase and consistently milled 3/4-inch hardwood for the frame. Maple is a durable option; poplar is commonly used when the cabinet will be painted. Size the cabinet for its actual installation, not a generic kitchen dimension: upper cabinets are often around 12 inches deep and base cabinets around 24 inches, but those are common examples, not fixed standards. The face frame also affects the finished width and depth.
What’s actually slowing this PC down?
Pick the symptom - the matching free tool is one click away.
Plan the cabinet and its openings
Before cutting, measure the installation space and decide how the cabinet will be used. Record its finished height, width and depth, the door and drawer arrangement, any toe-kick requirement, and how it will meet neighboring cabinets. Plan the frame openings around the doors, drawers and hardware you intend to use; confirm the required reveals and overlays rather than assuming the frame dimensions alone determine them.
#1 Best Overall

- 【PONY 8510 Cabinet Claw】Complete your cabinetry projects in a fraction of the time with Pony cabinet claw. This unique and patented tool combines the various steps of face-frame cabinet installation into one easy process.
- 【Dimensions】 Works on stiles from 1-1/2 inch to 2 inch; Throat Depth: 1-1/2 inch; Minimum Opening: 2 inch; Maximum Opening Capacity: 4-3/8 inch; Jaw Width: 2 Inch. Max load capacity: 650 lbs.
- 【Pilot-Hole Drill】 There is a pilot-hole drilling guide on one end. The guide flips out of the way so you can drive screws to connect the cabinets without removing or repositioning the clamp.
- 【Protection Pads】 Comes with 4 sets of protective rubber pads to cushion and protect cabinetry. Face frame stiles can be tightened, aligned, pre-drilled and fastened while the clamp remains in its original position.
- 【Professional】Professional, quality installation is achieved at a fraction of the time compared to the use of more conventional clamps.
- Measure the installation location more than once and check for out-of-square walls or floors that may require scribing.
- Choose a box construction method. Dados or rabbets provide locating surfaces; cleats and pocket screws can be a simpler approach with fewer specialized cuts.
- Include stretchers where needed for box rigidity and for fastening the cabinet to wall studs.
- Decide whether the frame will overhang the box slightly so it can be fitted to the installation.
WOOD’s example uses 3/4-inch plywood and checks the box diagonals; matching diagonal measurements indicate a square box. A separate SawStop example specifies a 28-1/2-inch bottom, 35-1/4-by-20-1/4-inch side panels, a 5-inch toe kick and 3-inch support cleats. Those are project-specific dimensions, not universal cabinet standards.
Build and square the plywood carcase first
Cut the sides, bottom, top or stretchers, and any fixed shelves from 3/4-inch cabinet-grade plywood. Assemble the box with the joinery you chose, keeping the parts aligned and the corners square. Add adjustable shelf-pin holes if the design calls for adjustable shelves. Check the diagonals before the glue or fasteners lock the box in place; correct any racking while it can still be adjusted.
Rank #2

- Precision alignment for time-saving, one-step face frame cabinet installation
- Professional grade, all-aluminum construction
- Thick protective pads won't damage surfaces
- Hardened drill guide with integrated pilot hole
- Works on stiles from 1-1/2" - 2"
Make sure the front edges of the assembled carcase are even, since they are the surfaces the frame will cover. Add the planned stretchers or cleats, including support for wall attachment. Let any glue cure as appropriate before measuring the finished front.
The Tool Desk
Outbyte PC Repair FREERepair Windows errors before they cause bigger problemsFix Now →Outbyte Driver Updater FREEFix the driver behind crashes, sound loss and screen glitchesFind Drivers →Make the face frame to the completed box
Measure the actual carcase after assembly and squaring. Making the frame now, rather than cutting it from nominal plan dimensions first, helps it fit the box that exists. If you intend to leave a fitting lip, account for it in the frame width and later scribe or trim as needed.
Rank #3

- 【PONY 8510 Cabinet Claw】Complete your cabinetry projects in a fraction of the time with Pony cabinet claw. This unique and patented tool combines the various steps of face-frame cabinet installation into one easy process.
- 【Dimensions】 Works on stiles from 1-1/2 inch to 2 inch; Throat Depth: 1-1/2 inch; Minimum Opening: 2 inch; Maximum Opening Capacity: 4-3/8 inch; Jaw Width: 2 Inch. Max load capacity: 650 lbs.
- 【Pilot-Hole Drill】 There is a pilot-hole drilling guide on one end. The guide flips out of the way so you can drive screws to connect the cabinets without removing or repositioning the clamp.
- 【Protection Pads】 Comes with 4 sets of protective rubber pads to cushion and protect cabinetry. Face frame stiles can be tightened, aligned, pre-drilled and fastened while the clamp remains in its original position.
- 【Professional】Professional, quality installation is achieved at a fraction of the time compared to the use of more conventional clamps.
Mill and cut the frame members
Plane the frame stock to a consistent 3/4-inch thickness, establish one straight reference edge, then rip the stiles and rails to width. A Taunton Press cabinetmaking chapter uses approximately 2-inch-wide members as a common starting point. Cut at least two stiles and two rails for each cabinet, adding divider rails or stiles to suit the door and drawer layout. Keep cuts square so the shoulders meet cleanly during assembly.
That chapter cuts the stiles 3/4 inch longer than the box height to create a reveal that can help hide small case imperfections. Treat this as a fitting choice, not a mandatory dimension: verify the reveal against adjacent cabinets, the installation and the door or drawer arrangement.
Rank #4

- DURABLE ALUMINUM CINSTRUCTION: Features sliding T-bars with precision threads for 2" to 4-3/8" jaw width adjustment securing cabinet’s face frames without slippage oxidation-treated alloy resists rust while an aluminum alignment plate stabilizes stiles during tightening
- UPGRADED DRILL GUIDE SYSTEM: The built-in drill guide locks for accurate pilot holes eliminating clamp repositioning compatible with 1/4" or 3/16" drill bits to pre-drill and secure face frame stiles efficiently in cabinetry clamps applications
- SCRATCH-PROOF JAW PROTECTION: Multi-size felt pads cushion clamp faces and alignment plate preventing marks on finishes 440-lb grip holds stiles securely with adhesive pads that protect and cushion delicate surfaces
- PORTABLE PROFESSIONAL KIT: Includes two face frame clamps for top/bottom positioning in a sturdy protective case ideal for face frame cabinet installation or DIY projects ensuring organized storage
- USER-FRIENDLY MICRO-ADJUSTMENT: Silky T-bar rotation enables precise control alignment plate depth stabilizes frames front-to-back allowing craftsmen to align tighten pre-drill and fasten cabinet stiles effortlessly
Lay out the openings
Mark the frame parts and their positions before drilling. For a cabinet with multiple openings, identify the top, bottom and divider rails and any center stiles. Check the clear openings against the doors, drawers and selected hardware. If the frame is designed with an overhang, mark how much will extend beyond the box so it remains consistent where cabinets meet.
Assemble the frame with pocket screws
Pocket-hole joinery is a beginner-accessible way to connect rails to stiles. Drill pocket holes in the backs of the rails only, following the jig maker’s settings for the stock thickness and screw length. The holes stay out of sight when the frame is installed.
Best Value
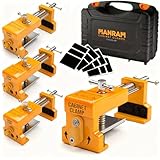
- All-in-One Cabinet Clamp & Drill Guide System – These cabinet clamps for installing cabinets combine tightening, aligning, pre-drilling, and securing into one smooth step. Built-in flip-away drill guide creates perfect pilot holes without removing or repositioning the cabinet installation clamps, saving time on every install.
- Heavy-Duty Cabinet Installation Tools Built to Last – Made from solid cast steel with an aluminum alignment plate, these cabinet face frame clamps deliver industrial strength with 300–600 lbs of clamping force. Rust-resistant and designed for long-term use in professional cabinet making tools and woodworking tools setups.
- Precision Alignment for Face Frames & Doors – Designed as a reliable cabinet alignment tool, these face frame clamps ensure boards, stiles, and frames sit perfectly flush. Ideal cabinet tools for installing cabinets, bookshelves, and door projects where accuracy matters.
- Scratch-Free Protection with EVA Pads – Unlike standard felt pads, these cabinet installation tools feature high-density EVA padding on all contact points. Your cabinet finishes stay protected while using these cabinet clamps, door clamp, or other cabinetry tools.
- Complete Cabinet Tool Kit with Storage Case – Includes four (4) heavy-duty cabinet clamps, EVA protective pads, and a durable storage box. Compatible with stiles up to 1-1/4" thick and 4" clamp capacity, making this set an essential cabinet tool, tool cabinet accessory, and upgrade for any tool cabinets or workshop.
- Arrange the frame members face down on a flat surface, with the best visible faces oriented outward.
- Clamp each rail flush to its stile at the joint. Clamping helps prevent the parts from shifting or climbing as the screw is driven.
- Drive the pocket screws while maintaining the clamp and checking that the front faces remain flush.
- Check the assembled frame for square and confirm that its openings match the planned door and drawer layout.
Pocket screws are quick and require relatively accessible tooling. Dados, rabbets, biscuits, dowels or mortise-and-tenon joints are alternatives, but involve different layouts and tools. Regardless of method, accurately milled stock and square joints matter because small errors accumulate across the frame.
Fit and attach the frame to the carcase
Dry-fit the completed frame against the box and check that it is centered, that its edges align as intended, and that the openings remain correct. If you planned a small overhang for scribing or fitting, leave it in place until the cabinet is fitted to its installation.
- Apply a thin bead of glue to the front edges of the carcase.
- Set the frame in position, keeping its front face flush with the intended front plane of the box.
- Clamp the frame securely while the glue cures, checking alignment and flushness as you tighten the clamps.
- After the glue has cured, trim or scribe any planned overhang to fit the installation and neighboring cabinets.
WOOD’s method leaves about a 1/4-inch lip on each side to allow fitting and maneuvering adjoining cabinets. That is a reference approach, not a requirement; the right amount depends on the installation and the cabinet layout.
Finish with doors, drawers and hardware
Once the frame is attached, remeasure each opening before making or ordering doors and drawer fronts. Choose overlay and reveal dimensions to suit the hinges and slides. WOOD’s example uses stub-tenon-and-groove doors and half-blind dovetail drawer boxes, but those are optional projects beyond the basic carcase-and-frame build. Drawer slides can be mounted to the face frame and a rear support rail; confirm the chosen slide’s mounting requirements before placing that rail.
Quick Recap
- Dry-fit doors and drawer fronts to check even reveals before final hardware adjustment.
- Use hardware compatible with the frame openings and the intended overlay.
- Anchor the finished cabinet to wall framing using the planned support points.
Common fitting problems to prevent
- Frame does not sit flat: Check that the carcase front edges are even and that glue squeeze-out or debris is not holding the frame away from the box.
- Joints shift during pocket-screw assembly: Clamp each rail to its stile and verify that the faces are flush before driving screws.
- Doors or drawers do not fit: Base their dimensions on the completed, measured frame openings and the selected hardware, not on nominal box dimensions.
- Cabinet is difficult to fit between neighbors: Account for the frame width during planning and consider leaving a controlled lip for scribing rather than making the box and frame exactly the same nominal width.
- Box racks out of square: Compare its diagonals during assembly and correct the shape before the joints set.
Product prices and availability are accurate as of the date/time indicated and are subject to change. Any price and availability information displayed on Amazon at the time of purchase will apply.


Leave a Reply