Some links on this page are affiliate links: if you buy through them we may earn a commission, at no extra cost to you.
Yes, a Creality CR-10 can be converted into a basic CNC engraver, but the practical result is a light-duty rotary engraver rather than a rigid CNC router. The most sensible reversible setup replaces the hotend with a rigid mount for a lightweight Dremel-style flex-shaft handpiece, secures the workpiece to a sacrificial spoilboard, and uses the printer’s existing X, Y, and Z motion for shallow cuts.
This approach is suitable for pen plotting, cardboard, foam, plastics, and shallow engraving in soft wood. It is not a good choice for deep pocketing, aggressive routing, steel, production work, or unattended operation.
What a CR-10 conversion can—and cannot—do
A CR-10 has useful Cartesian motion and a relatively large working envelope, making it a practical platform for learning CAD, CAM, G-code, and workholding. However, it was designed to move a lightweight hotend, not to resist the side loads and vibration produced by a rotary cutter.
Free tools Windows power users keep installed
One-click scans. No signup required.
| Application | Suitability |
|---|---|
| Pen plotting | Excellent first test |
| Cardboard or foam scoring | Good |
| Shallow engraving in soft wood | Reasonable |
| Plastic engraving | Possible with careful feeds |
| Acrylic | Possible, but heat and chips require control |
| Hardwood | Marginal; use shallow passes |
| Aluminum | Generally a poor fit for a stock CR-10 |
| Steel | Not appropriate |
| Deep pockets or aggressive routing | Not appropriate |
| Unattended operation | Unsafe |
Engraving means shallow material removal, usually with a V-bit or small cutter. Routing and milling create substantially greater cutting forces. This article describes a mechanical rotary engraver—not a laser engraver. A laser conversion requires different control electronics, software, optical shielding, and fire precautions.
#1 Best Overall

- When you want to upgrade your Ender5 Pro Plus to core-XY kinematics, this kit has all needed parts—skips sourcing separate components, making the conversion smooth even for first-time DIY modders.
- CNC machined aluminum alloy parts ensure ultra-high precision (±0.1mm tolerance), so every component aligns perfectly, avoiding the misalignment that causes shaky core-XY movement and blurry prints.
- Core-XY design after conversion cuts print time by 30%—the Ender5 Pro Plus moves the print head faster without losing accuracy, ideal for large or time-sensitive projects.
- Tailored exclusively for Ender5 Pro Plus, it fits the printer’s original frame exactly—no drilling or cutting needed; just follow the assembly guide to finish the upgrade in a few hours.
- Durable aluminum alloy resists wear from daily core-XY movement, maintaining structural stability for years, unlike plastic conversion parts that warp or break under stress.
Check your exact CR-10 model first
Do not assume that a mount, wiring diagram, or firmware file for one CR-10 fits another. The family includes the original CR-10, CR-10S, CR-10 Mini, CR-10 V2, CR-10 V3, S4, S5, Max, Smart, and Smart Pro. These models can differ in mainboard, display, wiring, carriage geometry, power supply, build dimensions, Z-axis arrangement, and firmware.
The main instructions below target the original CR-10 and closely related CR-10S machines with the conventional V-slot gantry and hotend carriage. V2, V3, larger-format, and Smart models require a mount and electrical plan verified for that exact machine. Creality’s firmware listings separate several CR-10 variants: Creality CR-series firmware downloads. The original CR-10’s project repository also includes firmware, wiring, and circuit documentation: Creality’s CR-10 GitHub repository.
Choose the conversion level
Level 1: reversible flex-shaft engraver
This is the recommended approach for most owners. A flex shaft keeps the heavier motor away from the X carriage, reducing gantry sag, belt loading, vibration, and the likelihood of missed steps. The carriage holds only the lightweight handpiece.
What’s actually slowing this PC down?
Pick the symptom - the matching free tool is one click away.
Level 2: recompiled Marlin with spindle features
This can provide software-controlled spindle enable, PWM speed control, or CNC-style commands, but it requires identifying the exact board and compiling firmware for the actual machine. It is not a feature that should be assumed to exist in stock CR-10 firmware.
Level 3: dedicated CNC controller
A GRBL-style controller gives a more conventional CAD-to-CAM-to-G-code workflow, but requires rewiring motors and endstops, configuring drivers, supplying suitable power, and giving up some reversibility. It is more defensible for a permanent CNC project than for an occasional experiment.
Parts and safety equipment
Mechanical parts
- A rigid tool mount designed for the exact CR-10 carriage.
- A lightweight Dremel-style flex shaft or compact rotary tool.
- Small V-bits, carbide engraving cutters, or short straight cutters.
- A sacrificial MDF, plywood, hardwood, or phenolic spoilboard.
- Low-profile clamps, screws, or T-nuts.
- Cable management and, where practical, a dust shield or chip guard.
A documented CR-10 design uses a Dremel-style flex-shaft mount and includes a work-fixturing jig: CR-10 CNC Router/Dremel upgrade. Treat the design as a reference, not proof that it fits every CR-10 variant.
Electrical and personal protection
- A physical emergency stop that removes power from the rotary tool and, ideally, the printer.
- A separately switched and properly rated power supply or outlet for the rotary tool.
- Eye protection and hearing protection.
- Dust extraction appropriate to the material.
- An enclosure or chip shield where practical.
Never connect a rotary tool directly to the hotend heater, part-cooling fan, extruder motor, or an unverified spare connector. Their voltage, current, switching behavior, isolation, and firmware meaning may not match the tool. Mains-powered equipment must be controlled with properly rated hardware; do not improvise mains wiring inside the printer.
PC Slower Than It Used to Be?
A free scan shows the junk files, broken settings and background clutter dragging Windows down - then fixes them in one click.Free scan · Windows 10 & 11Crashes, No Sound, or Screen Glitches?
Random freezes, missing sound and display glitches usually trace back to one bad driver. Find and replace yours safely.Free scan · under a minuteBuild the reversible flex-shaft conversion
- Back up the printer. Photograph the wiring, record the board and firmware, save any available EEPROM settings, and confirm that the printer works before modification.
- Power down completely. Remove filament, let heated parts cool, disconnect mains power, and never work on energized wiring.
- Remove the hotend attachment. Keep the hotend, screws, fans, and wiring labeled so the printer can be restored.
- Install the mount. Verify that bolts do not interfere with wheels, belts, wiring, or the frame. The mount should not rotate when pushed by hand.
- Fit the handpiece. Keep the cutter vertical, concentric, and as close to the carriage as practical. Minimize unsupported tool length.
- Install a spoilboard. Secure it to the build plate. Do not rely on glass or a magnetic build surface alone to resist cutting forces.
- Check the complete travel envelope. With power off, move the carriage through its range and check clamps, clips, belts, frame members, and cable clearance. Repeat with slow powered jogging and the tool switched off.
- Install and test the emergency stop. The LCD Stop function is not an adequate substitute. One documented conversion warns that an abort may not always stop motion immediately, so test the physical stop with the cutter removed: documented conversion notes.
- Set tool height. Lower the bit until it just touches the work surface or spoilboard. Treat that point as work Z-zero, then raise the tool before moving the stock.
- Perform a pen test. Use a pen or blunt stylus before fitting a cutter. Confirm scale, direction, origin, travel, and abort behavior.
Control the tool safely
Stock Marlin with manual tool control
This is the least invasive method. The printer performs motion while the operator switches the rotary tool separately. The exact G-code supported depends on the installed firmware, so test at low risk rather than assuming every command is available.
G21        ; millimeters
G90        ; absolute positioning
G28        ; home only if homing is safe
G92 X0 Y0 Z0 ; define current position as zero
G0 Z5 F300
G1 X20 Y20 F600
G92 changes the coordinate interpretation; it does not move the machine. Position the tool safely first and understand whether you are defining a machine coordinate or a work coordinate.
This motion-only example draws a square. Run it with the cutter removed or lifted clear:
G21
G90
G92 X0 Y0 Z5
G0 Z5 F300
G0 X10 Y10 F600
G1 Z0 F120
G1 X40 Y10 F300
G1 X40 Y40
G1 X10 Y40
G1 X10 Y10
G0 Z5 F300
It does not start or stop a spindle. Start the rotary tool only after the workpiece is secured, the path has been inspected, the emergency stop is reachable, and the cutter is clear of clamps.
Quick wins for a faster PC:
Scan for outdated or missing drivers - takes under a minuteDriver Scan →Repair Windows errors before they cause bigger problemsFix Now →Fix the driver behind crashes, sound loss and screen glitchesFind Drivers →Rank #2

- 【Nema17 Stepper Motor】Step angle: 1.8deg; Rated current: 1.7A; Holding torque: 0.45Nm (64 oz.in) ; Size: 40mm; Phase: 2; 1.8 ° ± 5% step angle (200 steps / rotation)
- 【UNO R3 Improvement Borad】 UNO is a Simple I/O platform based on open source code, and has a Processing/Wiring development environment similar to Java and C language, which is easy to understand, allowing you to quickly use UNC to make interesting things
- 【CNC Shield Board V3 Expansion Board】This expansion board can be used as a drive expansion board for engraving machines, 3D printers, etc.
- 【DRV8825 Stepper Motor Driver】Six different stepping modes: full, half, 1/4, 1/8, 1/16, 1/32; The adjustable potentiometer can adjust the maximum current output, so as to obtain a higher step rate.
- 【Mechanical Switches with 3-pin Cable】Under normal circumstances, the system needs to be equipped with at least 3 mechanical switches;easy to install, more common styles.
Do not assume M3 and M5 work
Commands such as M3 S10000 and M5 are common in CNC workflows, but stock CR-10 firmware may ignore them or interpret them differently. Marlin has configurable CNC and spindle features, but they must be compiled and wired correctly for the actual board: Marlin’s CNC/spindle configuration.
Recompile Marlin only for the exact machine
Identify the board, obtain the correct configuration example, preserve the original firmware, and configure the actual thermistors, endstops, steps per millimeter, display, and motor directions. Enable only features supported by the electronics. After flashing, test motion without a tool, then test any spindle output with suitable low-risk equipment.
Incorrect firmware can reverse an axis, invert an endstop, break display communication, misconfigure heater safety, corrupt EEPROM values, or make recovery difficult. Keep the original firmware and configuration available for rollback.
Use a dedicated CNC controller for a permanent build
A dedicated controller running GRBL or similar firmware provides a clearer workflow: CAD, CAM, G-code generation, and a G-code sender. GRBL’s workflow guidance explains that CAM must account for machine dimensions, steps per millimeter, cutter type, cutting depth, spindle speed, and movement speed: GRBL’s idea-to-G-code guide.
The Tool Desk
Outbyte PC Repair FREERepair Windows errors before they cause bigger problemsFix Now →Outbyte Driver Updater FREEScan for outdated or missing drivers - takes under a minuteDriver Scan →This option improves control clarity but requires new electronics, rewiring, driver-current setup, firmware configuration, a suitable spindle interface, and potentially a new power supply.
Prepare the toolpath
A CNC engraver normally uses this sequence:
- Create or import vector or CAD geometry.
- Define stock size, tool diameter, origin, and cutting depths.
- Generate toolpaths in CAM software.
- Post-process for the actual controller.
- Inspect the G-code.
- Dry-run it above the workpiece before cutting.
Possible software includes Fusion for integrated CAD and CAM, FreeCAD Path for an open-source workflow, VCarve for 2D signmaking, and Inkscape with a compatible G-code extension for simple vector work. GRBL lists Fusion, FreeCAD, SketchUp, and VCarve among possible CAD/CAM tools: GRBL CAD/CAM guidance.
A slicer can be adapted for simple outlines, but that is an experiment rather than the preferred CNC workflow. Printer G-code may contain heating, extrusion, and other commands that are inappropriate for an engraver. Remove or disable commands for hotends, beds, filament extrusion, and unsupported spindle outputs.
At minimum, CAM must define stock dimensions, work origin, tool diameter, cutting depth, step-down, feed rate, plunge rate, spindle speed, safe Z height, number of passes, and tool compensation. Do not copy universal feed-and-speed numbers: they vary with material, bit geometry, diameter, rotary-tool speed, rigidity, workholding, and finish requirements. Begin with shallow cuts, multiple passes, soft scrap, and a small test pattern.
Secure the workpiece and set Z-zero
- Attach a flat sacrificial spoilboard.
- Secure the stock with clamps, double-sided tape, or screws outside the cutting area.
- Push the stock sideways by hand to confirm it cannot shift.
- Jog to the intended XY origin.
- Lower the bit until it barely touches the top surface.
- Set work Z-zero.
- Raise the cutter to a safe travel height.
- Dry-run the entire job above the stock.
- Start the tool only after the path and clearances are confirmed.
Keep clamps low and outside the toolpath. A jig can help square stock consistently; the documented CR-10 conversion above includes one for this purpose.
Calibrate before cutting
Motion
- Confirm X, Y, and Z directions.
- Test absolute and relative positioning with
G90andG91. - Measure a 50 mm or 100 mm move and verify steps per millimeter.
- Check repeatability by returning to the same coordinate several times.
- Test homing with the tool removed.
Tool and gantry
- Check bit runout and vertical alignment.
- Confirm the mount does not flex.
- Ensure the flex shaft is not pushing the carriage sideways.
- Check belts, V-wheels, eccentric nuts, and gantry level.
G-code and workpiece
- Inspect the first and last lines of the file.
- Remove heating, extrusion, and unsupported spindle commands.
- Confirm every Z retract clears the clamps.
- Check for unexpected negative Z moves.
- Verify that the stock is square, flat, and the intended thickness.
Run the first engraving
Start with a calibration square, circle, single-line lettering, or shallow decorative groove in foam, cardboard, or soft scrap. Keep the cutter close to the carriage, use the lightest practical tool, reduce acceleration and jerk if the firmware permits, and work near the center of the bed where possible.
Use several light passes instead of one deep pass. Conventional cutting is generally the safer starting preference on a flexible printer conversion because climb cutting can encourage self-feeding, although the correct direction depends on the material, cutter, and machine stiffness.
Rank #3
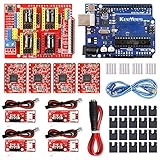
- ★ Stable performance ★ A4988 Driver Chip is low power consumption and will not be too hot during use. The performance is more stable than chip.
- ★ DC Power cable ★ The DC power cord can quickly connect to the DC power adapter and power the CNC shield board. Save time and more securer cable connection Plug and Work.
- ★ CNC Shield ★ This is the latest version of the expansion board, which can be used for engraving machines and 3D printers. It can drive 4 A4988 stepper motors.
- ★ With 20 Pcs Jumpers ★ When setting up CNC projects, jumper caps are necessary accessories. There are 20 of them in the kit, enough for most project.
- ★ Reliable technical support ★ Please visit github (github: Keeyees/KY-102) to get relevant information or can contact us on Amazon, we will send PDF Document to you.
Stop immediately if the cutter chatters, stalls, walks, overheats, or causes missed steps. Once the machine loses position, do not continue the job from an uncertain location; stop, establish a known origin, and restart.
Recommended Free Tools
Troubleshooting
The tool vibrates or chatters
Likely causes include a flexible mount, excessive cutter overhang, excessive depth, high feed rate, loose workholding, tool runout, or loose gantry components. Stop the tool, remove it from the work, tighten the mount and stock, reduce depth and overhang, and inspect belts, wheels, and eccentric nuts before testing again on scrap.
The machine skips steps
Cutting force, excessive acceleration, a binding flex shaft, incorrect belt tension, gantry friction, or motor-driver problems can cause missed steps. Retract the tool, inspect the machine, reduce the cutting load, and re-home only after confirming homing is safe. Restart from a verified origin rather than continuing.
The machine keeps moving after abort
Use the physical emergency stop or remove tool power; do not reach toward a rotating cutter. Test abort behavior with the cutter removed before running any live job. A documented CR-10 conversion reports that motion may sometimes continue depending on the last line sent: conversion safety notes.
The cut is deeper on one side
An uneven spoilboard, unlevel Z gantry, bed sag, an out-of-square mount, or warped stock may be responsible. Surface or shim the spoilboard, level the gantry, square the mount, and use probing or surfacing only if the controller and firmware support it reliably.
The file produces extrusion or heating commands
The file was generated as printer G-code rather than CNC G-code. Remove heating commands and extrusion moves, check that XY motion is not coupled to an E axis, and use a CAM post-processor suited to the controller.
Safety requirements
Never leave this conversion running unattended. Rotating cutters can eject fragments, break, or pull loose stock into the machine. A flex shaft can whip if damaged or routed incorrectly, and a printed mount can crack under vibration.
- Keep the emergency stop within reach.
- Wear eye and hearing protection.
- Keep hands, loose clothing, jewelry, and hair away from the cutter.
- Stop the tool before measuring or adjusting the workpiece.
- Use extraction and suitable respiratory protection for the material.
- Do not machine unknown materials or materials containing hazardous reinforcement such as glass fiber or carbon fiber without appropriate controls.
- Keep dust and chips away from exposed electronics.
- Use an enclosure or chip shield where practical.
Wood dust can irritate the lungs and create a fire risk. Some plastics produce hazardous dust or fumes. Protection must match the material and process; a basic dust mask is not automatically adequate.
When a dedicated CNC is better
Stop modifying the CR-10 and consider a purpose-built desktop CNC when you need rigidity, repeatability, dependable workholding, automatic spindle control, deeper cuts, metal work, or a machine intended for regular production. A 3018-class machine or another dedicated desktop CNC may provide a smaller nominal work area than a CR-10 but usually offers a more appropriate frame, spoilboard, controller, and tooling workflow.
Dedicated CNC options can be evaluated from manufacturers such as Genmitsu and Carbide 3D. The right choice depends on required work area, material, rigidity, software, and budget.
Reverse the conversion
- Disconnect power and remove the rotary tool and mount.
- Restore the original hotend, fans, wiring, and hardware without forcing connectors.
- Reinstall the original firmware if you changed Marlin.
- Restore saved EEPROM settings where appropriate.
- Check axis directions, endstops, temperatures, extrusion, bed leveling, and first-layer calibration.
- Run a small test print before returning the printer to normal use.
The safest default is therefore a reversible flex-shaft setup, manual tool switching, conservative motion-only G-code, careful workholding, and a tested physical emergency stop. If your project requires aggressive cutting or dependable spindle control, the CR-10 is the wrong platform unless you are prepared for a substantial mechanical and electrical redesign.
Quick Recap
Product prices and availability are accurate as of the date/time indicated and are subject to change. Any price and availability information displayed on Amazon at the time of purchase will apply.


Leave a Reply