Quick wins for a faster PC:
Fix the driver behind crashes, sound loss and screen glitchesFind Drivers →Clear out junk files and repair common Windows errorsFree Scan →Scan for outdated or missing drivers - takes under a minuteDriver Scan →Some links on this page are affiliate links: if you buy through them we may earn a commission, at no extra cost to you.
Connect a standalone equalizer at line level—never between a receiver’s speaker terminals and speakers. The right connection is a tape-monitor loop, a pre-out/main-in loop, or (if neither is available) an inline connection for one analog source. Which sources the equalizer affects depends on the receiver’s signal routing.
First, check the receiver’s connections
Look at the rear panel and the manual for your exact model. A standalone EQ needs stereo line-level inputs and outputs and a route that places it before the receiver’s power amplifier. RCA is common in home stereo systems; some equipment uses TRS or XLR connectors. Use cables that match the equipment, and confirm balanced/unbalanced wiring and signal levels before adapting between connector types.
| Receiver connection | What it can do | Important qualification |
|---|---|---|
TAPE OUT/REC OUT and TAPE IN/PLAY IN, plus a monitor control |
Usually provides an insertion loop for sources routed to the record output | Source coverage varies by receiver; engage Tape Monitor, Monitor, or Processor. |
PRE OUT and MAIN IN/POWER AMP IN |
Can insert the EQ between preamp and power amp | A pre-out alone is not a complete loop. Check which channels and modes are supported. |
Ordinary line input, such as CD, AUX, or LINE |
Allows an EQ to be placed before that input for one source | Other receiver sources are not automatically equalized. |
ZONE 2 OUT or subwoofer/LFE output |
Not a general main-stereo insertion point | Zone outputs serve a second zone; subwoofer outputs are not full-range stereo feeds. |
| HDMI, optical, coaxial, network, or Bluetooth source | Not directly routed through a typical analog EQ | Requires a suitable analog output before the EQ or a compatible digital processor. |
Labels vary by make and age: a genuine loop may be marked MD/TAPE, MONITOR, PROCESSOR, or EQ. Do not assume two similarly named jacks form a loop; confirm their function in the manual. A receiver’s PRE OUT is an output to an external amplifier, not a return path by itself. Yamaha’s documentation, for example, describes PRE OUT connections as outputs for an external power amplifier; verify whether your model also has a corresponding power-amp input (Yamaha PRE OUT guidance).
Method 1: Connect through a tape-monitor loop
This is the usual method for a stereo receiver or integrated amplifier with both record and playback jacks and a monitor control.
#1 Best Overall
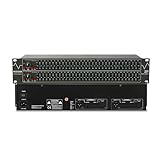
- Professional Dual Channel Stereo Graphic Equalizer: Experience top-tier audio quality with this professional-grade dual-channel stereo graphic equalizer, designed to deliver an exceptional audio experience for audiophiles and professionals alike.
- 31-Band Design: Each channel features a 31-band design with an adjustable range of ±12dB per band, allowing for extensive customization to suit your specific audio needs. Adjust gain and decay values from +/-6dB to +/-12dB for precise control.
- Effective Elimination of Low Frequency Noise: Equipped with a LOW-CUT switch, this 31-band graphic equalizer effectively attenuates unwanted sounds such as wind noise, floor rumble, electrical hum, and more, results in crystal-clear, dynamic output with the perfect level of low-end punch.
- Convenient Machine Debugging: Featuring a BYPASS switch, this stereo equalizer simplifies machine debugging and makes it user-friendly and hassle-free.4-segment LED ladders for monitoring of gain reduction and output levels–the most comprehensive visual feedback available.
- Versatile Input & Output Options: The audio control equalizer supports various input and output methods, including XLR balanced and 1/4" TRS unbalanced inputs and outputs. This versatility ensures compatibility with a wide range of audio setups, catering to diverse usage needs.Suitable for live applications, audio installations, and for use in a studio.
Receiver REC OUT / TAPE OUT ──> Equalizer LINE IN / INPUT
Equalizer LINE OUT / OUTPUT ──> Receiver PLAY IN / TAPE IN

Then select: TAPE MONITOR / MONITOR / PROCESSOR- Turn off the receiver and equalizer.
- Connect the receiver’s left and right
REC OUTorTAPE OUTjacks to the EQ’s left and rightLINE INorINPUTjacks. - Connect the EQ’s left and right
LINE OUTorOUTPUTjacks to the receiver’sPLAY IN,TAPE IN, orMONITOR INjacks. Keep left connected to left and right to right. - Turn on both units. Select a source and engage the receiver’s
Tape Monitor,Monitor, orProcessorfunction. - Set the EQ flat—all bands at 0 dB—or use its bypass. Play familiar material, then move one control modestly to check that the EQ is in the signal path. Return to flat before adjusting for listening.
The receiver sends the selected program out to the EQ, then uses the EQ’s returned signal. Connecting only from REC OUT to the equalizer does not complete the loop. The monitor control is essential on receivers that require it. Sony likewise identifies a tape-monitor loop as necessary for this style of external EQ connection; its support guidance also notes that current Sony AV receivers without such a loop do not support an add-on EQ by that method (Sony’s equalizer connection guidance).
Method 2: Connect through PRE OUT and MAIN IN
Use this method only when the receiver or integrated amplifier has both preamp outputs and a corresponding main-amp input. The EQ sits between the preamplifier and power amplifier.
Rank #2

- 【31-Band Precise Audio Tuning】Equalizer Home Audio Elevate your sound experience with this high-performance Graphic Equalizer featuring 31-band real-time frequency monitoring and a built-in Spectrum Analyzer Home Audio function. Covering the full range from deep bass to crisp treble, this Digital Equalizer comes with 12 fully customizable modes and independent band tuning. It effectively minimizes unwanted noise and echo, letting you tailor the sound—whether you’re enhancing vocal warmth, boosting bass impact, or balancing mid-range clarity. Ideal for Stereo Equalizers for Home Audio setups.
- 【Versatile Multi-Device Connectivity】 This Graphic Equalizer serves as your all-in-one central signal processing hub, boasting seamless connectivity with KTV mixers, home theater receivers, studio monitors, car audio systems, and more via optical/coaxial inputs and USB lossless playback. Compatible with a wide range of audio formats, it preserves pristine sound integrity and detail without compromise. As a premium Graphic Equalizer for Home Stereo, it requires no complicated setup—simply plug in your devices to unify your audio system, making it the top choice for integrating multiple gadgets in both home and professional environments.
- 【Intuitive Interface & Auto-Save Presets】Fine-tune your sound with zero hassle using this Stereo Equalizers for Home Audio user-friendly control panel, Making band adjustment, mode switching, and preference saving a breeze—even for first-time Equalizer Home Audio users. The auto-save presets function allows instant switching between customized EQ curves, whether you’re optimizing for music, movies, or live venues. Perfect for both audio enthusiasts and casual users, this Graphic Equalizer delivers hassle-free sound refinement for any Stereo Equalizers for Home Audio setup.
- 【Durable & Highly Portable Design】This Home Stereo Equalizer is crafted from sturdy materials with wear-resistant controls that withstand regular use and extend product lifespan. It strikes the perfect balance between long-lasting durability for daily home use and lightweight portability for on-the-go setups. Take this compact Audio Equalizer to gigs, DJ events, or live stages with ease, or mount it permanently in studio racks and home entertainment centers. A reliable Stereo Equalizer for all scenarios, it combines robustness and convenience for every audio need.
- 【Wide Application Across Scenes】This Graphic Equalizer is a versatile powerhouse, suitable for home theaters, recording studios, live stages, KTV venues, DJ booths, car audio systems, and office entertainment setups. As a top-tier Digital Equalizer, it enhances bass depth for music lovers, refines vocal clarity for vocalists and podcasters, and balances audio levels for immersive movie nights and dynamic live performances. Whether for professional audio production or daily entertainment, this Stereo Equalizers for Home Audio solution adapts seamlessly to every scenario, delivering consistent, immersive sound that elevates your listening experience to new heights.
Receiver PRE OUT L/R ──> Equalizer INPUT L/R
Equalizer OUTPUT L/R ──> Receiver MAIN IN / POWER AMP IN L/R- Turn off all equipment. If short metal jumpers connect
PRE OUTtoMAIN IN, remove them only while the receiver is powered off. Keep them in a safe place. - Connect
PRE OUT L/Rto the EQ’sINPUT L/R. - Connect the EQ’s
OUTPUT L/RtoMAIN INorPOWER AMP IN L/R. - Set the EQ to bypass or flat, turn the system on, and begin at low volume. Play a known-good source, then make a small test adjustment.
Some receivers expose only selected channels at PRE OUT, and some do not offer a corresponding main input. Do not try to return a pre-out signal through an ordinary line input: that does not recreate a preamp-to-power-amp loop. To restore the receiver’s original path after removing the EQ, power off and reinstall the original jumpers.
Method 3: Put the EQ in front of one analog source
If the receiver has no usable loop, you can EQ one source by placing the unit between that source’s analog output and a receiver line input:
Rank #3

- Professional Dual Channel Stereo Graphic Equalizer: Experience top-tier audio quality with this professional-grade dual-channel stereo graphic equalizer, designed to deliver an exceptional audio experience for audiophiles and professionals alike.
- 15-Band Design: Each channel features a 15-band design with an adjustable range of ±12dB per band, allowing for extensive customization to suit your specific audio needs. Adjust gain and decay values from +/-6dB to +/-12dB for precise control.
- Effective Elimination of Low Frequency Noise: Equipped with a LOW-CUT switch, this 15-band graphic equalizer effectively attenuates unwanted sounds such as wind noise, floor rumble, electrical hum, and more, results in crystal-clear, dynamic output with the perfect level of low-end punch.
- Convenient Machine Debugging: Featuring a BYPASS switch, this stereo equalizer simplifies machine debugging. Its standard 1U rack-mount design ensures straightforward installation, making it user-friendly and hassle-free
- Versatile Input & Output Options: The audio control equalizer supports various input and output methods, including XLR balanced and 1/4" TRS unbalanced inputs and outputs. This versatility ensures compatibility with a wide range of audio setups, catering to diverse usage needs.Suitable for live applications, audio installations, and for use in a studio.
CD player / DAC / streamer analog OUT ──> Equalizer INPUT
Equalizer OUTPUT ──> Receiver CD / AUX / LINE IN
This works for an analog-output CD player, DAC, streamer, or phono preamp. It normally affects only that source. HDMI, optical, coaxial, network, and Bluetooth playback will not pass through the EQ unless the source provides an analog output that you route through it.
A turntable cartridge produces a phono-level signal, which needs phono gain and equalization before it reaches a standard line-level EQ input. Use a turntable’s built-in preamp set to LINE, or connect an external phono preamp before the EQ. If the turntable is switched to raw PHONO output, connect it to a phono preamp or receiver PHONO input—not directly to an ordinary EQ line input. Avoid running two phono preamps in series. Yamaha explains the difference between phono- and line-level turntable connections in its turntable-to-receiver guidance.
Rank #4

- 9-Band EQ: Tune nine bands from 20Hz to 16kHz within ±6dB to shape bass, mids, and treble precisely for music, movies, and gaming.
- 111dB SNR: Ultra-clean background and wide dynamic range keep details intact at any volume with excellent headroom for demanding tracks.
- 0.001% THD: Extremely low distortion preserves clarity and realism, delivering tight bass, open mids, and airy highs without harshness.
- 2 RCA In/Out: Connect multiple sources and amps at once for seamless switching and easy integration into existing home setups.
- Tone Controls: Instant bypass for original signal and a balance knob to center vocals and imaging across left/right channels.
Modern AV receivers: check the signal path before buying
Many modern AV receivers do not have a tape-monitor loop or a break between preamp and power amp. Some manufacturers explicitly say a conventional external analog EQ cannot be connected by the tape-monitor method when the receiver lacks that loop. Even if an AVR has analog inputs and outputs, it does not follow that every HDMI, network, or Bluetooth source will appear at an analog record output. Routing varies by model and listening mode; analog inputs may be digitized internally, and internal room correction or tone controls may be applied at a different point in the chain.
Free tools Windows power users keep installed
One-click scans. No signup required.
Do not treat a multichannel input, Zone 2 output, subwoofer output, or ordinary line input as an equivalent substitute for a main-path loop. Consult the receiver’s signal-flow diagram and manual for the exact source and output combination. In a digital-heavy setup, the receiver’s own DSP may be the simpler option. Receivers may offer broad bass and treble controls, fixed-band graphic EQ (GEQ), adjustable parametric EQ (PEQ), and automatic room correction. Yamaha documents GEQ, PEQ, and room-correction options in its receiver manuals; availability and menus depend on model (Yamaha receiver EQ options; RX-V381 manual example).
Best Value

- DUAL 21-BAND EQ: Fine-tune audio with 2 x 21-band graphic equalizers covering a wide 20Hz-20kHz frequency range.
- RCA CONNECTIVITY: Features RCA stereo input and record output with front panel selector switch and 3.5mm MP3/iPod input jack.
- RACK-MOUNT READY: Standard 19" rack-mountable design with removable brackets for easy integration into professional audio setups.
- LED VISUAL MONITORING: Blue LED sliders, multi-color LED display, and dual VU meters provide precise level monitoring.
- ROBUST BUILD: Durable black metal chassis weighs only 6 lbs and operates on 110V, suitable for home studios, events, or mobile DJs.
What each type of equalization is for
- Bass and treble controls: Simple, broad tonal adjustments.
- Graphic EQ: A set of fixed frequency bands adjusted with sliders or controls.
- Parametric EQ: Lets you adjust a filter’s frequency, gain, and bandwidth (Q).
- Room correction: Uses measurements—usually a microphone—to apply correction according to the receiver’s system.
- External source-level EQ: Goes before the receiver and affects the source routed through it.
- Main-path EQ: Sits after source selection and may affect more than one source, depending on receiver routing.
An external EQ is not automatically better than built-in processing. If the AVR already provides the adjustment you want, a second processor may add setup complexity without solving a real problem. Conversely, if you need EQ only for one analog source, source-specific wiring can be sufficient.
Test the connection and troubleshoot
Start with a familiar analog source, flat EQ settings, and modest listening volume. Engage and bypass the EQ for comparison; if your EQ has no bypass, make a small change to one band. Confirm both channels remain present and that the receiver’s volume control behaves normally. Compare at similar volume: an increase in loudness can be mistaken for an improvement in tone.
| Symptom | Checks |
|---|---|
| No sound with monitor enabled | Check that both halves of the loop are connected, the correct EQ input and output jacks are used, the EQ is powered and not muted, and the receiver’s monitor control is engaged. Confirm the selected source reaches the receiver’s record output. |
| Sound only when monitor is disabled | The monitor return path is likely incomplete or the EQ output is not reaching the receiver’s playback input. Recheck the return cable, channel matching, and EQ output controls. |
| Very low volume | Check for a phono/line-level mismatch, reduced EQ output, a gain or attenuation switch, or use of a headphone or microphone output instead of a line output. Sony notes that an incorrect phono/line setting can cause very low turntable output (Sony phono/line guidance). |
| Only one channel works | Check left/right cabling, fully seated plugs, the EQ’s channel or balance controls, the receiver’s balance setting, and whether the source itself is stereo. |
| EQ works for CD but not Bluetooth or streaming | This may be a routing limitation, not a fault. Check whether the receiver sends that internally generated source to its analog record output. Otherwise, route an analog source output through the EQ or use compatible digital processing. |
| Distortion, protection shutdown, or abnormal sound | Power off immediately. Check that no speaker output is connected to the EQ and that the EQ output is connected to a line-level receiver input of the intended type. |
If the test fails, work through this order: select the correct receiver source; engage the monitor/processor control if required; check EQ power, bypass, input selection, and output; verify left/right cables; confirm the receiver’s record output carries that source; then consult the manual for source-routing restrictions. Restore the original wiring or jumpers if needed, power off before reconnecting them, and return EQ controls to flat.
Use EQ conservatively
Begin flat and make small adjustments. Large boosts can consume headroom and may make the sound harsher or more distorted; when correcting an excess, try a modest cut before a large boost. Compare changes with bypass at matched volume, and do not assume a brighter or louder setting is more accurate. If your goal is to correct room-related response rather than change tonal preference, receiver room correction or measurement-based DSP may be more appropriate than adjusting sliders by ear.
Which approach makes sense?
- Your receiver has a tape-monitor loop: Connect REC/TAPE OUT to EQ INPUT, EQ OUTPUT to PLAY/TAPE IN, then engage the monitor control. Confirm which sources the loop carries.
- Your receiver has PRE OUT and MAIN IN: Insert the EQ between them, removing jumpers only with the receiver off.
- It has neither: Place the EQ before one analog source, or use another form of processing; do not improvise with speaker terminals, Zone 2, or a subwoofer output.
- You mainly use HDMI, network, or Bluetooth: Check for built-in DSP or a compatible digital processor before buying an analog EQ.
A digital processor may be appropriate when you need parametric filters, presets, crossover functions, delay, or subwoofer integration. For example, the miniDSP Flex offers these kinds of digital-processing functions, but it requires suitable signal routing and setup. If you want a simple analog control, choose an EQ only after confirming that your receiver or source has a usable line-level path. A practical connection needs correctly fitting, reliable cables—not premium cables as a sound-quality requirement.
Quick Recap
Product prices and availability are accurate as of the date/time indicated and are subject to change. Any price and availability information displayed on Amazon at the time of purchase will apply.


Leave a Reply