Outdated Drivers Are Slowing You Down
One free scan finds every outdated or missing driver and matches the right update for your exact hardware.Free scan · exact hardware matchWindows Errors? Fix Them Before They Spread
Repair common Windows errors and clear accumulated junk for a smoother, more stable PC - no reinstall needed.Free scan · no reinstallSome links on this page are affiliate links: if you buy through them we may earn a commission, at no extra cost to you.
A practical DIY alarm control panel for Home Assistant combines three parts: an alarm engine, security sensors and a physical interface. For most makers, the clearest design is Home Assistant + Alarmo + an ESPHome keypad: Alarmo manages the alarm state and rules, while the keypad sends commands and displays the state Home Assistant confirms.
A keypad alone is not an alarm system, and a Home Assistant-based build should not be assumed to replace a listed, professionally monitored or code-compliant security system. This guide helps you choose an architecture, set up the alarm logic, plan the panel and test what happens when something fails.
What makes up a Home Assistant alarm panel?
Home Assistant’s alarm_control_panel integration is a building block, not usually a complete alarm system by itself. An integration such as Alarmo or a compatible existing alarm system provides the alarm entity and behavior that a dashboard or physical keypad can control. See the Home Assistant alarm control panel documentation.
Recommended Free Tools
A complete project has four functional parts:
- Alarm engine: decides whether the system is disarmed, armed, pending or triggered, and applies entry and exit delays.
- Sensors: report events such as an opened door or motion in a protected area.
- Physical interface: accepts commands and shows the confirmed alarm state.
- Outputs and communications: operate a siren or other alert and deliver notifications.
Keep one authoritative alarm state. In the recommended design, Alarmo owns that state; the keypad sends arm or disarm requests and displays the resulting state. A keypad should not claim the system is armed merely because it sent a command.
#1 Best Overall

- INTUITIVE TOUCHSCREEN CONTROL: The responsive touchscreen hub makes everyday home security simple. View system status and quickly switch between Stay Arm, Away Arm, Disarm, and SOS modes directly from the security panel—clear, convenient control for every family member.
- NO MONTHLY SUBSCRIPTION FEES: This wireless home security system requires no monthly security subscription. Use the alarm hub and Smart Life app for daily monitoring and remote control without paying ongoing service fees, making it a practical security solution for houses, apartments, renters, and homeowners.
- WIFI + 4G DUAL CONNECTIVITY: Connect the touchscreen alarm system to 2.4GHz WiFi for remote arm/disarm control, system management, and instant Smart Life app alerts. Insert a compatible 4G SIM card to enable alarm phone calls and SMS notifications. SIM card and cellular plan are sold separately; 5GHz WiFi is not supported.
- 16-PIECE WHOLE-HOME PROTECTION: The DIY alarm kit includes 1 touchscreen hub, 6 door/window sensors, 3 PIR motion detectors, 2 remote controls, 2 RFID key fobs, 1 SOS button, and 1 wired siren. Monitor doors, windows, hallways, bedrooms, garages, and other important areas throughout your home.
- EASY DIY SETUP WITH 120DB ALARM:Wireless sensors and accessories arrive pre-paired, reducing setup time and eliminating the need for professional installation. Mount the alarm hub on a wall or place it on a desktop, while the external 120dB wired siren and one-press SOS button provide powerful audible alerts during intrusions or emergencies.
Door, window and motion sensors
              │
              ▼
       Home Assistant
              │
              ▼
            Alarmo
              │
      alarm_control_panel.alarmo
        ┌─────┼─────────┐
        ▼     ▼         ▼
    ESPHome  Tablet   Siren output
     panel   dashboard
Choose the right physical interface
| Option | Best for | Main trade-off |
|---|---|---|
| ESPHome keypad | Makers who want custom buttons, lights, display or NFC | Requires firmware, wiring, enclosure work and failure-mode design |
| Z-Wave or Zigbee keypad | People who already run that radio network and want a finished keypad | Device support and synchronization may depend on model-specific setup or community automation |
| Wall-mounted tablet | Fast prototyping and clear sensor-fault messages | Depends on a working screen, network and dashboard session |
| Existing alarm retrofit | People who want to retain a compatible alarm panel and its sensors | Adapter compatibility and configuration vary by system |
If you are unsure, first configure the alarm and sensors in Home Assistant and test them from a dashboard. Then add a tablet or simple ESPHome interface. This separates alarm-logic problems from keypad and hardware problems.
Use Alarmo for the central alarm logic
Alarmo is a third-party Home Assistant custom integration, not built-in Home Assistant software. It combines Home Assistant entities into a configurable alarm system and supports modes, entry and exit delays, PINs and users, sensor configuration, actions and multiple areas. It creates an entity such as alarm_control_panel.alarmo. Its available modes depend on configuration and can include away, home, night, vacation and custom bypass.
The Alarmo project’s installation instructions describe installing through HACS or manually copying the release into custom_components, restarting Home Assistant, then adding Alarmo under Settings → Devices & services. Configure sensors, modes, delays, users, PINs and actions before relying on a physical panel. UI labels can change between Home Assistant releases; use the instructions for the version you run. The repository listed v1.10.18, released May 17, 2026, as of the dossier’s August 18, 2026 check; verify the current release before installation.
Do these 3 things before closing this tab:
1Scan for outdated or missing drivers - takes under a minute2Repair Windows errors before they cause bigger problems3Fix the driver behind crashes, sound loss and screen glitchesFor a very small setup, Home Assistant’s manual alarm functionality may be enough and avoids a custom integration. It generally offers less alarm-specific configuration and user management than Alarmo. If you already have a supported wired alarm system, consider keeping its original panel and integrating it for monitoring and automation instead of replacing it. Home Assistant’s AlarmDecoder integration is one option for compatible systems.
Configure and test the alarm before adding hardware
- Add the sensors that should participate in the alarm and organize them by area and arming mode.
- Set the modes you will actually use, then choose practical entry and exit delays.
- Configure users and PINs. Prefer separate user codes where supported rather than sharing one code.
- Set what should happen when an alarm triggers, such as operating a siren and sending a notification.
- Use Home Assistant’s alarm card or the Alarmo card to test the behavior before wiring a keypad. The Alarmo card adds alarm-specific feedback, including countdown and sensor-related information.
Test open-door and unavailable-sensor conditions deliberately. A system that accepts an arm request without making clear that a zone is open or unavailable is difficult to use safely.
Rank #2

- Easy Setup: Install in minutes all by yourself. The entry sensors attach to doors and windows, while the motion sensor and keypad can be secured to walls via the included mounts. No Monthly Fees: Eufy Security products are one-time purchases that combine security with convenience. Instant Alerts: Get notified as soon as motion or a breach is detected with the eufy Security app. What’s In The Box: HomeBase, keypad, motion sensor, 2 × entry sensors, owner's manual, and Happy Card.
Recommended DIY build: an ESPHome keypad
ESPHome’s Home Assistant integration makes an ESP32-based interface a natural choice for a custom build. A first version might use an ESP32 development board, a 3×4 or 4×4 matrix keypad, a small OLED or TFT display, status LEDs, a piezo buzzer, a suitable power supply and a wall enclosure. An NFC reader or tamper switch can be added later.
Check the selected board and component documentation before assigning pins or wiring anything. ESP32 variants differ in available GPIO, voltage behavior and peripheral support; the dossier does not establish one universally compatible board or NFC module. Do not connect a siren directly to an ESP32 GPIO.
Free tools Windows power users keep installed
One-click scans. No signup required.
Plan the feedback and controls
Make the display useful when the user needs to act, not just decorative. A sensible state scheme might show green for disarmed, blue for home-armed, amber or red for away-armed, a flashing indicator and countdown during exit delay, and a distinct warning for entry delay or a triggered alarm. Show an explicit “Unavailable” or “Not ready” message for a lost Home Assistant connection or a sensor fault instead of presenting an old state as current.
A predictable interaction could work like this:
- Arm away: choose Arm Away, enter a PIN, review open or unavailable sensors, then confirm if permitted. Show the exit countdown.
- Arm home: choose Arm Home, enter a PIN, and display the confirmed arming state and any delay.
- Disarm: enter a PIN and wait for Home Assistant to confirm disarming.
- Invalid request: show a useful reason—wrong PIN, open zone, unavailable sensor, unsupported mode or lost connection—rather than silently doing nothing.
- Panic input: if included, make its activation deliberate, such as a press-and-hold with clear feedback. Decide separately whether it triggers the burglar alarm or another automation.
Debounce keypad inputs, limit repeated invalid attempts and avoid revealing a PIN on the display or in logs. If an NFC tag is used, treat it as a credential that can be lost or copied; a tag tap should not bypass authorization design.
Connect it with ESPHome or MQTT
ESPHome native API is the default for a straightforward Home Assistant build. It exposes supported device controls and sensors to Home Assistant without requiring you to design an MQTT topic format. The trade-off is that a keypad whose commands depend on Home Assistant needs a working connection to control the central alarm. Configure and protect API access, and decide what the panel should show when that connection is lost.
Rank #3
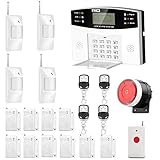
- No monthly fees and contracts with security companies,Just pay the cell phone operation service provider; Put-in a GSM SIM card (This alarm do not including GSM sim card) to call/send alert message, you can choose one of two ways or use all of them. The whole system complete with fully programmable main unit and wireless sensors. Before using, please kindly read user's manual
- Network Support: The alarm panel built-in GSM Module, it support GSM SIM card, T-Mobile sim card can work with our system (This alarm do not including GSM sim card). When the sensor is triggered, the alarm panel will make an call or send alert message to the alert phone number you set before. The GSM (only) frequency is 850/900/1800/1900MHZ, which can be applied in all over the world; In GSM status, 6 groups calling alert phone number and 2 groups help SMS number you can set
- Loud Emergency Alarm and Easy to Get Help: Children and seniors at home in emergency, press the emergency alarm button of the remote controller, which will trigger all alarms and send emergency calls and messages to other families, so they can get help in time. Support 6 groups preset alarm phone number, if alarm occurs, the host will dial preset number automatically and 10 seconds help voice recording
- Defense Zone Support: Allow up to 99 wireless defense zones and 7 wired zones, 5 groups of scheduled arm/disarmed function; 2 wired siren for different size houses as you need; DIY home security, tool-free setup and assembling, plug and play installation
- With 10 second manual recording function to leave messages
Use MQTT when the panel firmware or wider system already speaks MQTT. Home Assistant’s MQTT alarm control panel integration uses a state topic for incoming state and a command topic for commands. It recognizes alarm states including disarmed, armed_home, armed_away, armed_night, pending and triggered. A retained state message can let a subscriber receive the latest state after reconnect; without an initial state update, the entity may begin as unknown.
What’s actually slowing this PC down?
Pick the symptom - the matching free tool is one click away.
For example, a panel could publish a state payload such as {"state":"armed_away"}, and a configured value template could read value_json.state. The panel or an automation would translate commands into alarm actions and publish the confirmed resulting state. Do not copy a PIN into a public example or leave it in an unprotected payload. Home Assistant warns that a code can be sent unprotected if the MQTT connection is not secured. Use broker authentication and encryption where possible, do not expose the broker directly to the internet, and do not retain sensitive PINs.
ESPHome also has its own alarm control panel component, with local triggers for states such as arming, pending, armed and triggered. This can be useful for deliberately local behavior on the ESP device. It is a different architecture from using Alarmo as the system-level source of truth. Prefer Alarmo for centrally configured sensors, users, modes and multiple interfaces; use ESPHome-local alarm logic only when autonomy during a Home Assistant outage is an explicit design requirement and you have planned how state will synchronize afterward.
PINs, actions and credentials
Do not publish a real PIN in YAML, screenshots, firmware, source repositories or an unsecured MQTT message. Home Assistant alarm actions accept a code field when the selected integration requires one; a missing or incorrect required code can cause an action to fail and leave the alarm in its previous state. Home Assistant has been standardizing the interface’s terminology from “service” toward “action,” so verify the syntax in your current release and test it with a harmless arm/disarm cycle before relying on it.
A conceptual secrets-based action looks like this:
action:
  - action: alarm_control_panel.alarm_arm_away
    target:
      entity_id: alarm_control_panel.alarmo
    data:
      code: !secret alarm_pin
Store secrets securely, restrict access to configuration and backups, and review what gets logged. A secrets file reduces accidental exposure in configuration but does not make every copy of the credential safe. Alarmo’s README also documents an external-device automation pattern; avoid patterns that hard-code a PIN or skip an exit delay by default. Skipping the delay is usually a poor fit for a keypad at an entry door.
Rank #4

- Honeywell Ademco 6150 Fixed English Display Keypad
Sensors, sirens and installation details
Contact sensors cover doors and windows; motion sensors cover interior movement. Glass-break, tamper, smoke, heat, water-leak and freezing sensors serve different purposes and should not automatically be treated as interchangeable burglar-alarm zones. In particular, life-safety alarms deserve their own appropriate devices and response plan.
Plan for real sensor conditions: a door left open during arming, a wireless sensor with a depleted battery or weak connection, a sensor that reports unknown during startup, or a sensor physically bypassed without the user realizing it. Make the panel communicate what prevented arming. Supervise sensor health and test the sensor-to-alarm path, not just whether an entity appears in Home Assistant.
For a siren, use a suitably rated relay or supported alarm output and a power supply appropriate to the siren. Check voltage and current ratings, and provide suitable protection for inductive loads. Decide whether the output is fail-safe or fail-secure, how long it may sound, and how it can be silenced if Home Assistant or the network fails. Outdoor sirens may be subject to local restrictions. A smart speaker, notification or colored light alone is not a robust audible alarm output.
Independent reader supportYour contribution helps us test, update, and keep practical guides available for everyone.Commercial keypad, tablet or existing alarm?
Ring Alarm Keypad v2 and Z-Wave
The Ring Alarm Keypad v2 is a finished Z-Wave keypad marketed as part of the Ring Alarm ecosystem. A compatible Home Assistant Z-Wave network may make it an option, but do not assume official plug-and-play support or identical behavior in every region. Check current availability, radio compatibility, inclusion behavior and the specific Home Assistant integration or automation before buying. A community-maintained Ring keypad component exists; it is not an official Ring or Home Assistant integration. Home Assistant’s Z-Wave JS documentation covers the Home Assistant side of a Z-Wave network.
Zigbee keypads
A Zigbee keypad may suit a home already using ZHA or Zigbee2MQTT. Support, key events and alarm-state synchronization vary by model, converter and software version. Some projects rely on a blueprint or automation rather than a universal plug-and-play integration. Confirm the exact model’s current support and the needed coordinator before buying.
Best Value

- 【Complete Home Security Alarm Kit】Build multi-layer protection with door sensors, PIR motion sensors, remote controls, RFID tags, and a powerful siren. The PIR sensor offers a 110° detection angle and an 8–12 m detection range, while the door sensor monitors doors and windows, making this alarm system suitable for houses, apartments, garages, and more.
- 【Alexa & Google Home Voice Control】Works with Amazon Alexa and Google Assistant for convenient hands-free voice control. Easily arm or disarm your home security system with simple voice commands and integrate it into your smart home routine for easier everyday security.
- 【4G/GSM/Wi-Fi Triple Connectivity】Stay connected with 2.4GHz Wi-Fi and 4G/GSM network support for reliable home protection. Receive real-time app alerts, SMS messages, and phone call notifications when the alarm is triggered, keeping you informed even if the Wi-Fi connection is unavailable.
- 【Easy DIY Setup & Simple Control】Get started quickly with pre-paired wireless sensors and straightforward installation—no complicated wiring required. Control the alarm system from the easy-to-use keypad, RFID tags, remote controls, or Smart Life app, making everyday home security simple and convenient for the whole family.
- 【Multi-Layer Home Security Protection】Wide-angle PIR motion sensors detect movement across a broad area, while door sensors provide instant alerts when doors or windows are opened. In an emergency, activate the one-touch SOS alarm and powerful 100dB+ siren for immediate response. A built-in backup battery and tamper protection provide added security during power outages and unauthorized interference.
Tablet dashboard
A wall-mounted Android tablet running a Home Assistant dashboard or a compatible alarm-panel app is often the fastest visual interface to prototype. Alarmo documents external control options, including tablet-based use. A tablet can show sensor faults and countdowns more clearly than a small keypad, but screen sleep, browser or kiosk maintenance, charging and network dependence need attention. It is still only an interface, not a substitute for tested alarm logic.
Retain a compatible alarm panel
If security, supervision or continuity is a priority, retaining a compatible original alarm system and using Home Assistant for monitoring and automation may be preferable to replacing the panel. Compatibility and integration capabilities vary; do not assume that connecting the system to Home Assistant preserves every certification or monitoring feature.
Reliability and security are part of the build
Decide in advance what happens if Home Assistant, Wi-Fi, a radio network, the MQTT broker, a sensor or power becomes unavailable. A panel should show the loss of connection rather than imply that an old alarm state is live. If a command cannot be confirmed, say so. Use one state authority and a feedback loop so commands rejected by Alarmo do not leave a keypad or second interface showing a false state.
The Tool Desk
Outbyte PC Repair FREERepair Windows errors before they cause bigger problemsFix Now →Outbyte Driver Updater FREEFix the driver behind crashes, sound loss and screen glitchesFind Drivers →Consider a UPS for the Home Assistant host and network hardware, battery backup for a siren where appropriate, sensor battery monitoring, and the ESP32’s behavior during brownout and reboot. A relay may change state when power fails; choose wiring and hardware with that behavior understood. Test how state is restored after Home Assistant restarts. Alarmo’s project documentation describes restoring the previous state after restart, but verify this with your installed version and backup/storage setup.
Secure the physical panel as well as the network: consider its location, enclosure, cable entry, tamper switch and protected reset access. A keypad outside the protected perimeter can be unplugged, covered or tampered with, and its visible state can reveal occupancy or security information. Use strong Home Assistant accounts and multifactor authentication where available; secure ESPHome API and MQTT access; and avoid exposing Home Assistant or a broker directly to the public internet without a properly secured access method.
Test before depending on it
- Arm and disarm from the panel, phone and any dashboard; confirm all interfaces converge on the same state.
- Try a wrong PIN, an open door and an unavailable sensor; confirm the reason is visible and the alarm does not falsely report success.
- Restart Home Assistant while disarmed, then test restart behavior while armed.
- Reboot the ESPHome panel and check that it receives the current state instead of displaying a default.
- Interrupt Wi-Fi or the relevant radio network; verify the panel reports unavailable and does not misrepresent state.
- Restart the MQTT broker if used; test retained-state and reconnect behavior, including stale-state handling.
- Trigger the alarm and test whether the siren, notifications and disarm procedure still behave sensibly during a network interruption.
- Test power loss and restoration, sensor battery removal, tamper activation and siren failure.
- Test multiple users and simultaneous commands from different interfaces.
Repeat these checks after major configuration or integration changes. A successful dashboard test does not prove that the physical panel, siren and recovery behavior work.
Self-monitoring is not professional monitoring
A Home Assistant project may operate a local siren and send alerts to you, but that is not the same as a professionally monitored alarm. It should not be assumed to meet insurer, building, electrical, fire-code or monitoring-provider requirements. Requirements vary by jurisdiction and property. Keep certified or professionally monitored equipment where those requirements matter, and consult qualified installers or local authorities for regulated work.
Quick Recap
Product prices and availability are accurate as of the date/time indicated and are subject to change. Any price and availability information displayed on Amazon at the time of purchase will apply.


Leave a Reply