What’s actually slowing this PC down?
Pick the symptom - the matching free tool is one click away.
Some links on this page are affiliate links: if you buy through them we may earn a commission, at no extra cost to you.
You can use an nRF24L01 radio and a Raspberry Pi to connect DIY sensor and actuator nodes to a home-automation system—but they are only the radio link and gateway hardware, not a plug-and-play IoT network. Each remote node needs compatible radio hardware and firmware, and the Pi needs software such as MySensors or a custom RF24 application to pass messages to MQTT or Home Assistant.
How the system fits together
An nRF24L01 is a low-cost 2.4-GHz packet radio controlled over SPI. It does not provide Wi-Fi, TCP/IP, MQTT, cloud access, or Home Assistant discovery. The Pi supplies the network connection and software; each remote sensor or actuator normally needs its own compatible radio and a microcontroller.
Sensor or actuator node → nRF24L01 radio link → Pi + nRF24L01 gateway
                                               ↓
                                      MySensors or custom RF24 app
                                               ↓
                                      MQTT / Home Assistant
The radio uses SPI signals plus CE and CSN control lines; IRQ is optional for ordinary operation. Radios can send packets with acknowledgements, but both endpoints must agree on the channel, data rate, addresses, payload format, and relevant radio settings. MySensors documents 250 kbps, 1 Mbps, and 2 Mbps data rates, while warning that some compatible chips do not support every rate (MySensors RF24 settings). Its API documentation gives channel 76 as a default, not a universal requirement (MySensors sensor API).
Free tools Windows power users keep installed
One-click scans. No signup required.
Is nRF24L01 a good choice?
It suits a controlled DIY network with small, infrequent messages, microcontroller-based nodes, and a builder willing to maintain firmware and a gateway. It can be useful when Wi-Fi at every sensor is undesirable, but low radio power does not guarantee low total node consumption: the microcontroller, regulator, sensors, sleep strategy, and retransmissions all matter.
#1 Best Overall

- HiLetgo 4pcs NRF24L01+ Wireless Transceiver Module
- Multi-frequency: 125 frequency points
- Low operating voltage : 1.9 ~ 3.6V low voltage operation
| Option | Good fit | Trade-off |
|---|---|---|
| nRF24L01 with MySensors or custom RF24 software | Custom, local sensor networks and experimentation | Requires compatible nodes, a gateway, configuration, and radio troubleshooting |
| Wi-Fi | Direct IP networking and common HTTP or MQTT tooling | Each node needs Wi-Fi software, credentials, and suitable coverage; battery operation can be more involved |
| Zigbee, Thread, or Matter-compatible devices | Interoperability and standardized commissioning are priorities | Requires choosing compatible ecosystem hardware; nRF24 modules do not become these protocols by themselves |
Do not choose nRF24 just because a bare module is inexpensive. The overall build also includes node firmware, power design, enclosures, gateway maintenance, and time spent diagnosing faults. If commercial interoperability, a modern security model, or safety-critical operation is central, use an appropriate supported system rather than an unauthenticated custom radio protocol.
Choose the gateway software
MySensors for a structured DIY network
MySensors supplies a sensor-network framework with node presentation, sensor values, requests, and internal messages. It supports RF24 transport and Raspberry Pi gateways, including Ethernet, serial, and MQTT modes (MySensors Raspberry Pi gateway). Choose it when you want established node conventions and a documented Home Assistant path rather than designing the entire protocol yourself.
pyRF24 for a custom application
The pyRF24 project provides Python bindings for the RF24 stack on Linux boards such as Raspberry Pi (pyRF24 documentation). Choose it when you want direct control over packet layout, retries, acknowledgements, routing, and the bridge logic. That flexibility means you must also define and maintain the message contract on both the Pi and remote nodes.
Recommended Free Tools
Hardware and safe power
- Raspberry Pi with a 40-pin GPIO header, suitable power supply, and boot storage.
- One nRF24L01 or nRF24L01+ module for the Pi, plus a compatible radio and microcontroller for each remote node.
- Jumper wires or a suitable breakout, with a shared ground between radio and Pi.
- Stable 3.3-V power for the radio and a decoupling capacitor placed close to its VCC and GND pins.
The radio is a 3.3-V device: do not connect its VCC to the Pi’s 5-V pin. Small, non-amplified modules often work from the Pi’s 3.3-V rail when wiring and decoupling are sound. PA+LNA modules draw more current; pyRF24 warns that the Pi’s 3.3-V supply may not be sufficient for them and calls for an external 3-V supply. It gives about 100 µF across radio VCC and GND as a usual starting point (pyRF24 power and wiring guidance). Check the actual breakout circuit rather than assuming a board includes suitable regulation or capacitance.
Rank #2
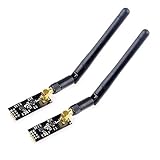
- High-performance wireless data transmission chip NRF24L01 +, an increase of high-power PA and LNA chips, RF switches, band-pass filters and other professional full bidirectional RF power amplifier, making the effective communication distance has been greatly expanded.
- NRF24L01P + PA + LNA wireless module works in the license-free 2.4G ISM band, can be point-to-point applications can also form a star network.
- In the RF part of a large number of optimized matching debugging, making the highest transmission efficiency, the smallest harmonic, making NRF24L01P + PA + LNA wireless module to external radio equipment to achieve the lowest radio frequency interference, but also not susceptible to interference from other devices, extremely large Improve the stability of the work.
- NRF24L01P + PA + LNA wireless module is highly integrated, the size of only 41mm * 15.5mm, easy to embed in any space-stressed products.
- Customers only need to add one MCU to control NRF24L01P + PA + LNA through SPI port ,Wireless module to complete ultra-long-range wireless data transmission system design.Do not need to worry about R & D of RF part, drastically reduce R & D expense and shorten R & D cycle.
Module labels are not a guarantee of identical behavior. RF24-family ecosystems include Nordic nRF24L01/nRF24L01+ devices and compatible chips such as SI24R1, BK24xx, and XN297-compatible variants; supported rates and compatibility can differ (MySensors RF24 settings).
Wire the radio to the Pi
The following is the common pyRF24/RF24 mapping. “Physical pin” is the header position; “BCM” is the GPIO number used in many software examples. CSN is the SPI chip-select signal, not the CE GPIO.
| Radio pin | Pi signal | BCM or SPI name | Typical physical pin |
|---|---|---|---|
| GND | Ground | — | 6 or 14 |
| VCC | 3.3 V | — | 1 or 17 |
| CE | GPIO output | GPIO22 | 15 |
| CSN | SPI chip select 0 | CE0 / GPIO8 | 24 |
| SCK | SPI clock | GPIO11 | 23 |
| MOSI | SPI controller output | GPIO10 | 19 |
| MISO | SPI controller input | GPIO9 | 21 |
| IRQ | Optional GPIO input | GPIO24 | 18 |
IRQ is optional for ordinary operation. RF24’s Raspberry Pi guide uses the same common BCM mapping and warns that examples may use BCM numbers rather than physical header positions (RF24 Raspberry Pi guidance). Verify the numbering scheme before wiring; “GPIO22” and physical pin 22 are not interchangeable.
Enable SPI and verify the Pi
- Open a terminal and run
sudo raspi-config. - Choose Interface Options or the equivalent interface menu, select SPI, and enable it.
- Reboot if prompted, then check for device nodes with
ls /dev/spidev*. A system may show/dev/spidev0.0and/dev/spidev0.1; the exact names depend on the model and configuration. - Check the Python version with
python3 --versionif you plan to use pyRF24, and follow the current project instructions for your OS and architecture.
RF24 documentation notes that newer versions use Linux’s GPIO character-device API rather than deprecated sysfs GPIO access, so an old tutorial may fail on a current Raspberry Pi OS even when its wiring is correct (RF24 Raspberry Pi guidance).
Rank #3

- nRF24L01 is a single chip radio transceiver for the worldwide 2.4 - 2.5 GHz ISM band. Compatible with Arduino and Raspberry Pi
- Applications: Wireless peripherals, remote control systems such as RC vehicles and consumer remote electronics, wireless voice transmission such as VoIP, wireless sensor networks, wireless networks, home and commercial automation
- Ultra Small: 15x29mm (including: built-in 2.4GHz antenna), for easy implementation into designs without additional hardware
- Auto-acknowledge and auto-retransmit function
- You can find several resources available online easily, such as tutorials, data sheets, and notes
Bring up a radio link before adding Home Assistant
First prove that the Pi can exchange a known payload with one remote microcontroller node. For a Python gateway, the pyRF24 project documents installation from PyPI and source; a common starting sequence is:
sudo apt update
sudo apt install -y python3-dev python3-pip
python3 -m pip install pyrf24
Python packaging rules vary across OS releases; if system Python rejects a global pip install, follow the project’s current virtual-environment or packaging guidance instead of forcing the install. The pyRF24 documentation is the authority for current installation details (pyRF24 documentation).
Configure both endpoints with matching settings. Record the SPI device, CE pin, channel, data rate, address width, TX/RX addresses, payload encoding, auto-acknowledgement setting, retry delay/count, and receive timeout. Start with one sender and one receiver, log the radio’s diagnostic details (such as radio.printDetails() where supported), and confirm repeatable packet receipt before introducing a broker or automation layer. A numeric sensor payload should have an agreed representation—such as a documented integer scale—rather than relying on each side to guess how bytes should be interpreted.
Quick wins for a faster PC:
Repair Windows errors before they cause bigger problemsFix Now →Scan for outdated or missing drivers - takes under a minuteDriver Scan →For MySensors, inspect the current project options before building. Its documentation gives this representative MQTT gateway pattern:
Rank #4

- It can be wildly used to wireless remote control, somatosensory devices, RFID, NFC, smart grid, smart home, wireless audio etc.
- 5PCS NRF24L01 8 Pin Socket Breakout Adapter Board: On-board AMS1117-3.3 chip, a simple socket breakout board which is for 8-Pin NRF24L01 wireless module
- 5PCS NRF24L01+PA+LNA RF Transceiver Module with SMA Antenna: Built-in 2.4Ghz antenna: available software to set the address, only received local address when output data(Provide interrupt instruction), can be directly connected to a variety of microcontrollers
- RF24L01+ Breakout Adapter: Small power on SMD LED indicator, On-board 3.3V voltage regulator, which accepts +5V power supply input and provides 3.3V for the attached "nRF24L01+" module.
- The packing list includes: 5 * NRF24L01+PA+LNA Wireless Transceiver RF Transceiver Module; 5* SMA Antenna 2.4G 1100m; 5 * NRF24L01+ Breakout Adapter
git clone https://github.com/mysensors/MySensors.git --branch master
cd MySensors
./configure --help
./configure
  --my-transport=rf24
  --my-gateway=mqtt
  --my-controller-ip-address=127.0.0.1
  --my-mqtt-publish-topic-prefix=mysensors-out
  --my-mqtt-subscribe-topic-prefix=mysensors-in
  --my-mqtt-client-id=mygateway1
Adapt it to the installed MySensors version, actual broker address, gateway location, SPI device, and GPIO configuration; the example’s loopback address only makes sense when the broker is on that same host. IRQ can be specified in builds that use it, but it is not mandatory. MySensors protocol documentation describes a 32-byte maximum nRF24L01 radio payload; its historical MySensors 1.5 protocol reserved header space and allowed up to 25 bytes for application data. That 25-byte figure is specific to that protocol version, not a universal application limit (MySensors protocol documentation).
Connect MySensors to Home Assistant
Home Assistant has a MySensors integration for supported gateway types, including serial, MQTT, and Ethernet configuration. After a node presents itself, its devices can be added by the integration (Home Assistant MySensors integration).
- Make sure the MySensors gateway is running and its serial connection or MQTT broker path works independently.
- In Home Assistant, open Settings → Devices & services, choose Add integration, search for MySensors, and select it.
- Choose the gateway type that matches the running gateway, then enter its serial, MQTT, or Ethernet details.
- Present or restart a node and check that its device appears before creating automations.
- Test sensor readings and actuator commands directly before relying on them in an automation.
For MQTT, take care with topic direction: Home Assistant’s input and output prefix fields can appear reversed from the gateway’s perspective. Set them according to the gateway’s publish and subscribe behavior; the integration documentation explicitly notes the prefix mapping issue (Home Assistant MySensors integration).
PC Slower Than It Used to Be?
A free scan shows the junk files, broken settings and background clutter dragging Windows down - then fixes them in one click.Free scan · Windows 10 & 11Crashes, No Sound, or Screen Glitches?
Random freezes, missing sound and display glitches usually trace back to one bad driver. Find and replace yours safely.Free scan · under a minuteWhat you can automate—and where to stop
Suitable projects include temperature and humidity monitoring, door or cabinet contacts, mailbox or shed alerts, soil moisture, leak detection, motion reporting, energy-pulse counting, battery sensors, remote buttons, and low-voltage relay control. A relay module must be rated for its load. Direct mains switching calls for correctly rated components, isolation, fusing, a suitable enclosure, compliance with local electrical rules, and safe failure behavior; do not treat a hobby radio build as a substitute for proper electrical design.
Best Value

- The nRF24L01+ is a 2.4GHz ISM band transceiver Compatible with arduino IDE.
- The module has 5V tolerant inputs which allows for direct connection of SPI pins to the compatible with ArduinoIDE.
- Range: 800+ meters line of sight, Weight: 13.28 g (0.468 oz).
- Auto-acknowledge and auto-retransmit abilities.
- In the RF part of a large number of optimized matching debugging, making the highest transmission efficiency, the smallest harmonic, making NRF24L01P + PA + LNA wireless module to external radio equipment to achieve the lowest radio frequency interference, but also not susceptible to interference from other devices, extremely large Improve the stability of the work.
For example, a presented door sensor can trigger a Home Assistant light automation, or a temperature reading can request a fan. Keep the actuator’s safe behavior local where possible, and do not make locks, heaters, garage doors, or other hazardous equipment depend on an unauthenticated, failure-prone radio link.
Troubleshoot by symptom
No SPI device or radio initialization failure
- Confirm SPI is enabled and inspect
ls /dev/spidev*. - Check that the software’s SPI bus and chip select match the device node.
- Trace MOSI, MISO, and SCK individually; verify CE and CSN are not swapped.
- Check 3.3-V power, shared ground, module orientation, and GPIO numbering.
- Confirm the software uses a GPIO access method compatible with the installed OS.
Radio initializes but packets do not arrive
- Check stable power and local decoupling first, especially with PA+LNA modules.
- Compare channel, data rate, address width, addresses, payload width, and dynamic-payload settings at both ends.
- Check acknowledgement and retry configuration, and test with a short known payload.
- Consider clone-chip incompatibility, excessive distance, shielding, or 2.4-GHz interference from Wi-Fi, Bluetooth, USB 3 devices, or nearby networks.
Bench link works but fails around the house
Metal cases, concrete, ductwork, antenna orientation, and noise from relay supplies can change link behavior. Try relocating the gateway away from the Pi, router, or USB 3 storage; adjust placement and channel; and test a sensible power level. Do not rely on a generic range claim: results depend on module, antenna, power, obstacles, interference, and local radio conditions.
MQTT connects but Home Assistant has no devices
- Verify that Home Assistant and the gateway use the same functioning broker.
- Check publish/subscribe topic prefixes from the gateway’s point of view.
- Confirm that the node completed MySensors presentation and has a stable node ID.
- Verify the selected Home Assistant gateway type and inspect for stale retained data if old devices or values appear.
Security, reliability, and maintenance
A custom nRF24 application may have no device authentication, encryption, replay protection, or protection against radio interference. Treat predictable commands as forgeable unless the protocol explicitly prevents it. MySensors documents an optional software AES feature but warns that its initialization vector is always zero, making that design weak; do not present it as equivalent to modern end-to-end security (MySensors RF24 settings).
For a dependable installation, plan for lost packets, gateway restarts, battery depletion, node replacement, and a safe actuator state when communication fails. Keep a local manual override for meaningful loads, monitor node health, and avoid using this hobby architecture for life-safety or safety-critical control.
Choosing the Pi and buying the right system
A Raspberry Pi is useful when you want one Linux host for the gateway, MQTT, automation software, logs, and dashboards. Home Assistant’s Raspberry Pi OS installation guidance supports Pi 4 and Pi 5 systems with at least 2 GB RAM (Home Assistant Raspberry Pi installation). Budget beyond the board for suitable power, storage, cooling where needed, an enclosure, radio modules, and node parts.
If the only goal is a lower-maintenance Home Assistant host, Home Assistant Green is the official plug-and-play appliance; it is not itself a built-in nRF24 gateway. A separate compatible gateway is still needed for this radio network (Home Assistant Green). Home Assistant software can also be installed on a Raspberry Pi, mini-PC, or virtual machine (Home Assistant software FAQ).
For a first build, a standard non-amplified nRF24L01+ module is often simpler than a PA+LNA variant. Prefer modules with identifiable chipset information and a real schematic or datasheet; for amplified modules, use a suitable separate regulated supply and local capacitor. If interoperability and long-term support matter more than custom-node experimentation, start with supported Zigbee, Thread, Matter, or commercial smart-home devices instead.
Do these 3 things before closing this tab:
1Repair Windows errors before they cause bigger problems2Fix the driver behind crashes, sound loss and screen glitches3Clear out junk files and repair common Windows errorsQuick Recap
Product prices and availability are accurate as of the date/time indicated and are subject to change. Any price and availability information displayed on Amazon at the time of purchase will apply.


Leave a Reply