What’s actually slowing this PC down?
Pick the symptom - the matching free tool is one click away.
Some links on this page are affiliate links: if you buy through them we may earn a commission, at no extra cost to you.
A Raspberry Pi camera can send a doorbell alert, but it is not a complete doorbell by itself. For a dependable press-to-alert build, add a physical button, a GPIO input, software to capture an image, and a separate service to deliver the notification. Motion and person-detection alerts are different: they can tell you that something moved or that software recognized a person, but they do not confirm that anyone pressed the bell.
This guide covers a simple button-triggered build and a more capable Home Assistant and Frigate setup. It also explains the parts that matter most on a real building: safe wiring, weather protection, network access, and a way to retain an image when the internet or notification service is unavailable.
Choose what should trigger the alert
| Trigger | What it means | Best use | Main drawback |
|---|---|---|---|
| Physical button | A visitor presses a wired momentary button; the Pi captures an image and sends an alert. | A conventional doorbell event with predictable intent. | Requires button wiring and a protected input circuit for a permanent exterior installation. |
| Motion | Movement in the camera view triggers an alert. | Awareness of activity near an entrance. | Shadows, rain, insects, foliage, animals, and lighting changes can trigger alerts. |
| Person detection | Video software identifies and tracks an object classified as a person. | Filtering activity to likely visitors and saving event clips. | Requires more processing and careful camera placement, zones, and tuning; it is not proof that someone rang. |
For most doorways, use a physical button as the authoritative doorbell event. Add motion or person detection only if you also want a security-camera function.
Pick an architecture that matches the job
| Design | What it does | Choose it when |
|---|---|---|
| Python button project | GPIO button event → image capture → notification provider such as a Home Assistant webhook, Telegram, or email. | You mainly want a press to send an alert and are comfortable maintaining a small Linux service. |
| Home Assistant | A button event or camera event triggers an automation and the Home Assistant mobile app notification. | You already use Home Assistant, want alerts on several phones, or want the bell to control lights, speakers, or other devices. |
| Frigate plus Home Assistant | Frigate analyzes a camera stream and records events; MQTT carries events to Home Assistant for notification and automation. | You want person detection, zones, event clips, or a local NVR as well as doorbell alerts. |
| Commercial video doorbell | A purpose-built product provides a doorbell-oriented enclosure and phone experience. | You need a polished outdoor product, two-way audio, warranty, and low maintenance more than you need a customizable local build. |
For a simple build, a Raspberry Pi Zero 2 W or Pi 4 may be sufficient. The Zero 2 W is listed by Raspberry Pi at $15; stock and reseller pricing can differ. For a new Home Assistant and Frigate build, a Pi 5 offers more headroom, though demanding detection or multiple cameras may be better served by a separate mini PC. Raspberry Pi’s product brief, viewed August 18, 2026, lists US Pi 5 prices from $45 for 1GB to $305 for 16GB; these are manufacturer list prices, not a guarantee of current retailer price or availability. See the Zero 2 W product page and Pi 5 product brief.
#1 Best Overall
![Adafruit A/V and RCA (Composite Video, Audio) Cable for Raspberry Pi [ADA2881]](https://m.media-amazon.com/images/I/517ecmnCfPL._SL160_.jpg)
- Great way to turn your Pi 3, 2, A+ or B+'s output into a full on composite video and audio device
- 5 ft long cable
- Get full RCA visuals and sound with this cable
Choose the camera and build parts
Camera Module 3 is a sensible default for a new CSI-camera build. Raspberry Pi specifies a 12-megapixel-class sensor, autofocus, HDR, 4608 × 2592 still resolution, and standard and wide variants. The standard model has a 75-degree diagonal field of view; the wide version is 120 degrees. The product page listed the camera from $25 and wide versions from $35 when checked August 18, 2026; pricing and stock vary. Pi Zero boards require a Zero-compatible camera cable, and camera connectors differ by board, so check Raspberry Pi’s camera compatibility documentation before ordering. Product details are on the Camera Module 3 page.
- Standard lens: A narrower view can make a visitor farther from the camera larger in the frame.
- Wide lens: Useful for a close porch or an off-center approach, but a person at the far edge appears smaller, which can make identification harder.
- NoIR: Select this only if you will provide suitable infrared illumination; the camera alone does not create night vision.
- Other essentials: compatible Pi and camera cable, reliable storage, a suitable power supply, momentary normally-open button, protected wiring/connectors, and an enclosure designed for the actual outdoor conditions.
The camera’s listed video modes include 1080p50 and 720p120, but a doorbell does not necessarily need either. Higher resolution and frame rates increase processing, storage, and network load. Set the stream and recording quality for the actual detection and viewing distance.
Wire a button without risking the GPIO
For a short, low-voltage prototype, a momentary normally-open push button can connect one terminal to a GPIO pin and the other to ground. Configure the input with an internal pull-up: idle reads HIGH and a press pulls the pin LOW. GPIO17 below is only an example. Never connect an external voltage directly to a Raspberry Pi GPIO input.
Recommended Free Tools
GPIO pin (example: GPIO17) ─── momentary normally-open button ─── GND
That simple circuit is not automatically appropriate for a long outdoor cable. Long wires can pick up electrical noise and electrostatic discharge; existing doorbell wiring may carry AC voltage or use proprietary signaling. Do not connect existing doorbell wires directly to the Pi. Use a correctly rated relay interface, optocoupler, or dedicated input circuit, and have mains-voltage work handled by a qualified professional. For permanent exterior wiring, use suitable cable, strain relief, weather-sealed connections, and protection designed for the installation.
Rank #2

- The Raspberry Pi Raphael Starter Kit for Beginners: The kit offers a rich learning experience for beginners aged 10+. With 337+ components, 161 projects, and 70+ expert-led video lessons, this kit makes learning Raspberry Pi programming and IoT engaging and accessible. Compatible with Raspberry Pi 5/4B/3B+/3B/Zero 2 W /400, RoHS Compliant
- Expert-Guided Video Lessons: The Raspberry Pi Kit includes 70+ video tutorials by the renowned educator, Paul McWhorter. His engaging style simplifies complex concepts, ensuring an effective learning experience in Raspberry Pi programming
- Wide Range of Hardware: The Raspberry Pi 5 Kit includes a diverse array of components like Camera, Speaker, sensors, actuators, LEDs, LCDs, and more, enabling you to experiment and create a variety of projects with the Raspberry Pi
- Supports Multiple Languages: The Raspberry Pi 4 Kit offers versatility with support for 5 programming languages - Python, C, Java, Node.js and Scratch, providing a diverse programming learning experience
- Dedicated Support: Benefit from our ongoing assistance, including a community forum and timely technical help for a seamless learning experience
Build the button-to-image prototype
The basic flow is: button press, debounced GPIO event, timestamped capture, local save, then notification delivery. Keep capture and delivery separate. If the network or provider is unavailable, retain the image locally and queue or retry the alert rather than losing the event.
The following is an illustrative gpiozero pattern, not a universal drop-in recipe. Camera command names, OS images, permissions, and camera support vary; confirm the command for your board and installed OS in the Raspberry Pi camera documentation.
from gpiozero import Button
from signal import pause
from datetime import datetime
from pathlib import Path
import subprocess

BUTTON_PIN = 17
IMAGE_DIR = Path("/home/pi/doorbell/images")
IMAGE_DIR.mkdir(parents=True, exist_ok=True)

def doorbell_pressed():
    timestamp = datetime.now().strftime("%Y%m%d-%H%M%S")
    image_path = IMAGE_DIR / f"doorbell-{timestamp}.jpg"

    subprocess.run([
        "rpicam-still", "-n", "-o", str(image_path),
        "--width", "1920", "--height", "1080",
    ], check=True, timeout=15)

    # Enqueue a notification or call the chosen provider here.
    print(f"Captured {image_path}")

button = Button(BUTTON_PIN, pull_up=True, bounce_time=0.2)
button.when_pressed = doorbell_pressed
pause()
The 0.2-second bounce setting is an example to suppress rapid electrical transitions from a mechanical button; adjust it if testing shows missed or duplicated presses. A production service should also decide what happens if another press arrives during capture, rotate old images, log failures, and avoid blocking the GPIO event handler on a slow network request. Run it under systemd with restart behavior rather than relying on an open terminal. Add disk-space monitoring and log rotation so retained images and logs cannot silently fill the storage device.
Deliver phone alerts with Home Assistant
Home Assistant is a useful notification layer when it is already part of the home. The Pi can send a webhook, publish a message through MQTT, or expose a binary sensor; Home Assistant then runs an automation and sends a notification through the mobile app integration. For MQTT, the Pi and Home Assistant need access to a broker and appropriately restricted credentials. Home Assistant’s MQTT integration describes the broker connection, and its mobile app integration provides the phone notification path.
Rank #3

- High-Definition video camera for Raspberry Pi Model A or B, B+, model 2, Raspberry Pi 3,3 B+, Pi 4, Pi 5(NOT for Pi Zero)
- 5MPixel sensor with Omnivision OV5647 sensor in a fixed-focus lens. Software auto focus lens: B07SN8GYGD
- Integral IR filter
- Still picture resolution: 2592 x 1944; Max video resolution: 1080p
- Check ASIN: B07RWCGX5K for OV5647 with acrylic case. Other optional accessories: ABS case (B09TNG4V55); Mini tripod case kit (B09TKYXZFG).
For a button event, keep the automation simple: accept one press event, optionally attach a locally saved image, and apply a cooldown or event identifier to prevent duplicates. Test the image link from the phone itself, especially when away from home; a URL reachable only on the local network will not work remotely. Notification delivery time and attachment support depend on the network, phone settings, operating system, and service, so do not promise instant delivery.
Add Frigate for person detection and event recording
Frigate is appropriate when the camera should also identify tracked objects, apply zones, and retain clips. The usual path is camera stream → Frigate detection and recording → MQTT event → Home Assistant automation → phone notification. Frigate’s Home Assistant integration requires MQTT configured, with Home Assistant and Frigate connected to the same broker; follow the official integration setup.
Frigate publishes tracked-object updates on frigate/events and review events on frigate/reviews. Its notification guide recommends review events because their identifiers can be used to retrieve snapshots, thumbnails, and clips. Use those identifiers and trigger on the appropriate event state rather than sending an alert for every update to a tracked person. See the MQTT topic reference and Home Assistant notification guide.
Detection performance depends on stream resolution, frame rate, codec, number of cameras, recording load, detector configuration, and available acceleration. A Pi may suit one modest stream, but there is no universal guarantee that a Pi 5 will handle a chosen workload. Benchmark the intended configuration; consider a supported accelerator or separate host for multiple cameras or demanding detection. A physical button remains valuable even with AI because it records the visitor’s intentional ring independently of model accuracy.
Rank #4
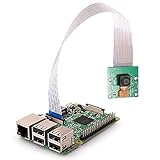
- High Quality -- Good condition, with high quality, great performance, solid construction.
- Camera Specifications -- The camera is capable of 2592 x 1944 pixel static images,and also supports 1080 p @ 30 fps, 720 p @ 60 fps and 640 x480 p 60/90 video recording, with 5MP OV5647 1080p webcam sensor.
- Fixed Focus -- The sensor has a native resolution of 5 megapixel with OV5647 sensor in a fixed-focus lens.
- Compatible With -- High-Definition video camera for Raspberry Pi Model A, B, B+, Raspberry Pi 2 B, Raspberry Pi 3,3 B+ ,Pi 4 B.
- CSI Interface -- This interface uses the dedicated CSI interface, via the CSI bus, a higher bandwidth link which carries pixel data from the camera back to the processor, high data rates, and it exclusively carries pixel data.
Frigate WebPush or Home Assistant notifications?
| Method | Strength | Trade-off |
|---|---|---|
| Frigate WebPush | Direct notifications from Frigate with fewer components. | Requires HTTPS, a supported browser, device registration, and secure remote accessibility if alerts are needed away from home. Frigate documents Chrome image support; Safari and Firefox may show only title and message. |
| Home Assistant mobile app | Integrates camera events with household automations and other devices. | Requires Home Assistant and the MQTT/integration setup. |
Frigate’s notification documentation explains WebPush requirements and cooldown settings. Its example global and per-camera cooldowns of 10 and 30 seconds are examples, not recommended universal values. Frigate’s Home Assistant integration also exposes media endpoints for notification content; protect them through the surrounding Home Assistant and network access controls.
Independent reader supportYour contribution helps us test, update, and keep practical guides available for everyone.Plan the outdoor installation
A Pi board and camera module are not weatherproof. Treat the enclosure, cable entry, lens window, power, mounting, and heat management as one outdoor assembly. A weather-resistant box can still fail if water follows a cable inside, condensation forms against the lens, or the enclosure traps heat.
- Use an enclosure suited to the location, with sealed cable entry, strain relief, UV-resistant materials, and drainage or condensation management appropriate to its design.
- Keep the lens window clear of the field of view and test for fogging, glare, distortion, and infrared reflections. NoIR installations need properly placed IR illumination.
- Mount for a useful face and torso view; avoid direct sun into the sensor and aim Frigate zones away from the street, trees, and other sources of irrelevant movement.
- Use stable, appropriately rated power. Do not assume an indoor USB-C supply is safe outdoors; follow local electrical requirements for protected power installation.
- Check Wi-Fi at the actual mounting point, or use a suitable wired connection. Weak coverage can delay image upload and alerts even when local capture succeeds.
- Secure the assembly against tampering and allow access for updates, inspection, and safe shutdown.
Secure footage and respect privacy
- Do not expose an unauthenticated camera stream or Pi service directly to the internet. Prefer a VPN or a properly authenticated, maintained remote-access system.
- Use HTTPS for browser push and remotely fetched media. Avoid publicly guessable snapshot URLs.
- Change default credentials, update the operating system and services, and restrict MQTT accounts and topic permissions to the devices that need them.
- Set a retention period for images and clips, monitor storage, and consider whether a cloud notification provider receives visitor images.
- Consider camera placement, signage, and audio settings. Recording, consent, landlord or HOA rules, and privacy obligations vary by jurisdiction; check applicable local and state requirements rather than assuming one rule applies everywhere.
Make the system resilient
A doorbell is useful only if it survives reboots, temporary outages, and ordinary maintenance. Before mounting, plan for automatic service restart, timestamp synchronization, camera reconnect handling, a local event queue with retry, duplicate suppression, disk-space alerts, log rotation, and a safe shutdown or UPS if power interruptions are likely. If capture is slow, save a smaller notification image first and process a higher-quality image or clip afterward.
Quick wins for a faster PC:
Scan for outdated or missing drivers - takes under a minuteDriver Scan →Repair Windows errors before they cause bigger problemsFix Now →Fix the driver behind crashes, sound loss and screen glitchesFind Drivers →Test before relying on it
- Confirm the camera is detected and can capture a still image using the command documented for the selected OS and board.
- Press the button once; verify a single GPIO event and a timestamped local image.
- Confirm the phone receives the alert and can open any attached image from both the home network and the intended remote-access route.
- Test repeated presses during the cooldown and while an image capture is still running; verify the intended queue or ignore behavior.
- Disconnect Wi-Fi or internet access and check that local capture persists and notifications retry or fail visibly rather than disappearing silently.
- Reboot the Pi and confirm the service starts automatically; inspect logs for camera, GPIO, permission, and network errors.
- Test at night, at different visitor distances and angles, and with the enclosure closed. Check for glare, IR reflections, and lens obstruction.
- For motion/person detection, observe shadows, rain, insects, moving foliage, and street traffic; adjust zones, thresholds, and cooldowns to reduce false alerts.
- Review storage consumption after several days and verify that retention cleanup works.
Troubleshoot by symptom
No camera image
Check that the camera connector and cable match the Pi model, that the cable is fully seated in the correct orientation, and that the camera software and command match the installed OS. Test indoors before diagnosing the enclosure or outdoor cable. The connector and compatibility guidance is in Raspberry Pi’s camera documentation.
Best Value
No button event or duplicate events
Verify the button is normally open, the ground connection is sound, and the configured GPIO number matches the physical pin mapping used by the library. For repeats, increase debounce cautiously and check the cable for noise; a long exterior run may need an optocoupler or dedicated input circuit rather than a direct GPIO connection.
Late or missing notifications
Check Wi-Fi at the door, camera capture duration, Pi load, broker connectivity, phone background/battery settings, and the provider’s status. Test local capture separately from notification delivery. For remote media, verify HTTPS, authentication, and that the target phone can reach the URL.
False person alerts or missing visitors
Reposition the camera, ensure the useful approach is not only a small far-edge image, add suitable lighting, restrict detection to a porch zone, and tune object filters. Motion blur, backlight, reflections, rain, and foliage can all affect detection; retain the physical button for an explicit ring event.
Reboots, overheating, or full storage
Check the power supply, cable, board temperature, available disk space, storage health, and continuous recording load. Reduce stream resolution or frame rate, rotate logs, enforce media retention, and move detection to a more capable host if the intended workload exceeds the Pi’s capacity.
Quick Recap
Product prices and availability are accurate as of the date/time indicated and are subject to change. Any price and availability information displayed on Amazon at the time of purchase will apply.


Leave a Reply