Some links on this page are affiliate links: if you buy through them we may earn a commission, at no extra cost to you.
This project is a small, interactive demonstration: HUSKYLENS 2 recognizes the expression label Happiness, a FireBeetle 2 ESP32-P4 reads that result, and a servo swings a lightweight 3D-printed gate. It is not a secure access-control system or a design for a driveway, garage, or pedestrian gate. In the published build, vision inference runs on HUSKYLENS 2; the ESP32-P4 handles communication and actuator control. See the original project.
How the system works
The signal path is straightforward:
Face → HUSKYLENS 2 expression recognition → I²C → ESP32-P4 → PWM → servo → gate
- HUSKYLENS 2 observes a face and runs its expression-recognition model.
- The ESP32-P4 polls the sensor over I²C and checks the returned results for the name
Happiness. - When that label is present, the controller sweeps a servo to move the gate, runs an LED effect, then sweeps the servo back.
The published sketch does not calculate a smile score or apply a confidence threshold; it checks a result name. “Smile to open” is therefore a playful trigger, not proof that the system reliably identifies a smile. The project reports no accuracy, latency, repeatability, or false-trigger measurements. The build and code are described on Hackster.
Recommended Free Tools
Parts for a tabletop prototype
- HUSKYLENS 2 for onboard vision and expression recognition. DFRobot lists a Kendryte K230 processor, 2 MP camera, touchscreen, UART and I²C interfaces, and multiple built-in recognition models. Those specifications do not guarantee performance in every room or with every user. HUSKYLENS 2 specifications.
- DFRobot FireBeetle 2 ESP32-P4 AI Development Kit to read the sensor and control the servo. DFRobot lists Arduino IDE and ESP-IDF compatibility; its product page is the reference for board interfaces and revision-specific details. FireBeetle 2 ESP32-P4 product page.
- SG90 micro-servo for a lightweight gate, plus a suitable regulated supply for the servo.
- A small PLA gate and frame, hinge or linkage hardware, jumper wires, USB-C cable, and optionally an LED with a resistor for the status effect.
The ESP32-P4 is the integration controller here, not the device performing the emotion inference. For a simple binary sensor-to-servo demonstration, a less capable controller may also be sufficient; the P4 is more compelling if the project will grow to use its broader interfaces.
#1 Best Overall

- 6 TOPS Edge AI & Deploying Custom Models Trained with YOLO: Powered by a 1.6GHz dual-core processor and a 6 TOPS AI accelerator, it handles complex neural networks locally. Built-in with 20+ algorithms (face, gesture, posture tracking), it also supports a complete toolchain for training and deploying custom YOLO models without relying on cloud computing.
- 116.6° WIDE-ANGLE VISION TO MINIMIZE BLIND SPOTS: The Plus Kit includes a specialized Wide-Angle Camera Module featuring an expansive FOV (D: 116.6°, H: 107.6°, V: 72.6°). Optimized for a near-field effective capture distance of 0.1~1.5m, it is perfectly designed for dynamic mobile robots, desktop robotic arms, and STEM competitions. It captures massive environmental data in a single frame, ensuring targets are detected earlier and is not lost during fast close-range movements.
- DUAL-MODE REAL-TIME VIDEO TRANSMISSION: Break traditional connection limits! Equipped with the WiFi module, it supports both USB wired and WiFi wireless real-time video transmission. Utilizing highly efficient image compression technology, it achieves millisecond-level latency, seamlessly syncing recognition results and live visuals to your remote terminals. It provides extremely reliable remote visual perception and data collection for enclosed robotic chassis.
- LLM INTEGRATION VIA MCP: HUSKYLENS 2 is the first AI vision sensor to support the Model Context Protocol (MCP). It acts as the "intelligent eyes" for Large Language Models (LLMs), sending structured contextual summaries (e.g., "A person is doing a specific gesture") directly to your AI Agents for smarter decision-making.
- PLUG-AND-PLAY: Featuring standard UART and I2C (Gravity) interfaces, it's fully compatible with Arduino, ESP32, Raspberry Pi, micro:bit, and UNIHIKER. Its intuitive "learn-and-use" touchscreen interface allows beginners and pros alike to build AI projects in minutes.
Configure the vision sensor and development environment
- Power HUSKYLENS 2 and select its expression-recognition function. Frame a face clearly and check that the sensor reports the expected result.
- Install Arduino IDE and the ESP32 board support needed for the FireBeetle ESP32-P4. Install DFRobot’s HUSKYLENS V2 library and an ESP32-compatible servo library.
- Select the board and serial port that match the hardware in use. Exact board-menu labels and compatible package and library versions can change; verify them against the current board and library documentation.
- Upload the sketch and open the serial monitor at 115200 baud to inspect startup and sensor communication.
- Test the sensor and servo separately before connecting the mechanical linkage.
The original sketch includes DFRobot_HuskylensV2.h, ESP32Servo.h, and Wire.h. It calls Wire.begin(), attempts to initialize HUSKYLENS 2, attaches the servo to GPIO 4, and polls the expression-recognition algorithm. The project does not identify exact software versions or establish that GPIO 4 is the best choice on every board revision. Check the board pinout and library APIs for your specific setup before wiring or uploading.
Wiring: keep the servo power separate
Use this as a functional wiring guide, not a substitute for the pinout for your exact board revision. Confirm the ESP32-P4 board’s I²C pins and a PWM-capable servo pin before connecting wires.
Rank #2
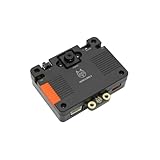
- [Touch-to-Train - No Code Required] Featuring a built-in 2.4-inch interactive screen, HUSKYLENS 2 allows users to train faces, objects, and colors directly on the device. Simply point and tap to learn. This intuitive design makes it the perfect vision sensor for STEM classrooms and beginners who want to see immediate results without complex debugging.
- [6 TOPS Efficient AI - Fast & Cool] Powered by the K230 chip, this module delivers 6 TOPS to run custom YOLO models at high frame rates. Unlike power-hungry boards that overheat or laggy sensors, HUSKYLENS 2 is optimized for edge efficiency. It ensures millisecond response times with instant start-up and low power consumption—perfect for high-performance, battery-powered robots.
- [20+ Built-in Algorithms & Custom Expansion] Ready to use out of the box with over 20 essential functions including Face Recognition, Line Tracking, and Tag Detection. For advanced users, it supports custom model uploading, allowing the device to grow with your skills—from simple line-following cars to complex sorting machines.
- [Visual Link for ChatGPT & LLMs] Transform your robot into an intelligent agent. HUSKYLENS 2 supports the Model Context Protocol (MCP), allowing it to serve as the "eye" for ChatGPT and other Large Language Models. Instead of just tracking objects, your hardware can now "discuss" what it sees with the AI, unlocking advanced interactions impossible with traditional sensors.
- [Compatible with Arduino, Raspberry Pi, ESP32 & micro:bit] Solves integration headaches with standard UART and I2C protocols. Whether you are building a line-following car or a smart pet feeder, the plug-and-play Gravity interface simplifies wiring, allowing hobbyists to upgrade existing projects with AI vision in minutes.
| Connection | Guidance |
|---|---|
| HUSKYLENS 2 I²C | Connect SDA to the board’s confirmed SDA pin and SCL to its confirmed SCL pin. Check the sensor’s communication mode and connector orientation. |
| Ground | Connect sensor, controller, and servo-supply grounds together so the I²C and PWM signals share a reference. |
| Servo signal | Connect the servo’s signal lead to a confirmed PWM-capable GPIO. Do not assume GPIO 4 is appropriate without checking the board pinout. |
| Servo power | Power the servo from a suitable regulated supply rather than relying on a weak development-board rail. Size the supply for the servo’s load and startup or stall current. |
| LED (optional) | Connect through an appropriate series resistor to a suitable output, observing the board’s voltage limits. |
Servo current spikes can cause jitter or reset the controller. Keep servo power wiring distinct from I²C wiring where practical; if resets occur, improve the supply and grounding and consider bulk capacitance near the servo. DFRobot lists I²C support on HUSKYLENS 2 and the ESP32-P4 kit, but the precise pins depend on the board configuration. HUSKYLENS 2 interfaces · FireBeetle ESP32-P4 details.
What the published sketch does—and what to improve
The sketch requests expression results using huskylens.getResult(ALGORITHM_EMOTION_RECOGNITION), iterates through available results, and compares each result name with Happiness. On a match, it moves the servo in 10-degree steps from 0° to 180°, waiting 50 ms between steps, performs an LED heartbeat effect, and sweeps back. It then waits before polling again. These are the published example’s values, not guaranteed safe travel limits for every servo or linkage.
Rank #3

- ESP32-S3 camera board: Dual-core 32-bit microprocessor up to 240 MHz, 8 MB flash, 8 MB PSRAM, onboard 2.4 GHz Wi-Fi and Bluetooth 5 (LE), USB-OTG, USB code uploader, camera, memory card slot (Comes with 1GB memory card and card reader)
- 3 sets of code: MicroPython, C and Processing (Java). Python is one of the most popular languages, and C is one of the most classic languages. Processing code needs to run on computers to provide graphical interfaces
- Detailed tutorial: Can be downloaded (in English, 828-page in total) or viewed online (original in English, can be translated into other languages by browsers) (The tutorial link can be found on the product box, no paper tutorial)
- 121 projects from simple to complex: Provides step-by-step guide with electronics and components knowledge, each project has schematics, wiring diagrams, complete code and detailed explanations
- 243 items in total: This ultimate kit includes the most commonly used electronic components, modules, sensors, wires and other compatible items
Before attaching a gate, test the servo without a load and determine safe endpoints for your mechanism. Many servos should not be driven to their nominal extremes, and a linkage can bind before the servo reaches them. Start with a small range, keep fingers clear, and adjust gradually. The gate should move freely by hand and should not force the servo against a hard stop.
The example is useful for learning, but its blocking delays mean it cannot promptly respond to new sensor events during a sweep. It has no debounce, confidence check, open/closed state tracking, obstruction sensor, limit switch, emergency stop, or movement feedback. It also does not verify that the gate moved, distinguish multiple faces, or authenticate anyone. For an improved demonstration, use a non-blocking state machine such as CLOSED, OPENING, OPEN, CLOSING, and FAULT; require a result across consecutive polls, impose a cooldown, and define what the mechanism should do if the sensor or power fails.
Rank #4

- 🚀 Beginner-Friendly ESP32 Starter Kit:Designed for beginners to explore electronics, programming, and IoT concepts, this ESP32 starter kit combines an ESP32 development board with essential electronic modules, providing a practical way to learn through hands-on experiments and simple DIY projects.
- 🧠 Powerful ESP32 WiFi Development Board:Built around the ESP32 ESP-32S microcontroller with integrated WiFi, the development board supports wireless communication, digital control, and sensor-based projects. It helps beginners gain practical experience with microcontrollers and basic IoT applications.
- 🔧 Hands-On Learning with Multiple Modules:The included electronic components and modules allow users to experiment with sensors, outputs, and basic circuit functions. By building and testing different projects, beginners can gradually understand how hardware components work together with microcontroller programming.
- 💻 Arduino IDE Programming Support:Compatible with the Arduino IDE, the ESP32 starter kit provides a familiar programming environment for beginners, students, hobbyists, and makers. Users can write, upload, and test their own programs while developing practical coding and embedded programming skills.
- 🎓 Ideal for Education & DIY Projects:Suitable for STEM education, classroom activities, electronics practice, and home DIY projects, this ESP32 learning kit encourages hands-on exploration. It helps beginners develop foundational skills in programming, circuit building, sensor applications, and IoT concepts.
Build and test in stages
- Sensor-only: Confirm the sensor powers up and expression recognition is selected. Try neutral and smiling expressions, different angles and distances, partial occlusion, low light, and more than one person. Inspect the actual returned label rather than assuming it will be
Happiness. - Controller and servo: Use a test button or serial command instead of vision. Confirm the servo moves over a conservative range and the board does not reset when it starts.
- Mechanism: Begin with a cardboard or foam mock-up if needed. Fit a low-friction hinge, align the servo near the hinge, and use a linkage that does not over-constrain movement. Reinforce a flexible PLA hinge area.
- Integrated operation: Connect the linkage only after the unloaded servo test. Watch serial output, test repeated triggers, and observe what happens if the face disappears, I²C communication is lost, or the board is power-cycled during motion.
- Record results: Note the lighting, angle, distance, and conditions that produced false or missed triggers. The source project supplies no measured performance figures, so do not infer a success rate from a few demonstrations.
Troubleshooting
- Sensor not detected: Check power, ground, cable orientation, I²C mode, SDA/SCL assignment, address, and compatibility with the installed library.
- No expression result: Confirm the correct model is active, the face is framed, and lighting is adequate. Test the sensor independently before debugging the servo code.
- The result label differs: Print raw result names over serial and adapt the comparison only after confirming what the installed model and library return.
- Servo jitters or the board resets: Check the servo supply, common ground, mechanical load, and wiring. Avoid powering a loaded servo from a weak controller rail; reduce noise and improve supply delivery.
- Gate binds: Disconnect the linkage, check hinge alignment, reduce travel, and avoid driving the servo into a stop.
- It triggers repeatedly: Add state tracking, a cooldown, and a requirement for consecutive detections rather than running the full sweep on every matching poll.
- False triggers: Improve lighting and framing, then consider requiring repeated detections or combining the expression with a separate presence or explicit input. This can reduce nuisance triggers but does not make expression recognition an authorization method.
Where this design stops
A small SG90 and printed PLA gate are suitable for a tabletop display or classroom project, not a residential driveway gate, garage door, heavy gate, pedestrian security gate, or lock. A real gate requires professionally engineered actuation and appropriate obstruction and entrapment protection, limit sensing, manual release, emergency access, weather protection, and compliance with applicable local requirements. The published prototype does not provide those safeguards.
Windows Errors? Fix Them Before They Spread
Repair common Windows errors and clear accumulated junk for a smoother, more stable PC - no reinstall needed.Free scan · no reinstallOutdated Drivers Are Slowing You Down
One free scan finds every outdated or missing driver and matches the right update for your exact hardware.Free scan · exact hardware matchEmotion recognition also raises reliability, accessibility, and privacy concerns. Facial expressions vary between people and can be affected by camera angle, lighting, occlusion, and model limitations. Local inference means the basic interaction need not rely on cloud inference, but it does not automatically settle privacy concerns. Avoid storing images unnecessarily, explain what the device does, and do not use this project to make consequential access decisions.
Best Value
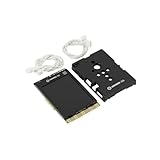
- COMPLETE STARTER SET [Board + Case + Cables]: This value kit includes the powerful UNIHIKER K10 AI Board, a rugged Protective Plastic Case, and a set of Essential Connection Cables (2x 3-Pin, 1x 4-Pin). It is the perfect all-in-one choice for parents and educators, eliminating the need to buy separate accessories to get started.
- [DESIGNED FOR DURABILITY & SAFETY]: The custom-fitted enclosure wraps securely around the PCB, protecting the delicate components and the 2.8" screen from accidental drops, static electricity, and scratches. The ergonomic design makes it easier for smaller hands to hold the device like a camera during active STEM projects.
- [EXPANSION READY WITH INCLUDED CABLES]: Don't let a lack of wires stop your creativity. The kit comes with high-quality cables compatible with DFRobot Gravity sensors (3-Pin for digital/analog, 4-Pin for I2C/UART). Students can immediately connect ultrasonic sensors, environment monitors, or other electronic modules to the K10 without soldering.
- [POWERFUL AI & MOBILE DEPLOYMENT]: At its heart is the ESP32-S3 chip, offering built-in visual recognition (Face/Pet/QR), offline voice control, and TinyML capabilities. With the protective case, students can confidently deploy their AI projects anywhere—from mounting it on a robot to using it as a handheld smart assistant.
- [EASIEST WAY TO LEARN PYTHON & AI]: Supports Mind+ (Graphical Coding) and MicroPython. The addition of the case and cables transforms the K10 from a delicate component into a robust educational tool, making it ideal for classrooms, coding camps, and makers who want a reliable, grab-and-go development platform.
If the goal is an access-related prototype, separate the act of detecting a person from authorizing entry. Depending on the application, alternatives include a keypad, RFID/NFC credential, QR code, or another explicit user action, paired with presence and obstruction sensing. HUSKYLENS 2 lists other recognition models, including face, QR-code, barcode, tag, and license-plate recognition, but a recognition feature alone does not make a complete or secure gate controller. See the manufacturer’s listed HUSKYLENS 2 capabilities.
Quick Recap
Product prices and availability are accurate as of the date/time indicated and are subject to change. Any price and availability information displayed on Amazon at the time of purchase will apply.


Leave a Reply