What’s actually slowing this PC down?
Pick the symptom - the matching free tool is one click away.
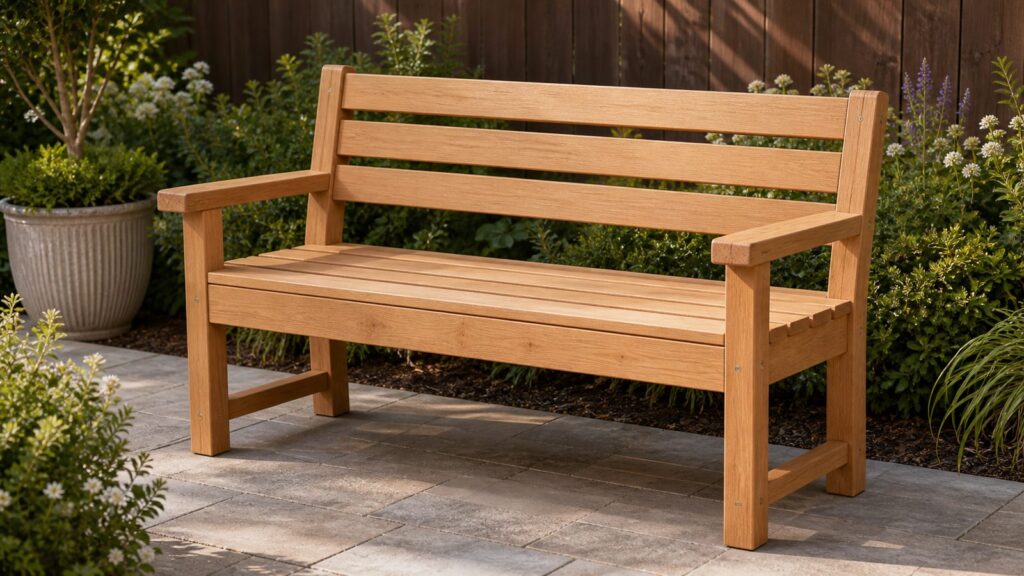
A simple garden bench is one of the best weekend woodworking projects for a homeowner because it is useful, forgiving, and does not require cabinetmaker joinery. The mistake is treating it like indoor furniture. Outdoors, water, sunlight, soil contact, fastener corrosion, and seasonal wood movement matter more than fancy cuts.
This plan builds a freestanding slat-style garden bench about 54 inches wide, 18 inches high at the seat, 18 inches deep, and roughly 34 inches tall at the back. That size comfortably seats two adults, fits most patios and garden paths, and can be built from standard 2×4 and 2×6 lumber with a circular saw or miter saw, drill/driver, square, tape, clamps, and sander.
For 2026 pricing in the United States, expect about $55 to $125 in materials for a basic pressure-treated pine version, $120 to $300 for cedar or redwood, and $250 to $700 or more for premium hardwood or composite boards. Most homeowners can build the bench in 4 to 7 hours, plus drying or finishing time.
Bench Dimensions That Actually Feel Comfortable
On our job sites, we pay close attention to outdoor seating dimensions because a bench can be structurally sound and still feel wrong. A comfortable garden bench usually lands in these ranges:
#1 Best Overall

- 137PCS 3-INCH DECK SCREWS: The 2-pound package includes approximately 137 pieces of #10 x 3-inch deck screws and one matching T25 star drive bit. A practical exterior wood screw set for decks, fences, framing and general outdoor construction projects.
- RUST-RESISTANT EPOXY COATING: The bronze epoxy-coated surface helps protect the screws against moisture, weather exposure and corrosion during exterior use. These coated deck screws are suitable for outdoor wood projects where ordinary uncoated screws may rust more quickly.
- T25 STAR DRIVE FOR SECURE INSTALLATION: The star drive recess provides multiple points of contact with the included T25 driver bit, helping reduce slipping and cam-out during installation. The drive design supports efficient fastening with a drill or impact driver.
- #10 x 3" FOR DEEP WOOD FASTENING: The 3-inch length provides deeper penetration when joining wood boards, lumber and outdoor project components. These long wood screws are suitable for deck boards, fence rails, posts, gates, pergolas, sheds, planters and outdoor furniture.
- VERSATILE EXTERIOR WOOD SCREWS: Use these outdoor screws for decking, fencing, framing, landscaping projects, garden beds, wooden walkways, docks, porches, patios, workshops and general wood construction. The bronze finish blends naturally with many wood colors for a clean appearance.
- Seat height: 16 to 18 inches from finished grade or patio surface
- Seat depth: 16 to 20 inches from front edge to back support
- Overall width: 48 to 60 inches for a two-person bench
- Back angle: 95 to 105 degrees from the seat for relaxed sitting
- Back height: 30 to 36 inches overall for normal garden use
This plan uses an 18-inch seat height and a slightly reclined back. If the bench is mainly for older guests, keep the seat closer to 18 inches high because it is easier to stand up from. If it is going beside a low planting bed or fire pit, 16 to 17 inches can feel more casual.
A 54-inch width is a good middle ground. A 48-inch bench is easier to tuck into a small garden corner, while a 60-inch bench gives two adults more shoulder room. Do not stretch a simple 2×4 slat bench much past 60 inches without adding a center support, because long slats can sag over time.
Materials and 2026 Cost Options
The best wood for a simple outdoor bench depends on budget, climate, appearance, and how much maintenance you are willing to do. For most homeowners, pressure-treated pine is the practical low-cost choice. Cedar and redwood look better and are lighter to move, but cost more. Composite decking or premium hardwood can last longer, but the material price and fastener requirements climb quickly.
| Bench Version | Typical 2026 Material Cost | Best For | Notes |
|---|---|---|---|
| Pressure-treated pine | $55-$125 | Budget builds, vegetable garden areas, utility seating | Use fasteners rated for treated lumber. Seal field-cut ends. |
| Cedar or redwood | $120-$300 | Visible patios, front gardens, lighter movable benches | Use stainless screws to reduce staining and corrosion risk. |
| Composite or premium hardwood | $250-$700+ | Long-life benches, coastal areas, low-maintenance patios | May require special blades, stainless hardware, or hidden fasteners. |
Commodity pressure-treated lumber pricing varies by region, but common 2026 big-box pricing often puts 2x4x8 ground-contact pressure-treated pine around $5 to $8 each and 4x4x8 ground-contact posts around $10 to $18. A 5-pound box of exterior deck screws commonly runs $30 to $50, while smaller 1-pound boxes are often $10 to $25. Stainless screws can cost 2 to 4 times more than coated deck screws, but they are worth it for cedar, redwood, coastal homes, and high-corrosion settings.
Recommended Free Tools
Recommended Lumber List
For the 54-inch bench in this plan, buy the following:
- Five 2x4x8 boards for legs, frame, back supports, and bracing
- Two 2x6x8 boards for seat slats and optional wider back slats
- One 2x4x8 extra if you want a center support or wider arm detail
- Exterior-rated 2-1/2 inch deck screws for most 2x connections
- Exterior-rated 3-1/2 inch deck screws for heavier frame connections
- Waterproof exterior wood glue, optional, used only as a supplement
- exterior stain, sealer, penetrating oil, or paint system
- Rubber feet, leveling feet, pavers, or gravel pads to keep legs off wet soil
If you use pressure-treated wood, look for lumber rated for the exposure. Exterior above-ground use is commonly UC3B. Any leg that sits directly on soil, mulch, or wet pavers should be treated as ground-contact exposure, meaning UC4A or higher, or isolated from moisture with feet or pads. We prefer isolation even with ground-contact lumber because it buys service life.
Tools You Need
This bench does not require a shop full of equipment. A careful homeowner can build it with basic job-site tools:
- Circular saw or miter saw
- Drill/driver
- Exterior-rated driver bits matching your screws
- 1/8-inch pilot bit and countersink bit
- Speed square or framing square
- Tape measure and pencil
- Two to four clamps
- Random-orbit sander or sanding block
- 80-, 120-, and optional 150-grit sandpaper
- Eye protection, hearing protection, gloves, and dust mask
If you are starting from scratch, budget $150 to $500 or more for saw, drill/driver, bits, clamps, sander, square, tape, and basic PPE. Many homeowners already own or can borrow most of this. A miter saw speeds up repeat cuts, but a circular saw with a square as a guide is enough.
Cut List for a 54-Inch Garden Bench
Measure twice and cut once, but also mark parts as you go. A simple bench becomes confusing when ten pieces are lying on the floor and several are close in length.
| Part | Material | Quantity | Length | Purpose |
|---|---|---|---|---|
| Seat slats | 2×6 | 3 | 54 in. | Seat surface |
| Back slats | 2×4 | 3 | 54 in. | Backrest |
| Front legs | 2×4 | 2 | 18 in. | Front support |
| Rear legs/back posts | 2×4 | 2 | 34 in. | Rear support and back angle |
| Seat side rails | 2×4 | 2 | 19 in. | Side frame |
| Front and rear rails | 2×4 | 2 | 48 in. | Frame under seat |
| Center seat support | 2×4 | 1 | 19 in. | Reduces slat flex |
| Lower stretcher | 2×4 | 1 | 48 in. | Prevents side-to-side racking |
| Diagonal braces | 2×4 | 2 | Cut to fit | Stiffens side assemblies |
These dimensions assume nominal lumber, where a 2×4 is actually about 1-1/2 inches by 3-1/2 inches and a 2×6 is about 1-1/2 inches by 5-1/2 inches. If your lumber is unusually wet, swollen, or slightly undersized, dry-fit before committing to final screw locations.
Step 1: Pick Straight Outdoor Lumber
The quality of the boards matters more than most beginners expect. When we buy lumber for exterior finish work, we sight down every board. Reject boards with heavy twist, deep wane, large loose knots on seating surfaces, or splits running in from the ends. A small crown is manageable. A twisted seat slat will fight you the whole build.
Rank #2

- SUPERIOR ANTI-RUST COATING: Tan coated exterior wood screws 3 inch through 1500 hours salt spray test against erosion and rust. These deck screws for exterior can be exposed to the sun, humidity, rain and snow condition for a long time
- STAR/TORX DRIVE: Star/Torx drive deck screws with 6 contact points prevent stripping, save drive torque and further fasten screws into wood construction, eliminate loose or camout
- AGGRESSIVE THREAD + SELF-TAPPING POINT: No pre-drilling, exterior decking screws with self-tapping point and coarse thread increase tapping power. Ideal exterior wood screws for treated deck, fence and other outdoor wood projects
- FINGER PROTECTION SHANK: Smooth shank of deck screw protects your fingers from sharp threads, convenient for picking/holding wood screws up
- PACKAGE: #10 x 3" Deck Screws, 300 Pieces, T-25 Star Drive Bit Included. LIONMAX Deck Screws are arranged in a nice container for convenient storage with clear label for easy recognition
For pressure-treated pine, choose boards that feel reasonably dry and are not dripping wet. Wet treated lumber can shrink, cup, and check as it dries. That does not mean you cannot build with it, but you should expect movement. For cedar or redwood, look for straight grain and avoid fragile knots near screw locations.
Crashes, No Sound, or Screen Glitches?
Random freezes, missing sound and display glitches usually trace back to one bad driver. Find and replace yours safely.Free scan · under a minuteWindows Errors? Fix Them Before They Spread
Repair common Windows errors and clear accumulated junk for a smoother, more stable PC - no reinstall needed.Free scan · no reinstallLay the best-looking faces upward for the seat and forward for the backrest. Put minor defects on hidden frame members. This is a small habit, but it is one of the differences between a bench that looks planned and one that looks patched together.
Step 2: Build the Two Side Frames
Each side frame uses one 18-inch front leg, one 34-inch rear leg/back post, and one 19-inch seat side rail. The seat rail should sit so the finished top of the seat lands at about 18 inches. With a 1-1/2 inch thick seat slat, set the top of the side rail at 16-1/2 inches from the bottom of the legs.
Clamp the side rail to the front leg first, square it carefully, predrill, countersink, and fasten with two 2-1/2 inch exterior screws. Keep screws about 3/4 inch or more from board edges where possible to reduce splitting. Repeat at the rear leg.
For comfort, lean the rear post back slightly. A simple way is to set the back post so the backrest lands around 100 degrees from the seat. You can cut the bottom of the rear leg with a slight angle if you want full bearing on a flat patio, but for a beginner build it is acceptable to keep the leg square and angle only the back support face. The important part is that both side frames match.
Do these 3 things before closing this tab:
1Clear out junk files and repair common Windows errors2Fix the driver behind crashes, sound loss and screen glitches3Repair Windows errors before they cause bigger problemsAdd a diagonal brace or triangular side geometry between the seat rail and rear post. This prevents the bench from racking side to side after a season of use. A bench without a stretcher or brace may feel fine on day one and loose by the end of the summer.
Step 3: Connect the Frames and Square the Bench
Stand the two side frames upright and connect them with the 48-inch front and rear rails under the seat. Clamp the rails in place, check that the bench width is even front and back, and measure diagonally from corner to corner. If the diagonal measurements match, the base is square.
Fasten each rail with 3-1/2 inch exterior screws or structural exterior screws rated for the lumber you are using. Predrilling matters here, especially near the ends. Add the 48-inch lower stretcher between the legs, centered left to right and set low enough to stiffen the bench without becoming a foot obstruction. Around 6 to 8 inches above the ground works well for most designs.
Install the center seat support halfway across the width. This small piece reduces bounce in the 54-inch seat slats and helps the bench feel more substantial. If you stretch the bench to 60 inches, do not skip the center support.
Step 4: Install the Seat Slats With Drainage Gaps
Outdoor benches need drainage. A flat, solid seat traps water, speeds up finish failure, and encourages rot. Set the three 2×6 seat slats across the frame with 1/4-inch to 3/8-inch gaps between them. Use scrap spacers so the gaps stay consistent.
Rank #3

- SUPERIOR ANTI-RUST COATING: Tan coated exterior wood screws 2 inch through 1500 hours salt spray test against erosion and rust. These deck screws for exterior can be exposed to the sun, humidity, rain and snow condition for a long time
- STAR/TORX DRIVE: Star/Torx drive deck screws with 6 contact points prevent stripping, save drive torque and further fasten screws into wood construction, eliminate loose or camout
- AGGRESSIVE THREAD + SELF-TAPPING POINT: No pre-drilling, exterior decking screws with self-tapping point and coarse thread increase tapping power. Ideal exterior wood screws for treated deck, fence and other outdoor wood projects
- FINGER PROTECTION SHANK: Smooth shank of deck screw protects your fingers from sharp threads, convenient for picking/holding wood screws up
- PACKAGE: #8 x 2" Deck Screws, 300 Pieces, T-25 Star Drive Bit Included. LIONMAX Deck Screws are arranged in a nice container for convenient storage with clear label for easy recognition
Overhang the seat slats evenly at both ends. With 54-inch slats over a 48-inch frame, you get about 3 inches of overhang per side. That looks balanced and keeps the frame tucked under the seat.
Predrill and countersink every exposed screw. Use two screws at each side rail and one or two at the center support depending on your layout. Keep screw heads just below the surface without crushing the wood fibers. Overdriven screws collect water and make small pockets where finish fails first.
Step 5: Add the Back Slats
Set the lower back slat first, leaving a small gap above the rear edge of the seat so water and debris do not get trapped. Then install the middle and upper back slats with 1-1/2 to 2-1/2 inches of space between them. The exact spacing is partly visual, but keep the top slat high enough to support the upper back without hitting the shoulders awkwardly.
Quick wins for a faster PC:
Repair Windows errors before they cause bigger problemsFix Now →Scan for outdated or missing drivers - takes under a minuteDriver Scan →Clamp each slat before fastening. Predrill near the ends, especially with cedar, redwood, or dry pressure-treated boards. Use stainless screws for cedar, redwood, coastal projects, or anywhere staining from fasteners would be unacceptable. For typical inland pressure-treated pine, use coated deck screws explicitly approved by the screw manufacturer for treated lumber.
Do not use drywall screws, interior screws, or random leftover fasteners. Treated wood can be corrosive to incompatible metal, and outdoor moisture will expose cheap fasteners quickly. Acceptable options include stainless steel, hot-dip galvanized, silicon bronze, copper, or manufacturer-approved coated exterior screws.
Step 6: Sand, Round Edges, and Finish Correctly
Comfort is built in the sanding stage. Sand seating surfaces to at least 120 grit and break every hand-contact edge. Sharp 90-degree corners are uncomfortable, splinter more easily, and shed finish faster than slightly eased edges. You can use a router with a small roundover bit, but sandpaper works if you are patient.
Seal cut ends, especially on pressure-treated lumber. Field cuts can expose less-protected interior wood. Use an end-cut preservative compatible with your lumber, or at minimum make sure stain or sealer is worked into every end grain surface.
Free tools Windows power users keep installed
One-click scans. No signup required.
Finishing pressure-treated lumber requires judgment. If the boards are wet, let them dry before applying stain or paint. Depending on climate and lumber moisture, that can mean several weeks. A quick field check is to sprinkle water on the surface. If water beads, the wood may not accept penetrating finish yet. If it absorbs, it is usually ready for stain or sealer. Follow the finish manufacturer’s timing, because trapped moisture can cause peeling and blotchy color.
For cedar and redwood, a penetrating exterior oil or semi-transparent stain keeps the natural look while slowing weathering. Paint gives more color control but needs more careful prep and maintenance. Clear film finishes look good at first but can be demanding outdoors unless they are maintained before cracking starts.
Where to Place the Bench So It Lasts
Never assume the build is finished when the last screw goes in. Placement determines how long the bench survives. Keep the legs off wet soil, mulch, and constantly damp grass. Use pavers, gravel pads, rubber feet, plastic glides, or leveling feet. Even ground-contact treated lumber lasts longer when it can dry between storms.
Rank #4

- 【ABOVE 1500HRS SALT SPRAY TEST】FIXLINK wood screws have passed about 1500 hours salt spray test provide exceptional protection against rust and corrosion, specifically designed to work best with either pressure-treated lumber or composite decking. These deck screws for exterior can be exposed to the sun, humidity, rain, and snow conditions for a long time
- 【NO PRE-DRILLING】We design our special thread-cutting screws with sharp points and serrated thread. It can not only start drilling holes rapidly without pre-drilling but also make the contact surface smooth and avoid wood splitting
- 【STAR/TORX DRIVE】T-25 star/torx drive deck screws with 6 contact points prevent stripping, save drive torque and further fasten screws into wood construction, eliminate loose or amount. And we use tan plated metal to make it suitable for most woodwork because tan is similar to the color of wood
- 【WIDE APPLICATION】These wood screws have proven themselves across diverse projects, from deck remodeling to scaffolding construction. The versatility in their applications is a standout feature, find them suitable for a wide array of tasks
- 【WORRY-FREE SERVICE】FIXLINK focuses on customer satisfaction, if you have any questions or are not satisfied, you can contact us by email, we will solve all your problems as soon as possible
Set the bench on a stable, level surface. If it rocks, shim or adjust the feet rather than letting the frame twist under load. Avoid placing the bench where sprinklers hit it every morning. Repeated wetting is harder on wood than occasional rain because the bench never fully dries.
The Tool Desk
Outbyte Driver Updater FREEScan for outdated or missing drivers - takes under a minuteDriver Scan →Outbyte PC Repair FREERepair Windows errors before they cause bigger problemsFix Now →If the bench sits beside a path, leave enough clearance for safe walking. A 36-inch clear route is a good practical target for many residential garden paths, and wider is better where wheelbarrows, strollers, or mobility devices need access.
Maintenance Schedule for an Outdoor Wood Bench
A wood garden bench is not maintenance-free. The good news is that the work is light if you do it before the finish fails.
- After the first month: Check for raised grain, loose screws, or sharp spots caused by drying wood.
- Once a year: Wash with mild cleaner, inspect fasteners, tighten hardware, and clear debris from slat gaps.
- Every 1 to 3 years: Recoat stain, sealer, or oil when water stops beading or color fades unevenly.
- After heavy storms: Check that the bench is not sitting in mud, mulch buildup, or standing water.
Do not wait until the wood is gray, cracked, and rough before doing anything. Annual cleaning and timely recoating are much cheaper than rebuilding a rotten base.
Independent reader supportYour contribution helps us test, update, and keep practical guides available for everyone.Common Mistakes to Avoid
The most common bench failures are predictable. We see them when outdoor projects are built like indoor shop projects.
- Using untreated interior framing lumber outdoors without serious protection
- Setting legs directly into soil or mulch without ground-contact treatment or isolation
- Using drywall screws or interior screws outside
- Skipping pilot holes near board ends
- Building a solid seat with no drainage gaps
- Ignoring board twist and crown at the lumber rack
- Finishing wet pressure-treated lumber too soon
- Making the seat too deep, too high, or too upright
- Leaving sharp corners on seat and back slats
- Attaching a bench to a deck edge without checking guard rules
If you avoid those mistakes, this is a very forgiving project. The bench does not need perfect joinery to be strong, but it does need drainage, compatible hardware, stable geometry, and a sensible finish.
Permit and Safety Notes
A freestanding garden bench in a private yard usually does not require a building permit, but local rules vary. Some cities exempt small site furnishings and minor residential improvements, while others may care if the bench is anchored, attached to a structure, placed in a public-facing area, or part of commercial property.
The bigger code concern is when a bench is attached to a deck, balcony, porch, retaining wall, or raised patio. If a bench is near an open edge, it can affect required guard height and climbability. Residential guards are commonly required where walking surfaces are more than 30 inches above grade, and many deck guardrails are 36 inches high for residential work, with 42 inches common in many commercial situations. Do not build a fixed bench that effectively turns a guard into a step unless the assembly has been reviewed for the local code condition.
For public, multifamily, HOA, rental, or commercial settings, treat the bench as more than a casual DIY project. Accessibility, anchoring, tip resistance, maintenance responsibility, and liability all matter. A loose freestanding bench in a private garden is one thing; a fixed bench beside a public walkway is another.
When to DIY vs When to Hire a Pro
This bench is a good DIY project if you can safely operate a saw and drill, work on a flat surface, and follow measurements closely. A homeowner with basic tools can usually complete the build in one day. Add another day or weekend for finish work if the lumber is dry enough.
Best Value

- All-in-One Outdoor Solution: 110-piece assorted wood deck screws + included T25 star bit—no extra tool purchases needed, ready to use right out of the box for decking, landscaping, and log projects.
- Superior Rust Resistance: Bronze epoxy coating forms a tough barrier against rain, moisture, and outdoor corrosion, keeping screws strong and durable for years of exterior use.
- Non-Slip T25 Star Drive: Precision-machined star drive head prevents cam-out (slipping) during installation, saving time and avoiding damage to screws or wood surfaces.
- Heavy-Duty Holding Power: Designed for timber, logs, and outdoor wood—features sharp threads that drill easily and grip tightly, ensuring stable, long-lasting connections for decks or fences.
- Versatile Exterior Use: Perfect for wood decks, patios, garden fences, and landscaping structures; the assorted set covers multiple sizes to meet different outdoor woodworking needs.
Hire a carpenter, handyman, or contractor if the bench needs to be built into a deck, anchored to masonry, integrated with planters, installed on a sloped site, or used in a public or rental property. Also hire out the work if you want premium hardwood, curved parts, hidden fasteners, or a furniture-grade finish. In 2026, a simple custom bench built and installed by a carpenter or handyman can plausibly run $250 to $900 or more depending on local labor rates, materials, site prep, finish, and anchoring.
DIY saves money on a basic pressure-treated bench. Professional help earns its keep when the bench affects safety, drainage, structure, or the finished look of a larger outdoor living space.
Simple Upgrades Worth Considering
Once the basic bench is built, a few upgrades can improve durability and comfort without complicating the plan.
Do these 3 things before closing this tab:
1Repair Windows errors before they cause bigger problems2Fix the driver behind crashes, sound loss and screen glitches3Clear out junk files and repair common Windows errors- Armrests: Add 2×4 arms at about 24 to 26 inches above the ground for easier sitting and standing.
- Center leg: Add one under the middle if you extend the bench beyond 60 inches.
- Composite seat slats: Use composite decking for the seat while keeping a pressure-treated frame.
- Stainless hardware: Upgrade all exposed fasteners in wet, coastal, cedar, or redwood builds.
- Leveling feet: Add adjustable feet for patios with slight slope.
- End-grain treatment: Brush preservative or sealer into every cut end before final assembly.
The best upgrade is often the least visible one: keeping the legs dry. A $10 set of feet or a few pavers can add years to a bench that would otherwise wick moisture from the ground.
Final Build Notes From the Field
A good garden bench is simple, but it should not be careless. Build it with outdoor-rated lumber, compatible corrosion-resistant fasteners, drainage gaps, eased edges, and enough bracing that it does not rack. Keep the seat around 16 to 18 inches high, the depth around 16 to 20 inches, and the back angle around 95 to 105 degrees.
For the best value, pressure-treated pine is hard to beat at about $55 to $125 in 2026 materials. For a more refined patio bench, cedar or redwood with stainless screws is usually worth the jump to $120 to $300. Premium hardwood or composite can make sense when the bench is part of a larger outdoor living investment.
Take your time at the lumber rack, predrill the ends, leave room for water to drain, and keep the legs off wet ground. Those details are what turn a quick weekend bench into outdoor seating that still looks intentional after several seasons.
Frequently Asked Questions
What is the best wood for a simple outdoor garden bench?
Pressure-treated pine is the best budget choice. Cedar and redwood are lighter, more stable, and better looking, but cost more. Premium hardwoods and composite boards can last longer but may require stainless hardware and sharper tools.
How much does it cost to build a DIY garden bench in 2026?
A basic 4-5 ft pressure-treated pine bench usually costs about $55-$125 in materials. Cedar or redwood commonly runs $120-$300, while premium hardwood or composite versions can reach $250-$700 or more.
What screws should I use for an outdoor wood bench?
Use exterior-rated corrosion-resistant fasteners. For pressure-treated pine, use coated deck screws approved by the manufacturer for treated lumber. For cedar, redwood, coastal areas, or high-corrosion locations, stainless steel screws are the better choice.
How tall and deep should a comfortable garden bench be?
A comfortable bench seat is usually 16-18 inches high and 16-20 inches deep. A back angle around 95-105 degrees is more comfortable than a straight 90-degree back.
Do I need a permit to build a garden bench in my yard?
A freestanding private garden bench usually does not need a permit, but rules vary locally. Check before anchoring it to a deck, patio structure, retaining wall, public area, rental property, or commercial site.
How do I keep bench legs from rotting on soil or grass?
Keep the legs off wet ground with pavers, gravel pads, rubber feet, plastic glides, or leveling feet. If legs touch soil or mulch, use ground-contact-rated lumber and seal cut ends.
Quick Recap
Product prices and availability are accurate as of the date/time indicated and are subject to change. Any price and availability information displayed on Amazon at the time of purchase will apply.