The Tool Desk
Outbyte PC Repair FREEClear out junk files and repair common Windows errorsFree Scan →Outbyte Driver Updater FREEScan for outdated or missing drivers - takes under a minuteDriver Scan →Weeds in patio pavers can be removed with hand tools, boiling water, steam, vinegar, flame weeding, labeled herbicides, pressure washing, or full joint cleanout and re-sanding. The right method depends on how many weeds you have, how deep the roots are, whether pets or edible plants are nearby, and whether the paver joints have lost their sand.
On construction and hardscape job sites, we treat patio weeds as a symptom first. A few seedlings after spring rain are normal. A patio full of crabgrass, moss, and deep-rooted weeds usually means the joints are open, organic debris is collecting, drainage is poor, or the pavers have settled enough to hold soil. Killing the top growth may make the patio look better for a few weeks, but the long-term repair is usually cleaning the joints, correcting low spots where needed, and restoring the joint material.
This guide gives you nine practical removal methods, when each one makes sense, what it costs in 2026, and how to keep weeds from coming back between the pavers.
Start With the Cause, Not Just the Weed
Most patio weeds do not need a deep soil bed. Windblown seeds land in decomposed leaves, dust, grass clippings, and soil that settles between the joints. Once the joint sand erodes or gets contaminated with organic matter, the gap becomes a shallow planter. That is why two patios built with the same pavers can behave differently: the cleaner, better-drained patio grows fewer weeds.
#1 Best Overall

- FLEXIBILITY, STRENGTH and BEAUTY: Ease your mind with revolutionary CERAMIC FLEX technology in the most advanced polymeric sand available, allowing flexibility and durability in joints 1/8” up to 4”, with beautiful colors to make your paver or stone surfaces pop!
- EASY TO USE PACKAGING: Our bag’s NEW Easy Pour Handle makes carrying a breeze and offers more control and precision installation a breeze.
- EASY INSTALLATION: Made with fine sand and a cement-free formula, DOMINATOR Polymeric Sand easily sweeps into joints and rinses easily, dramatically cutting your installation time and labor efforts. (Note: This product is not a replacement for grout, mortar, and paver edging.)
- COVERAGE RATE: Using Google, search "DOMINATOR Polymeric Sand Calculator" to help you calculate the amount of sand needed for your project, or download our Product Documentation in the Product Guides section of this listing for a Calculator Worksheet.
- NOTE: Use the Installation Manual in the Product Guides section of this listing, and reference our How To Video.
Before choosing a removal method, look at four things. First, check the joint width. Tight joints under about 1/4 inch are easier to stabilize than wide, irregular joints. Second, measure how much joint sand is missing. If the sand is more than 1/2 inch below the paver surface, weeds and water have room to collect. Third, watch what happens after rain. Standing water for more than a few hours points to slope, base, or drainage issues. Fourth, walk the patio. Rocking pavers, sunken edges, or loose border restraints mean the problem is structural, not cosmetic.
For a clean, stable patio with scattered weeds, simple hand removal may be enough. For a neglected patio with widespread growth, plan on a sequence: trim tall growth, loosen or treat roots, remove plants and soil from the joints, wash carefully, let the joints dry fully, re-sand, activate the sand correctly, and then maintain the surface with sweeping or blowing.
Quick Comparison: Which Weed Removal Method Fits Your Patio?
The table below ranks the common options by where they work best. Costs are typical 2026 US homeowner ranges and vary by market, product size, patio condition, and minimum service charges.
| Method | Best Use | Typical DIY Cost | Timeframe | Main Caution |
|---|---|---|---|---|
| Hand-pulling after rain | Scattered weeds with reachable roots | $0-$20 | Immediate | Roots snap if soil is dry |
| crevice knife or wire brush | Narrow joints and small patios | $20-$60 | Immediate | Can scratch soft or sealed pavers |
| Boiling water | Small areas near pets or edible plants | $0-$10 | 1-2 days | Burn risk and limited root kill |
| Steam treatment | Chemical-free spot control | $40-$200+ equipment | 1-3 days | Slow on large patios |
| Flame weeding | Open, non-combustible areas where legal | $36-$65 plus propane | 1-3 days | Fire risk; repeat passes often needed |
| Vinegar or acetic acid | Young seedlings at the 1-2 leaf stage | $5-$30 | Hours to days | Weak on mature roots; can damage plants |
| Labeled non-selective herbicide | Persistent perennial weeds | $15-$60 | Several days to 2 weeks | Follow the label and prevent runoff |
| Pressure washing | Dirty pavers with widespread joint growth | $99-$299 washer, or rental/service | Same day, plus drying | Can remove joint sand and chip pavers |
| Joint cleanout and polymeric sand | Long-term prevention after removal | $20-$40 per bag | 1-2 dry days plus cure time | Needs clean, dry, properly filled joints |
1. Hand-Pull Weeds After Rain or Watering
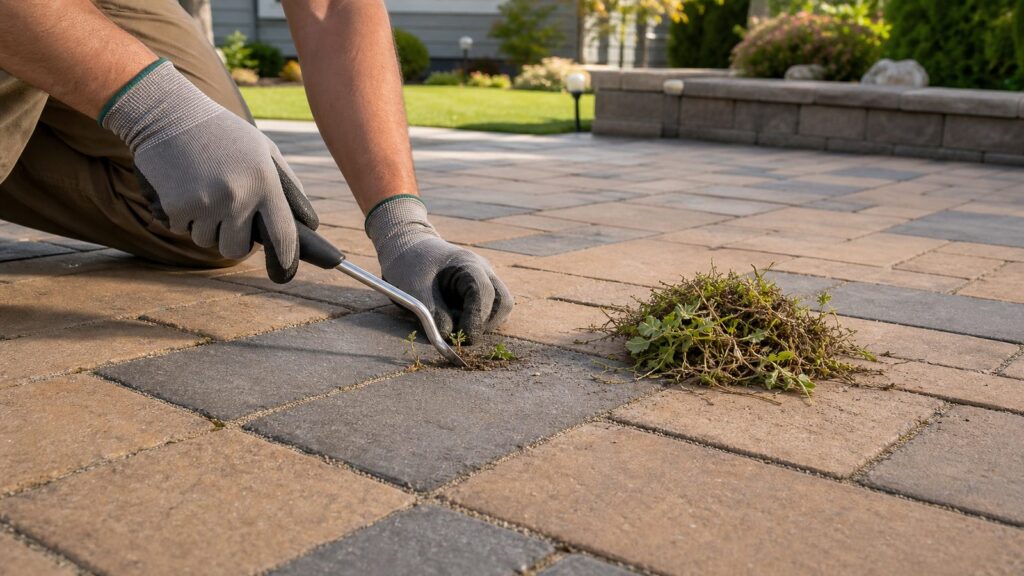
Hand-pulling is still the cleanest solution for scattered patio weeds, especially broadleaf weeds growing from shallow joints. The trick is timing. Pull after a soaking rain or after watering the patio and waiting 20 to 30 minutes. Damp joint material releases roots more easily, so you remove more of the plant instead of tearing off the green top.
Recommended Free Tools
Grip the weed low, close to the joint, and pull straight up with steady pressure. If the paver joint is tight, rock the plant slightly rather than yanking. For taprooted weeds, use a narrow weeding tool beside the root before pulling. Bag mature weeds with seed heads. Throwing seeded weeds into open compost or blowing them into the yard simply moves the problem.
Cost is minimal: free if you already have gloves, or about $10 to $20 for a decent pair. For a 100 to 200 square foot patio with light growth, expect 30 to 90 minutes. This method is slow for heavy infestations, but it is safe for nearby turf, vegetable beds, pets, and permeable paver systems.
2. Use a Crevice Knife, Patio Weeder, or Wire Brush
A crevice knife is built for the narrow gaps between pavers. It lets you cut below the crown of the plant and scrape out the soil that is feeding new seedlings. Basic patio knives, crack weeders, and long-handled joint tools commonly run about $20 to $60. They are worth buying if your patio gets weeds every season.
Work the tool along the joint at a shallow angle and pull loosened roots and debris out of the gap. A wire brush can help on concrete pavers, but be careful with clay pavers, natural stone, textured surfaces, or sealed patios. Aggressive brushing can leave shiny scratches, remove finish, or disturb sand in joints you were not planning to refill.
This is one of the best chemical-free methods for a small to medium patio. It also gives you useful information. If the tool keeps dropping into deep empty joints, or you scrape out black soil instead of clean sand, the patio needs more than weeding. It needs joint restoration.
3. Pour Boiling Water on Small Weed Patches
Boiling water is simple, cheap, and effective on young weeds in small areas. It damages the leaves and crown quickly, and the plant usually wilts within a day or two. It is a good option around edible planters, pet areas, and spots where you do not want herbicide drift.
Use a kettle with a controlled pour, wear closed-toe shoes, and keep children and pets away until the surface cools. Pour slowly at the base of the weed so the hot water reaches the joint. A second application may be needed for established weeds. Boiling water does not reliably kill deep perennial roots, so do not expect it to eliminate nutsedge, dandelion, or grass clumps that have been growing for months.
Rank #2

- Professional Polymeric Sand for Pavers Ideal jointing sand for patios, walkways, driveways, pool decks, and stone installations
- Rain Safe Technology Sets quickly and resists washout after activation
- Strong Joint Stabilization Locks pavers together to prevent shifting and movement
- Fast & Easy Installation Simple sweep-in application for contractors and homeowners
- For Concrete & Natural Stone Pavers Compatible with most hardscape surfaces
A practical limit is size. Carrying repeated kettles across a large patio is inefficient and increases burn risk. For more than a few dozen weeds, move to hand tools, steam, herbicide, or pressure washing followed by re-sanding.
4. Use Steam for Chemical-Free Weed Control
Steam works on the same principle as boiling water: heat ruptures plant cells and collapses foliage. It is cleaner to aim than a kettle and safer around sensitive planting beds than broad spraying. Home steamers vary widely, but basic equipment may cost $40 to $200 or more depending on capacity and temperature.
Hold the steam head over the weed long enough to wilt it, not long enough to cook the paver surface. Young weeds may respond after one treatment. Established plants usually need repeat treatments every 1 to 2 weeks until the root reserves are exhausted. Steam is slower than spraying, but it avoids chemical residue and is useful where runoff is a concern.
Do not use steam as an excuse to ignore the joint. If the gap is full of soil, seeds will keep germinating. After the dead growth dries, scrape the joint clean and replace missing sand where needed.
5. Flame Weed Only Where It Is Legal and Safe
Propane weed torches can be effective, but they are also the easiest patio weed method to misuse. Consumer torch kits commonly cost about $36 to $65 plus propane. They should be used only on non-combustible surfaces with clear space around the work area. Avoid flame weeding near mulch, dry leaves, fences, decks, siding, stored lumber, vinyl trim, dry grass, or landscape fabric. Do not use a torch during hot, dry, windy, or burn-ban conditions.
The goal is not to burn weeds to ash. On our job sites, the correct visual cue is wilted foliage. A quick pass that heats the leaf tissue is enough. If the plant turns black or burns, you used more heat than needed and increased fire risk. Deep-rooted weeds often come back and need repeat passes.
Keep a charged hose or extinguisher nearby and stay on site for at least 30 minutes after finishing to watch for smoldering debris. Some municipalities and fire departments discourage or restrict torch use for weeds, especially during dry weather. When in doubt, choose a non-flame method.
6. Spray Vinegar or Acetic Acid on Young Weeds
Vinegar can work, but it is often oversold. Extension guidance is consistent: household-strength acetic acid is mainly useful on very small, young weeds. Products in the 5% to 10% acetic acid range can control weeds at the 1-2 leaf stage, while larger weeds commonly survive unless stronger concentrations or repeated applications are used.
Vinegar is a contact treatment. It burns the foliage it touches, but it does not reliably move through the plant into deep roots the way some systemic herbicides do. Use it on a calm, dry day and spot-treat the weed, not the whole patio. Keep spray off turf, shrubs, annuals, and edible plants. Higher-concentration horticultural vinegar can injure skin and eyes, so follow the product label for gloves, eye protection, dilution, and storage.
Free tools Windows power users keep installed
One-click scans. No signup required.
Avoid salt-heavy DIY recipes. Salt can contaminate adjacent soil, harm desirable plants, contribute to runoff, and may damage masonry or concrete surfaces over repeated use. Baking soda has similar overuse problems and is not a permanent patio weed solution.
7. Use a Labeled Non-Selective Herbicide for Persistent Roots
For perennial weeds with deep or spreading roots, a labeled non-selective herbicide may be the most practical option. This includes weeds that keep returning after pulling, boiling water, or vinegar. The key word is labeled. Pesticide labels are legal directions in the United States, and the product must be labeled for the target site and use pattern.
Glyphosate and other non-selective herbicides can injure grasses, broadleaf plants, shrubs, and trees if spray contacts green tissue or runs off into planting beds. Spot-treat only the weeds in the joints. Apply on a calm, dry day, use the personal protective equipment listed on the label, and avoid applying before rain or irrigation. Keep the spray pattern low and controlled. A piece of cardboard can work as a shield near lawn edges.
Rank #3

- FLEXIBILITY, STRENGTH and BEAUTY: Ease your mind with revolutionary CERAMIC FLEX technology in the most advanced polymeric sand available, allowing flexibility and durability in joints 1/8” up to 4”, with beautiful colors to make your paver or stone surfaces pop!
- EASY TO USE PACKAGING: Our bag’s NEW Easy Pour Handle makes carrying a breeze and offers more control and precision installation a breeze.
- EASY INSTALLATION: Made with fine sand and a cement-free formula, DOMINATOR Polymeric Sand easily sweeps into joints and rinses easily, dramatically cutting your installation time and labor efforts. (Note: This product is not a replacement for grout, mortar, and paver edging.)
- COVERAGE RATE: Using Google, search "DOMINATOR Polymeric Sand Calculator" to help you calculate the amount of sand needed for your project, or download our Product Documentation in the Product Guides section of this listing for a Calculator Worksheet.
- NOTE: Use the Installation Manual in the Product Guides section of this listing, and reference our How To Video.
Do not blanket-spray the patio as a shortcut. It wastes product, increases runoff risk, and does not fix the dirty or empty joints that allowed the weeds to grow. After the treated weeds die, remove the dead material and soil from the joints before re-sanding.
Crashes, No Sound, or Screen Glitches?
Random freezes, missing sound and display glitches usually trace back to one bad driver. Find and replace yours safely.Free scan · under a minutePC Slower Than It Used to Be?
A free scan shows the junk files, broken settings and background clutter dragging Windows down - then fixes them in one click.Free scan · Windows 10 & 118. Pressure Wash, Then Inspect the Joints
Pressure washing is useful when weeds are mixed with dirt, moss, algae, and failed joint material. It can clear a neglected patio quickly, but it can also create the next weed problem if done carelessly. Too much pressure can chip pavers, etch concrete, disturb bedding sand, and blast out joint sand.
Start with the gentlest effective setting and test an inconspicuous area first. Keep the wand moving. Avoid holding a narrow jet directly into the joints unless your plan is to refill them. Consumer electric pressure washers commonly cost about $99 to $299 for 1900 to 2500 PSI units. That pressure range can clean many residential pavers, but nozzle choice, distance, and technique matter as much as the machine rating.
After washing, inspect the patio before it dries completely. Look for low spots, loose edge restraints, rocking pavers, chipped corners, and joints that are now empty. If you remove joint sand, replace it. Open joints collect debris faster, move more water into the base, and give new weeds a better place to root.
9. Clean Out the Joints and Re-Sand With Polymeric Sand
For long-term weed reduction, joint cleanout and re-sanding is the most important step. Polymeric sand contains fine sand and binders that harden when activated with water. It helps resist washout and makes it harder for windblown seeds to establish in the joints. It is not magic. It will not correct a bad base, poor drainage, wide dirty joints, or pavers that have shifted out of alignment.
Preparation decides the result. Remove weeds, roots, old loose sand, soil, and organic debris from the joints. The joints must be clean and dry before installing polymeric sand. Follow the product requirements for joint width and depth; many failures happen because the joint is too shallow, too wide for the product, or still damp. Sweep the sand diagonally across the pavers, compact it into the joints, refill low areas, and remove all surface dust before wetting. Dust left on the face of the paver can haze or stain after activation.
Wet with a light mist, not a flood. Too much water can wash binders out of the joint. Too little water may leave the lower joint unactivated. Most products also require a dry weather window during curing, so check the forecast before opening bags. Retail polymeric sand commonly runs about $20 to $40 per 50 to 55 pound bag, and a 40 pound bag may cover roughly 20 to 80 square feet depending on paver size, joint width, and joint depth. Tight, narrow joints use far less material than wide or deep joints.
What Patio Weed Removal Costs in 2026
DIY weed removal can cost almost nothing if you already own gloves and a kettle. The real cost shows up when the patio needs cleaning, joint restoration, or sealing. Professional weed control and removal guides in 2026 commonly report about $49 to $200 per treatment, with $50 to $150 typical for basic weed removal. Manual weeding is often priced around $35 to $140 per hour depending on the market, access, weed density, and minimum trip charge. HomeGuide reports $50 to $100 per hour for hand-pulling and $150 to $400 per acre for larger weed removal work, though a small patio-only visit may still be billed at a minimum service charge.
For paver cleaning, re-sanding, and sealing, 2026 pricing commonly lands around $1 to $3 per square foot. Angi cites about $2 per square foot on average. HomeGuide lists about $2.20 to $3.25 per square foot for small jobs under 500 square feet and about $1.50 to $2.95 per square foot for larger jobs. Condition matters: clay, porous, textured, and tumbled pavers take longer to clean; failed old sealer adds labor; and deep roots or compacted soil in the joints slow the job down.
Do these 3 things before closing this tab:
1Scan for outdated or missing drivers - takes under a minute2Repair Windows errors before they cause bigger problems3Fix the driver behind crashes, sound loss and screen glitches| Project | Typical 2026 Cost | What Changes the Price |
|---|---|---|
| DIY hand tools | $20-$60 | Tool length, blade style, wire brush quality |
| Pump sprayer | $15-$42 | Capacity, seals, nozzle quality |
| Propane weed torch | $36-$65 plus propane | BTU rating, hose length, ignition type |
| Electric pressure washer | $99-$299 | PSI, GPM, nozzle kit, brand |
| Professional weed removal | $49-$200 per treatment | Minimum charge, weed density, access |
| Manual weeding labor | $35-$140 per hour | Local labor rates, root depth, disposal |
| Clean, re-sand, and seal pavers | $1-$3 per square foot | Size, stains, failed sealer, joint depth |
How to Stop Weeds From Coming Back
The best prevention is boring maintenance done consistently. Sweep or blow the patio every 1 to 2 weeks during leaf season and after mowing. Keep soil from washing over patio edges. Clean gutters and downspouts that dump leaves, grit, or roof debris onto the hardscape. If a nearby bed is mulched above the patio surface, lower the bed edge or add restraint so organic matter does not migrate into the joints.
Inspect joints each spring. If the sand is low, loose, or contaminated with soil, remove the dirty material and top up with the correct sand. Do spot weed removal in summer before seed heads form. In fall, remove leaves before they decompose into a thin soil layer. A patio that stays clean on top gives seeds fewer places to germinate.
Drainage is just as important. Patios should shed water away from the house and should not hold puddles in the field of pavers. If water stands in the same area after every storm, weeds and algae will concentrate there. Re-sanding may help the appearance, but it will not solve settlement, a poorly compacted base, or a slope problem.
Rank #4
- FLEXIBILITY, STRENGTH and BEAUTY: Ease your mind with revolutionary CERAMIC FLEX technology in the most advanced polymeric sand available, allowing flexibility and durability in joints 1/8” up to 4”, with beautiful colors to make your paver or stone surfaces pop!
- EASY TO USE PACKAGING: Our bag’s NEW Easy Pour Handle makes carrying a breeze and offers more control and precision installation a breeze.
- EASY INSTALLATION: Made with fine sand and a cement-free formula, DOMINATOR Polymeric Sand easily sweeps into joints and rinses easily, dramatically cutting your installation time and labor efforts. (Note: This product is not a replacement for grout, mortar, and paver edging.)
- COVERAGE RATE: Using Google, search "DOMINATOR Polymeric Sand Calculator" to help you calculate the amount of sand needed for your project, or download our Product Documentation in the Product Guides section of this listing for a Calculator Worksheet.
- NOTE: Use the Installation Manual in the Product Guides section of this listing, and reference our How To Video.
Why Landscape Fabric Is Usually Not the Fix
Homeowners often ask whether they can stop weeds by adding landscape fabric under existing pavers. For an existing patio, that usually means removing the pavers, disturbing the bedding layer, installing fabric, rebuilding the base as needed, and relaying the field. That is a reconstruction project, not a weed treatment.
Quick wins for a faster PC:
Scan for outdated or missing drivers - takes under a minuteDriver Scan →Repair Windows errors before they cause bigger problemsFix Now →Fabric also does not stop the most common patio weed source: seeds and organic debris arriving from above. A fabric layer under the pavers may help separate soil layers in some assemblies, but it will not keep leaf compost from collecting in open joints. If the base is stable, the practical fix is usually joint cleaning, proper sand, drainage correction, and surface maintenance.
When to DIY and When to Hire a Pro
DIY is reasonable when the patio is level, the pavers are stable, and weeds are scattered or shallow. A homeowner can hand-pull, use a crevice tool, spot-treat young weeds, or refill small areas of missing joint sand over a weekend. For a 200 square foot patio in decent condition, expect a few hours for weeding and cleaning, plus drying and cure time if polymeric sand is used.
Hire a paver or hardscape pro when you see widespread sinking, loose edge restraints, pavers rocking underfoot, standing water, moss or algae combined with weeds, failed sealer, or joints wider or deeper than the sand product allows. Those conditions often need base correction, edge restraint repair, controlled cleaning, re-sanding, and possibly sealing. Repeated spraying will not fix movement or water.
Permits are rarely required for routine patio maintenance such as weed removal, washing, re-sanding, or sealing. They may be required for new paving, expansion, drainage changes, work in a right-of-way, or work that changes impervious surface coverage. Cities and counties handle this differently. Before expanding a patio or redirecting runoff, check your local building department or stormwater rules.
What’s actually slowing this PC down?
Pick the symptom - the matching free tool is one click away.
Our Recommended Sequence for a Neglected Patio
If the patio has not been maintained for a few seasons, use a staged approach. First, trim tall weeds close to the surface so you can see the joints. Second, loosen roots with a crevice tool or spot-treat persistent perennial weeds with a labeled product and wait for it to work. Third, remove dead growth, roots, soil, and loose joint sand. Fourth, pressure wash only as aggressively as needed, and assume you will need to replace joint sand afterward.
Let the joints dry fully before adding polymeric sand. Sweep and compact the sand so the joints are filled to the product’s required depth. Remove surface dust thoroughly. Mist in several light passes according to the manufacturer’s directions and protect the work from rain during the cure window. Once cured, maintain the patio by blowing off debris, removing weeds early, and topping up joints before they become deep gaps.
The durable answer is not one product. It is a clean surface, sound pavers, stable edges, working drainage, and properly filled joints. When those pieces are right, weed control becomes a maintenance task instead of a recurring patio rescue.
Frequently Asked Questions
What is the fastest way to remove weeds between pavers?
For scattered weeds, hand-pulling after rain is fastest and removes more root. For widespread dirty joints, pressure washing is faster, but it usually removes joint sand and should be followed by re-sanding.
What’s actually slowing this PC down?
Pick the symptom - the matching free tool is one click away.
Does vinegar permanently kill patio weeds?
Usually no. Household vinegar works best on very young weeds at the 1-2 leaf stage. Larger weeds and deep roots often survive unless treatments are repeated.
Is polymeric sand worth it for weed prevention?
Yes, when the joints are clean, dry, properly filled, and within the product’s width and depth limits. It reduces weed growth but will not fix poor drainage, settled pavers, or dirty joints.
Can I pressure wash weeds out of pavers?
Yes, but use the lowest effective pressure, test first, and keep the wand moving. Pressure washing can chip pavers and blast out joint sand, so inspect and re-sand afterward.
When should I call a pro for weeds in patio pavers?
Call a pro if pavers are sinking, rocking, holding standing water, losing edge restraint, covered with moss and weeds, or have failed sealer. Those are hardscape problems, not just weed problems.
Quick Recap
Product prices and availability are accurate as of the date/time indicated and are subject to change. Any price and availability information displayed on Amazon at the time of purchase will apply.