Do these 3 things before closing this tab:
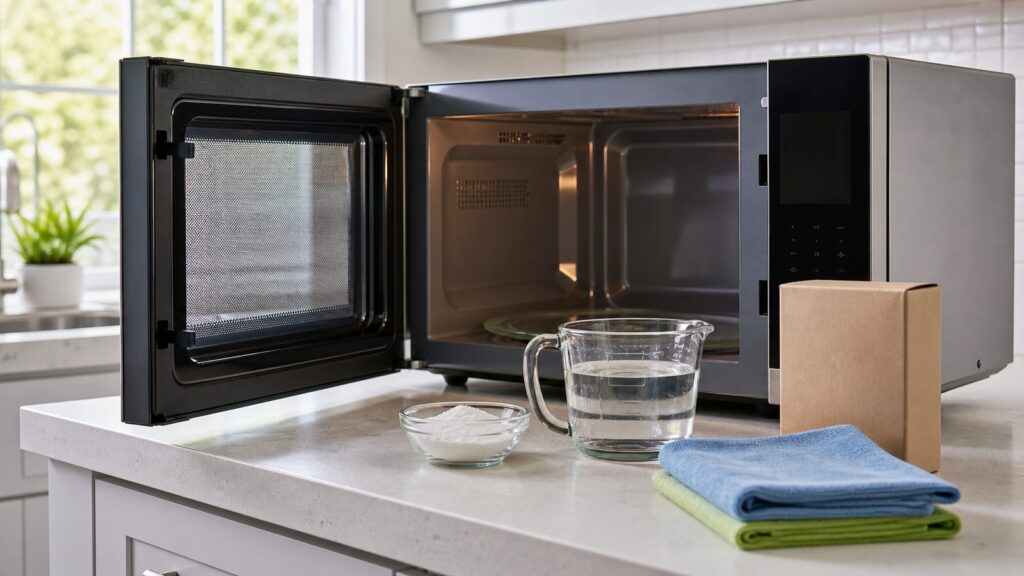
1Fix the driver behind crashes, sound loss and screen glitches2Clear out junk files and repair common Windows errors3Scan for outdated or missing drivers - takes under a minuteTo clean a microwave with vinegar, use 1 cup of water and 1 tablespoon of ordinary 5% distilled white vinegar in an open microwave-safe bowl. Heat it for 3 to 4 minutes, let the steam sit with the door closed for about 2 minutes, then wipe the ceiling, walls, door, turntable area, and floor with a soft microfiber cloth. That is the core method, and for most household splatter, it works without scrubbing, harsh fumes, or expensive cleaners.
On our job sites, we treat microwave cleaning as both a housekeeping issue and a small appliance-safety issue. A dirty microwave is not just unattractive during a kitchen turnover or move-out walkthrough. Dried food and grease can smoke, smell, attract pests, and in the wrong conditions contribute to a cooking fire. The right process is simple: soften the mess with steam, wipe gently, keep liquids out of electrical openings, and know when a stained or sparking microwave should be repaired or replaced instead of cleaned harder.
The key is restraint. More vinegar is not better. Stronger vinegar is not better. Scraping harder is not better. A microwave has vents, seams, a door screen, a waveguide cover, control electronics, and interior coatings that need to stay intact. Use the mildest method that removes the soil, dry everything before reassembly, and stop if you see signs of arcing, melting, or electrical damage.
The 10-Minute Vinegar Microwave Cleaning Method
This is the method we would use before a client walkthrough, rental turnover, or normal home maintenance clean. It takes about 10 minutes of hands-on time and uses less than one cent of vinegar per cleaning.
Materials and tools
- 1 cup water
- 1 tablespoon 5% distilled white vinegar
- Open microwave-safe glass bowl or measuring cup, ideally 2-cup capacity or larger
- 2 microfiber cloths: one damp wiping cloth and one dry finishing cloth
- Mild dish soap for the turntable
- Baking soda for stubborn cooked-on spots, used only as needed
Use regular household white vinegar, typically labeled as 5% acidity. Do not use 20% to 30% horticultural vinegar or industrial vinegar inside a microwave. Those concentrates create harsher fumes, are unnecessary for food-contact surfaces, and increase the chance that residue or odor becomes the problem you are trying to solve.
#1 Best Overall

- VERSATILE PANTRY STAPLE: Perfect for cooking, pickling, marinating, and enhancing your favorite recipes with a crisp, tangy flavor.
- ALL-NATURAL & PURE: Made from 100% distilled white vinegar, free from artificial additives and preservatives for a clean, fresh taste.
- POWERFUL MULTI-PURPOSE CLEANER: A natural, eco-friendly solution for disinfecting, deodorizing, and tackling tough household messes.
- BULK SIZE FOR MORE VALUE: Large 1-gallon jug is perfect for high-volume cooking, canning, and cleaning needs, offering great savings.
Step-by-step
- Remove loose debris. Take out the glass turntable, roller ring, and any removable support pieces. Brush crumbs into a paper towel or cloth. Do not run the microwave empty.
- Mix the steam solution. Add 1 cup water and 1 tablespoon 5% white vinegar to an open microwave-safe bowl. Do not cover it.
- Heat for 3 to 4 minutes. The water should steam heavily but does not need to boil violently. If your microwave is high wattage, 3 minutes may be enough. Older or lower-wattage units may need closer to 4 minutes.
- Let it rest for 2 minutes. Keep the door closed. This dwell time matters because the steam softens dried starch, sauce, grease, and splatter on the ceiling.
- Remove the bowl carefully. Use an oven mitt or folded towel. Hot water can burn skin even when the bowl looks calm.
- Wipe from top to bottom. Start with the ceiling, then the sides, back wall, door interior, floor, and turntable well. Apply cleaner to the cloth, not directly into vents or seams.
- Wash removable parts. Clean the turntable and roller ring by hand with warm water and mild dish soap. Dry them completely before reinstalling.
- Dry and air out. Wipe the cavity with a dry microfiber cloth and leave the door open for 5 to 10 minutes so moisture and vinegar odor can dissipate.
The ceiling is the area most homeowners miss. It is also where tomato sauce, butter, soup, and oatmeal splatter often bake onto the surface. Wipe it carefully, especially near the waveguide cover. That cover may look like a small mica, plastic, or cardboard-like panel on one side wall or ceiling. It protects the microwave energy path and should not be soaked, scraped, removed casually, or scrubbed with abrasives.
Why Vinegar Works, and Why Steam Does Most of the Work
Vinegar is useful inside a microwave because it is mildly acidic. In a 5% distilled white vinegar, the active ingredient is acetic acid diluted in water. When you use only 1 tablespoon in 1 cup of water, the solution is mild enough for routine cleaning but still helpful for odor control, light grease, and mineral film.
That said, the real worker is steam. Steam softens dried food so you can wipe instead of scrape. In construction and remodeling, we use the same principle in other contexts: soften the bond first, then remove the residue with less force. Less force means less damage to finishes, coatings, seals, and trim. Inside a microwave, that matters.
Abrasive pads, metal scrapers, knives, and steel wool can damage the interior coating. Once that coating is chipped or compromised, cleaning becomes harder and the appliance may be more prone to rust, arcing, or failure. A microwave interior is not a cast-iron pan. It should be wiped, not scoured.
Vinegar Ratios, Timing, and Cost in 2026
Most homes already have the supplies for this job. If not, the cost is still low. In 2026, a 64-ounce bottle of 5% distilled white vinegar has commonly been listed around $2.97 in major retail channels, or about 4.6 cents per fluid ounce. Since 1 tablespoon is 0.5 fluid ounce, the vinegar used in one microwave cleaning costs less than 3 cents, and often effectively less than a penny depending on the bottle price and measuring loss.
Microfiber cloths usually run about $5 to $15 for a multipack. Baking soda is typically a few dollars per box. A microwave-safe glass measuring cup or bowl often already exists in the kitchen, but if you need one, expect about $5 to $15.
| Item or Service | Typical 2026 Cost | Best Use |
|---|---|---|
| DIY vinegar steam clean | Under $1 in consumables per cleaning | Routine splatter, odors, light grease, weekly or monthly cleaning |
| Microfiber cloth multipack | $5-$15 | Soft wiping without scratching interior coating or door surfaces |
| Baking soda | A few dollars per box | Paste for stubborn cooked-on residue after steaming |
| Microwave-safe glass bowl or measuring cup | $5-$15 if not already owned | Open container for safe steam cleaning |
| Professional house cleaning | About $40-$75 per hour per cleaner | Deep kitchen clean, move-out clean, neglected buildup, turnover service |
| Standard cleaning visit | Commonly about $120-$280; many homeowners spend about $174-$256 | Whole-home cleaning where the microwave is one task among many |
| Deep clean or move-out clean | Roughly $250-$700+ | Heavy grease, rental turnover, sale preparation, smoke residue, neglected kitchens |
A microwave-only professional cleaning is rarely economical because many cleaners have minimum visit charges. If the microwave is the only dirty item, DIY is almost always the right call. If it is part of a greasy kitchen, rental turnover, post-renovation cleanup, or move-out standard, it makes sense to include it in a larger cleaning scope.
Recommended Free Tools
What Not to Use Inside a Microwave
The biggest mistakes come from treating a microwave like a tile floor or grill grate. It is neither. It is a cooking appliance with electrical components and protective surfaces.
Do not use 20% to 30% vinegar concentrate inside the appliance. Stronger acid does not improve the steam-cleaning process in a meaningful way, and the fumes can be unpleasant in a small kitchen. Use 5% household vinegar unless your specific appliance manual says otherwise.
Rank #2

- One 16-fluid-ounce bottle of Distilled White Vinegar
- 5% acidity
- Great for cooking and cleaning
- Avoid freezing
- With Amazon Saver, you’ll find affordable staples without the frills. Our essentials will help your grocery budget go further
Do not mix vinegar with bleach or ammonia-based cleaners. That can create hazardous fumes. Also avoid oven cleaner, drain cleaner, metal scouring pads, steel wool, razor blades, knives, and abrasive powders. If a stain does not come off after steaming and gentle wiping, move to a baking-soda paste before considering any commercial degreaser.
Do not spray liquids directly into vents, fan grilles, control panels, keypad seams, latch openings, or the waveguide-cover area. Spray or pour onto the cloth first. The goal is to dampen the soil, not flood the appliance.
Do not run the microwave empty to test it after cleaning. If you need to test operation, place a microwave-safe cup of water inside and heat it briefly. Running an empty microwave can damage the appliance.
How to Handle Stubborn Grease, Burnt Smells, and Cooked-On Food
If the first vinegar steam pass removes 80% of the mess but leaves a few stubborn areas, do not immediately reach for a scraper. Repeat the steam process once with a fresh solution. A second 3-minute steam cycle often removes residue that looked permanent after the first wipe.
For cooked-on residue
Mix baking soda with a small amount of water to make a soft paste. Apply it to the spot with your finger or a cloth, let it sit for 5 minutes, then wipe gently. Baking soda provides mild abrasion without the damage risk of steel wool or hard scraping. Keep the paste away from vents, keypad seams, and the waveguide cover.
For burnt food odor
Use the standard vinegar-water steam cycle, wipe the interior, then leave the door open for 10 to 20 minutes. If the vinegar smell lingers, run a second steam cycle with plain water only. Persistent burnt-plastic or electrical odor is different from burnt popcorn smell. If the odor smells like wiring, hot plastic, or smoke from inside the appliance body, stop using the microwave.
Free tools Windows power users keep installed
One-click scans. No signup required.
For greasy over-the-range microwaves
Cleaning the cavity does not clean the vent system. Over-the-range microwaves usually have grease filters underneath. Depending on the model, those filters may be washable aluminum mesh or replaceable charcoal filters. Wash or replace them according to the manual. A vinegar steam clean inside the cavity will not remove grease trapped in the hood filter, fan path, or ductwork.
Safety Checks Before You Call the Microwave Clean
Food residue and grease are not just cosmetic. Cooking equipment is a major source of home fire risk, and built-up grease can smoke or ignite when heated. A clean microwave is easier to inspect, easier to use, and less likely to surprise you with odor or smoke during normal reheating.
After cleaning, inspect the microwave with the power off and the door open. Look for sparking marks, chipped interior coating, melted plastic, bubbling paint, a cracked door, a damaged latch, or a burned waveguide cover. If you see any of those, cleaning is not the solution. The appliance needs inspection, repair, or replacement.
Rank #3

- ONLY ONE INGREDIENT: Mrs. Wages Vinegar is just vinegar, versatile for canning, cooking and more.
- VERSATILE USE: Whether you are pickling cucumbers, beets, or green beans, our vinegar adds the perfect tangy flavor.
- ACIDITY LEVEL: With 5% acidity, it meets all requirements to use for canning. Mrs. Wages Vinegar can also be used for cooking and cleaning purposes.
- KOSHER CERTIFIED: Mrs. Wages vinegar meets kosher standards, making it sutable for a wide range of dietary preferences.
- LARGE QUANITY: Each bottle contains a generous 1 gallon of vinegar, so you will have plenty for all your canning needs. It also contains a twist-on cap making it easy to pour and measure.
The waveguide cover deserves special attention. It is often a small rectangular panel inside the cavity. If it is greasy, gently wipe around it with a damp cloth. If it is burned, cracked, loose, or associated with sparking, do not keep using the microwave as if it only needs another wipe-down. That part protects a critical area of the appliance.
Stop using the microwave and unplug it if safe to do so when you notice any of these conditions:
- Sparks or arcing during normal use
- Burning electrical smell or burnt-plastic odor
- Smoke that is not clearly from food residue
- Melted interior parts or warped plastic
- Broken or unreliable door latch
- Damaged cord, plug, or receptacle
- Fire history inside the appliance
If a fire occurs in a microwave, keep the door closed, turn the appliance off if you can do so safely, and call emergency services if the fire does not stop immediately. Opening the door can feed oxygen to the fire.
Cleaning the Exterior, Door, Keypad, and Surrounding Area
A good microwave clean includes the surfaces people touch every day. The handle, keypad, door edge, underside of an over-the-range unit, backsplash, and adjacent cabinet faces often collect more residue than the cavity itself.
For the exterior, use a damp microfiber cloth with mild dish soap or a small amount of vinegar-water solution. Wipe the handle and keypad gently. Do not spray the keypad directly. Control panels have seams where liquid can migrate behind the surface. Apply cleaner to the cloth, wipe, then dry with a second cloth.
Windows Errors? Fix Them Before They Spread
Repair common Windows errors and clear accumulated junk for a smoother, more stable PC - no reinstall needed.Free scan · no reinstallOutdated Drivers Are Slowing You Down
One free scan finds every outdated or missing driver and matches the right update for your exact hardware.Free scan · exact hardware matchClean the door glass and screen without soaking the perimeter. The mesh in the microwave door is part of the appliance design, and the door seal area should stay clean and intact. Food crumbs near the latch should be removed with a damp cloth, not flushed with liquid.
For stainless steel exteriors, wipe with the grain and dry immediately to reduce streaks. If you use a stainless cleaner, keep it on the exterior only and do not use oily polish inside the cooking cavity.
When a Dirty Microwave Is Really an Installation Problem
For countertop microwaves, cleaning usually has no permit or construction angle. You wipe the appliance, plug it back in, and move on. Built-in and over-the-range microwaves are different because they interact with cabinetry, venting, clearances, mounting, and electrical circuits.
Rank #4

- The information below is per-pack only
- VERSATILE PANTRY STAPLE: Perfect for cooking, pickling, marinating, and enhancing your favorite recipes with a crisp, tangy flavor.
- ALL-NATURAL & PURE: Made from 100% distilled white vinegar, free from artificial additives and preservatives for a clean, fresh taste.
- POWERFUL MULTI-PURPOSE CLEANER: A natural, eco-friendly solution for disinfecting, deodorizing, and tackling tough household messes.
- BULK SIZE FOR MORE VALUE: Large 1-gallon jug is perfect for high-volume cooking, canning, and cleaning needs, offering great savings.
On remodels, we pay attention when a homeowner complains that the microwave is always greasy, smells hot, trips breakers, vibrates, or seems hard to clean. Sometimes the problem is not the vinegar ratio. It is poor installation.
Quick wins for a faster PC:
Clear out junk files and repair common Windows errorsFree Scan →Fix the driver behind crashes, sound loss and screen glitchesFind Drivers →Watch for these red flags:
- Poor venting: Over-the-range units need the correct recirculating or ducted setup. A misconfigured fan path can leave grease and odor in the kitchen.
- Wrong clearance: A microwave mounted too low over a range gets exposed to more heat, steam, and grease than intended.
- Loose mounting: Movement can stress brackets, cabinetry, and the power connection.
- Undersized or overloaded circuit: Microwaves draw significant power. A dedicated circuit is often required or strongly preferred depending on installation and local code requirements.
- Damaged receptacle or cord: Heat, looseness, discoloration, or intermittent power should be evaluated before continued use.
- Cabinet modifications: Built-in changes may affect support, airflow, and access to the plug or junction box.
Replacing a countertop microwave normally does not require a permit. Electrical permits become relevant when adding or replacing circuits, installing a hardwired unit, changing built-in cabinetry in a way that affects electrical or ventilation work, or replacing an over-the-range microwave as part of a larger kitchen modification. Local rules vary, so permit decisions should be checked against the authority having jurisdiction in your city or county.
Independent reader supportYour contribution helps us test, update, and keep practical guides available for everyone.When to DIY vs. When to Hire a Pro
DIY is the right choice for normal splatter, mild odors, weekly cleaning, and move-in touch-ups where the appliance is otherwise working correctly. The materials are cheap, the process is low risk when done properly, and the result is usually immediate.
Hire a house cleaner when the microwave is part of a larger kitchen or whole-home cleaning scope. In 2026, expect many professional cleaners to fall around $40 to $75 per hour per cleaner, with standard visits often landing around $120 to $280 and many homeowners spending about $174 to $256 per visit. Deep cleans and move-out cleans can run $250 to $700+, especially in larger homes or expensive labor markets.
Call an appliance repair technician, electrician, or qualified installer when cleaning reveals a functional or safety problem. Sparking, a damaged waveguide cover, chipped cavity coating, a broken latch, melted parts, electrical odor, breaker trips, or a questionable over-the-range installation are not cleaning problems. They are repair, replacement, or installation problems.
The Tool Desk
Outbyte PC Repair FREERepair Windows errors before they cause bigger problemsFix Now →Outbyte Driver Updater FREEFix the driver behind crashes, sound loss and screen glitchesFind Drivers →For rental properties and move-out standards, a microwave should be clean enough that there is no visible food residue, grease film, odor, loose debris, or sticky handle/keypad buildup. The turntable should be washed and dry, the underside of over-the-range units should be free of grease, and filters should be serviced according to the appliance type. A landlord or buyer will usually notice the ceiling of the microwave first because that is where old splatter hides.
How Often Should You Clean a Microwave?
For an average household, wipe fresh splatter immediately and do a vinegar steam clean every 2 to 4 weeks. If the microwave is used daily for sauces, oatmeal, soup, butter, or uncovered leftovers, weekly cleaning is more realistic. In a rental turnover, office kitchen, or heavily used household, clean as soon as residue is visible.
The easiest maintenance habit is also the cheapest: cover food while reheating. A microwave-safe cover or loose paper towel can prevent most ceiling splatter. Less splatter means less grease film, fewer odors, and less aggressive cleaning later.
After each cleaning, leave the door open for a few minutes. Moisture trapped under the turntable or roller ring can lead to musty odor, slipping parts, or new residue. Drying is part of the job, not an optional finishing step.
What’s actually slowing this PC down?
Pick the symptom - the matching free tool is one click away.
Final Contractor Takeaway
The best way to clean a microwave with vinegar is simple: 1 cup water, 1 tablespoon 5% white vinegar, 3 to 4 minutes of heat, 2 minutes of steam dwell, then a careful microfiber wipe-down. Remove and wash the turntable separately, dry everything, and keep liquids out of vents, seams, controls, and the waveguide-cover area.
Best Value

- Reduced with water to 5% acidity
- Reduced with water to 5% acidity
- Daily chef vinegar
Use baking soda paste only for stubborn residue. Avoid concentrated vinegar, bleach mixtures, metal scrubbers, and direct spraying into openings. If the microwave sparks, smells electrical, has a burned waveguide cover, damaged coating, broken latch, or fire history, stop treating it as a cleaning chore. At that point, the responsible next step is inspection, repair, or replacement.
Frequently Asked Questions
How much vinegar and water do you use to clean a microwave?
Use 1 cup of water and 1 tablespoon of ordinary 5% distilled white vinegar in an open microwave-safe bowl. That ratio is strong enough for odor control and light grease without creating harsh fumes.
How long should you microwave vinegar to clean the inside?
Heat the vinegar-water bowl for 3 to 4 minutes, then leave the door closed for about 2 minutes so the steam can soften dried food. After that, remove the bowl carefully and wipe the interior with a microfiber cloth.
Is cleaning vinegar safe to use inside a microwave?
For microwave interiors, use regular 5% white vinegar. Avoid 20% to 30% cleaning or horticultural vinegar concentrates inside appliances because the fumes are harsher and the extra strength is unnecessary for food-contact surfaces.
Can vinegar damage a microwave?
A mild diluted vinegar solution used as steam is generally safe for routine cleaning. Problems come from using strong concentrates, spraying liquid into vents or control seams, soaking the waveguide cover, or scrubbing with abrasive tools.
What should I do if my microwave sparks after cleaning?
Stop using it. Sparking can point to a damaged waveguide cover, chipped interior coating, metal contamination, or another appliance fault. Unplug it if safe and have it inspected or replaced before continued use.
Do I need a permit to replace an over-the-range microwave?
A simple like-for-like countertop microwave replacement usually does not need a permit. Permits may apply when adding a circuit, changing hardwired electrical work, modifying cabinetry, altering venting, or installing a built-in or over-the-range unit as part of a larger project.
Quick Recap
Product prices and availability are accurate as of the date/time indicated and are subject to change. Any price and availability information displayed on Amazon at the time of purchase will apply.